【高可用HA】Nginx (1) —— Mac下配置Nginx Http负载均衡(Load Balancer)之101实例
nginx版本: nginx-1.9.8
参考来源:
【高可用HA】Apache (2) —— Mac下安装多个Apache Tomcat实例
Nginx on Mac OS X Snow Leopard in 2 Minutes
iteye:图文解说:Nginx+tomcat配置集群负载均衡
安装
首先
从nginx官方网站下载
编译配置
-
执行命令
$ ./configure --prefix=/Users/Richard/Documents/Dev/servers/cluster/nginx/node-a --with-http_ssl_module执行结果末尾几行
... nginx error log file: "/Users/Richard/Documents/Dev/servers/cluster/nginx/node-a/logs/error.log" nginx http access log file: "/Users/Richard/Documents/Dev/servers/cluster/nginx/node-a/logs/access.log" nginx http client request body temporary files: "client_body_temp" nginx http proxy temporary files: "proxy_temp" nginx http fastcgi temporary files: "fastcgi_temp" nginx http uwsgi temporary files: "uwsgi_temp" nginx http scgi temporary files: "scgi_temp" -
执行命令
$ make执行结果末尾几行
... objs/src/http/modules/ngx_http_upstream_zone_module.o objs/ngx_modules.o -lpcre -lssl -lcrypto -lz /Library/Developer/CommandLineTools/usr/bin/make -f objs/Makefile manpage sed -e "s|%%PREFIX%%|/Users/Richard/Documents/Dev/servers/cluster/nginx/node-a|" -e "s|%%PID_PATH%%|/Users/Richard/Documents/Dev/servers/cluster/nginx/node-a/logs/nginx.pid|" -e "s|%%CONF_PATH%%|/Users/Richard/Documents/Dev/servers/cluster/nginx/node-a/conf/nginx.conf|" -e "s|%%ERROR_LOG_PATH%%|/Users/Richard/Documents/Dev/servers/cluster/nginx/node-a/logs/error.log|" < man/nginx.8 > objs/nginx.8 -
执行命令
$ sudo make install执行结果末尾几行
test -d '/Users/Richard/Documents/Dev/servers/cluster/nginx/node-a/logs' || mkdir -p '/Users/Richard/Documents/Dev/servers/cluster/nginx/node-a/logs' test -d '/Users/Richard/Documents/Dev/servers/cluster/nginx/node-a/logs' || mkdir -p '/Users/Richard/Documents/Dev/servers/cluster/nginx/node-a/logs' test -d '/Users/Richard/Documents/Dev/servers/cluster/nginx/node-a/html' || cp -R html '/Users/Richard/Documents/Dev/servers/cluster/nginx/node-a' test -d '/Users/Richard/Documents/Dev/servers/cluster/nginx/node-a/logs' || mkdir -p '/Users/Richard/Documents/Dev/servers/cluster/nginx/node-a/logs' -
修改服务器启动配置
-
将端口修改成85(与其他文章中httpd的端口区分),并修改location配置Proxy
server {
listen 85;
server_name localhost;#charset koi8-r; #access_log logs/host.access.log main; # location / { # root html; # index index.html index.htm; # } location / { proxy_connect_timeout 3; proxy_send_timeout 30; proxy_read_timeout 30; proxy_pass http://localhost; }...
-
增加转发路由的配置,并指向之前配好的两台Tomcat服务器
  upstream localhost {
  	#根据ip计算将请求分配各那个后端tomcat,许多人误认为可以解决session问题,其实并不能。
  	#同一机器在多网情况下,路由切换,ip可能不同
  	#ip_hash;
  	server localhost:8081;
  	server localhost:8082;
  }
-
运行
执行命令
$ ./sbin/nginx
提示错误
nginx: [alert] could not open error log file: open() "/Users/Richard/Documents/Dev/servers/cluster/nginx/node-a/logs/error.log" failed (13: Permission denied)
2015/12/09 16:26:55 [emerg] 16550#0: mkdir() "/Users/Richard/Documents/Dev/servers/cluster/nginx/node-a/client_body_temp" failed (13: Permission denied)
*这是因为nginx没有相应的权限
运行命令授权或者以sudo运行
$ sudo ./sbin/nginx
启动
$ sudo ./sbin/nginx -s stop
测试
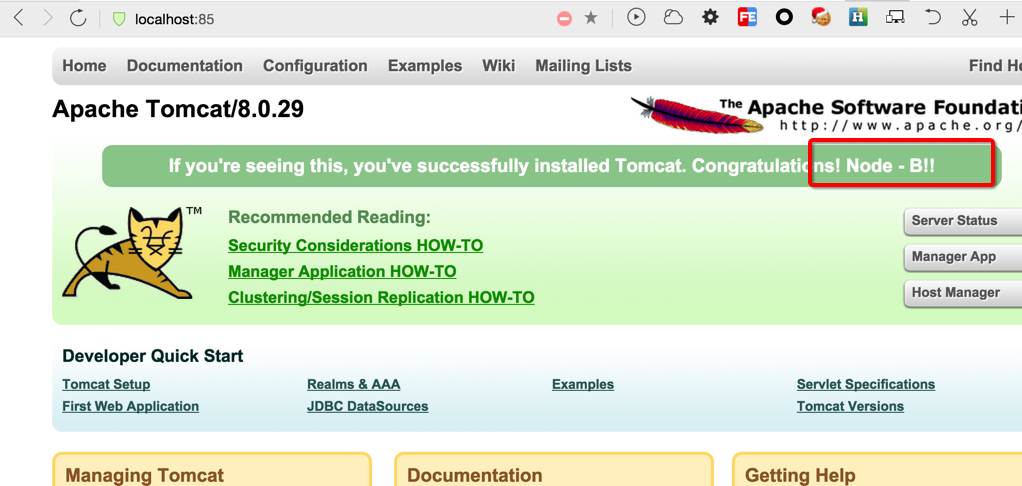
用浏览器访问localhost:85,页面中会交替出现"Node-A!!"和"Node-B!!"