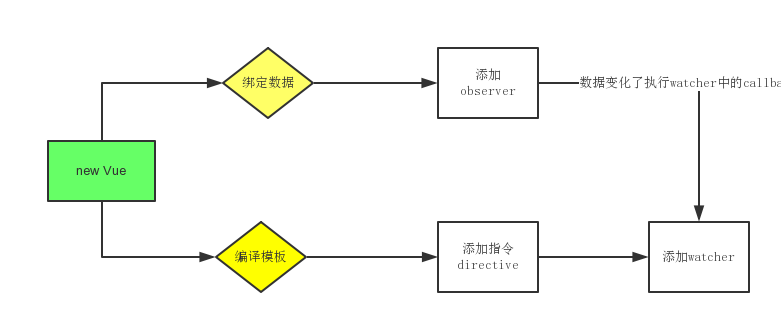
一、定义
vue的数据双向绑定是基于Object.defineProperty方法,通过定义data属性的get和set函数来监听数据对象的变化,一旦变化,vue利用发布订阅模式,通知订阅者执行回调函数,更新dom。
二、实现
vue关于数据绑定的生命周期是: 利用options的data属性初始化vue实力data---》递归的为data中的属性值添加observer--》编译html模板--》为每一个{{***}}添加一个watcher;
var app = new Vue({
data:{
message: 'hello world',
age: 1,
name: {
firstname: 'mike',
lastname: 'tom'
}
}
});
1.初始化data属性
this.$data = options.data || {};
这个步骤比较简单将data属性挂在到vue实例上即可。
2.递归的为data中的属性值添加observer,并且添加对应的回调函数(initbinding)
function Observer(value, type) {
    this.value = value;
    this.id = ++uid;
    Object.defineProperty(value, '$observer', {
        value: this,
        enumerable: false,
        writable: true,
        configurable: true
    });
    this.walk(value); // dfs为每个属性添加ob

}
Observer.prototype.walk = function (obj) {
    let val;
    for (let key in obj) {
        if (!obj.hasOwnProperty(key)) return;

        val = obj[key];

        // 递归this.convert(key, val);
    }
};
Observer.prototype.convert = function (key, val) {
    let ob = this;
    Object.defineProperty(this.value, key, {
        enumerable: true,
        configurable: true,
        get: function () {
            if (Observer.emitGet) {
                ob.notify('get', key);
            }
            return val;
        },
        set: function (newVal) {
            if (newVal === val) return;
            val = newVal;
            ob.notify('set', key, newVal);//这里是关键
        }
    });
};
上面代码中,set函数中的notify是关键,当用户代码修改了data中的某一个属性值比如app.$data.age = 2;,那么ob.notify就会通知observer来执行上面对应的回掉函数。
绑定回掉函数
exports._updateBindingAt = function (event, path) {
    let pathAry = path.split('.');
    let r = this._rootBinding;
    for (let i = 0, l = pathAry.length; i < l; i++) {
        let key = pathAry[i];
        r = r[key];
        if (!r) return;
    }
    let subs = r._subs;
    subs.forEach((watcher) => {
        watcher.cb(); // 这里执行watcher的回掉函数
    });
};

/**
 * 执行本实例所有子实例发生了数据变动的watcher
 * @private
 */
exports._updateChildrenBindingAt = function () {
    if (!this.$children.length) return;
    this.$children.forEach((child) => {
        if (child.$options.isComponent) return;
        child._updateBindingAt(...arguments);
    });
};

/**
 * 就是在这里定于数据对象的变化的
 * @private
 */
exports._initBindings = function () {
    this._rootBinding = new Binding();

    this.observer.on('set', this._updateBindingAt.bind(this))
};
3.编译模板
这个是数据绑定的关键步骤,具体可以分为一下2个步骤。
A)解析htmlElement节点,这里要dfs所有的dom和上面对应的指令(v-if,v-modal)之类的
B)解析文本节点,把文本节点中的{{***}}解析出来,通过创建textNode的方法来解析为真正的HTML文件
在解析的过程中,会对指令和模板添加Directive对象和Watcher对象,当data对象的属性值发生变化的时候,调用watcher的update方法,update方法中保存的是Directive对象更新dom方法,把在当directive对应的textNode的nodeValue变成新的data中的值。比如执行app.$data.age = 1;
首先编译模板
exports._compile = function () {

    this._compileNode(this.$el);
};

/**
 * 渲染节点
 * @param node {Element}
 * @private
 */
exports._compileElement = function (node) {

    if (node.hasChildNodes()) {
        Array.from(node.childNodes).forEach(this._compileNode, this);
    }
};

/**
 * 渲染文本节点
 * @param node {Element}
 * @private
 */
exports._compileTextNode = function (node) {
    let tokens = textParser.parse(node.nodeValue); // [{value:'姓名'}, {value: 'name‘,tag: true}]
    if (!tokens) return;

    tokens.forEach((token) => {
        if (token.tag) {
            // 指令节点
            let value = token.value;
            let el = document.createTextNode('');
            _.before(el, node);
            this._bindDirective('text', value, el);
        } else {
            // 普通文本节点
            let el = document.createTextNode(token.value);
            _.before(el, node);
        }
    });

    _.remove(node);
};

exports._compileNode = function (node) {
    switch (node.nodeType) {
        // text
        case 1:
            this._compileElement(node);
            break;
        // node
        case 3 :
            this._compileTextNode(node);
            break;
        default:
            return;
    }
};
上面代码中在编译textNode的时候会执行bindDirctive方法,该方法的作用就是绑定指令,{{***}}其实也是一条指令,只不过是一个特殊的text指令,他会在本ob对象的directives属性上push一个Directive对象。Directive对象本身在构造的时候,在构造函数中会实例化Watcher对象,并且执行directive的update方法(该方法就是把当前directive对应的dom更新),那么编译完成后就是对应的html文件了。
/**
 * 生成指令
 * @param name {string} 'text' 代表是文本节点
 * @param value {string} 例如: user.name  是表示式
 * @param node {Element} 指令对应的el
 * @private
 */
exports._bindDirective = function (name, value, node) {
    let descriptors = dirParser.parse(value);
    let dirs = this._directives;
    descriptors.forEach((descriptor) => {
        dirs.push(
            new Directive(name, node, this, descriptor)
        );
    });
};
function Directive(name, el, vm, descriptor) {
    this.name = name;
    this.el = el; // 对应的dom节点
    this.vm = vm;
    this.expression = descriptor.expression;
    this.arg = descriptor.arg;this._bind();
}

/**
 * @private
 */
Directive.prototype._bind = function () {
    if (!this.expression) return;

    this.bind && this.bind();


        // 非组件指令走这边
        this._watcher = new Watcher(
            // 这里上下文非常关键
            // 如果是普通的非组件指令, 上下文是vm本身
            // 但是如果是prop指令, 那么上下文应该是该组件的父实例
            (this.name === 'prop' ? this.vm.$parent : this.vm),
            this.expression,
            this._update,  // 回调函数,目前是唯一的,就是更新DOM
            this           // 上下文
        );
        this.update(this._watcher.value);

};
exports.bind = function () {
};

/**
 * 这个就是textNode对应的更新函数啦
 */
exports.update = function (value) {
    this.el['nodeValue'] = value;
    console.log("更新了", value);
};
但是,用户代码修改了data怎么办,下面是watcher的相关代码,watcher来帮你解决这个问题。
/**
 * Watcher构造函数
 * 有什么用呢这个东西?两个用途
 * 1. 当指令对应的数据发生改变的时候, 执行更新DOM的update函数
 * 2. 当$watch API对应的数据发生改变的时候, 执行你自己定义的回调函数
 * @param vm
 * @param expression {String} 表达式, 例如: "user.name"
 * @param cb {Function} 当对应的数据更新的时候执行的回调函数
 * @param ctx {Object} 回调函数执行上下文
 * @constructor
 */
function Watcher(vm, expression, cb, ctx) {
    this.id = ++uid;
    this.vm = vm;
    this.expression = expression;
    this.cb = cb;
    this.ctx = ctx || vm;
    this.deps = Object.create(null);//deps是指那些嵌套的对象属性,比如name.frist 那么该watcher实例的deps就有2个属性name和name.first属性
    this.initDeps(expression);
}
/**
 * @param path {String} 指令表达式对应的路径, 例如: "user.name"
 */
Watcher.prototype.initDeps = function (path) {
    this.addDep(path);
    this.value = this.get();
};

/**
   根据给出的路径, 去获取Binding对象。
 * 如果该Binding对象不存在,则创建它。
 * 然后把当前的watcher对象添加到binding对象上,binding对象的结构和data对象是一致的,根节点但是rootBinding,所以根据path可以找到对应的binding对象
 * @param path {string} 指令表达式对应的路径, 例如"user.name"
 */
Watcher.prototype.addDep = function (path) {
    let vm = this.vm;
    let deps = this.deps;
    if (deps[path]) return;
    deps[path] = true;
    let binding = vm._getBindingAt(path) || vm._createBindingAt(path);
    binding._addSub(this);
};
初始化所有的绑定关系之后,就是wather的update了
/**
 * 当数据发生更新的时候, 就是触发notify
 * 然后冒泡到顶层的时候, 就是触发updateBindingAt
 * 对应的binding包含的watcher的update方法就会被触发。
 * 就是执行watcher的cb回调。watch在
 * 两种情况, 如果是$watch调用的话,那么是你自己定义的回调函数,开始的时候initBinding已经添加了回调函数
 * 如果是directive,那么就是directive的_update方法
 * 其实就是各自对应的更新方法。比如对应文本节点来说, 就是更新nodeValue的值
 */
三、结论

