15. vue-resource的跨域请求
目的:想要前后端分离,前端用vue和vue-resource请求http接口地址获取数据。
首先要安装vue-resource:
npm install vue-resource
然后在入口文件main.js中引入vue-source:
import VueResource from 'vue-resource'
Vue.use(VueResource)
准备工作到这里就做完了。
用来准备测试的接口:
http://ip.tianqiapi.com/?ip=
可以查询IP的一些简单信息,支持多个IP查询,IP之间用半角逗号间隔。该接口返回IP的JSON格式的信息。
vue文件中HTML部分的代码如下,使用了ElementUI的输入框和表格:
<template>
    <div>
        <el-input v-model="input1" id="inputText"></el-input>
        <el-button type="primary" @click="getData()">查询IP信息</el-button>
        <br>
            <el-table :data="data1" stripe>
                <el-table-column prop="ip" label="IP地址" width="140">
                </el-table-column>
                <el-table-column prop="country" label="国家" width="120">
                </el-table-column>
                <el-table-column prop="province" label="省份">
                </el-table-column>
                <el-table-column prop="city" label="城市">
                </el-table-column>
                <el-table-column prop="isp" label="服务供应商">
                </el-table-column>
            </el-table>
    </div>
</template>
js部分的代码如下:
<script>
    export default {
        name: "xuanxiang2",
        data(){
            return {
                data1 : [],
                input:''
            }
        },
        methods:{
            getData(){
                var text = document.getElementById("inputText").value;
                var api = "http://ip.tianqiapi.com/?ip="+text;//查询IP地址
                this.$http.get(api).then(function (response) {
                    console.log(typeof response.body);
                    if(typeof response.body == "object"){
                        var tmp=[];
                        for(var key in response.body){
                            //key是属性,object[key]是值
                            tmp.push(response.body[key]);//往数组中放值
                        }
                        this.data1 = tmp;
                    } else
                        this.data1 = response.body;
                },function (err) {
                    console.log(err);
                })
            }
        },
        mounted(){
            // this.getData();
        },
    }
</script>
如此即可完成一次http的请求。
一些说明
this.$http.get即为发起get请求的语法,其他的还有:
get请求:
this.$http.get(URL,{
params:{
key:value,
}
}).then(function(success){
//TODO: 成功后的操作
},function(error){
//TODO:失败后的操作
})
POST请求:
this.$http.post(URL,{
params:{
key:value,
}
}).then(function(success){
//TODO: 成功后的操作
},function(error){
//TODO:失败后的操作
})
JSONP请求(跨域请求):
this.$http.jsonp(URL,{
params:{
key:value,
}
}).then(function(success){
//TODO: 成功后的操作
},function(error){
//TODO:失败后的操作
})
js中的data{return{}}部分,是对页面内的变量的初始化:
data(){
   return {
     data1 : [],  //定义一个叫data1的变量,[]表示其类型为Array
     input1:''  //定义一个叫input1的变量,''表示其类型为String
   }
 }
下面的是elementUI的table组件,:data="data1"是绑定数据源,表格会加载data1中的数据(所以在data()中定义的data1是[]类型),stripe是对表格加了条纹显示,便于查看;el-table-column中的prop对应接口返回的json中的key值,label是表头:
<el-table :data="data1" stripe>
    <el-table-column prop="ip" label="IP地址" width="140">
    </el-table-column>
    <el-table-column prop="country" label="国家" width="120">
    </el-table-column>
    <el-table-column prop="province" label="省份">
    </el-table-column>
    <el-table-column prop="city" label="城市">
    </el-table-column>
    <el-table-column prop="isp" label="服务供应商">
    </el-table-column>
</el-table>
对于input标签,其v-model属性表示这个输入框的输入内容的类型,并通过该属性对input框的输入值做初始化,没有这个属性的话,input框无法输入。我的理解是,通过data()中定义的变量input1对input的初始输入值做了初始化,之后用户的输入内容相当于对input1这个变量做赋值操作:
<el-input v-model="input" id="inputText"></el-input>
button按钮中的@click="getData()"是对按钮绑定了鼠标单击事件:
<el-button type="primary" @click="getData()">查询IP信息</el-button>
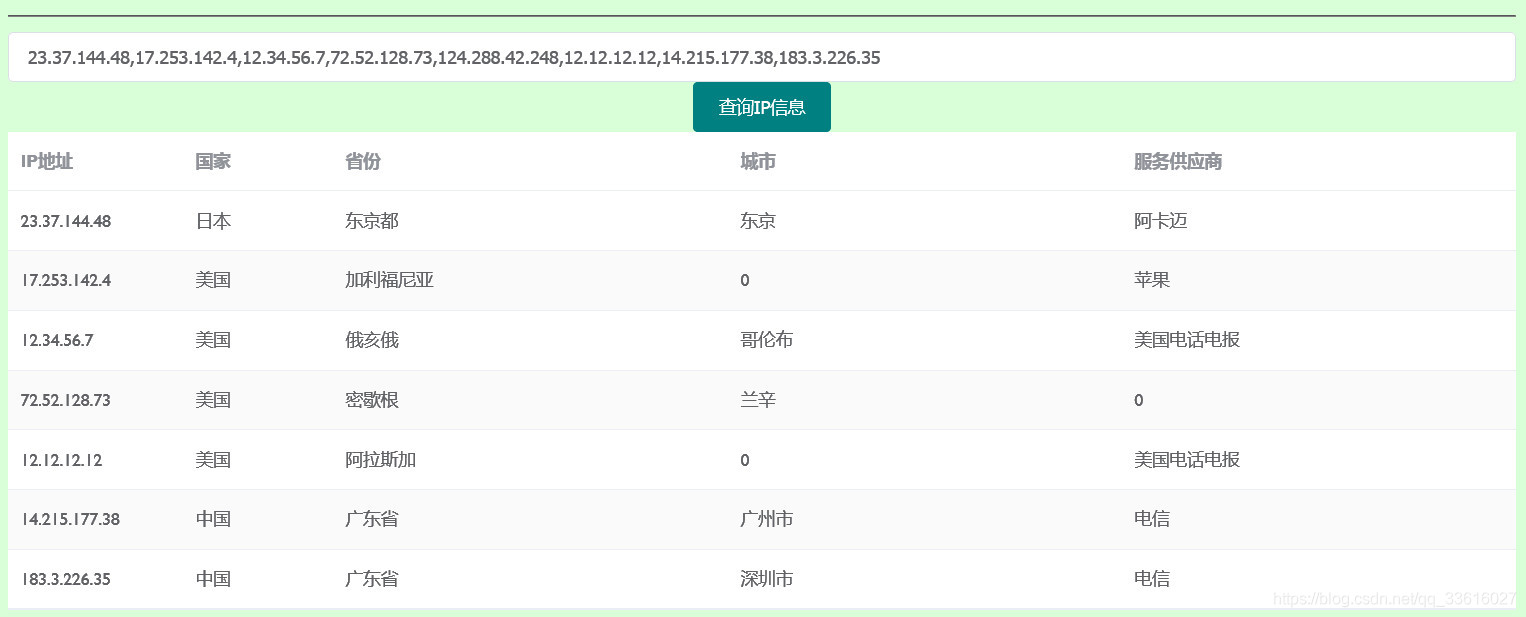
以上就是对所有代码的解释了。最后附上完整的代码和效果图:
代码:

<template>
    <div>
        <br>
        <hr>
        <el-input v-model="input" id="inputText"></el-input>
        <el-button type="primary" @click="getData()">查询IP信息</el-button>
        <br>
        <el-table :data="data1" stripe>
            <el-table-column prop="ip" label="IP地址" width="140">
            </el-table-column>
            <el-table-column prop="country" label="国家" width="120">
            </el-table-column>
            <el-table-column prop="province" label="省份">
            </el-table-column>
            <el-table-column prop="city" label="城市">
            </el-table-column>
            <el-table-column prop="isp" label="服务供应商">
            </el-table-column>
        </el-table>
    </div>
</template>

<script>
    export default {
        name: "xuanxiang2",
        data(){
            return {
                data1 : [],
                input:''
            }
        },
        methods:{
            getData(){
                var text = document.getElementById("inputText").value;
                var api = "http://ip.tianqiapi.com/?ip="+text;//查询IP地址
                this.$http.get(api).then(function (response) {
                    console.log(response.body);
                    if(typeof response.body == "object"){
                        var tmp=[];
                        for(var key in response.body){
                            //key是属性,object[key]是值
                            tmp.push(response.body[key]);//往数组中放值
                        }
                        this.data1 = tmp;
                    } else
                        this.data1 = response.body;
                },function (err) {
                    console.log(err);
                })
            }
        },
        mounted(){
            // this.getData();
        },
    }
</script>

<style scoped>

</style>
效果图:

