ASP.NET实际开发中身份验证 是一个不可回避的问题。在相当一段长的时间内,由于不求甚解,我对这个话题似懂非懂。今天就对它做个简单的小结。
Authentication and Authorization(身份验证和授权)
在开始ASP.NET身份验证之前,我们必须了解两个概念:Authentication and Authorization
Authentication是识别该用户的身份,换句话说,它检查特定用户是不是特定网站的用户,它回答了“Who are you”的问题。
Authorization 是识别该用户的权限,换句话说,它检查特定用户是否有权限访问website站点上的某些资源,它回到了“What right's you have”的问题。
当一个用户访问某个站点时,比方说http://job.cnblogs.com/如果你要发送简历或者是发布招聘信息,但是你还不是cnblogs.com的注册用户,那么你没办法登录成功,你的身份标识是匿名用户,你的权限是可以看到这些招聘信息。当你想投递简历或者发布自己的招聘信息的时候,你必须成为注册用户并且满足一些条件才行。也就是你得先被authentication然后被authorization。
Roles and permissions(角色和权限)
上面说到ASP.NET身份验证其实是囊括了两个概念Authentication and Authorization,伴随而来的两个概念是Roles and permissions它们的关系是多对多的关系。即一个角色可以同时拥有多个权限,一个权限也可以隶属于多个绝色。比方说,曹操是可以剑履上殿,三公都可以开府。角色和权限与身份验证和授权不同,大多数站点的策略是即使没有通过身份验证和授权,也不影响某个用户是否拥有特定角色和权限。比方说你无需登录也可以以匿名用户的角色拥有查看到cnblogs博文的权限。
Principal and Identity objects
如果你要得到身份认证的细节,你需要Identity对象,通过IIdentity.Name来查看“Who are you”
如果你要得到授权身份的细节,你需要Principal对象,通过IPrincipal.IsInRole()来查看“What rights you have”
Types of authentication and authorization in ASP.NET(ASP.NET的身份验证和授权的方式)
a.Windows authentication
使用本地windows用户组进行身份验证和授权
b.Forms Authentication
它是一种将username和password存储在客户端计算机的cookie文件上或者(cookie不能用了)在每次请求的时通过加密后在URL地址传递的基于cookie/URL的身份验证,它为用 户提供了基于html的Web页面来输入用户凭证
c.Passport authentication
它是基于微软提供的通行证网站,当用户登录凭证达到通行证网站,将会发生认证,如果认证成功,将令牌返回到你的网站。
d.Custom Authentication Mechanisms
它是用户自定义身份验证,比如基于iis的HttpModule身份验证、PageBase身份验证、自定义MembershipProvider身份验证
e.Anonymous access
即不采用任何认证方式,也就是允许匿名用户来访问。
身份验证的方式有以上种种,每一种验证方式都是可以细细玩味,由于篇幅和资质的原因,我今天就先说说第二种Forms Authentication
Forms Authentication(窗体身份验证)
表单验证的流程:
1.用户在登录界面输入用户名和密码
2.检查用户名和密码
3.验证成功,将会在客户端生成cookie文本,当用户浏览该网站的其它资源文件,由于客户端有cookie文件存在,将不在进行验证。
表单验证实例:
1.使用web.config作为数据源
2.使用SQL server作为数据源
3.使用ASP.NET Membership and role进行表单验证
a.运行aspnet_regsql.exe
b.配置连接字符串
c.配置ASP.NET membership provider
d.配置role provider
›使用web.config作为数据源
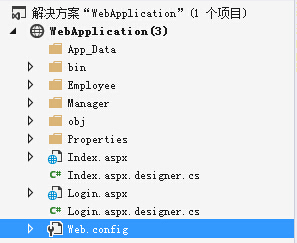
网站项目文件结构如上所示。现在实现的目标是:拒绝匿名用户访问本网站,Employee用户可以访问Employee下的资源,Manager用户可以同时访问Employee和Manager下的资源。
首先,在web.config文件中做如下配置:
<configuration>
  <system.web>
    <compilation debug="true" targetFramework="4.5" />
    <httpRuntime targetFramework="4.5" />
    <!--身份认证-->
    <authentication mode="Forms">
      <forms loginUrl="Login.aspx" timeout="30" defaultUrl="Index.aspx" cookieless="UseDeviceProfile" >
      </forms>
    </authentication>
    <authorization>
      <deny users="?"/>
      <!--拒绝匿名用户-->
    </authorization>
  </system.web>
  <!--控制资源的访问权限-->
  <location path="Manager">
    <system.web>
      <authorization>
        <deny users="*"/>
      </authorization>
    </system.web>
  </location>
  <location path="Employee">
    <system.web>
      <authorization>
        <deny users="*"/>
      </authorization>
    </system.web>
  </location>
</configuration>
接下来,创建用户凭证:
<system.web>
  <compilation debug="true" targetFramework="4.5" />
  <httpRuntime targetFramework="4.5" />
  <!--身份认证-->
  <authentication mode="Forms">
    <forms loginUrl="Login.aspx" timeout="30" defaultUrl="Index.aspx" cookieless="UseDeviceProfile" >
      <credentials passwordFormat="Clear">
        <user name="flowers" password="flowers"/>
        <user name="Jim" password="Jim"/>
      </credentials>
    </forms>
  </authentication>
  <authorization>
    <deny users="?"/>
    <!--拒绝匿名用户-->
  </authorization>
</system.web>
<!--控制资源的访问权限-->
<location path="Manager">
  <system.web>
    <authorization>
      <allow users="flowers"/>
      <deny users="*"/>
    </authorization>
  </system.web>
</location>
<location path="Employee">
  <system.web>
    <authorization>
      <allow users="flowers"/>
      <allow users="Jim"/>
      <deny users="*"/>
    </authorization>
  </system.web>
</location>
接下来在登录页面的登录按钮中进行登录验证:
protected void btnLogin_ServerClick(object sender, EventArgs e)
{
    if (FormsAuthentication.Authenticate(txtUserName.Value, txtUserPass.Value))
    {
        FormsAuthentication.RedirectFromLoginPage(txtUserName.Value,
            chkPersistCookie.Checked); //此时设置defaultUrl是必须的。当Loginout之后再次登录,它将跳转致你设置的defaultUrl地址
    }
    else
        Response.Redirect("Login.aspx", true);
}
接下来,看结果。
先使用flowers登录,看看他是不是能同时访问Employee和Manager下的Default.aspx


不出所料,访问成功了,再来看看Jim是不是只能访问Employee下的DDefault.aspx


也如预期所料,那么当Jim试图访问Manager的时候被拒绝,

以上是使用web.config作为数据存储来实现表单验证。这种方式很简单,但是在实际生产过程中,我想用户数据量大的情况下,不宜采用它。 代码下载
代码下载
›使用SQL server作为数据源
依旧使用上面的demo稍作修改。配置文件如下:
<system.web>
  <compilation debug="true" targetFramework="4.5" />
  <httpRuntime targetFramework="4.5" />
  <!--身份认证-->
  <authentication mode="Forms">
    <forms loginUrl="Login.aspx" timeout="30" defaultUrl="Index.aspx" cookieless="UseDeviceProfile" >
    </forms>
  </authentication>
  <authorization>
    <deny users="?"/>
    <!--拒绝匿名用户-->
  </authorization>
</system.web>
<!--控制资源的访问权限-->
<location path="Manager">
  <system.web>
    <authorization>
      <allow roles="Manager" />
      <deny users="*"/>
    </authorization>
  </system.web>
</location>
<location path="Employee">
  <system.web>
    <authorization>
      <allow roles="Employee,Manager" />
      <deny users="*"/>
    </authorization>
  </system.web>
</location>
为了简单,我在User类中使用静态数据模拟(大家可以看看微软的基于SQL数据库的表单的身份验证demo)。
public class User
{
    public string UserName { get; set; }
    public string Password { get; set; }
    public int Role { get; set; }

    public static List<User> users = new List<User>() { new User {
        UserName = "Jim", Password = "Jim",Role=1},
        new User { UserName = "flowers", Password = "flowers",Role=2 }
    };

    public static User GetUser(string name, string password)
    {
        return users.FirstOrDefault(i => i.UserName == name && i.Password == password);
    }

    public static User GetUser(string name)
    {
        return users.FirstOrDefault(i => i.UserName == name);
    }
}
添加角色枚举:
/// <summary>
/// Role 的摘要说明
/// </summary>
public enum Role
{
    Anonymous = 0,
    Employee = 1,
    Manager = 2
}
修改登录页面的登录按钮事件:
private bool ValidateUser(string userName, string passWord, out int role)
{
    //http://support.microsoft.com/kb/301240
    var user =FormAuthenticationDemo.User.GetUser(userName, passWord);
    if (user != null)
    {
        role = user.Role;
        return true;
    }
    else
    {
        role = Convert.ToInt32(FormAuthenticationDemo.Role.Anonymous);
        return false;
    }
}

protected void btnLogin_ServerClick(object sender, EventArgs e)
{
    int role;
    if (ValidateUser(txtUserName.Value, txtUserPass.Value, out role))
    {
        FormsAuthentication.RedirectFromLoginPage(txtUserName.Value,
            chkPersistCookie.Checked); //此时设置defaultUrl是必须的。当Loginout之后再次登录,它将跳转致你设置的defaultUrl地址
    }
    else
        Response.Redirect("Login.aspx", true);
}
当然你也可以这样创建票据:
protected void btnLogin_ServerClick(object sender, System.EventArgs e)
{
    int role;
    if (ValidateUser(txtUserName.Value, txtUserPass.Value,out role))
    {
        FormsAuthenticationTicket tkt;
        string cookiestr;
        HttpCookie ck;
        tkt = new FormsAuthenticationTicket(1, txtUserName.Value, DateTime.Now,
        DateTime.Now.AddMinutes(30), chkPersistCookie.Checked, txtUserName.Value);
        cookiestr = FormsAuthentication.Encrypt(tkt);
        ck = new HttpCookie(FormsAuthentication.FormsCookieName, cookiestr);
        if (chkPersistCookie.Checked)
            ck.Expires = tkt.Expiration;
        ck.Path = FormsAuthentication.FormsCookiePath;
        Response.Cookies.Add(ck);

        string strRedirect;
        strRedirect = Request["ReturnUrl"];
        if (strRedirect == null)
            strRedirect = "Index.aspx";
        Response.Redirect(strRedirect, true);
    }
    else
        Response.Redirect("login.aspx", true);
}
以上仅仅是完成了对用户的Authentication,接下来还要在Global.asax中指定用户角色以便进行Authorization:
void Application_AuthenticateRequest(object sender, EventArgs e)
{
    var user = Context.User;
    if (user != null && user.Identity.IsAuthenticated)
    {
        var roles = new string[] { Enum.GetName(typeof(FormAuthenticationDemo.Role),
            FormAuthenticationDemo.User.GetUser(user.Identity.Name).Role) };
        HttpContext.Current.User = new System.Security.Principal.GenericPrincipal(user.Identity, roles);
    }
}
如示例1一样,运行测试,同样能够实现目标。 代码下载
代码下载
›使用ASP.NET Membership and role进行表单验证
鉴于每次做身份验证的时候都需要创建用户角色表然后做类似的代码逻辑处理,微软为我们提供了一个很好的方案:成员资格和角色的表单验证。
在做这个之前,通过在cmd中运行aspnet_regsql.exe命令(注1)按照可视化界面提示操作(注2),就能为我们创建验证所必须的数据库,它包含业已创建好的存储过程和数据表。数据库结构如下所示:

接下来按照之前的步骤,修改配置文件如下:
<connectionStrings>
  <remove name="aspnetdb"/>
  <add name="aspnetdb" connectionString="server=.;database=aspnetdb;uid=sa;pwd=sa"/>
</connectionStrings>
<system.web>
  <compilation debug="true" targetFramework="4.5" />
  <httpRuntime targetFramework="4.5" />
  <!--身份认证-->
  <authentication mode="Forms">
    <forms loginUrl="Login.aspx" timeout="30" defaultUrl="Index.aspx" cookieless="UseDeviceProfile" >
    </forms>
  </authentication>
  <authorization>
    <deny users="?"/>
    <!--拒绝匿名用户-->
  </authorization>
  <!--成员资格提供程序-->
  <membership>
    <providers>
      <remove name="AspNetSqlMembershipProvider" />
      <add name="AspNetSqlMembershipProvider"
      type="System.Web.Security.SqlMembershipProvider, System.Web, Version=2.0.0.0, Culture=neutral, PublicKeyToken=b03f5f7f11d50a3a"
      connectionStringName="aspnetdb" enablePasswordRetrieval="false" requiresQuestionAndAnswer="false"
      enablePasswordReset="true" applicationName="/" minRequiredPasswordLength="7"/>
    </providers>
  </membership>
  <!--角色提供程序-->
  <roleManager enabled="true">
    <providers>
      <clear/>
      <add name="AspNetSqlRoleProvider" connectionStringName="aspnetdb"
      applicationName="/" type="System.Web.Security.SqlRoleProvider, System.Web, Version=2.0.0.0, Culture=neutral, PublicKeyToken=b03f5f7f11d50a3a"/>
    </providers>
  </roleManager>
</system.web>
<!--控制资源的访问权限-->
<location path="Manager">
  <system.web>
    <authorization>
      <allow roles="Manager" />
      <deny users="*"/>
    </authorization>
  </system.web>
</location>
<location path="Employee">
  <system.web>
    <authorization>
      <allow roles="Employee,Manager" />
      <deny users="*"/>
    </authorization>
  </system.web>
</location>
接下来你可以事先创建好相应的用户以及各自的角色:
MembershipUser user = Membership.CreateUser("flowers", "password@123", "flowers@sina.com");
MembershipUser user2 = Membership.CreateUser("Jim", "password@123", "Jim@sina.com");
Roles.CreateRole("Employee");
Roles.CreateRole("Manager");
Roles.AddUsersToRole(new string[] { "Jim" }, "Employee");
Roles.AddUsersToRole(new string[] { "flowers" }, "Manager");
修改登录页面登录按钮事件实现如下:
protected void btnLogin_ServerClick(object sender, EventArgs e)
{
    if (Membership.ValidateUser(txtUserName.Value, txtUserPass.Value))
    {
        FormsAuthentication.RedirectFromLoginPage(txtUserName.Value,
            chkPersistCookie.Checked); //此时设置defaultUrl是必须的。当Loginout之后再次登录,它将跳转致你设置的defaultUrl地址
    }
    else
        Response.Redirect("Login.aspx", true);
}
再次运行依旧可以达到目标。 代码下载
代码下载
注释:
(注1):bat文件命令如下:
@echo off
C:WINDOWSMicrosoft.netFrameworkv2.0.50727aspnet_regsql.exe
PAUSE
(注2):关于ASP.NET Membership and Role Provider可以参看此链接
其它:
1.关于FormsAuthentication访问的页面与登录页面不在同一个二级域名下ReturnUrl引发的问题,大家可以参看dudu的文章
[ASP.NET]更简单的方法:FormsAuthentication登录ReturnUrl使用绝对路径
2.关于FormAuthentication写得比较好的有博友Fish Li的细说ASP.NET Forms身份认证和ASP.NET authentication and authorization