Keras是搭建神经网络的一个框架,以代码简洁著称。MNIST数据集的输入是手写数字0~9的图片,标签是每张图片对应的数字,整个数据集可以直接从Keras.库中下载。
MNIST DEMO
下面使用Keras搭建一个双层的神经网络,测试它在MNIST数据集上的性能。
大致流程如下:
1、导入数据集,将数据集所有的输入图片都从28*28的矩阵转换为784维的向量,所有整数标签都转换为10维的one-hot编码。
2、定义784层->10层的双层网络,没有隐层。
3、将训练集分为训练数据与验证数据,用来测试超参数。
4、使用验证出的超参数与整个训练集重新训练模型。
5、使用测试集测试训练完毕的模型并统计。
6、绘制统计结果。
代码如下(划横线的是kares搭建模型、训练、测试的代码):
#%%导入数据
from keras.datasets import mnist
import matplotlib.pyplot as plt
import numpy as np

(train_data,train_labels),(test_data,test_labels) = mnist.load_data()

#%%数据预处理
train_data = train_data.reshape([len(train_data),28*28])
test_data = test_data.reshape([len(test_data),28*28])
ax = plt.figure().add_subplot()
ax.imshow(train_data[0].reshape([28,28]),cmap = 'bone')
def label_to_one_hot(labels):
    l = np.zeros([len(labels),10])
    for i in range(len(labels)):
        l[i,labels[i]]=1
    return l
train_labels = label_to_one_hot(train_labels)
test_labels = label_to_one_hot(test_labels)
#%%定义模型
from keras import models,layers,losses,optimizers,metrics
def build_model():
    model = models.Sequential()
    model.add(layers.Dense(28*28,activation = 'relu',input_shape = (len(train_data[0]),)))
    #model.add(layers.Dense(100,activation='relu'))
    model.add(layers.Dense(10,activation='softmax'))
    model.compile(optimizer=optimizers.RMSprop(lr=0.001),
        loss = losses.categorical_crossentropy,
        metrics=[metrics.accuracy])
    return model
model = build_model()
#%%测试验证参数和最优迭代次数
x_train = train_data[10000:]
y_train = train_labels[10000:]
x_val = test_data[:10000]
y_val = test_labels[:10000]
history = model.fit(x_train,y_train,512,80,validation_data=(x_val,y_val))
#%%绘制准确率图
print(history.history.keys())
acc = history.history['accuracy']
acc_val = history.history['val_accuracy']
ax = plt.figure().add_subplot()
ax.plot(range(len(acc)),acc)
ax.plot(range(len(acc)),acc_val)
#%%在整个训练集上重新训练
model_train = build_model()
model_train.fit(train_data,train_labels,512,50)
#%%预测测试集
predict_labels = model_train.predict(test_data)
print("预测标签:")
print(predict_labels)
evaluate = model_train.evaluate(test_data,test_labels)
print("损失值与准确率:")
print(evaluate)
两层全连接网络在MNIST上的表现很好,在测试数据上的准确率达到了98%。
函数式API MEMO
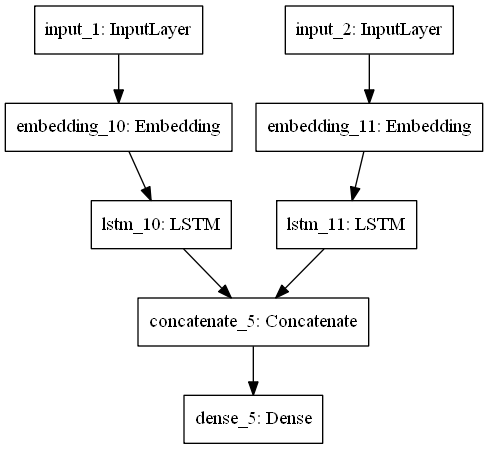
除了用Sequence()创建简单常见的“积木式”模型外,keras还支持函数式API搭建自定义的“类图”模型。
下面创建有两个输入层,一个输出层的模型,这个模型在中间层合并数据流。代码如下:
from tensorflow.keras import Input,layers,Model

input_1 = Input(shape=[None],dtype='int32',name = 'input_1')    #输入层1
out_1 = layers.Embedding(10000,32)(input_1)                     #嵌入层1,将文本整数索引变换为32维向量。以减小索引的“序”的影响,并且又不会和one-hot-code一样编码太长
out_1 = layers.LSTM(64)(out_1)                                  #循环层1

input_2 = Input(shape=[None],dtype='int32',name = 'input_2')    #输入层2
out_2 = layers.Embedding(10000,32)(input_2)                     #嵌入层2
out_2 = layers.LSTM(32)(out_2)                                  #循环层2

out_final = layers.concatenate([out_1,out_2],axis=-1)           #合并层
out_final = layers.Dense(500,activation='softmax')(out_final)   #输出层

model = Model([input_1,input_2],out_final)
model.summary()

from tensorflow.keras.utils import plot_model
plot_model(model,'aaa.png')
模型结构图:
创建好模型,要传入数据训练,以下是生成随机数据来训练这个模型代码:
import numpy as np
from tensorflow.keras.utils import to_categorical
num_samples = 1000
max_length = 100

text = np.random.randint(1,10000,size=[num_samples,max_length])
question = np.random.randint(1,10000,size=[num_samples,max_length])
answers = np.random.randint(500,size=[num_samples])
answers = to_categorical(answers)
#训练一,直接按定义的顺序传入列表
his = model.fit([text,question],answers,
                batch_size=2048,
                epochs=500)
#训练二,传入字典,字典key是输入层定义的名称
his = model.fit({'input_1':text,'input_2':question},answers,
                batch_size=2048,
                epochs=500)