SpringBoot整合Spring Data JPA,并在页面展示
1.添加依赖:pom.xml
<?xml version="1.0" encoding="UTF-8"?>
<project xmlns="http://maven.apache.org/POM/4.0.0"
xmlns:xsi="http://www.w3.org/2001/XMLSchema-instance"
xsi:schemaLocation="http://maven.apache.org/POM/4.0.0 http://maven.apache.org/xsd/maven-4.0.0.xsd">
<modelVersion>4.0.0</modelVersion>

<groupId>com.gxh</groupId>
<artifactId>springbootdemo2</artifactId>
<version>1.0-SNAPSHOT</version>

<parent>
<groupId>org.springframework.boot</groupId>
<artifactId>spring-boot-starter-parent</artifactId>
<version>2.0.2.RELEASE</version>
</parent>

<dependencies>
<!--1.添加springmvc的依赖-->
<dependency>
<groupId>org.springframework.boot</groupId>
<artifactId>spring-boot-starter-web</artifactId>
</dependency>

<!-- springData JPA的起步依赖 -->
<dependency>
<groupId>org.springframework.boot</groupId>
<artifactId>spring-boot-starter-data-jpa</artifactId>
</dependency>
<!--mysql数据库的依赖-->
<dependency>
<groupId>mysql</groupId>
<artifactId>mysql-connector-java</artifactId>
</dependency>
<!--freeMarker模板依赖-->
<dependency>
<groupId>org.springframework.boot</groupId>
<artifactId>spring-boot-starter-freemarker</artifactId>
</dependency>

</dependencies>

</project>
2.写application.yml配置文件(注意连接的数据库名称和数据库用户名和密码
#DataBase Configuration
spring:
  datasource:
    driverClassName: com.mysql.jdbc.Driver
    url: jdbc:mysql://localhost:3306/springbootdemo?useUnicode=true&characterEncoding=utf-8&useSSL=false&serverTimezone=GMT
    username: root
    password: 123
#SpringDataJPA Configuration
  jpa:
    database: mysql
    show-sql: true
    generate-ddl: true
3.写实体类
@Entity //表明该类是一个实体类
@Table(name="user") //如果没有该表时,会创建数据库,数据库表名为user
public class User {
    @Id
    @GeneratedValue(strategy = GenerationType.IDENTITY)//主键自增策略
    private int id;
    private String username;
    private String password;
    private String name;
    //并自己生成get、set方法,和toString方法
}
4.写UserDao接口,继承 JapRepository 类。
package com.gxh.dao;

import com.gxh.entity.User;
import org.springframework.data.jpa.repository.JpaRepository;

public interface UserDao extends JpaRepository<User,Integer> {

}
5.编写UserController类
package com.gxh.controller;

import com.gxh.dao.UserDao;
import com.gxh.entity.User;
import org.springframework.beans.factory.annotation.Autowired;
import org.springframework.stereotype.Controller;
import org.springframework.ui.Model;
import org.springframework.web.bind.annotation.RequestMapping;

import java.util.List;

@Controller
public class UserController {
    @Autowired
    private UserDao userDao;

    @RequestMapping("/user/getUserList")
    public String getUserList(Model model){
        List<User> userList = userDao.findAll();
        model.addAttribute("userList",userList);
        return "user";
    }
}
6.在resources/templates文件夹下创建user.ftl文件。
<html>
    <head>
        <title>spring boot</title>
    </head>

    <body>
        <table border="1px">
            <thead>
            <tr>
                <td>id</td>
                <td>用户名</td>
                <td>密码</td>
                <td>姓名</td>
            </tr>
            </thead>
            <tbody>
                <#list userList as user>
                    <tr>
                        <td>${user.id}</td>
                        <td>${user.username}</td>
                        <td>${user.password}</td>
                        <td>${user.name}</td>
                    </tr>
                </#list>
            </tbody>
        </table>
    </body>
</html>
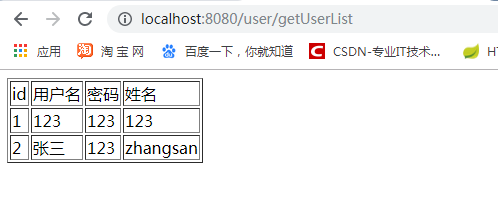
7.运行。在浏览器输入http://localhost:8080/user/getUserList 查看结果
