1、主内容视图一定要是DrawerLayout的第一个子视图
2、主内容视图宽度和高度匹配父视图,即“match_parent”
3、必须显示指定抽屉视图(如ListView)的 android:layout_gravity 属性
1)、 android:layout_gravity=“start”时,从左向右滑出菜单
2)、 android:layout_gravity=“end” 时,从右向左滑出菜单
3)、不推荐使用 “left”和“right”
4、抽屉视图的宽度以dp为单位,请不要超过320dp(为了总能看到一些主内容视图。
【知识点】
1、mDrawerLayout.setDrawerListener(DrawerLayout.DrawerListener);
2、ActionBarDrawerToggle是DrawerLayout.DrawerListener的具体实现类
1)、改变android.R.id.home图标(构造方法)
2)、Drawer拉出、隐藏,带有android.R.id.home动画效果(syncState())
3)、监听Drawer拉出、隐藏事件
3、覆写ActionBarDrawerToggle的onDrawerOpened()和onDrawerClosed()以监 听抽屉拉出或隐藏事件
4、覆写Activity的onPostCreate()和onConfigurationChanged()方法
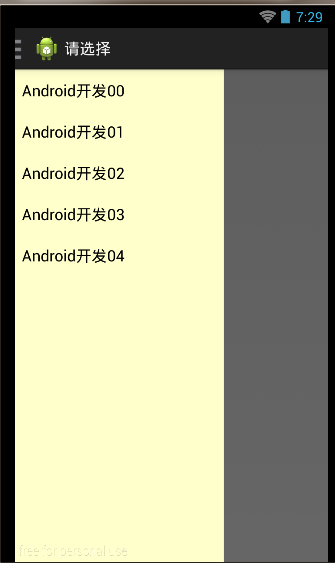
【范例】
activity_main.xml
 1 <android.support.v4.widget.DrawerLayout
 2     xmlns:android="http://schemas.android.com/apk/res/android"
 3     android:id="@+id/drawer_layout"
 4     android:layout_width="match_parent"
 5     android:layout_height="match_parent" >
 6
 7     <!-- The main content view -->
 8     <FrameLayout
 9         android:id="@+id/content_frame"
10         android:layout_width="match_parent"
11         android:layout_height="match_parent" />
12
13     <!-- The navigation view -->
14     <ListView
15         android:id="@+id/left_drawer"
16         android:layout_width="240dp"
17         android:layout_height="match_parent"
18         android:layout_gravity="start"
19         android:background="#ffffcc"
20         android:choiceMode="singleChoice"
21         android:divider="@android:color/transparent"
22         android:dividerHeight="0dp" />
23
24 </android.support.v4.widget.DrawerLayout>
MainActivity.java
  1 public class MainActivity extends Activity implements OnItemClickListener {
  2
  3     private DrawerLayout mDrawerLayout;
  4     private ListView mDrawerList;
  5     private ArrayList<String> menuLists;
  6     private ArrayAdapter<String> adapter;
  7     private ActionBarDrawerToggle mDrawerToggle;
  8     private String mTitle;
  9
 10     @Override
 11     protected void onCreate(Bundle savedInstanceState) {
 12         super.onCreate(savedInstanceState);
 13         setContentView(R.layout.activity_main);
 14
 15         mTitle = (String) getTitle();
 16
 17         mDrawerLayout = (DrawerLayout) findViewById(R.id.drawer_layout);
 18         mDrawerList = (ListView) findViewById(R.id.left_drawer);
 19         menuLists = new ArrayList<String>();
 20         for (int i = 0; i < 5; i++)
 21             menuLists.add("Android开发0" + i);
 22         adapter = new ArrayAdapter<String>(this,
 23                 android.R.layout.simple_list_item_1, menuLists);
 24         mDrawerList.setAdapter(adapter);
 25         mDrawerList.setOnItemClickListener(this);
 26
 27         mDrawerToggle = new ActionBarDrawerToggle(this, mDrawerLayout,
 28                 R.drawable.ic_drawer, R.string.drawer_open,
 29                 R.string.drawer_close) {
 30             @Override
 31             public void onDrawerOpened(View drawerView) {
 32                 super.onDrawerOpened(drawerView);
 33                 getActionBar().setTitle("请选择");
 34                 invalidateOptionsMenu(); // Call onPrepareOptionsMenu()
 35             }
 37             @Override
 38             public void onDrawerClosed(View drawerView) {
 39                 super.onDrawerClosed(drawerView);
 40                 getActionBar().setTitle(mTitle);
 41                 invalidateOptionsMenu();
 42             }
 43         };
 44         mDrawerLayout.setDrawerListener(mDrawerToggle);
 45
 46         //开启ActionBar上APP ICON的功能
 47         getActionBar().setDisplayHomeAsUpEnabled(true);
 48         getActionBar().setHomeButtonEnabled(true);
 50     }
 51
 52     @Override
 53     public boolean onPrepareOptionsMenu(Menu menu) {
 54         boolean isDrawerOpen = mDrawerLayout.isDrawerOpen(mDrawerList);
 55         menu.findItem(R.id.action_websearch).setVisible(!isDrawerOpen);
 56         return super.onPrepareOptionsMenu(menu);
 57     }
 58
 59     @Override
 60     public boolean onCreateOptionsMenu(Menu menu) {
 61         // Inflate the menu; this adds items to the action bar if it is present.
 62         getMenuInflater().inflate(R.menu.main, menu);
 63         return true;
 64     }
 65
 66     @Override
 67     public boolean onOptionsItemSelected(MenuItem item) {
 68         //将ActionBar上的图标与Drawer结合起来
 69         if (mDrawerToggle.onOptionsItemSelected(item)){
 70             return true;
 71         }
 72         switch (item.getItemId()) {
 73         case R.id.action_websearch:
 74             Intent intent = new Intent();
 75             intent.setAction("android.intent.action.VIEW");
 76             Uri uri = Uri.parse("http://www.cnblogs.com/androidsj");
 77             intent.setData(uri);
 78             startActivity(intent);
 79             break;
 80         }
 81         return super.onOptionsItemSelected(item);
 82     }
 83
 84     @Override
 85     protected void onPostCreate(Bundle savedInstanceState) {
 86         super.onPostCreate(savedInstanceState);
 87         //需要将ActionDrawerToggle与DrawerLayout的状态同步
 88         //将ActionBarDrawerToggle中的drawer图标,设置为ActionBar中的Home-Button的Icon
 89         mDrawerToggle.syncState();
 90     }
 91
 92     @Override
 93     public void onConfigurationChanged(Configuration newConfig) {
 94         super.onConfigurationChanged(newConfig);
 95         mDrawerToggle.onConfigurationChanged(newConfig);
 96     }
 97
 98     @Override
 99     public void onItemClick(AdapterView<?> arg0, View arg1, int position,
100             long arg3) {
101         // 动态插入一个Fragment到FrameLayout当中
102         Fragment contentFragment = new ContentFragment();
103         Bundle args = new Bundle();
104         args.putString("text", menuLists.get(position));
105         contentFragment.setArguments(args);
106
107         FragmentManager fm = getFragmentManager();
108         fm.beginTransaction().replace(R.id.content_frame, contentFragment)
109                 .commit();
110
111         mDrawerLayout.closeDrawer(mDrawerList);
112     }
113
114 }
ContentFragment.java
 1 public class ContentFragment extends Fragment {
 2     private TextView textView;
 3     @Override
 4     public View onCreateView(LayoutInflater inflater, ViewGroup container,
 5             Bundle savedInstanceState) {
 6         View view = inflater.inflate(R.layout.fragment_content, container, false);
 7         textView = (TextView) view.findViewById(R.id.textView);
 8
 9         String text = getArguments().getString("text");
10         textView.setText(text);
11
12         return view;
13     }
14 }
 1 <?xml version="1.0" encoding="utf-8"?>
 2 <LinearLayout
 3     xmlns:android="http://schemas.android.com/apk/res/android"
 4     android:layout_width="match_parent"
 5     android:layout_height="match_parent"
 6     android:orientation="vertical" >
 7     <TextView
 8         android:id="@+id/textView"
 9         android:layout_width="match_parent"
10         android:layout_height="wrap_content"
11         android:textSize="25sp" />
12 </LinearLayout>