UI的绘制流程和事件分发,属于Android里面的重点内容,在做自定义UI的时候,更是应该了解UI的绘制流程是如何的,此篇文章就是说明UI的绘制流程,事件分发前面已经详细讲过了
UI绘制流程探索
这里分析Activity,而不是AppCompatActivity,后者做了兼容处理,前者更容易理清逻辑
要知道UI的绘制流程,就需要有一个入手点,而这个入手点就是onCreate(),也就是下面这句代码
setContentView(R.layout.activity_main);
接下来找到了这个方法
public void setContentView(@LayoutRes int layoutResID) {
    getWindow().setContentView(layoutResID);
    initWindowDecorActionBar();
}
这里先看``,有下面的源代码发现,这里只是设置了ActionBar,并没有UI的绘制
private void initWindowDecorActionBar() {
    Window window = getWindow();

    // Initializing the window decor can change window feature flags.
    // Make sure that we have the correct set before performing the test below.
    window.getDecorView();

    if (isChild() || !window.hasFeature(Window.FEATURE_ACTION_BAR) || mActionBar != null) {
        return;
    }

    mActionBar = new WindowDecorActionBar(this);
    mActionBar.setDefaultDisplayHomeAsUpEnabled(mEnableDefaultActionBarUp);

    mWindow.setDefaultIcon(mActivityInfo.getIconResource());
    mWindow.setDefaultLogo(mActivityInfo.getLogoResource());
}
那么其关注的重点就放在了第一个设置上了
getWindow()返回的是mWindow,仔细查找发现,mWindow实际上就是一个Windows的实现类:PhoneWindow
mWindow = new PhoneWindow(this, window);
那么也就是说要在PhoneWindow中寻找setContentView()方法
PhoneWindow是Internal API,只能通过源代码查看(com.android.internal.policy)
在源代码中找到了相关代码
@Override
public void setContentView(int layoutResID) {
    // Note: FEATURE_CONTENT_TRANSITIONS may be set in the process of installing the window
    // decor, when theme attributes and the like are crystalized. Do not check the feature
    // before this happens.
    if (mContentParent == null) {
        installDecor();
    } else if (!hasFeature(FEATURE_CONTENT_TRANSITIONS)) {
        mContentParent.removeAllViews();
    }

    if (hasFeature(FEATURE_CONTENT_TRANSITIONS)) {
        final Scene newScene = Scene.getSceneForLayout(mContentParent, layoutResID,
                getContext());
        transitionTo(newScene);
    } else {
        mLayoutInflater.inflate(layoutResID, mContentParent);
    }
    mContentParent.requestApplyInsets();
    final Callback cb = getCallback();
    if (cb != null && !isDestroyed()) {
        cb.onContentChanged();
    }
    mContentParentExplicitlySet = true;
}
这里的关注点在于installDecor()方法,这个方法
private void installDecor() {
    mForceDecorInstall = false;
    if (mDecor == null) {
        mDecor = generateDecor(-1);
        mDecor.setDescendantFocusability(ViewGroup.FOCUS_AFTER_DESCENDANTS);
        mDecor.setIsRootNamespace(true);
        if (!mInvalidatePanelMenuPosted && mInvalidatePanelMenuFeatures != 0) {
            mDecor.postOnAnimation(mInvalidatePanelMenuRunnable);
        }
    }
	···
}
这里又指向了generateDecor(),继续查看
protected DecorView generateDecor(int featureId) {
    // System process doesn't have application context and in that case we need to directly use
    // the context we have. Otherwise we want the application context, so we don't cling to the
    // activity.
    Context context;
    if (mUseDecorContext) {
        Context applicationContext = getContext().getApplicationContext();
        if (applicationContext == null) {
            context = getContext();
        } else {
            context = new DecorContext(applicationContext, getContext().getResources());
            if (mTheme != -1) {
                context.setTheme(mTheme);
            }
        }
    } else {
        context = getContext();
    }
    return new DecorView(context, featureId, this, getAttributes());
}
这里返回了一个DecorView,那么DecorView是什么呢,他是一个类继承了FrameLayout
/** @hide */
public class DecorView extends FrameLayout implements RootViewSurfaceTaker, WindowCallbacks {
	···
}
那么回到installDecor(),在下面有这样的语句
private void installDecor() {
    mForceDecorInstall = false;
    if (mDecor == null) {
        mDecor = generateDecor(-1);
        mDecor.setDescendantFocusability(ViewGroup.FOCUS_AFTER_DESCENDANTS);
        mDecor.setIsRootNamespace(true);
        if (!mInvalidatePanelMenuPosted && mInvalidatePanelMenuFeatures != 0) {
            mDecor.postOnAnimation(mInvalidatePanelMenuRunnable);
        }
    } else {
        mDecor.setWindow(this);
    }
    if (mContentParent == null) {
        mContentParent = generateLayout(mDecor);
		···
	}
	···
}
而这里的generateLayout()有一句注释
protected ViewGroup generateLayout(DecorView decor) {
	// Apply data from current theme.
	···
	mDecor.onResourcesLoaded(mLayoutInflater, layoutResource);
}
其作用是用来设置当前的主题数据,其中的上面一段代码很重要,在这个方法里面,渲染了一个根布局
void onResourcesLoaded(LayoutInflater inflater, int layoutResource) {
    mStackId = getStackId();

    if (mBackdropFrameRenderer != null) {
        loadBackgroundDrawablesIfNeeded();
        mBackdropFrameRenderer.onResourcesLoaded(
                this, mResizingBackgroundDrawable, mCaptionBackgroundDrawable,
                mUserCaptionBackgroundDrawable, getCurrentColor(mStatusColorViewState),
                getCurrentColor(mNavigationColorViewState));
    }

    mDecorCaptionView = createDecorCaptionView(inflater);
    final View root = inflater.inflate(layoutResource, null);
    if (mDecorCaptionView != null) {
        if (mDecorCaptionView.getParent() == null) {
            addView(mDecorCaptionView,
                    new ViewGroup.LayoutParams(MATCH_PARENT, MATCH_PARENT));
        }
        mDecorCaptionView.addView(root,
                new ViewGroup.MarginLayoutParams(MATCH_PARENT, MATCH_PARENT));
    } else {

        // Put it below the color views.
        addView(root, 0, new ViewGroup.LayoutParams(MATCH_PARENT, MATCH_PARENT));
    }
    mContentRoot = (ViewGroup) root;
    initializeElevation();
}
在根布局里面才是我们的用户布局,那么可以得出整个屏幕的层次结构应该是这样的

那么再回到setContentView(),下面有一段重要代码
mLayoutInflater.inflate(layoutResID, mContentParent);
这便是通过资源ID去寻找布局,然后进行用户布局的渲染
用户布局绘制
上面介绍完了外层布局的绘制,那么在用户布局这里是怎么进行绘制的呢,其绘制方法在View.java中
向上面一样,这里首先要寻找的也是其布局绘制的入口,而这个绘制入口就是requestLayout()
@CallSuper
public void requestLayout() {
    if (mMeasureCache != null) mMeasureCache.clear();

    if (mAttachInfo != null && mAttachInfo.mViewRequestingLayout == null) {
        // Only trigger request-during-layout logic if this is the view requesting it,
        // not the views in its parent hierarchy
        ViewRootImpl viewRoot = getViewRootImpl();
        if (viewRoot != null && viewRoot.isInLayout()) {
            if (!viewRoot.requestLayoutDuringLayout(this)) {
                return;
            }
        }
        mAttachInfo.mViewRequestingLayout = this;
    }

    mPrivateFlags |= PFLAG_FORCE_LAYOUT;
    mPrivateFlags |= PFLAG_INVALIDATED;

    if (mParent != null && !mParent.isLayoutRequested()) {
        mParent.requestLayout();
    }
    if (mAttachInfo != null && mAttachInfo.mViewRequestingLayout == this) {
        mAttachInfo.mViewRequestingLayout = null;
    }
}
这里会不断地递归寻找父容器,直到找到DecorView
而在这之后,会执行到ViewRootImp类的performTranversal()方法
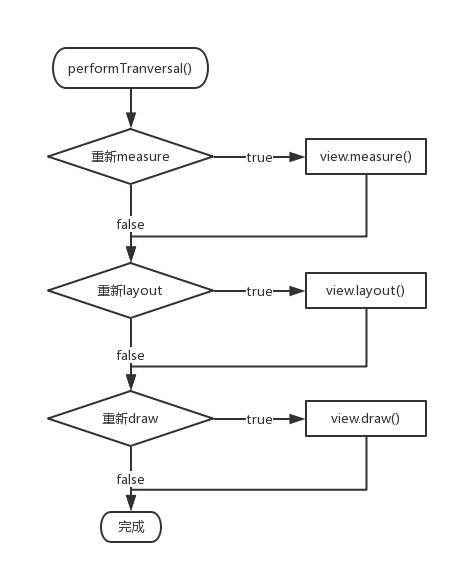
最后在performTranversal()方法中,会调用performMeasure(),performLayout()及performDraw(),而这三个方法又会进一步调用,最终会调用到View的measure(测量),layout(摆放)和draw(绘制)
其控制过程如下图
measure的测量过程
测量过程如下图
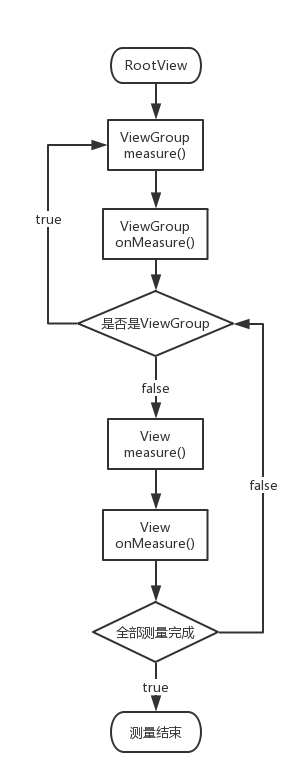
因为在Android中,其屏幕规格尺寸千差万别,为了做自适应,就需要测量,measure过程会使用先序遍历遍历整颗View树,然后依次测量每一个View的真实的尺寸
在measure当中,有一个很重要的参数:MeasureSpec(测量规格)
这个参数是用int表示的,其前两位代表mode,后三十位代表值
mode:EXACTLY(精确值),AT_MOST(最值),UNSPECIFIED(不确定值)
value:宽高的值
经过大量测量以后,最终确定了自己的宽高,才会调用setMeasuredDimension(w,h),从而真正确定宽高值,只有这时候调用宽高获取,其获取到的值才是有效的
写自定义控件的时候,必须先经过measure,才能获得到宽高,不是getWidth(),而是getMeasuredWidth(),也就是当我们重写onMeasure()的时候,我们需要在里面调用child.measure()才能获取child的宽高
从规格当中获取mode和value
int widthMode = MeasureSpec.getMode(widthMeasureSpec);
int heightMode = MeasureSpec.getMode(heightMeasureSpec);
int widthSize = MeasureSpec.getSize(widthMeasureSpec);
int heightSize = MeasureSpec.getSize(heightMeasureSpec);
反过来将mode和value合成一个规格
MeasureSpec.makeMeasureSpec(resultSize, resultMode);
自定义控件的测量问题
- 继承自View的子类
只需要重写onMeasure测量好自己的宽高就可以了
最终调用setMeasuredDimension()保存好自己的测量宽高。
int mode = MeasureSpec.getMode(widthMeasureSpec);
int size = MeasureSpec.getSize(widthMeasureSpec);
int viewSize = 0;
switch(mode){
	case MeasureSpec.EXACTLY:
		viewSize = size;//当前view的尺寸就为父容器的尺寸
		break;
	case MeasureSpec.AT_MOST:
		viewSize = Math.min(size, getContentSize());//当前view的尺寸就为内容尺寸和费容器尺寸当中的最小值。
		break;
	case MeasureSpec.UNSPECIFIED:
		viewSize = getContentSize();//内容有多大,久设置多大尺寸。
		break;
	default:
		break;
	}
	//setMeasuredDimension(width, height);
	setMeasuredDimension(size);
- 继承自ViewGroup的子类:
不但需要重写onMeasure测量自己,还要测量子控件的规格大小
可以直接使用ViewGroup的工具方法来测量里面的子控件,也可以自己来实现这一套子控件的测量(比如:RelativeLayout)
//1.测量自己的尺寸
ViewGroup.onMeasure();
//1.1 为每一个child计算测量规格信息(MeasureSpec)
ViewGroup.getChildMeasureSpec();
//1.2 将上面测量后的结果,传给每一个子View,子view测量自己的尺寸
child.measure();
//1.3 子View测量完,ViewGroup就可以拿到这个子View的测量后的尺寸了
child.getChildMeasuredSize();//child.getMeasuredWidth()和child.getMeasuredHeight()
//1.4ViewGroup自己就可以根据自身的情况(Padding等等),来计算自己的尺寸
ViewGroup.calculateSelfSize();
//2.保存自己的尺寸
ViewGroup.setMeasuredDimension(size);
理解实例
自定义ViewGroup
public class CustomView extends ViewGroup {

    private static final int OFFSET = 80;

    public CustomView(Context context, AttributeSet attrs) {
        super(context, attrs);
    }

    @Override
    protected void onLayout(boolean changed, int l, int t, int r, int b) {
        int left = 0;
        int right = 0;
        int top = 0;
        int bottom = 0;
        int childCount = getChildCount();
        for (int i = 0; i < childCount; i++) {
            View child = getChildAt(i);
            left = i * OFFSET;
            right = left + child.getMeasuredWidth();
            bottom = top + child.getMeasuredHeight();
            child.layout(left, top, right, bottom);
            top += child.getMeasuredHeight();
        }
    }

    @Override
    protected void onMeasure(int widthMeasureSpec, int heightMeasureSpec) {
        super.onMeasure(widthMeasureSpec, heightMeasureSpec);
        int widthMode = MeasureSpec.getMode(widthMeasureSpec);
        int heightMode = MeasureSpec.getMode(heightMeasureSpec);
        int widthSize = MeasureSpec.getSize(widthMeasureSpec);
        int heightSize = MeasureSpec.getSize(heightMeasureSpec);
        int width = 0;
        int height = 0;
        int childCount = getChildCount();
        for (int i = 0; i < childCount; i++) {
            View child = getChildAt(i);
            LayoutParams lp = child.getLayoutParams();
            int childWidthSpec = getChildMeasureSpec(widthMeasureSpec, 0, lp.width);
            int childHeightSpec = getChildMeasureSpec(heightMeasureSpec, 0, lp.height);
            child.measure(childWidthSpec, childHeightSpec);
        }
        switch (widthMode) {
            case MeasureSpec.EXACTLY:
                width = widthSize;
                break;
            case MeasureSpec.AT_MOST:
            case MeasureSpec.UNSPECIFIED:
                for (int i = 0; i < childCount; i++) {
                    View child = getChildAt(i);
                    int widthAndOffset = i * OFFSET + child.getMeasuredWidth();
                    width = Math.max(width, widthAndOffset);
                }
                break;
            default:
                break;
        }
        switch (heightMode) {
            case MeasureSpec.EXACTLY:
                height = heightSize;
                break;
            case MeasureSpec.AT_MOST:
            case MeasureSpec.UNSPECIFIED:
                for (int i = 0; i < childCount; i++) {
                    View child = getChildAt(i);
                    height += child.getMeasuredHeight();
                }
                break;
            default:
                break;
        }
        setMeasuredDimension(width, height);
    }
}
布局
<?xml version="1.0" encoding="utf-8"?>
<com.cj5785.testuimld.CustomView xmlns:android="http://schemas.android.com/apk/res/android"
    android:layout_width="match_parent"
    android:layout_height="match_parent">

    <TextView
        android:layout_width="wrap_content"
        android:layout_height="wrap_content"
        android:text="第一行文本" />

    <TextView
        android:layout_width="wrap_content"
        android:layout_height="wrap_content"
        android:text="第二行文本" />

    <TextView
        android:layout_width="wrap_content"
        android:layout_height="wrap_content"
        android:text="第三行文本" />

    <TextView
        android:layout_width="wrap_content"
        android:layout_height="wrap_content"
        android:text="第四行文本" />
</com.cj5785.testuimld.CustomView>
效果

layout摆放过程
layout摆放子空间,其过程和measure十分类似,这里就不赘述了
其摆放位置只关注父容器,父容器又专注父容器···
一般不会重写layout方法,不然就需要专注分发问题
附上layout的过程

draw绘制过程
draw用于绘制,在这个方法里面,有一段简明的注释
/*
* Draw traversal performs several drawing steps which must be executed
* in the appropriate order:
*
*      1. Draw the background
*      2. If necessary, save the canvas' layers to prepare for fading
*      3. Draw view's content
*      4. Draw children
*      5. If necessary, draw the fading edges and restore layers
*      6. Draw decorations (scrollbars for instance)
*/
这段注释就说明了绘制的流程,其过程也类似于measure与layout
ViewGroup的onDraw方法默认是不会调用的,因为在ViewGroup构造方法里面就默认设置了
setFlags(WILL_NOT_DRAW, DRAW_MASK);
原因是因为ViewGroup本来就没东西显示,除了设置了背景,这样就是为了效率,如果需要它执行onDraw,可以设置背景或者setWillNotDraw(false);
自定义ViewGroup实现热门标签
自定义ViewGroup
public class HotTagLayout extends ViewGroup {
    //记录每一行的高度
    private List<Integer> lineHeights = new ArrayList<>();
    private List<List<View>> views = new ArrayList<>();

    public HotTagLayout(Context context, AttributeSet attrs) {
        super(context, attrs);
    }

    @Override
    protected void onLayout(boolean changed, int l, int t, int r, int b) {
        views.clear();
        lineHeights.clear();
        //该行有多少个列数据
        List<View> lineViews = new ArrayList<>();
        //1.计算
        int width = getMeasuredWidth();//容器宽
        int lineWidth = 0;
        int lineHeight = 0;
        int childCount = getChildCount();
        for (int i = 0; i < childCount; i++) {
            View child = getChildAt(i);
            MarginLayoutParams lp = (MarginLayoutParams) child.getLayoutParams();
            int childWidth = child.getMeasuredWidth();
            int childHeight = child.getMeasuredHeight();
            if (childWidth + lp.leftMargin + lp.rightMargin + lineWidth > width) {
                //换行
                lineHeights.add(lineHeight);
                views.add(lineViews);
                lineWidth = 0;
                lineViews = new ArrayList<>();
            }
            lineWidth += childWidth + lp.leftMargin + lp.rightMargin;
            lineHeight = Math.max(lineHeight, childHeight + lp.topMargin + lp.bottomMargin);
            lineViews.add(child);
        }
        lineHeights.add(lineHeight);
        views.add(lineViews);
        //2.摆放
        int left = 0;
        int top = 0;
        int size = views.size();
        for (int i = 0; i < size; i++) {
            lineViews = views.get(i);
            lineHeight = lineHeights.get(i);
            for (int j = 0; j < lineViews.size(); j++) {
                //遍历一行所有child
                View child = lineViews.get(j);
                MarginLayoutParams lp = (MarginLayoutParams) child.getLayoutParams();
                int lc = left + lp.leftMargin;
                int tc = top + lp.topMargin;
                int rc = lc + child.getMeasuredWidth();
                int bc = tc + child.getMeasuredHeight();
                child.layout(lc, tc, rc, bc);
                left += child.getMeasuredWidth() + lp.leftMargin + lp.rightMargin;
            }
            left = 0;
            top += lineHeight;
        }
    }

    @Override
    protected void onMeasure(int widthMeasureSpec, int heightMeasureSpec) {
        int sizeWidth = MeasureSpec.getSize(widthMeasureSpec);
        int sizeHeight = MeasureSpec.getSize(heightMeasureSpec);
        int modeWidth = MeasureSpec.getMode(widthMeasureSpec);
        int modeHeight = MeasureSpec.getMode(heightMeasureSpec);
        int width = 0; //所有行最宽的一行
        int height = 0; //所有行的高度相加
        int lineWidth = 0;
        int lineHeight = 0;
        //1.测量所有子控件大小
        int childCount = getChildCount();
        for (int i = 0; i < childCount; i++) {
            View child = getChildAt(i);
            measureChild(child, widthMeasureSpec, heightMeasureSpec);
            MarginLayoutParams lp = (MarginLayoutParams) child.getLayoutParams();
            //计算子控件真实占用的宽高
            int childWidth = child.getMeasuredWidth() + lp.leftMargin + lp.rightMargin;
            int childHeight = child.getMeasuredHeight() + lp.topMargin + lp.bottomMargin;
            //当一行放不下时候换行
            if (lineWidth + childWidth > sizeWidth) {
                width = Math.max(lineWidth, width);
                lineWidth = childWidth;
                height += lineHeight;
                lineHeight = childHeight;
            } else {
                lineWidth += childWidth;
                lineHeight = Math.max(lineHeight, childHeight);
            }
            //最后得到宽高
            if (i == childCount - 1) {
                width = Math.max(width, lineWidth);
                height += lineHeight;
            }
        }
        //2.测量并定义自身大小
        int measuredWidth = (modeWidth == MeasureSpec.EXACTLY) ? sizeWidth : width;
        int measuredHeight = (modeHeight == MeasureSpec.EXACTLY) ? sizeHeight : height;
        setMeasuredDimension(measuredWidth, measuredHeight);
    }

    @Override
    public LayoutParams generateLayoutParams(AttributeSet attrs) {
        return new MarginLayoutParams(getContext(), attrs);
    }
}
布局
<?xml version="1.0" encoding="utf-8"?>
<LinearLayout xmlns:android="http://schemas.android.com/apk/res/android"
    android:layout_width="match_parent"
    android:layout_height="match_parent">

    <com.cj5785.testuimld.HotTagLayout
        android:layout_width="match_parent"
        android:layout_height="wrap_content"
        android:background="@android:color/darker_gray">

        <TextView
            android:layout_width="wrap_content"
            android:layout_height="wrap_content"
            android:layout_margin="5dp"
            android:background="@drawable/tag_style"
            android:text="哈哈"
            android:textColor="@android:color/holo_orange_light"
            android:textSize="32sp" />

        <TextView
            android:layout_width="wrap_content"
            android:layout_height="wrap_content"
            android:layout_margin="5dp"
            android:background="@drawable/tag_style"
            android:text="太好笑了"
            android:textColor="@android:color/holo_blue_light"
            android:textSize="36sp" />

        <TextView
            android:layout_width="wrap_content"
            android:layout_height="wrap_content"
            android:layout_margin="5dp"
            android:background="@drawable/tag_style"
            android:text="这也行"
            android:textColor="@android:color/holo_green_light"
            android:textSize="24sp" />

        <TextView
            android:layout_width="wrap_content"
            android:layout_height="wrap_content"
            android:layout_margin="5dp"
            android:background="@drawable/tag_style"
            android:text="hiahiahia~~~"
            android:textColor="@android:color/holo_red_light"
            android:textSize="18sp" />

    </com.cj5785.testuimld.HotTagLayout>

</LinearLayout>
背景
<?xml version="1.0" encoding="utf-8"?>
<shape xmlns:android="http://schemas.android.com/apk/res/android">
    <solid android:color="#AAC07F" />
    <corners android:radius="5dp" />
    <padding
        android:bottom="2dp"
        android:left="10dp"
        android:right="10dp"
        android:top="2dp" />
</shape>
效果
