Atlas下载地址: https://github.com/Qihoo360/Atlas/releases
Atlas是出于360的, 比mysql-proxy更稳定, 部署起来更方便。
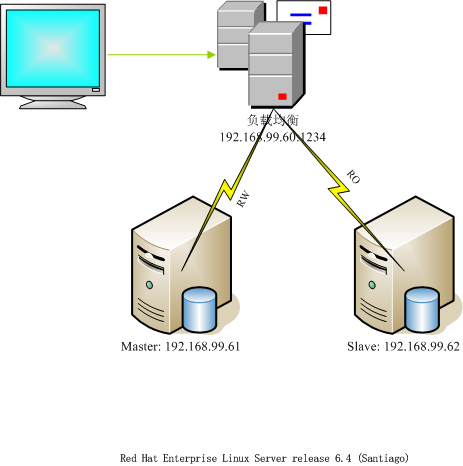
环境:
proxy:192.168.99.60
master:192.168.99.61
slave:192.168.99.62
1.安装
由于我使用的是rpm包, 直接安装
rpm -ivh Atlas-2.2.el6.x86_64.rpm
就是这么简单, 安装完成。
目录默认在:
/usr/local/mysql-proxy
一览目录结构:
total 16
drwxr-xr-x. 2 root root 4096 Dec 12 10:04 bin
drwxr-xr-x. 2 root root 4096 Dec 12 11:04 conf
drwxr-xr-x. 3 root root 4096 Dec 12 10:04 lib
drwxr-xr-x. 2 root root 4096 Dec 12 11:17 log
2.配置文件
cd /usr/local/mysql-proxy/conf

vim test.cnf
很多中文指示, 完美
[mysql-proxy]

#带#号的为非必需的配置项目

#管理接口的用户名
admin-username = admin

#管理接口的密码
admin-password = admin

#Atlas后端连接的MySQL主库的IP和端口,可设置多项,用逗号分隔
proxy-backend-addresses = 192.168.99.61:3306

#Atlas后端连接的MySQL从库的IP和端口,@后面的数字代表权重,用来作负载均衡,若省略则默认为1,可设置多项,用逗号分隔
proxy-read-only-backend-addresses = 192.168.99.62:3306@1

#用户名与其对应的加密过的MySQL密码,密码使用PREFIX/bin目录下的加密程序encrypt加密,下行的user1和user2为示例,将其替换为你的MySQL的用户名和加密密码!
pwds = admin:la1Ux+Bu4zo=

#设置Atlas的运行方式,设为true时为守护进程方式,设为false时为前台方式,一般开发调试时设为false,线上运行时设为true,true后面不能有空格。
daemon = true

#设置Atlas的运行方式,设为true时Atlas会启动两个进程,一个为monitor,一个为worker,monitor在worker意外退出后会自动将其重启,设为false时只有worker,没有monitor,一般开发调试时设为false,线上运行时设为true,true后面不能有空格。
keepalive = true

#工作线程数,对Atlas的性能有很大影响,可根据情况适当设置
event-threads = 8

#日志级别,分为message、warning、critical、error、debug五个级别
log-level = message

#日志存放的路径
log-path = /usr/local/mysql-proxy/log

#SQL日志的开关,可设置为OFF、ON、REALTIME,OFF代表不记录SQL日志,ON代表记录SQL日志,REALTIME代表记录SQL日志且实时写入磁盘,默认为OFF
sql-log = REALTIME

#慢日志输出设置。当设置了该参数时,则日志只输出执行时间超过sql-log-slow(单位:ms)的日志记录。不设置该参数则输出全部日志。
#sql-log-slow = 10

#实例名称,用于同一台机器上多个Atlas实例间的区分
instance = test

#Atlas监听的工作接口IP和端口
proxy-address = 0.0.0.0:1234

#Atlas监听的管理接口IP和端口
admin-address = 0.0.0.0:2345

#分表设置,此例中person为库名,mt为表名,id为分表字段,3为子表数量,可设置多项,以逗号分隔,若不分表则不需要设置该项
#tables = person.mt.id.3

#默认字符集,设置该项后客户端不再需要执行SET NAMES语句
#charset = utf8

#允许连接Atlas的客户端的IP,可以是精确IP,也可以是IP段,以逗号分隔,若不设置该项则允许所有IP连接,否则只允许列表中的IP连接
#client-ips = 127.0.0.1, 192.168.1

#Atlas前面挂接的LVS的物理网卡的IP(注意不是虚IP),若有LVS且设置了client-ips则此项必须设置,否则可以不设置
#lvs-ips = 192.168.1.1
3.启动
cd /usr/local/mysql-proxy/bin

./mysql-proxyd test start
在这个目录下有mysql-proxy mysql-proxyd, 第一个是mysql团队的, 第二个是属于360团队的, 我们使用的是360的。
端口
netstat -tlnp | grep  mysql-proxy


tcp        0      0 0.0.0.0:1234                0.0.0.0:*                   LISTEN      7270/mysql-proxy
tcp        0      0 0.0.0.0:2345                0.0.0.0:*                   LISTEN      7270/mysql-proxy
留意您的配置文件: 1234端口是api接口, 提供能外部进行工作连接的, 2345是属于内部管理的, 比如查询负载主机状态等。
进程
ps aux | grep mysql-proxy


root      1227  0.0  0.0 103244   856 pts/5    S+   16:03   0:00 grep mysql-proxy
root      7269  0.0  0.0  64916  5168 ?        S    11:17   0:00 /usr/local/mysql-proxy/bin/mysql-proxy --defaults-file=/usr/local/mysql-proxy/conf/test.cnf
root      7270  0.5  0.0 196084 40848 ?        Sl   11:17   1:30 /usr/local/mysql-proxy/bin/mysql-proxy --defaults-file=/usr/local/mysql-proxy/conf/test.cnf
4.测试
登录内部
mysql -u admin -padmin -P 2345 -h 192.168.99.60


Welcome to the MySQL monitor.  Commands end with ; or g.
Your MySQL connection id is 1
Server version: 5.0.99-agent-admin

Copyright (c) 2000, 2012, Oracle and/or its affiliates. All rights reserved.

Oracle is a registered trademark of Oracle Corporation and/or its
affiliates. Other names may be trademarks of their respective
owners.

Type 'help;' or 'h' for help. Type 'c' to clear the current input statement.

mysql>
登录成功,查看读写分离状态
 select * from backends;


+-------------+--------------------+-------+------+
| backend_ndx | address            | state | type |
+-------------+--------------------+-------+------+
|           1 | 192.168.99.61:3306 | up    | rw   |
|           2 | 192.168.99.62:3306 | up    | ro   |
+-------------+--------------------+-------+------+
2 rows in set (0.00 sec)
登录外部
mysql -u admin -padmin -P 1234 -h 192.168.99.60


Welcome to the MySQL monitor.  Commands end with ; or g.
Your MySQL connection id is 1
Server version: 5.0.99-agent-admin

Copyright (c) 2000, 2012, Oracle and/or its affiliates. All rights reserved.

Oracle is a registered trademark of Oracle Corporation and/or its
affiliates. Other names may be trademarks of their respective
owners.

Type 'help;' or 'h' for help. Type 'c' to clear the current input statement.

mysql>
登录成功, 查看数据库
mysql> show databases;


+--------------------+
| Database           |
+--------------------+
| information_schema |
| cm_prd             |
| jkapp              |
| monitorsys         |
| mysql              |
| mysqlslap          |
| ndbinfo            |
| performance_schema |
| sso                |
| test               |
| zskdb              |
+--------------------+
11 rows in set (0.01 sec)
查询日志
/usr/local/mysql-proxy/log

ls

sql_test.log  test.log  test.pid
sql_test.log是运行过的sql记录, test.log是日志,test.pid是进程ID
cat test.log

2017-12-12 11:17:59: (message) chassis-unix-daemon.c:138: [angel] we try to keep PID=7270 alive
2017-12-12 11:17:59: (message) mysql-proxy 0.8.2 started - instance: test
2017-12-12 11:17:59: (message) proxy listening on port 0.0.0.0:1234
2017-12-12 11:17:59: (message) added read/write backend: 192.168.75.61:3306
2017-12-12 11:17:59: (message) added read-only backend: 192.168.75.62:3306
2017-12-12 11:17:59: (message) chassis-event-thread.c:235: starting 8 threads
cat sql_test.log


[12/12/2017 16:17:33] C:192.168.99.60:52091 S:192.168.99.62:3306 OK 6.271 "select @@version_comment limit 1"
[12/12/2017 16:17:37] C:192.168.99.60:52091 S:192.168.99.62:3306 OK 2.425 "show databases"