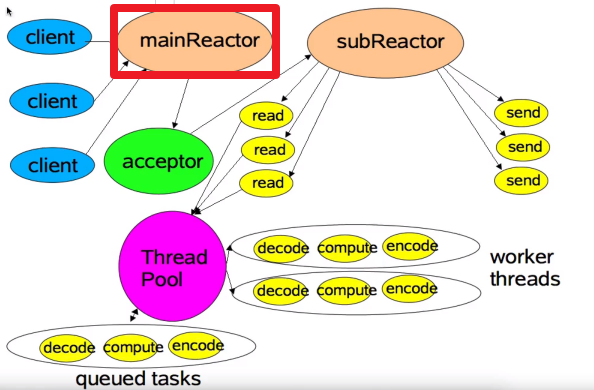
本文是我对Netty的NioEventLoopGroup及NioEventLoop初始化工作的源码阅读笔记, 如下图,是Netty的Reactor线程模型图,本文描述NioEventLoopGroup等价于我在图中标红的MainReactor组件,全篇围绕它的初始化展开,难免地方理解的不正确,欢迎留言
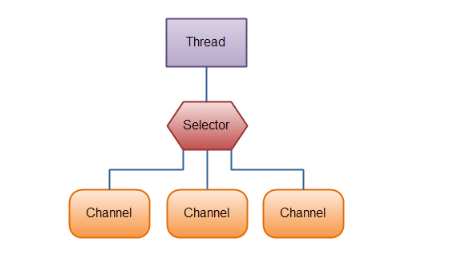
在Nio网络编程模型的图示是下面那张图, 单条Thread全职执行一个Selector,首先是服务端在启动的时候,会把代表服务端的ServerSockerChannel注册进Selector,且感兴趣的事件是Accept, 一旦有客户端请求建立连接,ServerSockerChannel的accept事件就会被Selector感知到,进行下一步处理
对NioEventLoopGroup最感性的认识,是在一定程度上,它其实是对上图组件的封装,那么封装了哪些部分呢?
- 对Thread的封装
NioEventLoopGroup维护的是事件循环,EventLoop, 在Netty的主从Reactor线程模型中,两个事件循环组其实也是线程组,因为每一个EventLoop在他的整个生命周期中都始终和一条线程唯一绑定,EventLoop的线程使用的是它自己封装的FastThreadLocalThread, 这条线程使得EventLoop有了处理事件的能力
- 对Selector的封装
NioEventLoopGroup维护的是事件循环,EventLoop,同样维护着属于自己的Selector选择器,这个选择器使得EventLoop拥有了轮询绑定在自己身上的Channel的能力. 并且Netty对JDK原生的选择器做出了升级,使用自定义的数组替换了原生Selector的HashSet集合SelectedKeys,使得时间的复杂度在任何时刻都是O1
现在看,每一个EventLoop都是一个工作单元, 它的初始化过程是怎样的? 下面就开始正式的阅读源码

上图是一个简化了体系图,,慢慢撸出他们的关系
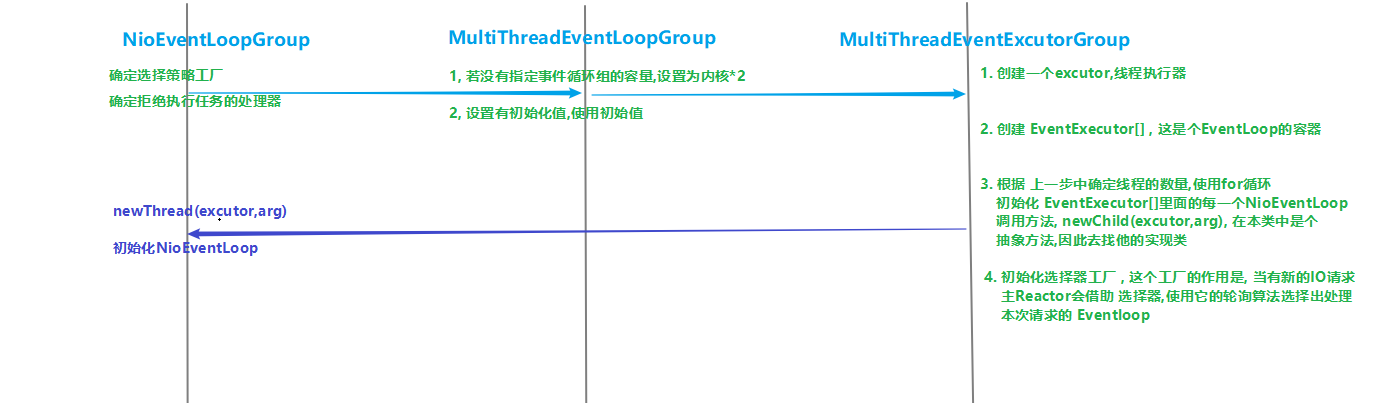
这个图使我们下面源码的流程图, 完成NioEventLoopGroup的初始化
入口:
EventLoopGroup bossGroup = new NioEventLoopGroup(1);
经过几层this()构造方法的调用,我们来到它的这个构造方法, 它调用了父类的构造方法,带上了默认的select策略,以及拒绝执行任务的handler
public NioEventLoopGroup(int nThreads, Executor executor, final SelectorProvider selectorProvider,
                     final SelectStrategyFactory selectStrategyFactory) {
//todo  0   null        根据系统选出 nioXXXprovider      默认的选择策略
// todo 调用父类的构造方法   MultithreadEventLoopGroup  多线程的事件循环组
super(nThreads, executor, selectorProvider, selectStrategyFactory, RejectedExecutionHandlers.reject());
}
接着进入super() , 进入MultiThreadEventLoopGroup 多线程事件循环组, 它干了件大事, 初始化了NioEventLoopGroup线程的数量,注意,是数量, 源码在下面: 当然,我们一般会把BossGroup的线程数量设置为1
 // todo 当MultithreadEventLoopGroup被加载进 JVM就会执行, 对 DEFAULT_EVENT_LOOP_THREADS进行初始化
    static {
        // todo max方法取最大值,
        // todo  SystemPropertyUtil.getInt,这是个系统辅助类, 如果系统中有 io.netty.eventLoopThreads,就取它, 没有的话,去后面的值
        // todo NettyRuntime.availableProcessors() 是当前的 系统的核数*2  , 在我的电脑上 2*2*2=8条线程
        DEFAULT_EVENT_LOOP_THREADS = Math.max(1, SystemPropertyUtil.getInt(
                "io.netty.eventLoopThreads", NettyRuntime.availableProcessors() * 2));

        if (logger.isDebugEnabled()) {
            logger.debug("-Dio.netty.eventLoopThreads: {}", DEFAULT_EVENT_LOOP_THREADS);
        }
    }

    /**
     * @see MultithreadEventExecutorGroup#MultithreadEventExecutorGroup(int, Executor, Object...)
     */
    // todo  接着 使用父类的构造方法,   nThreads=  DEFAULT_EVENT_LOOP_THREADS
    // todo Object... args  是 selectorProvider, selectStrategyFactory, RejectedExecutionHandlers.reject()的简写
    protected MultithreadEventLoopGroup(int nThreads, Executor executor, Object... args) {
        super(nThreads == 0 ? DEFAULT_EVENT_LOOP_THREADS : nThreads, executor, args);
    }
接着进入它的Supper() 来到了它的父类的构造方法,MultiThreadEventLoopExcutorGroup的构造方法, 这个类是至关重要的类,它做了大量的初始化工作, 总体上看:
- 首先: 根据上一步确定的它可以拥有的线程数,循环创建并初始化一个
EventExecutor[]这个数组其实就是盛放EventLoop的数组, 当这个for循环结束后,实际上NioEventLoopGroup就添加完成了EventLoop - 初始化选择器工厂, 这个工厂的作用是, 当出现新的IO事件需要处理时,通过工厂的轮询算法,从
NioEventLoopGroup中选取一个NioEventLoop处理
源码:
 // todo 在这个构造方法中,完成了一些属性的赋值, 彻底构造完成  事件循环组对象
            // todo  Object... args  是 selectorProvider, selectStrategyFactory, RejectedExecutionHandlers.reject()的简写
    protected MultithreadEventExecutorGroup(int nThreads, Executor executor,
                    EventExecutorChooserFactory chooserFactory, Object... args) {
                if (nThreads <= 0) {
                    throw new IllegalArgumentException(String.format("nThreads: %d (expected: > 0)", nThreads));
                }

                if (executor == null) {
            // todo 下面需要的参数,一开始使用无参的构造方法时, 传递进来的 就是null ,执行这一行代码, 创建默认的线程工厂
            /// todo ThreadPerTaskExecutor  意味为当前的事件循环组   创建Executor , 用于 针对每一个任务的Executor   线程的执行器
            // todo  newDefaultThreadFactory根据它的特性,可以给线程加名字等,
            // todo 比传统的好处是 把创建线程和 定义线程需要做的任务分开, 我们只关心任务,  两者解耦
            // todo 每次执行任务都会创建一个线程实体
            // todo NioEventLoop 线程命名规则  nioEventLoop-1-XX    1代表是第几个group   XX第几个eventLoop
            executor = new ThreadPerTaskExecutor(newDefaultThreadFactory());
        }

        children = new EventExecutor[nThreads];

        // todo  循环
        for (int i = 0; i < nThreads; i ++) {
            boolean success = false;
            try {
                // todo 创建EventLoop
                children[i] = newChild(executor, args);
                success = true;
            } catch (Exception e) {
                // TODO: Think about if this is a good exception type
                throw new IllegalStateException("failed to create a child event loop", e);
            } finally {
                if (!success) {
                    for (int j = 0; j < i; j ++) {
                        children[j].shutdownGracefully();
                    }

                    for (int j = 0; j < i; j ++) {
                        EventExecutor e = children[j];
                        try {
                            while (!e.isTerminated()) {
                                e.awaitTermination(Integer.MAX_VALUE, TimeUnit.SECONDS);
                            }
                        } catch (InterruptedException interrupted) {
                            // Let the caller handle the interruption.
                            Thread.currentThread().interrupt();
                            break;
                        }
                    }
                }
            }
        }
    // todo chooser 在这里 初始化了
        chooser = chooserFactory.newChooser(children);

        final FutureListener<Object> terminationListener = new FutureListener<Object>() {
            @Override
            public void operationComplete(Future<Object> future) throws Exception {
                if (terminatedChildren.incrementAndGet() == children.length) {
                    terminationFuture.setSuccess(null);
                }
            }
        };

        for (EventExecutor e: children) {
            e.terminationFuture().addListener(terminationListener);
        }

        Set<EventExecutor> childrenSet = new LinkedHashSet<EventExecutor>(children.length);
        Collections.addAll(childrenSet, children);
        readonlyChildren = Collections.unmodifiableSet(childrenSet);
    }
这个过程中的细节:
- Netty的
executor = new ThreadPerTaskExecutor(newDefaultThreadFactory());
默认的线程工厂,创建出的Thread,并不是JDK原生的Thread,而是Netty自己封装的
protected Thread newThread(Runnable r, String name) {
        System.out.println(threadGroup+"   threadGroup");
        return new FastThreadLocalThread(threadGroup, r, name);
    }
- Netty的
ThreadPerTaskExecutor源码如下, 可以看到,它的execute直接关联着Thread.start()方法, 一旦执行它就会开启新的线程, 当然源码看到这里时,它是没有没执行的,因为线程和NioEventLoop关联着,再往下就看NioEventLoop的实现
 *  todo 这里实际上使用了设计模式
 *  todo 1. command是用户定义的任务, 命令模式; 直观的 我定义一种任务, 程序不需要知道我执行的命令是什么,但是当我把任务扔给你, 你帮我执行就好了
 *  todo 2. 代理设计模型, 代理了ThreadFactory  , 把本来给ThreadPerTaskExecutor执行的任务给了ThreadFactory
 */
public final class ThreadPerTaskExecutor implements Executor {
    private final ThreadFactory threadFactory;

    public ThreadPerTaskExecutor(ThreadFactory threadFactory) {
        if (threadFactory == null) {
            throw new NullPointerException("threadFactory");
        }
        this.threadFactory = threadFactory;
    }

    // todo  必须实现 Executor 里面唯一的抽象方法, execute , 执行性 任务
    @Override
    public void execute(Runnable command) {
        threadFactory.newThread(command).start();
    }
}
其次,上面的newChild(executor, args);方法其实是抽象方法,真正运行时会执行子类NioEventLoopGroup的实现, 如下:
@Override
protected EventLoop newChild(Executor executor, Object... args) throws Exception {
    // todo !! 真正创建事件循环组的逻辑在这里!!!
    return new NioEventLoop(this, executor, (SelectorProvider) args[0],
        ((SelectStrategyFactory) args[1]).newSelectStrategy(), (RejectedExecutionHandler) args[2]);
}

 // todo 这里是 它的构造方法
    NioEventLoop(NioEventLoopGroup parent, Executor executor, SelectorProvider selectorProvider,
                 SelectStrategy strategy, RejectedExecutionHandler rejectedExecutionHandler) {
        // todo 进入到父类,  着重看他是如何创建出 TaskQueue的
        super(parent, executor, false, DEFAULT_MAX_PENDING_TASKS, rejectedExecutionHandler);
        if (selectorProvider == null) {
            throw new NullPointerException("selectorProvider");
        }
        if (strategy == null) {
            throw new NullPointerException("selectStrategy");
        }
        // todo 常用的 属性
        provider = selectorProvider;
        // todo 获取Selector选择器
        final SelectorTuple selectorTuple = openSelector();

        // todo SelectorTuple是netty维护 jdk 原生的Selector的包装类, 下面看,他有两个Selector, 一个是经过包装的,一个是未经过包装的
        selector = selectorTuple.selector;  //
        unwrappedSelector = selectorTuple.unwrappedSelector;  // todo Jdk 原生的Selector
        selectStrategy = strategy;
    }
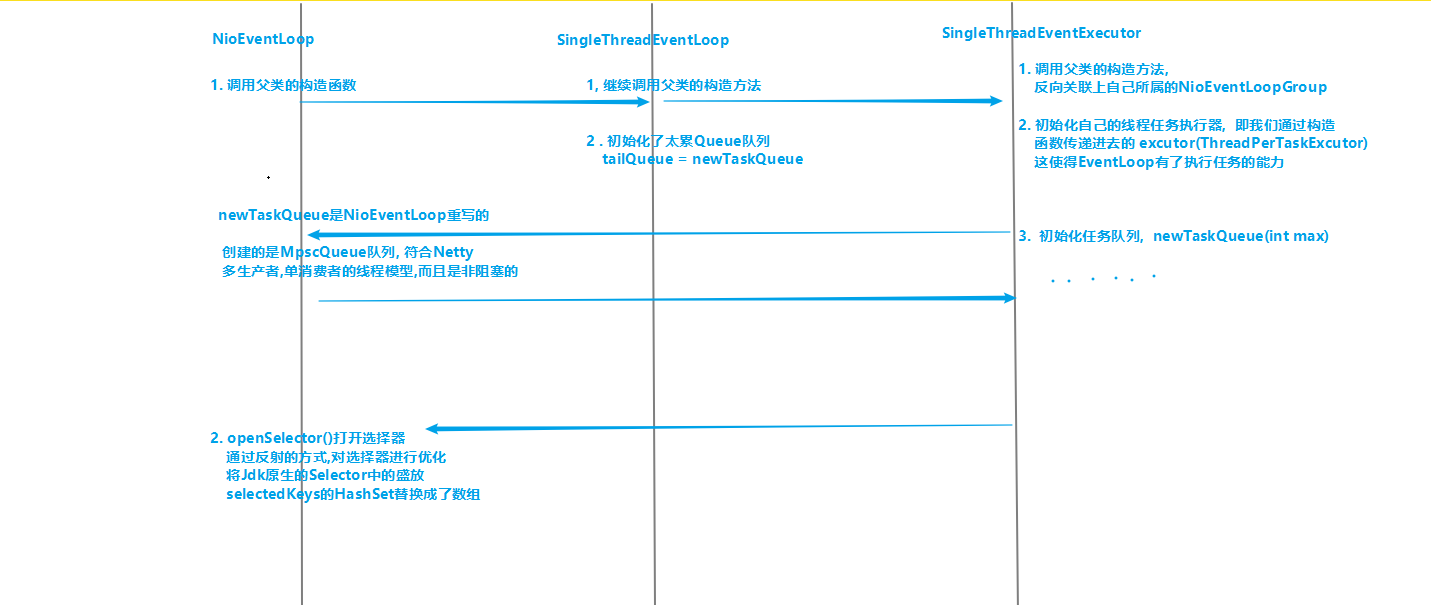
继续跟进去,上面的NioEventLoopGroup的体系图也就分析到右半部分了,如上图,是这半部分初始化工作的主要流程, 下面是它的构造方法,可以看到主要完成了两件事
- 进入父类的构造方法完成任务队列的创建
- 打开选择器,并且进行了优化
细节:
可以看到,现在已经进入了它的三级父类SingleThreadEventExecutor
 protected SingleThreadEventExecutor(EventExecutorGroup parent, Executor executor,
                                boolean addTaskWakesUp, int maxPendingTasks,
                                RejectedExecutionHandler rejectedHandler) {

super(parent);
this.addTaskWakesUp = addTaskWakesUp;
this.maxPendingTasks = Math.max(16, maxPendingTasks);
// todo 保存线程执行器
this.executor = ObjectUtil.checkNotNull(executor, "executor");
// todo 任务队列  , 进入查看
taskQueue = newTaskQueue(this.maxPendingTasks);
System.out.println(taskQueue.getClass());
rejectedExecutionHandler = ObjectUtil.checkNotNull(rejectedHandler, "rejectedHandler");
}
在这个类中进行了如下的工作:
- 调用父类的构造方法,设置自己的父Group
- 初始化自己的线程执行器
- 创建任务队列
队列有啥用?
我们知道,Netty中的线程可不止一个, 多个EventLoop意味着多个线程, 任务队列的作用就是当其他线程拿到CPU的执行权时,却得到了其他线程的IO请求,这时当前线程就把这个请求以任务的方式提交到对应线程的任务队列里面
创建的什么任务队列?
有个误区, 当我跟进 newTaskQueue(this.maxPendingTasks);方法时, 进入的方法创建了一个LinkedBlockingQueue队列, 实际上创建的确是MpscQueue , 这并不奇怪,是因为NioEventLoop把这个方法重写了, 源码如下:
@Override
protected Queue<Runnable> newTaskQueue(int maxPendingTasks) {
    // This event loop never calls takeTask()
    return maxPendingTasks == Integer.MAX_VALUE ? PlatformDependent.<Runnable>newMpscQueue()
            : PlatformDependent.<Runnable>newMpscQueue(maxPendingTasks);
}
这个任务队列的特性是 非阻塞的,多生产者单消费者, 正好和Netty的线程模型对应
此外,这个SingleThreadEventExecutor还有很多重要的方法
- excute执行任务
- 尝试开启线程(初始化EventLoop的线程)
- 开启线程
- 执行所有任务
- 聚合定时任务
- 把任务丢进队列
- 把任务从队列中取出
NioEventLoop打开自己的队列时,做了哪些优化?
通过反射,借助Java.Security.AccessController提供的线程安全的策略执行机制把原生JDK的selector的SelectedKeys这个HashSet替换成了数组,使得他的事件复杂度在任何时刻都是O1
// todo 这里进行了 优化, netty把hashSet转换成了数组, 因为在JDK的NIO模型中,获取Selector时, Selector里面内置的存放SelectionKey的容器是Set集合
// todo  而netty把它替换成了自己的数据结构, 数组, 从而使在任何情况下, 它的时间复杂度都是 O1
private SelectorTuple openSelector() {
final Selector unwrappedSelector;
try {
    // todo 使用jdk 的api创建新的 selector
    unwrappedSelector = provider.openSelector();
} catch (IOException e) {
    throw new ChannelException("failed to open a new selector", e);
}

if (DISABLE_KEYSET_OPTIMIZATION) { // todo 如果不需要优化,就返回原生的selector , 默认为false 即 使用优化
    return new SelectorTuple(unwrappedSelector);
}
// todo  接下来 netty会用下面这个SelectedSelectionKeySet数据结构 替换原来的 keySet , 进入查看
final SelectedSelectionKeySet selectedKeySet = new SelectedSelectionKeySet();

Object maybeSelectorImplClass = AccessController.doPrivileged(new PrivilegedAction<Object>() {
    @Override
    public Object run() {
        try {
            // todo 通过反射  sun.nio.ch.SelectorImpl 或者这个类
            return Class.forName(
                    "sun.nio.ch.SelectorImpl",
                    false,
                    PlatformDependent.getSystemClassLoader());
        } catch (Throwable cause) {
            return cause;
        }
    }
});
// todo 判断是否获取到了这个类
if (!(maybeSelectorImplClass instanceof Class) ||
        // ensure the current selector implementation is what we can instrument.
        !((Class<?>) maybeSelectorImplClass).isAssignableFrom(unwrappedSelector.getClass())) {
    if (maybeSelectorImplClass instanceof Throwable) {
        Throwable t = (Throwable) maybeSelectorImplClass;
        logger.trace("failed to instrument a special java.util.Set into: {}", unwrappedSelector, t);
    }
    return new SelectorTuple(unwrappedSelector);
}

// todo 确定是Selector的实现类  换了个名字
final Class<?> selectorImplClass = (Class<?>) maybeSelectorImplClass;

/**
 * todo 类java.security.AccessController提供了一个默认的安全策略执行机制,它使用栈检查来决定潜在不安全的操作是否被允许。
 * todo 这个访问控制器不能被实例化,它不是一个对象,而是集合在单个类中的多个静态方法。
 */
Object maybeException = AccessController.doPrivileged(new PrivilegedAction<Object>() {
    @Override
    public Object run() {
        try {
            // todo 通过反射, 获取到 selectorImplClass的两个字段 selectedKeys   publicSelectedKeys
            // todo  selectedKeys   publicSelectedKeys底层都是 hashSet() 实现的, 现在获取出来了, 放入上面的数组数据结构中
            Field selectedKeysField = selectorImplClass.getDeclaredField("selectedKeys");
            Field publicSelectedKeysField = selectorImplClass.getDeclaredField("publicSelectedKeys");

            // todo trySetAccessible 可以强制访问私有的对象
            Throwable cause = ReflectionUtil.trySetAccessible(selectedKeysField);
            if (cause != null) {
                return cause;
            }
            // todo trySetAccessible 可以强制访问私有的对象
            cause = ReflectionUtil.trySetAccessible(publicSelectedKeysField);
            if (cause != null) {
                return cause;
            }
            // todo 真正的把通过反射得到的 那两个字段放入我们自己的数据结构中
            // // todo  下面是把我们的NioEventLoop中的 unwrappedSelector 的 selectedKeysField的属性 直接设置成 优化后的selectedKeySet
            selectedKeysField.set(unwrappedSelector, selectedKeySet);
            publicSelectedKeysField.set(unwrappedSelector, selectedKeySet);
            return null;
        } catch (NoSuchFieldException e) {
            return e;
        } catch (IllegalAccessException e) {
            return e;
        }
    }
});

if (maybeException instanceof Exception) {
    selectedKeys = null;
    Exception e = (Exception) maybeException;
    logger.trace("failed to instrument a special java.util.Set into: {}", unwrappedSelector, e);
    return new SelectorTuple(unwrappedSelector);
}

// todo 初始化自己维护被选中的key的集合  --> 数组类型的
selectedKeys = selectedKeySet;
logger.trace("instrumented a special java.util.Set into: {}", unwrappedSelector);
return new SelectorTuple(unwrappedSelector,
        new SelectedSelectionKeySetSelector(unwrappedSelector, selectedKeySet));
}
到现在为止, NioEventLoopGroup和NioEventLoop就都初始化完成了,当然这是初始化,程序运行到现在,依然只有一条主线程, EventLoop的Thread还没start()干活,但是起码已经有能力准备启动了
总结一下:
就像下面的体系一样, 五脏俱全
- NioEventLoopGroup
- NIoEventLoop
- excutor(线程执行器) , 执行IO任务/非IO任务
- selector 选择器
- Chooser
- NIoEventLoop
- excutor(线程执行器) , 执行IO任务/非IO任务
- selector 选择器
- Chooser
- NIoEventLoop
- excutor(线程执行器) , 执行IO任务/非IO任务
- selector 选择器
- Chooser
- NIoEventLoop