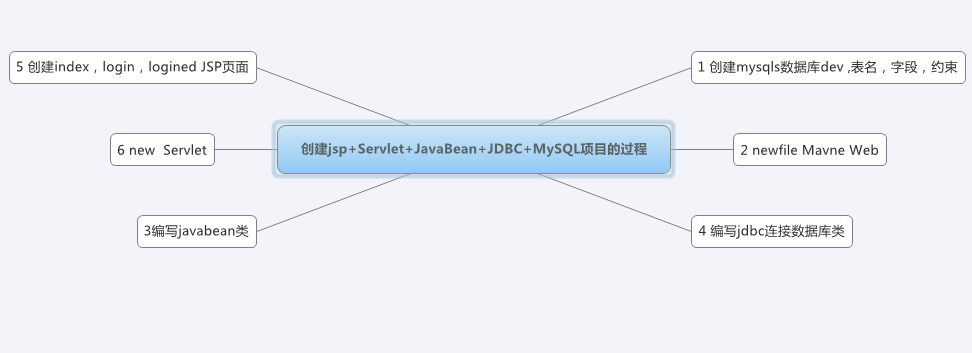
2 在Eclipes中new file ,other 找到 Maven ,选择 Mavne Mroject, New Mavne Mroject,Next之后,下拉到最下面,选择Webapp,接着Next。填写所属组织 Group Id , Artifact Id,项目名。Finish。到这里Maven Web 项目就创建完成了。
(1)项目这里报错,找到新建的项目,左键点击打开src/mian/webapp/WEB-INF/找到delete删除index.jsp页面
2然后找到pom.xml打开找到点击pom.xml查看源代码,
<project xmlns="http://maven.apache.org/POM/4.0.0" xmlns:xsi="http://www.w3.org/2001/XMLSchema-instance"
xsi:schemaLocation="http://maven.apache.org/POM/4.0.0 http://maven.apache.org/maven-v4_0_0.xsd">
<modelVersion>4.0.0</modelVersion>
<groupId>web</groupId>
<artifactId>test11</artifactId>
<packaging>war</packaging>
<version>0.0.1-SNAPSHOT</version>
<name>test11 Maven Webapp</name>
<url>http://maven.apache.org</url>
<dependencies>
<dependency>
<groupId>junit</groupId>
<artifactId>junit</artifactId>
<version>3.8.1</version>
<scope>test</scope>
</dependency>
</dependencies>
<build>
<finalName>test11</finalName>
</build>
</project>
(3)在这里指定JDK编译版本1.7
<build>
<finalName>test11</finalName> 项目名
<plugins>
<plugin>
<groupId>org.apache.maven.plugins</groupId>
<artifactId>maven-compiler-plugin</artifactId>
<configuration>
<source>1.7</source>
<target>1.7</target>
</configuration>
</plugin>
</plugins>
</build>
(4) 修改JDK版本,打开项目,找到Build Path ,Configure Build Path ,Java Build Path ,选择Libraries,选择JRE System Library 这里默认为J2SE 1.5.点击Edit,修改。点击选择 Workspace defult JRE 配置好的JDK环境版本。Finish。完成后,应用,关闭。这里JDK版本就修改好了。
(5) 项目报错,更新Maven 项目,找到要更新的项目,右键点击找到Maven, Update Project。更新完毕,项目不再报错。
(6) 然后在pom.xml中添加项目需要的关系依赖包
<dependencies>
<dependency>
<groupId>javax.servlet</groupId>
<artifactId>javax.servlet-api</artifactId> 使用的Servlte 版本
<version>3.1.0</version>
</dependency>
<dependency>
<groupId>javax.servlet.jsp</groupId>
<artifactId>javax.servlet.jsp-api</artifactId> Servlet JSP的版本
<version>2.3.1</version>
</dependency>
<dependency>
<groupId>javax.servlet</groupId>
<artifactId>jstl</artifactId> 标准标签类库的版本
<version>1.2</version>
</dependency>
<dependency>
<groupId>mysql</groupId>
<artifactId>mysql-connector-java</artifactId> Mysql 数据库JDBC连接版本
<version>5.1.39</version>
</dependency>
</dependencies>
(7) 在src/mian/webapp/WEB-INF/ 打开web.xml,点击Source, 修改web.xml, Servlet 版本对应为项目添加的版本。
<?xml version="1.0" encoding="UTF-8"?>
<web-app xmlns:xsi="http://www.w3.org/2001/XMLSchema-instance"
xmlns="http://xmlns.jcp.org/xml/ns/javaee"
xsi:schemaLocation="http://xmlns.jcp.org/xml/ns/javaee http://xmlns.jcp.org/xml/ns/javaee/web-app_3_1.xsd"
version="3.1">
<welcome-file-list>
<welcome-file>index.jsp</welcome-file> 设置欢迎页面
</welcome-file-list>
</web-app>
(8) 右键点击项目,找到Properties,打开找到Project Facets, 在Dynamic Web Module 选项前去掉勾选,把默认的2.3版本选择为3.1。然后应用,Appiy。在把它勾选上。在Appiy。关闭
(9) 更新Maven 项目,找到要更新的项目,右键点击找到Maven, Update Project。更新完毕。到这里Maven Web 项目就配置好了。
3 创建src/mian/model包, 编写User用户类。快速get,set。右键找到Source,选择Generate getters and setters,勾选属性名称,确定。
package model;
/*
* 用户实体类
*
*/
public class User {
String name;
String password;
public String getName() {
return name;
}
public void setName(String name) {
this.name = name;
}
public String getPassword() {
return password;
}
public void setPassword(String password) {
this.password = password;
}
}
4 编写 jdbc连接数据库BaseDao类
package dao;
import java.sql.Connection;
import java.sql.DriverManager;
import java.sql.ResultSet;
import java.sql.Statement;
public class BaseDao {
private Connection conn = null; //连接数据库对象
public BaseDao() {
String driver = "com.mysql.jdbc.Driver"; //加载驱动程序
try {
Class.forName(driver);
String url = "jdbc:mysql://localhost:3306/dev?characterEncoding=utf8";
conn = DriverManager.getConnection(url, "root", ""); //取得连接对象
System.out.println("连接mysql数据库成功");
} catch (Exception e) {
// TODO: handle exception
e.printStackTrace();
}
}
public boolean hasUser(String name) {
Statement stmt = null;
ResultSet rs = null;
Boolean result = false;
String strSql = null;
try {
strSql = " select * from user where name= '" + name + "'";
stmt = conn.createStatement(rs.TYPE_SCROLL_INSENSITIVE, rs.CONCUR_READ_ONLY);
// 执行SQL语句
rs = stmt.executeQuery(strSql);
while (rs.next()) {
result = true;
}
} catch (Exception e) {
// TODO: handle exception
e.printStackTrace();
}
return result;
}
public boolean isLegalUser(String name, String password) {
Statement stmt = null;
ResultSet rs = null;
Boolean result = false;
String strSql = null;
try {
strSql = " select name,password from user where name='" + name + "' and password='" + password + "'";
stmt = conn.createStatement(rs.TYPE_SCROLL_INSENSITIVE, rs.CONCUR_READ_ONLY);
// 执行SQL语句
rs = stmt.executeQuery(strSql);
if (rs.next()) {
result = true;
}
} catch (Exception e) {
// TODO: handle exception
e.printStackTrace();
}
return result;
}
}
5 创建JSP页面,在项目src/mian/webapp/WEB-INF,New JSP File ,取名login.jsp,Finish。
<!DOCTYPE html>
<html lang="en">
<head>
<meta charset="UTF-8">
<title>登录页面</title>
<style type="text/css">
风格样式
</style>
</head>
<body>
<c:if test="${not empty requestScope.msg}"></c:if>
<h1>${requestScope.msg}</h1>
<div>
<fieldset>
<legend>登录界面</legend>
<form action="loing.do" method="post"> 关联Servlet
<div>
<span>用户名</span>
<div>
<input type="text" name="name" id="user" />
</div>
<span>密码</span>
<div>
<input type="password" name="password" id="pw" />
</div>
</div>
<div class="login-button">
<div class="button">
<input type="submit" value=" 登 录" class="submit">
</div>
</form>
</fieldset>
</div
</body>
</html>
6 创建Servlet,在项目src/mian/web/ New 选择Servlet Class Name,取名LoginServlet。Next, 在URL mappings ,选择/LoginServlet,Edit。为/Login.do。Next,在这里可以勾选。Finisn。创建完毕,生成Servlet。 dopost 提交方式。
protected void doPost(HttpServletRequest request, HttpServletResponse response) throws ServletException, IOException {
// TODO Auto-generated method stub
response.setContentType("text/html;charset=UTF-8"); // 设置响应编码
// 取得请求的参数
String name = request.getParameter("name");
String password = request.getParameter("password");
BaseDao dao = new BaseDao(); //实例化BaseDao
if (dao.hasUser(name)) {
if (dao.isLegalUser(name, password)) {
request.setAttribute("msg", "用户" + name + "登录成功"); //传递参数
request.getRequestDispatcher("logined.jsp").forward(request, response); //转发页面
} else {
request.setAttribute("msg", "密码错误,请重新输入!");
request.getRequestDispatcher("login.jsp").forward(request, response);
}
} else {
// 用户不存在
response.sendRedirect("index.jsp"); //重定向
}
}