"IOS数据存储的方式有哪些"
1.plist
2.preference用户偏好设置
3.NSKeyedArchiver(归档)
4.sqlite
5.coredata
"plist文件存储"
应⽤用沙盒结构分析
应⽤用程序包:(上图中的Layer)包含了所有的资源⽂文件和可执⾏行⽂文件 Documents:保存应⽤用运⾏行时⽣生成的需要持久化的数据,iTunes同步设备时会
备份该⽬目录。例如,游戏应⽤用可将游戏存档保存在该⽬目录
tmp:保存应⽤用运⾏行时所需的临时数据,使⽤用完毕后再将相应的⽂文件从该⽬目录删 除。应⽤用没有运⾏行时,系统也可能会清除该⽬目录下的⽂文件。iTunes同步设备时 不会备份该⽬目录
Library/Caches:保存应⽤用运⾏行时⽣生成的需要持久化的数据,iTunes同步设 备时不会备份该⽬目录。⼀一般存储体积⼤大、不需要备份的⾮非重要数据
Library/Preference:保存应⽤用的所有偏好设置,iOS的Settings(设置)
应⽤用会在该⽬目录中查找应⽤用的设置信息。iTunes同步设备时会备份该⽬目录
● 沙盒根⺫⽬目录:NSString*home=NSHomeDirectory();
● Documents:(2种⽅方式)
● 利⽤用沙盒根⺫⽬目录拼接”Documents”字符串
NSString *home = NSHomeDirectory();
NSString *documents = [home stringByAppendingPathComponent:@"Documents"];
// 不建议采⽤用,因为新版本的操作系统可能会修改⺫⽬目录名
● 利⽤用NSSearchPathForDirectoriesInDomains函数
// NSUserDomainMask 代表从⽤用户⽂文件夹下找
// YES 代表展开路径中的波浪字符“~”
NSArray *array = NSSearchPathForDirectoriesInDomains(NSDocumentDirectory, NSUserDomainMask, NO);
// 在iOS中,只有⼀一个⺫⽬目录跟传⼊入的参数匹配,所以这个集合⾥里⾯面只有⼀一个元素
NSString *documents = [array objectAtIndex:0];
● tmp:NSString *tmp = NSTemporaryDirectory();
● Library/Caches:(跟Documents类似的2种⽅方法)
● 利⽤用沙盒根⽬目录拼接”Caches”字符串
● 利⽤用NSSearchPathForDirectoriesInDomains函数(将函数的第2个参数改 为:NSCachesDirectory即可)
● Library/Preference:通过NSUserDefaults类存取该⽬目录下的设置信息
● 属性列表是⼀一种XML格式的⽂文件,拓展名为plist
● 如果对象 是NSString、NSDictionary、NSArray、NSData、NSNumber 等类型,就可以使⽤用writeToFile:atomically:⽅方法直接将对象 写到属性列表⽂文件中
● 将⼀一个NSDictionary对象归档到⼀一个plist属性列表中
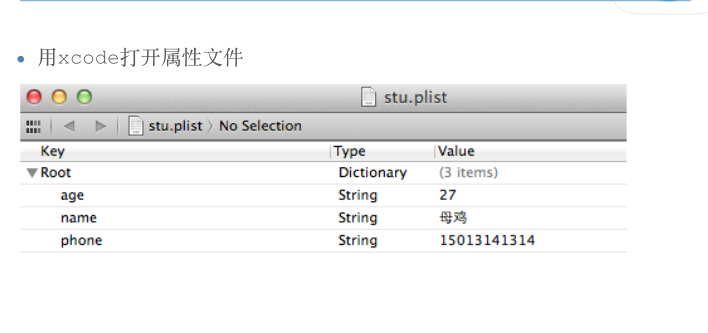
// 将数据封装成字典
NSMutableDictionary *dict = [NSMutableDictionary dictionary];
[dict setObject:@"⺟母鸡" forKey:@"name"];
[dict setObject:@"15013141314" forKey:@"phone"];
[dict setObject:@"27" forKey:@"age"];
// 将字典持久化到Documents/stu.plist⽂文件中
[dict writeToFile:path atomically:YES];
● 成功写⼊入到Documents⽬目录下
● ⽤用⽂文本编辑器打开,⽂文件内容为:

读取属性列表,恢复NSDictionary对象
// 读取Documents/stu.plist的内容,实例化NSDictionary
NSDictionary *dict = [NSDictionary dictionaryWithContentsOfFile:path];
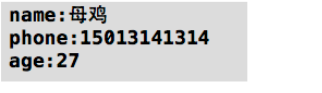
NSLog(@"name:%@", [dict objectForKey:@"name"]);
NSLog(@"phone:%@", [dict objectForKey:@"phone"]);
NSLog(@"age:%@", [dict objectForKey:@"age"]);
● 打印信息如下

1.字符串 数组 字典 可以直接存储数据在一个文件
2.掌握沙盒备目录的作用以及目录路径获取方式
// Document [NSSearchPathForDirectoriesInDomains(NSDocumentDirectory, NSUserDomainMask, YES) lastObject] 持久化数据,比如:文件
// 缓存 [NSSearchPathForDirectoriesInDomains(NSCachesDirectory, NSUserDomainMask, YES) lastObject]; 微博,另一个设备不会备份
// 临时 NSTemporaryDirectory(); 比如电影。看完之后不看了
// 主目录 NSHomeDirectory();
3.不是所有对象都可以保存到plist文件中,要有实现writeFile方法才可以
4.学会使用SimPholders2打开沙盒目录
ViewController.m
//
// ViewController.m
// A05.plist文件存储
//
// Created by huan on 16/1/22.
// Copyright © 2016年 huanxi. All rights reserved.
//
#import "ViewController.h"
#import "Contact.h"
@interface ViewController ()
@property (nonatomic, copy) NSString *plistPath;
@end
@implementation ViewController
//沙盒路径的方法:(1)前往(2)终端+open+enter(3)第三方框架
//懒加载
-(NSString *)plistPath{
if (!_plistPath) {
NSString *doc = [NSSearchPathForDirectoriesInDomains(NSDocumentDirectory, NSUserDomainMask, YES) lastObject];
_plistPath = [doc stringByAppendingPathComponent:@"data.plist"];
}
return _plistPath;
}
- (void)viewDidLoad {
[super viewDidLoad];
// NSString *doc = [NSSearchPathForDirectoriesInDomains(NSDocumentDirectory, NSUserDomainMask, YES) lastObject];
// NSLog(@"%@", doc);
//// NSLog(@"%@", NSHomeDirectory());
// NSString *plistPath = [doc stringByAppendingPathComponent:@"data.plist"];
//读取
// NSArray *array = [NSArray arrayWithContentsOfFile:plistPath];
// NSLog(@"%@", array);
//获取缓存路径(cache)
NSString * cachePath = [NSSearchPathForDirectoriesInDomains(NSCachesDirectory, NSUserDomainMask, YES) lastObject];
NSLog(@"%@", cachePath);
//获取临时路径(tmp)
NSString *tmpPath = NSTemporaryDirectory();
NSLog(@"%@", tmpPath);
//主目录
NSString *homePath = NSHomeDirectory();
NSLog(@"%@", homePath);
}
-(void)touchesBegan:(NSSet<UITouch *> *)touches withEvent:(UIEvent *)event{
// //把数据保存到沙盒的一个plist文件里
//// NSArray *data = @[@"asd", @"asds"];
// NSDictionary *data = @{@"name":@"zhangsan",@"age":@23};
// //获取document目录,用户主目录
// NSString *doc = [NSSearchPathForDirectoriesInDomains(NSDocumentDirectory, NSUserDomainMask, YES) lastObject];
// NSLog(@"%@", doc);
//// NSLog(@"%@", NSHomeDirectory());
// NSString *plistPath = [doc stringByAppendingPathComponent:@"data.plist"];
// //把数据写入一个文件
// [data writeToFile:plistPath atomically:YES];
// //读取
// NSArray *array = [NSArray arrayWithContentsOfFile:plistPath];
// NSLog(@"%@", array);
[self testDictionary];
[self testString];
//不是说有对象都可使用writeToFile方法
Contact *contact = [[Contact alloc] init];
contact.name = @"zhangsan";
}
-(void)testString{
NSString *data = @"aabc";
//写字符串
[data writeToFile:self.plistPath atomically:YES encoding:NSUTF8StringEncoding error:nil];
//读字符串
NSString *str = [NSString stringWithContentsOfFile:self.plistPath encoding:NSUTF8StringEncoding error:nil];
NSLog(@"%@", str);
}
-(void)testDictionary{
//把数据保存到沙盒的一个plist文件里
NSDictionary *data = @{@"name":@"zhangsan",@"age":@23};
//把数据写入一个文件
[data writeToFile:_plistPath atomically:YES];
//读取
NSDictionary *dict = [NSDictionary dictionaryWithContentsOfFile:self.plistPath];
NSLog(@"%@", dict);
}
/**
* 测试数组存储在一个plist文件
*/
-(void)testArray{
//把数据保存到沙盒的一个plist文件里
NSArray *data = @[@"asd", @"asds"];
// NSDictionary *data = @{@"name":@"zhangsan",@"age":@23};
//获取document目录,用户主目录
// NSString *doc = [NSSearchPathForDirectoriesInDomains(NSDocumentDirectory, NSUserDomainMask, YES) lastObject];
// NSLog(@"%@", doc);
// // NSLog(@"%@", NSHomeDirectory());
// NSString *plistPath = [doc stringByAppendingPathComponent:@"data.plist"];
//把数据写入一个文件
[data writeToFile:_plistPath atomically:YES];
//读取
NSArray *array = [NSArray arrayWithContentsOfFile:self.plistPath];
NSLog(@"%@", array);
}
//查看沙盒路径
//1.控制台打印沙盒的路径,使用finder-前往-文件夹 打开
//2.控制台打印沙盒的路径,打开终端 Open + 路径
//3.使用simholers工具
//4.可以断点 输入po NSHomeDirectory
@end
Contact.h
#import <Foundation/Foundation.h>
@interface Contact : NSObject
@property (nonatomic, copy) NSString *name;
@end
"用户偏好设置"
很多iOS应⽤用都⽀支持偏好设置,⽐比如保存⽤用户名、密码、字体⼤大⼩小等设置,iOS 提供了⼀一套标准的解决⽅方案来为应⽤用加⼊入偏好设置功能
● 每个应⽤用都有个NSUserDefaults实例,通过它来存取偏好设置
● ⽐比如,保存⽤用户名、字体⼤大⼩小、是否⾃自动登录
NSUserDefaults *defaults = [NSUserDefaults standardUserDefaults];
[defaults setObject:@"itcast" forKey:@"username"];
[defaults setFloat:18.0f forKey:@"text_size"];
[defaults setBool:YES forKey:@"auto_login"];

● 读取上次保存的设置
NSUserDefaults *defaults = [NSUserDefaults standardUserDefaults];
NSString *username = [defaults stringForKey:@"username"];
float textSize = [defaults floatForKey:@"text_size"];
BOOL autoLogin = [defaults boolForKey:@"auto_login"];
● 注意:UserDefaults设置数据时,不是⽴立即写⼊入,⽽而是根据时间戳定时地把缓存中
的数据写⼊入本地磁盘。所以调⽤用了set⽅方法之后数据有可能还没有写⼊入磁盘应⽤用程序
就终⽌止了。出现以上问题,可以通过调⽤用synchornize⽅方法强制写⼊入
[defaults synchornize];
1.ios中有个NSUserDefaults对象有可保存数据,我们称为用户偏好设置
2.通过[NSUserDefaults standardUserDefaults]可以获取用户偏好设置对象,保存字符串 布尔值 int等数据
3.保存数据时,一定要调用synchronize,因为数据要及时保存到沙盒的文件中
/* NSUserDefaults *defualts = [NSUserDefaults standardUserDefaults];
[defualts setObject:@"zhangsan" forKey:@"username"];
[defualts setObject:@"123" forKey:@"password"];
[defualts setBool:YES forKey:@"autoLogin"];
[defualts setBool:YES forKey:@"rememberPwd"];
//同步
[defualts synchronize];
*/
4.掌握用户偏好设置数据的获取,更改,删除
ViewController.m
//
// ViewController.m
// B02.用户偏好设置
//
// Created by huan on 16/1/22.
// Copyright © 2016年 huanxi. All rights reserved.
//
#import "ViewController.h"
@interface ViewController ()
@end
@implementation ViewController
- (void)viewDidLoad {
[super viewDidLoad];
// [self delete];
[self modify];
}
-(void)modify{
//修改 用户偏好设置 数据
NSUserDefaults *defaults = [NSUserDefaults standardUserDefaults];
[defaults setObject:@"321" forKey:@"password"];
[defaults synchronize];
NSLog(@"%@", NSHomeDirectory());
}
-(void)delete{
//删除 用户偏好设置 数据
NSUserDefaults *defautls = [NSUserDefaults standardUserDefaults];
[defautls removeObjectForKey:@"account"];
//删除记得数据也要调用 同步的方法
[defautls synchronize];
NSLog(@"%@", NSHomeDirectory());
}
-(void)read{
//读取 用户偏好设置 数据
NSUserDefaults *defautls = [NSUserDefaults standardUserDefaults];
NSString *account = [defautls objectForKey:@"account"];
NSString *password = [defautls objectForKey:@"password"];
BOOL rememberPwd = [defautls boolForKey:@"rememberPwd"];
BOOL autoLogin = [defautls boolForKey:@"autoLogin"];
NSLog(@"%@, %@, %d, %d", account, password, rememberPwd, autoLogin);
}
-(void)touchesBegan:(NSSet<UITouch *> *)touches withEvent:(UIEvent *)event{
//使用偏好设置保存数据
NSUserDefaults *defaults = [NSUserDefaults standardUserDefaults];
//要保存的数据
[defaults setObject:@"zhangsan" forKey:@"account"];
[defaults setObject:@"123" forKey:@"password"];
[defaults setBool:YES forKey:@"autoLogin"];
[defaults setBool:YES forKey:@"rememberPwd"];
//调用同步的方法,把数据保存到沙盒文件
[defaults synchronize];
}
@end
"NSKeyedArchiver归档"
● 如果对象是NSString、NSDictionary、NSArray、NSData、NSNumber等类 型,可以直接⽤用NSKeyedArchiver进⾏行归档和恢复
● 不是所有的对象都可以直接⽤用这种⽅方法进⾏行归档,只有遵守了NSCoding协议 的对象才可以
● NSCoding协议有2个⽅方法:
● encodeWithCoder:
每次归档对象时,都会调⽤用这个⽅方法。⼀一般在这个⽅方法⾥里⾯面指定如何归档对象中的每 个实例变量,可以使⽤用encodeObject:forKey:⽅方法归档实例变量
● initWithCoder: 每次从⽂文件中恢复(解码)对象时,都会调⽤用这个⽅方法。⼀一般在这个⽅方法⾥里⾯面指定如何解
码⽂文件中的数据为对象的实例变量,可以使⽤用decodeObject:forKey⽅方法解码实例变量
• 归档⼀一个NSArray对象到Documents/array.archive NSArray *array = [NSArray arrayWithObjects:@”a”,@”b”,nil];
[NSKeyedArchiver archiveRootObject:array toFile:path];
• 归档成功

@interface Person : NSObject<NSCoding>
@property (nonatomic, copy) NSString *name;
@property (nonatomic, assign) int age;
@property (nonatomic, assign) float height;
@end
@implementation Person
- (void)encodeWithCoder:(NSCoder *)encoder {
[encoder encodeObject:self.name forKey:@"name"];
[encoder encodeInt:self.age forKey:@"age"];
[encoder encodeFloat:self.height forKey:@"height"];
}
- (id)initWithCoder:(NSCoder *)decoder {
self.name = [decoder decodeObjectForKey:@"name"];
self.age = [decoder decodeIntForKey:@"age"];
self.height = [decoder decodeFloatForKey:@"height"]; return self;
}
- (void)dealloc {
[super dealloc];
   [_name release];
}
@end
● 归档(编码)
Person *person = [[[Person alloc] init] autorelease];
person.name = @"MJ";
person.age = 27;
person.height = 1.83f;
[NSKeyedArchiver archiveRootObject:person toFile:path];
● 恢复(解码)
Person *person = [NSKeyedUnarchiver unarchiveObjectWithFile:path];
● 如果⽗父类也遵守了NSCoding协议,请注意:
● 应该在encodeWithCoder:⽅方法中加上⼀一句
[super encodeWithCode:encode];
确保继承的实例变量也能被编码,即也能被归档
● 应该在initWithCoder:⽅方法中加上⼀一句
self = [super initWithCoder:decoder];
确保继承的实例变量也能被解码,即也能被恢复
NSData
● 使⽤用archiveRootObject:toFile:⽅方法可以将⼀一个对象直接写⼊入到
⼀一个⽂文件中,但有时候可能想将多个对象写⼊入到同⼀一个⽂文件中,那么就
要使⽤用NSData来进⾏行归档对象
● NSData可以为⼀一些数据提供临时存储空间,以便随后写⼊入⽂文件,或者存
放从磁盘读取的⽂文件内容。可以使⽤用[NSMutableData data]创建可

变数据空间
NSData-归档2个Person对象到同⼀一⽂文件中
● 归档(编码)
// 新建⼀一块可变数据区
NSMutableData *data = [NSMutableData data];
// 将数据区连接到⼀一个NSKeyedArchiver对象
NSKeyedArchiver *archiver = [[[NSKeyedArchiver alloc] initForWritingWithMutableData:data] autorelease];
// 开始存档对象,存档的数据都会存储到NSMutableData中
[archiver encodeObject:person1 forKey:@"person1"];
[archiver encodeObject:person2 forKey:@"person2"];
// 存档完毕(⼀一定要调⽤用这个⽅方法)
[archiver finishEncoding];
// 将存档的数据写⼊入⽂文件
[data writeToFile:path atomically:YES];
NSData-从同⼀一⽂文件中恢复2个Person对象
● 恢复(解码)
// 从⽂文件中读取数据
NSData *data = [NSData dataWithContentsOfFile:path];
// 根据数据,解析成⼀一个NSKeyedUnarchiver对象
NSKeyedUnarchiver *unarchiver = [[NSKeyedUnarchiver alloc] initForReadingWithData:data];
Person *person1 = [unarchiver decodeObjectForKey:@"person1"];
Person *person2 = [unarchiver decodeObjectForKey:@"person2"]; // 恢复完毕
[unarchiver finishDecoding];
利用归档实现深复制

/*什么叫归档 归档就是把数据保存到一个文件中*/
1.使用NSKeyedArchiver可以将NSArray NSDictiony NSString等对象归档到一个文件
2.只有实现了NSCoding协议的对象才可使用NSKeyedArchiver进行归档
3.将模型对象保存到一个文件时,对象要遵守NSCoding协议,并实现NSKeyedArchiver的encodeWithCoder方法,
4.从归档文件里读取对象时要实现NSCoding的initWithCoder方法
5.ios中,控制器,控件都继承NSCoding,storyboard/xib都是使用NSKeyedArchiver进行归档的
ViewController.m
//
// ViewController.m
// B03.NSCoding
//
// Created by huan on 16/1/22.
// Copyright © 2016年 huanxi. All rights reserved.
//
#import "ViewController.h"
#import "Contact.h"
@interface ViewController ()
/**
* NSKeyedArchiver 保存数据
* NSKeyedUnarchiver 读取数据
*/
@property (nonatomic, copy) NSString *plistPath;
-(IBAction)saveData;
-(IBAction)readData;
@end
@implementation ViewController
-(NSString *)plistPath{
if (!_plistPath) {
NSString *doc = [NSSearchPathForDirectoriesInDomains(NSDocumentDirectory, NSUserDomainMask, YES) lastObject];
_plistPath = [doc stringByAppendingPathComponent:@"data.plist"];
}
return _plistPath;
}
//-(id)initWithCoder:(NSCoder *)aDecoder{
// if (self = [super init]) {
//
// }
// return self;
//}
- (void)viewDidLoad {
[super viewDidLoad];
//保存字典
[self testDict];
//读字典
NSDictionary *dict = [NSKeyedUnarchiver unarchiveObjectWithFile:self.plistPath];
NSLog(@"%@", dict);
}
-(IBAction)saveData{
//使用 “归档” 方法保存数据
// NSArray *data = @[@"abc", @23];
// NSDictionary *data = @{@"name":@"zhangs", @"height":@90};
//
// //直接把一个对象保存到沙盒里
// [NSKeyedArchiver archiveRootObject:data toFile:self.plistPath];
// NSLog(@"%@", NSHomeDirectory());
Contact *contact = [[Contact alloc] init];
contact.name = @"张三";
contact.age = 27;
contact.tel = @"13512312345";
[NSKeyedArchiver archiveRootObject:contact toFile:self.plistPath];
NSLog(@"%@", NSHomeDirectory());
}
-(IBAction)readData{
//读数据
Contact *contact = [NSKeyedUnarchiver unarchiveObjectWithFile:self.plistPath];
NSLog(@"%@ %d %@",contact.name, contact.age, contact.tel);
}
/**
* 测试 系统的NSDictionary NSArray的归档
* 只有 对象 遵守了NSCoding协议才可以使用NSKeyedArchiver进行数据存储
*/
-(void)testDict{
//使用 “归档” 方法保存数据
NSDictionary *data = @{@"name":@"zhangs", @"height":@90};
//直接把一个对象保存到沙盒里
[NSKeyedArchiver archiveRootObject:data toFile:self.plistPath];
NSLog(@"%@", NSHomeDirectory());
}
@end
Contact.h
#import <Foundation/Foundation.h>
#import "Person.h"
@interface Contact : Person
@property (nonatomic, copy) NSString *tel;//当有属性是必须实现NSCondig的两种方法。
@end
Contact.m
#import "Contact.h"
@implementation Contact
-(void)encodeWithCoder:(NSCoder *)aCoder{
[super encodeWithCoder:aCoder];
//添加自己属性的存储
[aCoder encodeObject:self.tel forKey:@"tel"];
}
-(id)initWithCoder:(NSCoder *)aDecoder{
if (self = [super initWithCoder:aDecoder]) {
//子类实现initWithCoder方法时,self 不要写 self = [super init];
self.tel = [aDecoder decodeObjectForKey:@"tel"];
}
return self;
}
@end
Person.h
#import <Foundation/Foundation.h>
@interface Person : NSObject<NSCoding>
@property (nonatomic, copy) NSString *name;
@property (nonatomic, assign) int age;
@end
Person.m
#import "Person.h"
@implementation Person
-(void)encodeWithCoder:(NSCoder *)aCoder{
//指定 每个属性 怎么存储
[aCoder encodeObject:self.name forKey:@"name"];
[aCoder encodeInt:self.age forKey:@"age"];
}
-(id)initWithCoder:(NSCoder *)aDecoder{
//读取 数据 设置每个属性
if (self = [super init]) {
self.name = [aDecoder decodeObjectForKey:@"name"];
self.age = [aDecoder decodeIntForKey:@"age"];
}
return self;
}
@end