今天在idea集成开发环境下 使用maven搭建了ssm项目,遇到了3个问题
首先我们先复习一下知识点:
第一步:在web.xml中配置spring监听器
  <!-- spring监听器  加载spring容器 -->
  <listener>
    <listener-class>org.springframework.web.context.ContextLoaderListener</listener-class>
  </listener>
  <context-param>
    <param-name>contextConfigLocation</param-name>
    <param-value>classpath:spring/applicationContext.xml</param-value>
  </context-param>
然后创建对应的spring核心配置文件applicationContext.xml
<?xml version="1.0" encoding="UTF-8"?>
<beans xmlns="http://www.springframework.org/schema/beans"
       xmlns:xsi="http://www.w3.org/2001/XMLSchema-instance"
       xmlns:context="http://www.springframework.org/schema/context" xmlns:tx="http://www.springframework.org/schema/tx"
       xsi:schemaLocation="http://www.springframework.org/schema/beans
               http://www.springframework.org/schema/beans/spring-beans-4.0.xsd
               http://www.springframework.org/schema/context
               http://www.springframework.org/schema/context/spring-context-4.0.xsd
               http://www.springframework.org/schema/tx
               http://www.springframework.org/schema/tx/spring-tx-4.0.xsd">
    <!-- 引入外部文件 -->
    <context:property-placeholder location="classpath:db.properties"/>
    <!-- 配置数据源 dbcp -->
    <bean id="dataSource" class="org.apache.commons.dbcp.BasicDataSource"
          destroy-method="close">
        <property name="driverClassName" value="${jdbc.driver}"/>
        <property name="url" value="${jdbc.url}"/>
        <property name="username" value="${jdbc.username}"/>
        <property name="password" value="${jdbc.password}"/>
        <property name="maxActive" value="10"/>
        <property name="maxIdle" value="5"/>
    </bean>


    <!-- 配置sqlsessionfacory -->
    <bean id="sqlSessionFactory" class="org.mybatis.spring.SqlSessionFactoryBean">
        <property name="configLocation" value="classpath:mybatis/sqlMapConfig.xml"></property>
        <property name="dataSource" ref="dataSource"></property>
    </bean>


    <!-- 配置mapper 使用mapper扫描 自动扫描与装配进spring容器中  id=类名首字母小写-->
    <!--只能配置在这里  不能配置在springmvc.xml中-->
    <bean class="org.mybatis.spring.mapper.MapperScannerConfigurer">
        <property name="basePackage" value="org.dao"></property>
        <!-- name属性中只能写成sqlSessionFactoryBeanName -->
        <property name="sqlSessionFactoryBeanName" value="sqlSessionFactory"></property>
    </bean>

    <!-- 配置事务管理器 -->
    <bean id="transactionManager"
          class="org.springframework.jdbc.datasource.DataSourceTransactionManager">
        <property name="dataSource" ref="dataSource"></property>
    </bean>
    <!-- 开启注解驱动扫描 -->
    <tx:annotation-driven transaction-manager="transactionManager"/>

</beans>
第二步:在web.xml中配置springmvc前端控制器
  <!-- springmvc前端控制器(servlet) -->
  <servlet>
    <servlet-name>springmvc</servlet-name>
    <servlet-class>org.springframework.web.servlet.DispatcherServlet</servlet-class>
    <init-param>
      <param-name>contextConfigLocation</param-name>
      <param-value>classpath:spring/springmvc.xml</param-value>
    </init-param>
  </servlet>
  <servlet-mapping>
    <servlet-name>springmvc</servlet-name>
    <!-- 拦截所有的请求 / -->
    <url-pattern>*.action</url-pattern>
  </servlet-mapping>
然后创建对应的springmvc配置文件
<?xml version="1.0" encoding="UTF-8"?>
<beans xmlns="http://www.springframework.org/schema/beans"
       xmlns:mvc="http://www.springframework.org/schema/mvc" xmlns:xsi="http://www.w3.org/2001/XMLSchema-instance"
       xmlns:context="http://www.springframework.org/schema/context"
       xsi:schemaLocation="http://www.springframework.org/schema/beans
               http://www.springframework.org/schema/beans/spring-beans-4.0.xsd
               http://www.springframework.org/schema/context
               http://www.springframework.org/schema/context/spring-context-4.0.xsd
               http://www.springframework.org/schema/mvc
               http://www.springframework.org/schema/mvc/spring-mvc.xsd">


    <!-- 对于注解开发的handler可以单个进行配置 实际开发中建议使用组件扫描的方式-->
    <!--
        组件扫描 把符合条件的类加入到容器中 可以扫描@controller @service.... spring注解开发中使用过
        指定需要扫描的包 org.
        代表扫描org下的所有包 不要写成org ,或者org.* , org.ssm.controller最准确 或者org.ssm.
         文件夹下如果有子文件 写到子文件上个文件夹+. 如果文件夹下直接是对应的java文件  那么直接org.ssm.controller这种形式
    -->

    <!--这种方式 org.* 在eclipse中没有报错 在idea中会报错-->
    <!--<context:component-scan base-package="org.*"/>-->
    <!--这个扫描写在applicationContext.xml中 运行时 找不到路径-->
    <context:component-scan base-package="org.controller,org.service"></context:component-scan>

    <!-- 使用mvc注解驱动代替 注解适配器和注解映射器 -->
    <mvc:annotation-driven></mvc:annotation-driven>
    <!-- 视图解析器 解析jsp页面  默认使用jstl表签  classpath下得有jstl包-->
    <bean
            class="org.springframework.web.servlet.view.InternalResourceViewResolver">
        <!-- 前缀  请求时 可以省略前缀路径 -->
        <property name="prefix" value="/WEB-INF/jsp/"></property>
        <!-- 后缀:设置转发页面时  可以省略.jsp -->
        <property name="suffix" value=".jsp"></property>
    </bean>

</beans>
对springmvc中注解器和映射器不熟悉的可以看一下这篇文章(SpringMVC中注解和非注解方式下的映射器和适配器总结) http://blog.csdn.net/eson_15/article/details/51699103
---------------------------------
首先第一个问题就是上边蓝色背景出现的问题 相同的项目我在eclipse上配置的时候 可以写为org.*的方式 而在idea中就不能这样写 否则报以下错误:


也不知道是为什么 所以我们需要记得:在idea中不能这样写
-----------------------------
第二个需要注意的问题:
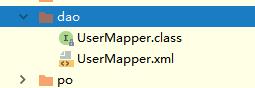
先看我的目录结构:
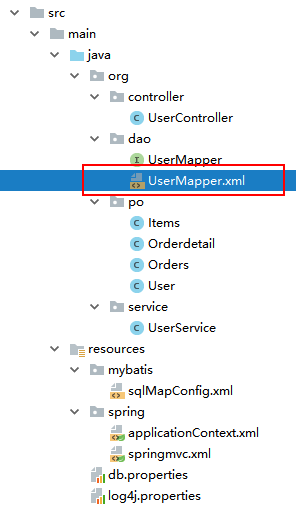
同样的代码在eclipse上可以正常运行 但是idea不行 真尼玛坑爹啊
启动项目 之后 前台传递给后台id 然后按照传统的方式进行查询对象 我debug了一下
可以保证:id传递给了controller controller调用service service中的mapper接口对象 也注入成功了 就是通过mapper接口对象调用方法查询的时候 报错了
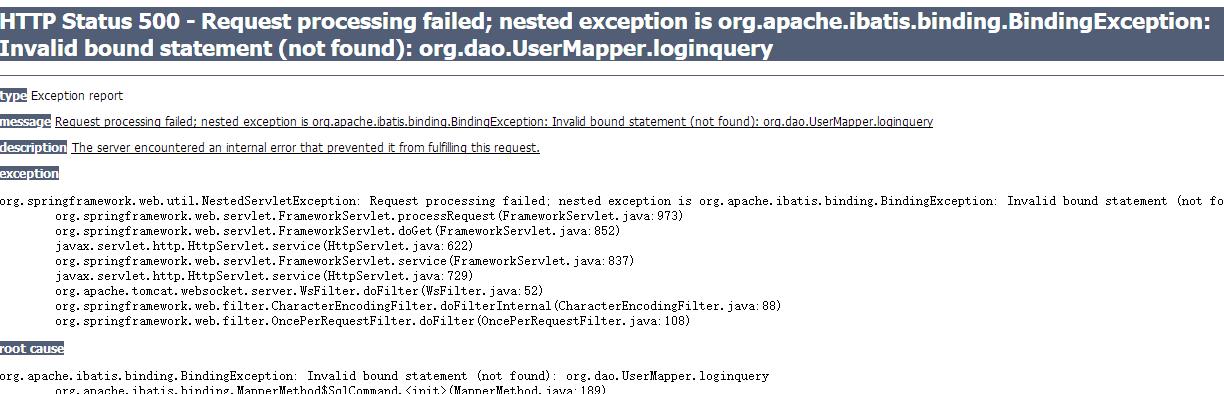
大致意思:无效的绑定声明(未找到):org.dao.UserMapper.loginquery
然后找了好久。。。最后终于找到了问题所在 大家请看我服务器启动之后的输出文件
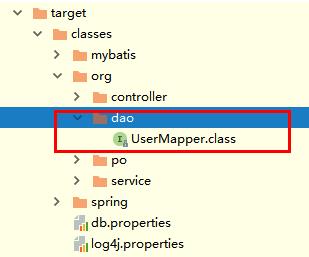
可以看到xml文件没有生成 我在网上找到了答案 参考文章:http://blog.csdn.net/ppppfly/article/details/46847299
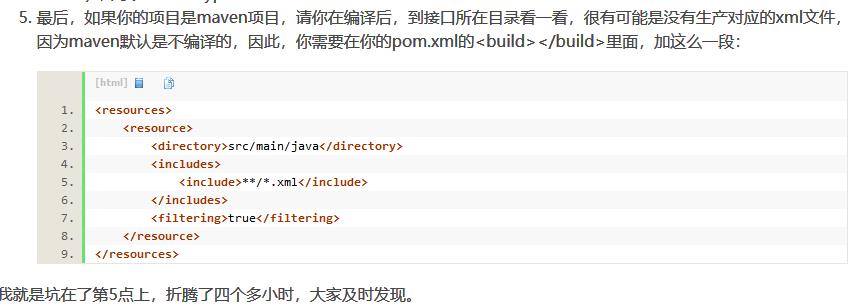
于是 我按照上边说的那样 就加上了如下代码:

<build>
    <resources>
      <resource>
        <directory>src/main/java</directory>
        <includes>
          <include>**/*.xml</include>
        </includes>
        <filtering>true</filtering>
      </resource>
    </resources>
  </build>
然后重新启动 果然生成了xml文件
运行项目 发现这个问题正确解决
-------------------------------------------------------