1、页面跳转方式
概念:超链接标签的作用是从一个页面跳转到另一个页面,a是anchor的缩写,意为:锚。在本网站内的页面称为内部链接
外部链接属性:
href:必须要写的属性,用于指定链接目标的地址
target:用于指定链接页面的打开方式,_self是默认值,_blank为在新窗口中打开
在当前窗口打开:
<!DOCTYPE html>
<html lang="en">
<head>
<meta charset="utf-8" />
<title></title>
</head>
<body>
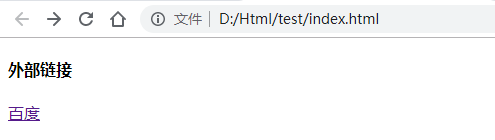
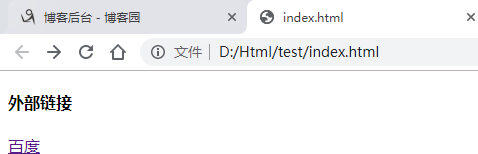
<h4>外部链接</h4>
<a href="https://www.baidu.com/" target="_self">百度</a>
</body>
</html>
通过外部链接,链接到百度首页:
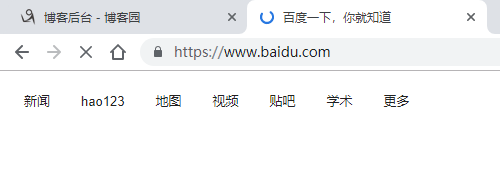
点击链接之后,百度首页在当前窗口打开:
在新窗口打开:
<!DOCTYPE html>
<html lang="en">
    <head>
        <meta charset="utf-8" />
        <title></title>
    </head>
    <body>
        <h4>外部链接</h4>
        <a href="https://www.baidu.com/" target="_blank">百度</a>
    </body>
</html>
点击超链接之后,页面在新的窗口打开:

默认是在当前窗口打开。
(2)提交表单实现页面跳转
定义收集用户信息的表单:
<!DOCTYPE html>
<html>
    <head>
        <meta charset="utf-8" />
        <title></title>
    </head>
    <body>
        <form action="login.html">
            <input type="text" name="username" />
            <input type="submit" />
        </form>
    </body>
</html>
定义接收数据的页面:
<!DOCTYPE html>
<html>
    <head>
        <meta charset="UTF-8">
        <title></title>
    </head>
    <body>
        <h5>你好</h5>
    </body>
</html>
点击提交后,跳转到第二个页面:

进入第二个页面:

(3)js方式
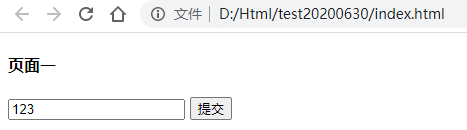
页面一:
<!DOCTYPE html>
<html>
    <head>
        <meta charset="utf-8" />
        <title></title>
      <script>
           function test(){
               window.location.href='test.html';
          }
      </script>
    </head>
    <body>
        <h4>页面一</h4>
    <form action="test.html">
        <input type="text" name="username" />
        <input type="submit" value="提交" />
    </form>
    </body>
</html>
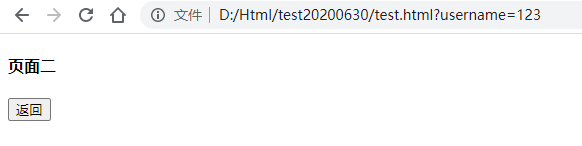
页面二:
<!DOCTYPE html>
<html>
    <head>
        <meta charset="UTF-8">
        <title></title>
       <script>
           function test(){
               javascript:history.go(-1);
          }
      </script>
    </head>
    <body>
        <h4>页面二</h4>
        <button onclick="test()">返回</button>
    </body>
</html>
点击提交:
进入页面二后,点击返回,可以重新回到页面一:
2、ajax请求数据
(1)GET方式:
书写页面,向服务器发起ajax请求:
<!DOCTYPE html>
<html lang="en">
<head>
    <meta charset="UTF-8">
    <meta name="viewport" content="width=device-width, initial-scale=1.0">
    <title>Document</title>
</head>
<body>
     账号:<input type="text" name="user" id="user">
    <br>
    密码:<input type="password" name="password" id="password">
    <br>
    <button id="btn">登录</button>
    <span id="sp1"></span>
    <script>
        var user=document.getElementById("user")
        var password=document.getElementById("password")
        var btn=document.getElementById("btn")
        var sp1=document.getElementById("sp1")
        btn.onclick=function(){
            var xhr=new XMLHttpRequest();
            xhr.open("get","phpinfo.php?user="+user.value+"&password="+password.value,true)
            xhr.send();
            xhr.onreadystatechange=function(){
                if(xhr.readyState==4&&xhr.status==200)
                console.log(xhr.responseText)
                sp1.innerHTML=xhr.responseText;
            }
        }
    </script>
</body>
</html>
书写php,模拟服务器,向html页面返回数据。
<?php
header("Content-type:text/html;charset=utf-8");//字符编码设置
$user=$_REQUEST["user"];
$password=$_REQUEST["password"];
echo "{$user},欢迎你,你的密码是{$password}"
?>
(2)post方式
<!DOCTYPE html>
<html lang="en">
<head>
    <meta charset="UTF-8">
    <meta name="viewport" content="width=device-width, initial-scale=1.0">
    <title>Document</title>
</head>
<body>
     账号:<input type="text" name="user" id="user">
    <br>
    密码:<input type="password" name="password" id="password">
    <br>
    <button id="btn">登录</button>
    <span id="sp1"></span>
    <script>
        var user=document.getElementById("user")
        var password=document.getElementById("password")
        var btn=document.getElementById("btn")
        var sp1=document.getElementById("sp1")
        btn.onclick=function(){
            var xhr=new XMLHttpRequest();
            xhr.open('POST','phpinfo.php',true)
             xhr.setRequestHeader("Content-type", "application/x-www-form-urlencoded");
            xhr.send('user='+user.value+'&password='+password.value);
            xhr.onreadystatechange=function(){
                if(xhr.readyState==4&&xhr.status==200)
                console.log(xhr.responseText)
                sp1.innerHTML=xhr.responseText;
            }
        }
    </script>
</body>
</html>
(3)get方式与post方式的比较
不同点:
(1)get请求的参数在URL中,post请求在请求体中。用户一般看不到请求体中的内容,post提交相对安全
(2)请求缓存:GET 会被缓存,而post不会
post不管刷新页面多少次,都不会304状态。而get在未改变代码的情况下,第一次刷新为状态码为200,第二次刷新状态码变为304。
(3)get请求长度最多1024kb,post对请求数据没有限制(浏览器和服务器对其有一定的限制)
(4)ajax的get方式的请求不需要设置请求头,而post方式需要
相同点:
GET和POST本质上都是TCP连接,但是由于HTTP的规定和浏览器/服务器的限制,导致他们在应用过程中表现出不同。
3、HTTP
(1)http响应和http请求通称为http协议

点击链接、提交表单都会触发http请求,这种方式会导致页面重载,速度较慢
(2)响应行常见状态码
200 :请求成功。
302 :请求重定向。
当访问网址A时,由于网址A服务器端的拦截器或者其他后端代码处理的原因,会被重定向到网址B。
304 :请求资源没有改变,访问本地缓存。
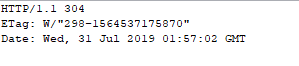
没有被修改,直接用缓存资源,可以减小开销
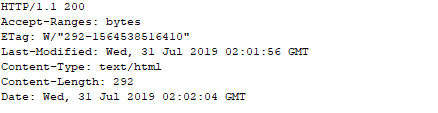
修改后重新加载
403:表明请求访问的资源被拒绝了
404 :请求资源不存在。通常是用户路径编写错误,也可能是服务器资源已删除。
500 :服务器内部错误。通常程序抛异常
4、ajax获取数据库数据
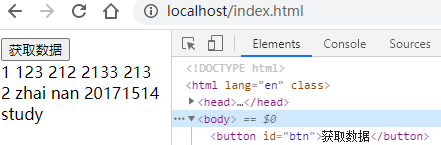
(1)书写页面,通过AJAX向服务端发起POST请求,获取服务端的数据,将其转换为js对象后进行遍历渲染在页面上:
<!DOCTYPE html>
<html lang="en">
<head>
    <meta charset="UTF-8">
    <meta name="viewport" content="width=device-width, initial-scale=1.0">
    <title>Document</title>

</head>
<body>
    <button id="btn">获取数据</button>
    <div id="sp1"></div>
    <script>
        var btn=document.getElementById("btn")
        var sp1=document.getElementById("sp1")
        btn.onclick=function(){
            var xhr=new XMLHttpRequest();
            xhr.open("POST",'phpinfo.php',true)
            xhr.setRequestHeader("Content-type", "application/x-www-form-urlencoded");
            xhr.send();
            xhr.onreadystatechange=function(){
                if(xhr.readyState==4&&xhr.status==200)
                var data=JSON.parse(xhr.responseText);
                var html="";
                for(var a in data) {
                    html+=`
                    <tr>
                        <td>${data[a].Id}</td>
                        <td>${data[a].sname}</td>
                        <td>${data[a].sex}</td>
                        <td>${data[a].snum}</td>
                        <td>${data[a].hobby}</td>
                    </tr>`
                  }
                 sp1.innerHTML=html;
            }

        }
    </script>

</body>
</html>
(2)PHP:创建并获取数据库连接,访问数据库,从数据库获取数据:
<?php
header("Content-type:text/html;charset=utf-8");//字符编码设置
$servername = "localhost";
$username = "root";
$password = "root";
$dbname = "student";

$con =mysqli_connect($servername, $username, $password, $dbname);

$sql = "SELECT * FROM t_stu";
$result = mysqli_query($con,$sql);
if (!$result) {
    printf("Error: %s
", mysqli_error($con));
    exit();
}

$jarr = array();
while ($rows=mysqli_fetch_array($result,MYSQL_ASSOC)){
    $count=count($rows);//不能在循环语句中,由于每次删除 row数组长度都减小
    for($i=0;$i<$count;$i++){
        unset($rows[$i]);//删除冗余数据
    }
    array_push($jarr,$rows);
}
echo $str=json_encode($jarr);//将数组进行json编码
?>
(3)创建数据库,存储数据:

(4)测试
5、图灵机器人
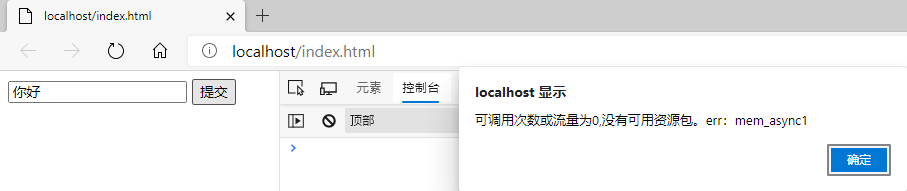
(1)向接口发起ajax请求,获取服务端的数据:
调用接口的时候,需要输入相关的请求参数,通过查看API获取返回的数据中的信息
其中,data里面是请求参数
<!DOCTYPE html PUBLIC "-//W3C//DTD XHTML 1.0 Transitional//EN" "http://www.w3.org/TR/xhtml1/DTD/xhtml1-transitional.dtd">
<html xmlns="http://www.w3.org/1999/xhtml">
<head>
<meta http-equiv="Content-Type" content="text/html; charset=UTF-8" />
<script src="http://libs.baidu.com/jquery/1.9.1/jquery.min.js"></script>
<title>   </title>

<script>
    function formatterDateTime() {
                    var date=new Date()
                    var month=date.getMonth() + 1
                  var datetime = date.getFullYear()
                                + ""// "年"
                                + (month >= 10 ? month : "0"+ month)
                                + ""// "月"
                                + (date.getDate() < 10 ? "0" + date.getDate() : date
                                        .getDate())
                                + ""
                                + (date.getHours() < 10 ? "0" + date.getHours() : date
                                        .getHours())
                                + ""
                                + (date.getMinutes() < 10 ? "0" + date.getMinutes() : date
                                        .getMinutes())
                                + ""
                                + (date.getSeconds() < 10 ? "0" + date.getSeconds() : date
                                        .getSeconds());
                 return datetime;
    }

    var me=document.getElementById("me")
    function dianji() {
    $.ajax({
        type: 'post',
        url: 'http://route.showapi.com/26-4',
        dataType: 'json',
        data: {
            "showapi_timestamp": formatterDateTime(), //注意要使用当前时间。服务器只处理时间误差10分钟以内的请求
            "showapi_appid": '281861', //这里需要改成自己的appid
            "showapi_sign": 'd8499e9ea1fd48469074de312a3a2ea1',  //这里需要改成自己的密钥
            "info":me
        },
        jsonp: 'jsonpcallback',
        error: function(XmlHttpRequest, textStatus, errorThrown) {
            alert("操作失败!");
        },
        success: function(result) {
           alert(result.showapi_res_error)
        }
    });
}
</script>
</head>

<body>
     <input type="text" id="me" />
     <button onclick="dianji()">提交</button>
</body>

</html>
(2)测试
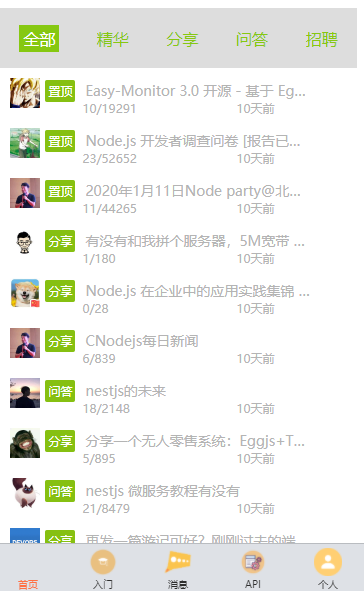
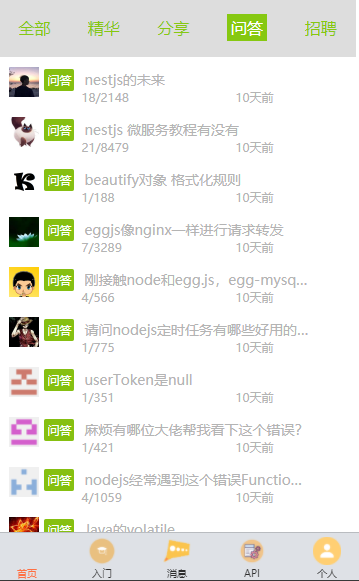
6、小程序的渲染
(1)请求数据并书写相应的函数实现页面的切换:
Page({
  data: {
    tabList:["全部","精华","分享","问答","招聘"],
    currentIndex:0,
    lists:[]//用来存数据
  },
  tabChange(e){
    this.setData({
        currentIndex:e.currentTarget.dataset.num
    })
    console.log(this.data.currentIndex)
    if(this.data.currentIndex==0){
      this.getLists("all");
    }else if(this.data.currentIndex==1){
      this.getLists("good");
    }else if(this.data.currentIndex==2){
      this.getLists("share");
    }else if(this.data.currentIndex==3){
      this.getLists("ask");
    }else{
      this.getLists("job");
    }

  },
  //获取后台数据
  getLists(e){
    var that = this
    console.log(e)
    wx.showLoading({
      title: '正在加载中',
    })
    wx.request({
      url:"https://cnodejs.org/api/v1/topics",
      data:{
        tab:e
      },
      method:"GET",
      success:function(res){
        console.log(that)
        that.setData({
          lists:res.data.data
        })
        // ,function(){
          wx.hideLoading({})
        // }
        console.log(that.data.lists)
      },
      fail:function(error){
        console.log(error)
      }
    })
  },
  //事件处理函数
  bindViewTap: function() {
    wx.navigateTo({
      url: '../logs/logs'
    })
  },
  onLoad: function () {
    this.getLists("all");
  },
  getUserInfo: function(e) {
    console.log(e)
    app.globalData.userInfo = e.detail.userInfo
    this.setData({
      userInfo: e.detail.userInfo,
      hasUserInfo: true
    })
  }
})
(2)样式:布局页面
/**index.wxss**/
.userinfo {
  display: flex;
  flex-direction: column;
  align-items: center;
}

.userinfo-avatar {
   128rpx;
  height: 128rpx;
  margin: 20rpx;
  border-radius: 50%;
}

.userinfo-nickname {
  color: #aaa;
}

.usermotto {
  margin-top: 200px;
}

.tab{
  font-size: 32rpx ;
  color:#86C811 ;
}
.current{
  color:#fff;
  background-color:#86C811;
  padding:6rpx 8rpx;
}
.main{
  95%;
  background-color:■#ffffff;
  margin:40rpx auto;
  border-radius:6rpx 6rpx 0 0;
  font-size:28rpx;
}
.header{
  100%;
  height:120rpx;
  background-color:#DDDDDD;
  display:flex;
  align-items:center;
  justify-content:space-around;
  font-size:32rpx;
}
.content{
  border-radius: 0 0 6rpx 6rpx;
  background-color: #ffffff;
}

.topic_list{
   100%;
  height:100rpx;
  border-radius: 1px solid #DDDDDD;
  color: #888;
  padding: 20rpx;
  box-sizing: border-box;
  position: relative;
}
.topic_list image{
   60rpx;
  height: 60rpx;
  vertical-align: middle;

}
.put-top{
  font-size: 24rpx;
  color: #fff;
  background-color: #86c011;
  padding: 6rpx;
  border-radius: 4rpx;
  margin: 0 20rpx 0 10rpx;

}

.titles{
  font-size: 28rpx;
  display: inline-block;
   450rpx;
  height: 50rpx;
  vertical-align: middle;
  overflow: hidden;
  white-space: nowrap;
  text-overflow: ellipsis;

}
.topic_list_bottom{
  font-size: 24rpx;
  color: #b4b4b4;
}
.reply_count{
  position: absolute;
  left: 165rpx;
  bottom: 5rpx;
}
.last_active_time{
  position: absolute;
  right: 165rpx;
  bottom: 5rpx;
}
(3)获取数据渲染页面
<view class="main">
  <view class="header">
    <block wx:for="{{tabList}}" >
        <view class="tab {{currentIndex==index?'current':''}}" bindtap="tabChange" data-num="{{index}}">
{{item}}</view>
      </block>
  </view>
  <view class="content">
    <navigator class="topic_list" wx:for="{{lists}}" wx:key="index">
      <view class="topic_list_bottom">
        <image src="{{item.author.avatar_url}}"></image>
        <text class="put-top" wx:if="{{item.top}}">置顶</text>
        <text class="put-top" wx:else>{{
            item.tab=="share"?"分享":item.tab=="good"?"精华":item.tab=="ask"?"问答":"招聘"}}</text>
        <text class="titles">{{item.title}}</text>
      </view>
      <view class="topic_list_bottom">
        <view class="reply_count">
          <text>{{item.reply_count}}</text>
          <text>/</text>
          <text>{{item.visit_count}}</text>
        </view>
        <text class="last_active_time">10天前</text>
      </view>

    </navigator>
  </view>
</view>
(4)测试: