一:Fastdfs简介
1. 什么是FastDFS
FastDFS 是用 c 语言编写的一款开源的分布式文件系统。FastDFS 为互联网量身定制, 充分考虑了冗余备份、负载均衡、线性扩容等机制,并注重高可用、高性能等指标,使用 FastDFS 很容易搭建一套高性能的文件服务器集群提供文件上传、下载等服务。
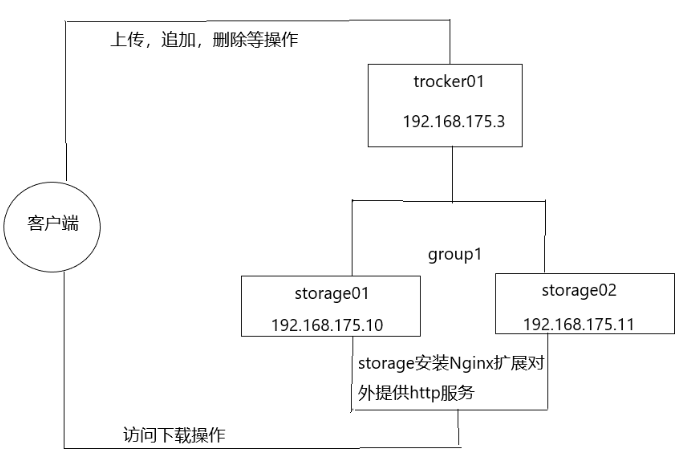
FastDFS 架构包括 Tracker server 和 Storage server。客户端请求 Tracker server 进行文 件上传、下载,通过 Tracker server 调度最终由 Storage server 完成文件上传和下载。
Tracker server 作用是负载均衡和调度,通过 Tracker server 在文件上传时可以根据一些 策略找到 Storage server 提供文件上传服务。可以将 tracker 称为追踪服务器或调度服务 器。
Storage server 作用是文件存储,客户端上传的文件最终存储在 Storage 服务器上, Storageserver 没有实现自己的文件系统而是利用操作系统 的文件系统来管理文件。可以将 storage 称为存储服务器。
服务端两个角色:
Tracker:管理集群,tracker 也可以实现集群。每个 tracker 节点地位平等。收集 Storage 集群的状态。
Storage:实际保存文件 Storage 分为多个组,每个组之间保存的文件是不同的。每 个组内部可以有多个成员,组成员内部保存的内容是一样的,组成员的地位是一致的,没有主从的概念。
2.文件上传流程
客户端上传文件后存储服务器将文件 ID 返回给客户端,此文件 ID 用于以后访问该文件的索引信息。文件索引信息包括:组名,虚拟磁盘路径,数据两级目录,文件名
组名:文件上传后所在的 storage 组名称,在文件上传成功后有 storage 服务器返回, 需要客户端自行保存。
虚拟磁盘路径:storage 配置的虚拟路径,与磁盘选项 store_path*对应。如果配置了 store_path0 则是 M00,如果配置了 store_path1 则是 M01,以此类推。
数据两级目录:storage 服务器在每个虚拟磁盘路径下创建的两级目录,用于存储数据文件
文件名:与文件上传时不同。是由存储服务器根据特定信息生成,文件名包含:源存储 服务器 IP 地址、文件创建时间戳、文件大小、随机数和文件拓展名等信息
3.简易FastDFS架构

二:FastDFS安装
1.安装前准备
系统软件说明:
| 名称 | 说明 |
| CentOS | 7.x(安装系统) |
| libfastcommon | FastDFS分离出的一些公用函数包 |
| FastDFS | FastDFS本体 |
| fastdfs-nginx-module | FastDFS和nginx的关联模块,解决组内同步延迟问题 |
| nginx | nginx 1.7.8(CentOS 7 下YUM可以安装的最新版本) |
编译环境说明
| 说明 | 位置 |
| 所有安装包 | /myself_settings |
| 数据存储位置 |
/opt/fastdfs_storage_data /opt/fastdfs_storage_info |
2.部署开始
Tracker01: 192.168.175.3
storage01:192.168.175.10
storage02:192.168.175.11
在所有主机上执行:
命令:iptables -F
命令:systemctl stop firewalld
命令:setenforce 0
Tracker:
命令:mkdir -p /opt/fastdfs_tracker #配置tracker所需的base_path
命令:mkdir /myself_settings
storage:
命令:mkdir -p /opt/fastdfs_storage_info
命令:mkdir -p /opt/fastdfs_storage_data
命令:mkdir /myself_settings
三:FastDFS安装环境(所有主机)
FastDFS是C语言开发,建议在linux上运行,本教程使用Centos6.4作为安装环境。安装FastDFS需要先将官网下载的源码进行编译,编译依赖gcc环境,如果没有gcc环境,需要安装gcc
命令:yum -y install gcc gcc-c++ perl
1.安装libfastcommon
libfastcommon是FastDFS官方提供的,libfastcommon包含了FastDFS运行所需要的一些基础库。将libfastcommonV1.0.7.tar.gz拷贝至/myself_settings/下
命令:cd /myself_settings/
命令:tar -zxvf libfastcommonV1.0.7.tar.gz
命令:cd libfastcommon-1.0.7
命令:./make.sh
命令:./make.sh install

注意,上述安装的路径在/usr/lib64/,但是FastDFS主程序设置的lib目录是/usr/local/lib,所以需要创建软连接如下:
命令:ln -s /usr/lib64/libfastcommon.so /usr/local/lib/libfastcommon.so
命令:ln -s /usr/lib64/libfastcommon.so /usr/lib/libfastcommon.so
命令:ln -s /usr/lib64/libfdfsclient.so /usr/local/lib/libfdfsclient.so
命令:ln -s /usr/lib64/libfdfsclient.so /usr/lib/libfdfsclient.so
2.安装fastdfs-5.05.tar.gz
前边几步如果安装的都正确的话,这一步就比较简单了,解压缩fastdfs-5.05.tar.gz,依旧是在/myself_settings目录下,然后依次执行 ./make.sh 和 ./make.sh install 这两个命令,过程中没有报错,并且打开 /etc/fdfs 这个目录发现有配置文件存在,就说明安装成功了
命令:cd /myself_settings/
命令:tar -zxvf FastDFS_v5.05.tar.gz
命令:cd FastDFS
命令:./make.sh
命令:./make.sh install
命令:ls /etc/fdfs

四:配置tracker
前边的这六步无论是配置tracker还是配置storage都是必须的,而tracker和storage的区别主要是在安装完fastdfs之后的配置过程
1.进入/etc/fdfs文件夹,执行命令:
命令:cd /etc/fdfs
命令:cp tracker.conf.sample tracker.conf
2.编辑tracker.conf,执行命令:
命令:vim tracker.conf
将以下几个选项进行编辑:
a. disabled=false #启用配置文件
b. port=22122 #设置tracker的端口号,一般采用22122这个默认端口
c. base_path=/opt/fastdfs_tracker #设置tracker的数据文件和日志目录(预先创建)
d. http.server_port=8080 #设置http端口号 注意,这个配置在fastdfs5.05这个版本中已经不用配置,不用管这个!

3.启动tracker,执行如下命令:
命令:/usr/bin/fdfs_trackerd /etc/fdfs/tracker.conf restart
4.启动完毕后,可以通过以下两个方法查看tracker是否启动成功:
命令:ss -unltp|grep fdfs #查看22122端口监听情况
通过以下命令查看tracker的启动日志,看是否有错误:
命令:tail -100f /opt/fastdfs_tracker/logs/trackerd.log

5.如果启动没有问题,可以通过以下步骤,将tracker的启动添加到服务器的开机启动中:
a. 打开文件 /etc/rc.d/rc.local
命令:vim /etc/rc.d/rc.local
b. 将如下命令添加到该文件中 /usr/bin/fdfs_trackerd /etc/fdfs/tracker.conf restart

五:配置storage安装
其实配置storage和配置tracker类似,只不过配置文件和配置内容不一样。我们以配置192.168.175.10配置storage为例
1. 进入/etc/fdfs文件夹,执行命令:
命令:cd /etc/fdfs
命令:cp storage.conf.sample storage.conf
2. 编辑storage.conf,执行命令:
命令:vim storage.conf
将以下几个选项进行编辑:
a. disabled=false #启用配置文件
b. group_name=group1 #组名,根据实际情况修改
c. port=23000 #设置storage的端口号,默认是23000,同一个组的storage端口号必须一致
d. base_path=/opt/fastdfs_storage_info #设置storage的日志目录(需预先创建)
e. store_path_count=1 #存储路径个数,需要和store_path个数匹配
f. store_path0=/opt/fastdfs_storage_data #存储路径
g. tracker_server=192.168.175.3:22122 #tracker服务器的IP地址和端口号
h. http.server_port=8080 #设置http端口号 注意,这个配置在fastdfs5.05这个版本中已经不用配置,不用管这个!
3.启动storage,执行如下命令:
命令:/usr/bin/fdfs_storaged /etc/fdfs/storage.conf restart

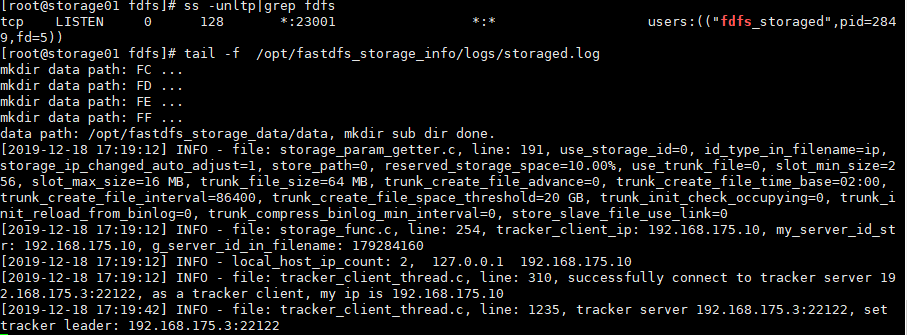
4. 启动完毕后,可以通过以下两个方法查看storage是否启动成功:
a. 使用命令查看23000端口监听情况
命令:ss -unltp|grep fdfs
b. 通过以下命令查看storage的启动日志,看是否有错误
命令:tail -f /opt/fastdfs_storage_info/logs/storaged.log

六:FastDFS和nginx整合
1.不管是在tracker中还是storage中安装nginx,前提都需要安装一些基础软件。有些服务器默认都会初始化这些软件,但是你在配置的时候可能还是最好自己利用命令确认一下
命令:yum -y install gcc gcc-c++ pcre pcre-devel zlib zlib-devel openssl openssl-devel
2.在storage中安装nginx(所有存储服务器主机storage)
在storage上安装的nginx主要为了提供http的访问服务,同时解决group中storage服务器的同步延迟问题
创建nginx默认的安装文件夹:
命令:mkdir /usr/local/nginx
提前将 nginx1.7.8.tar.gz 和 fastdfs-nginx-module_v1.16.tar.gz 解压缩,然后进入nginx1.7.8的文件夹目录,执行如下命令:
命令:tar -zvxf fastdfs-nginx-module_v1.16.tar.gz
命令:tar -zvxf nginx-1.7.8.tar.gz
命令:cd nginx-1.7.8
命令:./configure
--prefix=/usr/local/nginx
--add-module=/myself_settings/fastdfs-nginx-module/src
注意:我们在解压缩fastdfs-nginx-module_v1.16.tar.gz之后,需要进入fastdfs-nginx-module/src目 录,编辑config文件,找到包含CORE_INCS这个一行,将路径中local全部去掉,变为CORE_INCS="$CORE_INCS /usr/include/fastdfs /usr/include/fastcommon/"
命令:cd /myself_settings/fastdfs-nginx-module/src/
命令:vim config

将文件改过来之后,然后再次进入/myself_settings/nginx-1.7.8中,重新编译
命令:cd /myself_settings/nginx-1.7.8/
命令:./configure
--prefix=/usr/local/nginx
--add-module=/myself_settings/fastdfs-nginx-module/src
命令:make && make install
3.进入nginx配置文件中
命令:mkdir -p /opt/fastdfs_storage_data/data
命令:cd /usr/local/nginx/conf
命令:vim nginx.conf
listen 8080;
在server段中添加:
location ~/group[1-3]/M00{
root /opt/fastdfs_storage_data/data;
ngx_fastdfs_module;
}
注意,如果配置的storage是在group2组,则下面的location应该是 ~/group2/M00

4.执行命令 cd /myself_settings/FastDFS/conf,即进入fastdfs5.0.5的安装文件夹的conf目录下,将目录下面的http.conf和mime.types拷贝到/etc/fdfs/下,如果不执行这一步,后边在启动nginx时会报错。
命令:cd /myself_settings/FastDFS/conf
命令:cp http.conf /etc/fdfs/
命令:cp mime.types /etc/fdfs/

5.执行命令 cd /myself_settings/fastdfs-nginx-module/src,即进入 fastdfs-nginx-module_v1.16的安装文件夹的src目录下,将目录下面的mod_fastdfs.conf这个文件拷贝到 /etc/fdfs 目录下
命令:cd /myself_settings/fastdfs-nginx-module/src
命令:cp mod_fastdfs.conf /etc/fdfs/

6.打开 /etc/fdfs 这个目录,编辑 mod_fastdfs.conf 这个文件,如下:
注意以下配置是group1的第二个storage 192.168.175.11的配置,按照第一步确定的集群目标来配置的
命令:cd /etc/fdfs/
命令:vim mod_fastdfs.conf
a. base_path=/opt/fastdfs_storage_info #保存日志目录
b. tracker_server=192.168.175.3:22122 #tracker服务器的IP地址以及端口号
c. storage_server_port=23000 #storage服务器的端口号
d. group_name=group1 #当前服务器的group名
c. url_have_group_name= true #文件url中是否有group名
d. store_path_count=1 #存储路径个数,需要和store_path个数匹配
e. store_path0=/opt/fastdfs_storage_data #存储路径
f. http.need_find_content_type=true #从文件扩展名查找文件类型(nginx时为true)
注意:这个配置网上一般都会列出,但是在fastdfs5.05的版本中是没有的
h. group_count= 1 #设置组的个数
i. 在文件的末尾,按照第一步确定的集群目标,追加如下图的配置:
[group1]
group_name=group1
storage_server_port=23000
store_path_count=1
store_path0=/opt/fastdfs_storage_data

7.建立软连接
命令:ln -s /opt/fastdfs_storage_data/data /opt/fastdfs_storage_data/data/M00
8.执行命令启动nginx
命令:/usr/local/nginx/sbin/nginx
如果日志/usr/local/nginx/logs/error.log中没有报错,同时访问192.168.175.11:8080这个url能看到 nginx的欢迎页面
命令:tail /usr/local/nginx/logs/error.log
我做的是两台存储服务器192.168.175.10 192.168.175.11


七:在tracker中安装nginx
在tracker上安装的nginx主要为了提供http访问的反响代理、负载均衡以及缓存服务
注意:tracker中nginx安装时比storage中的nginx安装时多安装一个nginx的缓存模块, 同时在配置的时候有很大的不同
1.安装依赖包并创建默认的安装文件夹
命令:yum -y install pcre pcre-devel zlib zlib-devel openssl openssl-devel
命令:mkdir /usr/local/nginx
命令:mkdir -p /opt/cache/nginx/proxy_cache
2.解包
命令:cd /myself_settings/
命令:tar -zxvf nginx-1.7.8.tar.gz
命令:tar -zxvf fastdfs-nginx-module_v1.16.tar.gz
命令:tar -zxvf ngx_cache_purge-2.1.tar.gz
我们在解压缩fastdfs-nginx-module_v1.16.tar.gz之后,需要进入fastdfs-nginx-module/src目 录,编辑config文件,找到包含CORE_INCS这个一行,将路径中local全部去掉,变为CORE_INCS="$CORE_INCS /usr/include/fastdfs /usr/include/fastcommon/"
命令:cd /myself_settings/fastdfs-nginx-module/src/
命令:vim config

3.然后进入到nginx-1.7.8里面编译并安装
命令:cd /myself_settings/nginx-1.7.8/
命令:./configure
--prefix=/usr/local/nginx
--add-module=/myself_settings/fastdfs-nginx-module/src
--add-module=/myself_settings/ngx_cache_purge-2.1
命令:make && make install

4.执行命令 cd /myself_settings/FastDFS/conf,即进入fastdfs5.0.5的安装文件夹的conf目录下,将目录下面的http.conf和mime.types拷贝到/etc/fdfs/下,如果不执行这一步,后边在启动nginx时会报错。
命令:cd /myself_settings/FastDFS/conf
命令:cp http.conf /etc/fdfs/
命令:cp mime.types /etc/fdfs/
复制客户端配置文件到/etc/fdfs
命令:cp /etc/fdfs/client.conf.sample /etc/fdfs/client.conf
5.执行命令 cd /myself_settings/fastdfs-nginx-module/src,即进入 fastdfs-nginx-module_v1.16的安装文件夹的src目录下,将目录下面的mod_fastdfs.conf这个文件拷贝到 /etc/fdfs 目录下
命令:cd /myself_settings/fastdfs-nginx-module/src
命令:cp mod_fastdfs.conf /etc/fdfs/
6.打开 /etc/fdfs 这个目录,编辑 mod_fastdfs.conf 这个文件,如下:
命令:vim /etc/fdfs/mod_fastdfs.conf
a. base_path=/opt/fastdfs_storage_info
b. tracker_server=192.168.175.3:22122
c. url_have_group_name = true
d. store_path0=/opt/fastdfs_storage_data
e. http.need_find_content_type=true
f. group_count = 1
[group1]
group_name=group1
storage_server_port=23000
store_path_count=1
store_path0=/opt/fastdfs_storage_data
7.编辑nginx配置文件
命令:vim /usr/local/nginx/conf/nginx.conf
配置如下:
#user nobody;
worker_processes 1;
events {
worker_connections 1024;
}
http {
include mime.types;
default_type application/octet-stream;
#log_format main '$remote_addr - $remote_user [$time_local] "$request" '
#access_log logs/access.log main;
sendfile on;
tcp_nopush on;
keepalive_timeout 65;
gzip on;
server_names_hash_bucket_size 128;
client_header_buffer_size 32k;
large_client_header_buffers 4 32k;
client_max_body_size 300m;
proxy_redirect off;
proxy_set_header Host $http_host;
proxy_set_header X-Real-IP $remote_addr;
proxy_set_header X-Forwarded-For $proxy_add_x_forwarded_for;
proxy_connect_timeout 90;
proxy_send_timeout 90;
proxy_read_timeout 90;
proxy_buffer_size 16k;
proxy_buffers 4 64k;
proxy_busy_buffers_size 128k;
proxy_temp_file_write_size 128k;
proxy_cache_path /opt/cache/nginx/proxy_cache levels=1:2
keys_zone=http-cache:500m max_size=10g inactive=30d;
proxy_temp_path /opt/cache/nginx/proxy_cache/tmp;
upstream fdfs_group1 {
server 192.168.175.3:8080 weight=1 max_fails=2 fail_timeout=30s;
}
# upstream fdfs_group2 {
#server 192.168.130.73:8080 weight=1 max_fails=2 fail_timeout=30s;
#server 192.168.224.29:8080 weight=1 max_fails=2 fail_timeout=30s;
# }
server {
listen 8080;
server_name localhost;
location /group[1-3]/M00 {
proxy_next_upstream http_502 http_504 error timeout invalid_header;
proxy_cache http-cache;
proxy_cache_valid 200 304 12h;
proxy_cache_key $uri$is_args$args;
proxy_pass http://fdfs_group1;
expires 30d;
}
# location /group2/M00 {
# proxy_next_upstream http_502 http_504 error timeout invalid_header;
# proxy_cache http-cache;
# proxy_cache_valid 200 304 12h;
# proxy_cache_key $uri$is_args$args;
# proxy_pass http://fdfs_group2;
# expires 30d;
# }
location ~/purge(/.*) {
allow 127.0.0.1;
allow 192.168.175.0/24;
deny all;
proxy_cache_purge http-cache $1$is_args$args;
}
error_page 500 502 503 504 /50x.html;
location = /50x.html {
root html;
}
}
}
然后保存退出就行了
8.启动nginx并查看日志
命令:/usr/local/nginx/sbin/nginx
命令:tail /usr/local/nginx/logs/error.log #查看日志是否有报错

然后查看端口
命令:ss -antulp | grep 8080

9.然后回到storage中192.168.175.11来配置客户端
命令:cp /etc/fdfs/client.conf.sample /etc/fdfs/client.conf #拷贝客户端配置文件
命令:cd /etc/fdfs/
命令:vim client.conf
a. base_path=/opt/fastdfs_storage_info
b. tracker_server=192.168.175.3:22122
c. http.tracker_server_port=8080
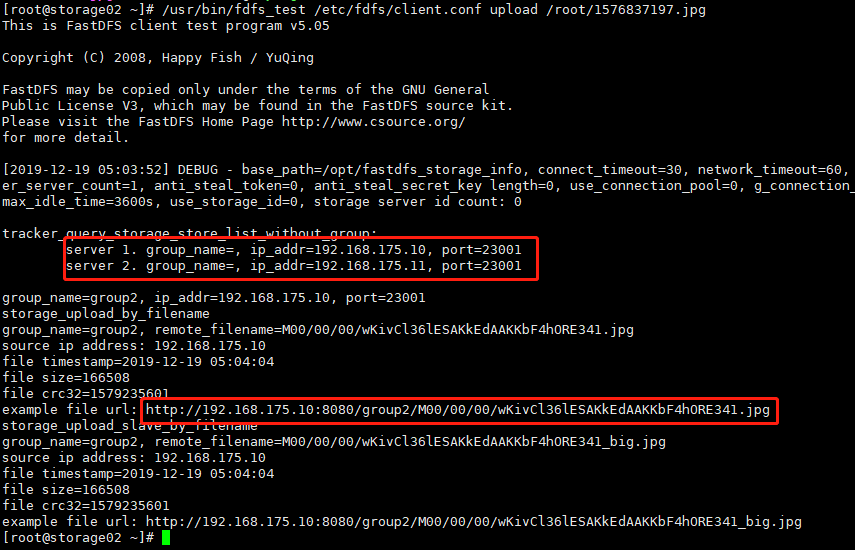
10.存储节点上传测试
命令:/usr/bin/fdfs_test /etc/fdfs/client.conf upload /root/1576837197.jpg

两台存储服务器已经同步成功

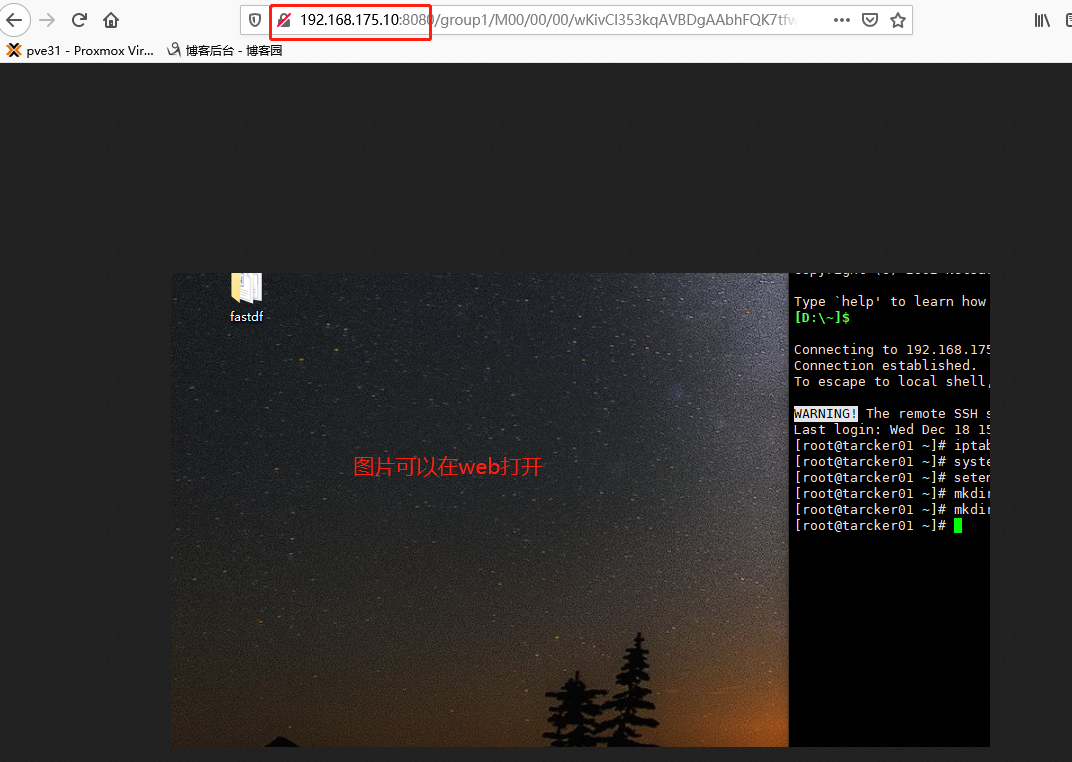
11.通过浏览器访问

总结:。。。。。。。。。。此处省略一万字