实验环境;
两台centos7主机,一台ip为10.10.251.49 作为master
一台ip为10.10.251.59作为slave(复制上台虚拟机,需要修改ip,还有mysql数据库的uuid)
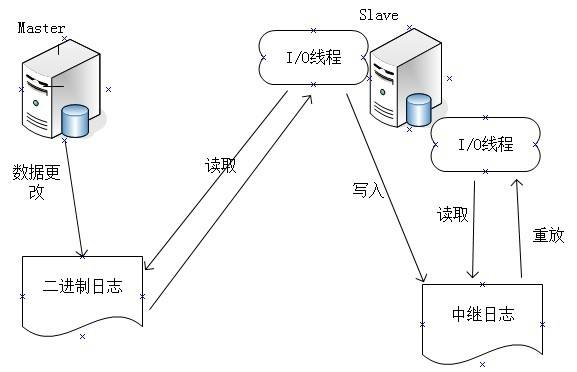
主从同步原理图

1),master需要开启bin-log,用于记录主库修改数据库的SQL语句。
2),异步复制过程,毫秒延迟(磁盘io,网速影响),需要开启3个线程,master开启IO线程,slave开启IO线程,SQL线程
3),从库启动salve start,通过IO线程,用户名和密码去连接 MASTER,MASTER IO线程,负责将bin-log内容,Position位置点数据发给SLAVE。
4),SLAVE IO 线程收到数据后,会将内容追加到本地 relay-log 中继日志,同时生成master.info 文件(用户名,密码,bin-log,)
二:
1)安装mysql
wget http://dev.mysql.com/get/mysql57-community-release-el7-7.noarch.rpm从 下载yum源
yum localinstall mysql57-community-release-el7-7.noarch.rpm 安装yum源
yum install mysql mysql-server mysql-devel -y
2)编辑myql默认配置文件,
vi /etc/my.cnf
添加以下内容
log-bin=mysql-bin
server-id= 1
systemctl restart mysqld 重启数据库
3)MASTER授权从库访问
mysql -uroot -pzabbix
mysql> grant replication slave on *.* to 'zabbix'@'10.10.251.65' identified by 'zabbix'; #授权用户名为zabbix,密码为zabbix的用户访问 (一定确认用户名,密码,ip地址正确)
Query OK, 0 rows affected, 1 warning (0.02 sec)
mysql> FLUSH PRIVILEGES; (刷新授权)
Query OK, 0 rows affected (0.01 sec)
mysql> show global variables like '%log%';
确认 为 on
| log_bin | ON |
mysql> show MAster LOGs;(先记录log_name (master主机上的日志名字) 和 File_size(开始同步时候的节点))
+------------------+-----------+
| Log_name | File_size |
+------------------+-----------+
| mysql-bin.000001 | 1125905 |
+------------------+-----------+
1 row in set (0.00 sec)
三,SLAVE库配置
vi /etc/my.cnf
添加以下内容
server-id= 2
relay-log=relay-log
relay-log-index=relay-log.index
systemctl restart mysqld 重启数据库
mysql -uroot -pzabbix
mysql> CHANGE MASTER TO MASTER_HOST='10.10.251.49',MASTER_USER='zabbix',MASTER_PASSWORD='zabbix', MASTER_LOG_FILE='mysql-bin.000001',MASTER_LOG_POS=881468;
Query OK, 0 rows affected, 2 warnings (0.43 sec) ##需要指定的master的ip,LOG_FILE,LOG_POS,
mysql> start slave;
Query OK, 0 rows affected (0.03 sec)
mysql> show slave statusG
*************************** 1. row ***************************
Slave_IO_State: Waiting for master to send event
Master_Host: 10.10.251.49
Master_User: zabbix
Master_Port: 3306
Connect_Retry: 60
Master_Log_File: mysql-bin.000001
Read_Master_Log_Pos: 1127135
Relay_Log_File: relay-log.000002
Relay_Log_Pos: 245987
Relay_Master_Log_File: mysql-bin.000001
Slave_IO_Running: Yes
Slave_SQL_Running: Yes
Replicate_Do_DB:
Replicate_Ignore_DB:
Replicate_Do_Table:
Replicate_Ignore_Table:
Replicate_Wild_Do_Table:
Replicate_Wild_Ignore_Table:
Last_Errno: 0
Last_Error:
Skip_Counter: 0
Exec_Master_Log_Pos: 1127135
Relay_Log_Space: 246188
Until_Condition: None
Until_Log_File:
Until_Log_Pos: 0
Master_SSL_Allowed: No
Master_SSL_CA_File:
Master_SSL_CA_Path:
Master_SSL_Cert:
Master_SSL_Cipher:
Master_SSL_Key:
Seconds_Behind_Master: 0
Master_SSL_Verify_Server_Cert: No
Last_IO_Errno: 0
Last_IO_Error:
Last_SQL_Errno: 0
Last_SQL_Error:
Replicate_Ignore_Server_Ids:
Master_Server_Id: 1
Master_UUID: 2c5af6b7-73a1-11e8-8798-a20c9f0a7fef
Master_Info_File: /var/lib/mysql/master.info
SQL_Delay: 0
SQL_Remaining_Delay: NULL
Slave_SQL_Running_State: Slave has read all relay log; waiting for more updates
Master_Retry_Count: 86400
Master_Bind:
Last_IO_Error_Timestamp:
Last_SQL_Error_Timestamp:
Master_SSL_Crl:
Master_SSL_Crlpath:
Retrieved_Gtid_Set:
Executed_Gtid_Set:
Auto_Position: 0
Replicate_Rewrite_DB:
Channel_Name:
Master_TLS_Version:
1 row in set (0.00 sec)
最后测试数据库
master1上
mysql> create database test;
Query OK, 1 row affected (0.01 sec)
mysql> show databases;
+--------------------+
| Database |
+--------------------+
| information_schema |
| mysql |
| performance_schema |
| sys |
| test |
| zabbix |
+--------------------+
6 rows in set (0.00 sec)
slave上
mysql> show databases;
+--------------------+
| Database |
+--------------------+
| information_schema |
| mysql |
| performance_schema |
| sys |
| test |
| zabbix |
+--------------------+
6 rows in set (0.00 sec)
本次搭建测试成功
一:
本次遇到的错误,复制主机后mysql的UUID没改
Last_IO_Errno: 0
Last_IO_Error:
这儿就出现关于uuid的错误,需要在数据库目录下
(我的是/var/lib/mysql/)
vi auto.cfg
删除
server-uuid=2c5af6b7-73a1-11e8-8798-a20c9f0a7fef
并且重启mysqld,会生成新的uuid
二,
SLAVE上多次写入MASTER的信息;
导致数据库总无法 start slave;
需要 reset slave all;
重新重新绑定主机,
mysql> CHANGE MASTER TO MASTER_HOST='10.10.251.49',MASTER_USER='zabbix',MASTER_PASSWORD='zabbix', MASTER_LOG_FILE='mysql-bin.000001',MASTER_LOG_POS=881468;
方可start slave;
本次参考B站京峰教育视频、