QPlainTextEdit可以说是一个简化版的QTextEdit类控件,和QTextEdit的功能差不多,使用了QTextEdit和QTextDocument作为背后实现的技术支撑。
由于QPlainTextEdit在文档中使用QPlainTextDocumentLayout的简化布局,它的性能要优于QTextEdit。(同样反过来可以说效果要略于QTextEdit)我们可以看一个这样的现象
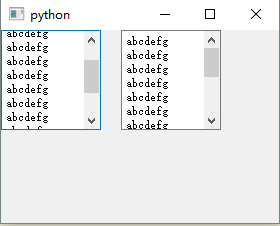
左边的是QTextEdit,右边的是QPlainTextEdit,注意看文本框上沿,QTextEdit的是不是没有完全显示出来?对了!这就是由于QPlainTextEdit是用逐行逐段滚动的方法替代了像素精准度高的滚动方法,所以效率要更高一些(每次滚动都需要重新的绘制)在处理大批量的文本内容有比较强大的优势。
QPlainTextEdit类的父类是QABstractScrollArea类,和QTextEdit不属于从属结构的。
一功能作用
QPlainTextEdit的功能作用和QTextEdit基本一致,我们大概过一遍
1.构造函数
qte = QPlainTextEdit(window)
qte = QPlainTextEdit('字符',window)
2.提示占位文本
QPlainTextEdit.setPlaceholderText('占位文本')
QPlainTextEdit.placeholderText()
3.只读模式(只对用户只读,但可以通过代码修改)
QPlainTextEdit.setReadOnly()
QPlainTextEdit.isReadOnly()
4.格式
QPlainTextEdit.setCurrentCharFormat(QTextCharFormat)     #格式设定
QPlainTextEdit.mergeCurrentCharFormat(QTextCharFormat)   #格式合并
QPlainTextEdit.currentCharFormat()                       #格式获取——>QTextCharFormat
5.软换行模式
QPlainTextEdit的软换行模式比QTextEdit的枚举值要少得多,只限定了是否限用软换行(默认情况时启用软换行的,即字符超出控件宽度后直接换行)
QPlainTextEdit.setLineWrapMode(QPlainTextEdit.NoWrap)
QPlainTextEdit.lineWrapMode()
#枚举值
QPlainTextEdit.NoWrap           #不换行——0
QPlainTextEdit.WidgetWidth      #按宽度换行——1
6.覆盖模式
QPlainTextEdit.setOverwriteMode(True)
QPlainTextEdit.overwriteMode()
但这里有个现象不知道是不是源代码里的bug,可以试一试:
启用覆盖模式,在文本框中输入1234567,把光标移动到3处,可以发现3是被光标覆盖的,这时候输入中文,可以发现3并没有被覆盖,和插入的效果一样
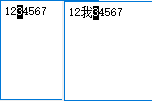
并且还可以试一试输入中文后在用中文覆盖,也是没有覆盖效果的,但是可以用非中文的字符覆盖中文(中文的标点不可以)。
7.Tab键控制
QPlainTextEdit.setTabChangesFocus()
QPlainTextEdit.setTabStopWidth()
QPlainTextEdit.tabChangesFocus()
QPlainTextEdit.tabStopWidth()
可以强制用Tab键切换焦点,或者定义Tab键的缩进距离。
8.文本操作
a.普通文本的操作
QPlainTextEdit.setPlainText()       #设置普通文本
QPlainTextEdit.insertPlainText()    #插入普通文本
QPlainTextEdit.appendPlainText()    #追加普通文本
插入是在光标位置插入,而追加不考虑光标位置,直接在最后端插入文本(另起一个段落)
b.富文本
QPlainTextEdit.appendHtml() #追加Html标签
这里添加的Html标签只能是最简单的标签,不支持表格、列表图片等。
c.文本的获取
QPlainTextEdit.toPlainText() #获取文本
这里获取的文本是从文本框里看到的文本,如果是Html标签并不会显示源代码
pte.appendHtml("<a herf='http://www.cngba.com'>博客园</a>")
print(pte.toPlainText())
打印出来的结果就是“博客园”。
9.块操作
QPlainTextEdit.blockCount()              #获取当前块的个数
QPlainTextEdit.setMaximumBlockCount()    #设置最多的块个数
QPlainTextEdit.maximumBlockCount()       #获取块的数量限定值
块就是在文本框中的段落的个数。默认值为0,即为不做限制。当给出限定值后,超出了限定值会把最上面的段落顶没了(是真的没了而不是不显示)
10.常用操作
QPlainTextEdit.selectAll()
QPlainTextEdit.copy()
QPlainTextEdit.paste()
QPlainTextEdit.cut()
QPlainTextEdit.clear()
QPlainTextEdit.redo()
QPlainTextEdit.undo()
QPlainTextEdit.find()
#搜索枚举值
QTextDocument.FindBackward              #向前搜索
QTextDocument.FindCaseSensitively       #区分大小写
QTextDocument.FindWholeWords            #匹配完整单词
这些用法按名字就能了解,还有一个缩放的功能要单独提一下
QPlainTextEdit.zoomIn(int) #缩放
int如果大于0,就是放大,而小于0就是缩小。
11.滚动
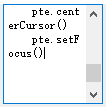
在处理比较大的文本的时候,有可能光标离开当前显示的页面,我们可以用滚动的方法,让光标显示在文本块的中间(一般都是配合一个按钮,这里就放出来槽函数就行了)
def fun():
    pte.centerCursor()
    pte.setFocus()
当点击了按钮,光标所在的行会尽可能的滚动到页面中间。这里说尽可能,是因为如果光标原先在第一行货最后一行,第一行放在中间前面是会留白的,肯定不现实,但是如果加上这句代码就可以使最后一行显示在文本框中间
pte = QPlainTextEdit(window)
pte.setCenterOnScroll(True)
注意是在声明控件的时候就要定义了,而不是在槽函数里(虽然没什么影响,但一般不这么用,否则需要在每个槽函数里都定义)。加了这句代码,就可以使文档后面留白
 .
.
然后就可以把光标所在行(最后一行)滚动到空间中间位置。
还有另外一种方法
def fun():
    pte.ensureCursorVisible()
    pte.setFocus()
这种方式是滚动距离最小的方法保证了光标可见。但是加上
pte.setCenterOnScroll(True)
也可以保证滚动到中间。
12.光标操作
QPlainTextEdit的光标操作和QTextEdit的光标操作差不多,把里面的API列一下就可以了。
QPlainTextEdit.textCursor()                #获取光标对象
QPlainTextEdit.cursorForPosition()         #获取距离指定位置最近的光标对象
QPlainTextEdit.setCursorWidth()            #设定光标宽度
QPlainTextEdit.cursorWidth()               #获取光标宽度——>int
QPlainTextEdit.cursorRect(QTextCursor)     #获取指定挂光标对象矩形
QTextCursor.moveCursor(QTextCursor.MoveOperation,QTextCursor.MoveMode)


NoMove = ...  # type: 'QTextCursor.MoveOperation'
Start = ...  # type: 'QTextCursor.MoveOperation'
Up = ...  # type: 'QTextCursor.MoveOperation'
StartOfLine = ...  # type: 'QTextCursor.MoveOperation'
StartOfBlock = ...  # type: 'QTextCursor.MoveOperation'
StartOfWord = ...  # type: 'QTextCursor.MoveOperation'
PreviousBlock = ...  # type: 'QTextCursor.MoveOperation'
PreviousCharacter = ...  # type: 'QTextCursor.MoveOperation'
PreviousWord = ...  # type: 'QTextCursor.MoveOperation'
Left = ...  # type: 'QTextCursor.MoveOperation'
WordLeft = ...  # type: 'QTextCursor.MoveOperation'
End = ...  # type: 'QTextCursor.MoveOperation'
Down = ...  # type: 'QTextCursor.MoveOperation'
EndOfLine = ...  # type: 'QTextCursor.MoveOperation'
EndOfWord = ...  # type: 'QTextCursor.MoveOperation'
EndOfBlock = ...  # type: 'QTextCursor.MoveOperation'
NextBlock = ...  # type: 'QTextCursor.MoveOperation'
NextCharacter = ...  # type: 'QTextCursor.MoveOperation'
NextWord = ...  # type: 'QTextCursor.MoveOperation'
Right = ...  # type: 'QTextCursor.MoveOperation'
WordRight = ...  # type: 'QTextCursor.MoveOperation'
NextCell = ...  # type: 'QTextCursor.MoveOperation'
PreviousCell = ...  # type: 'QTextCursor.MoveOperation'
NextRow = ...  # type: 'QTextCursor.MoveOperation'
PreviousRow = ...  # type: 'QTextCursor.MoveOperation'
MoveAnchor = ...  # type: 'QTextCursor.MoveMode'
KeepAnchor = ...  # type: 'QTextCursor.MoveMode'
二.信号
1.文本改变
QPlainTextEdit.textChanged()
2.选中文本改变
QPlainTextEdit.selectionChanged()
在这个函数中并没有参数传递,如果想获取选中的文本就需要结合文本光标来实现
def fun():
    print('选中文本发生改变:',pte.textCursor().selectedText())
3.光标位置发生改变
QPlainTextEdit.cursorPositionChanged()
4.块的个数变化
QPlainTextEdit.blockCountChanged(int)
随函数传递块的个数(int)。
5.内容更新请求
QPlainTextEdit.updateRequest(QRect.rect,int dy)
只要内容发生变化就调用(包括光标的闪烁)。这个主要是用在类似于文本框被滚动时,由于每次滚动导致的界面上内容发生变化都相当于重绘一遍,而dy就是滚动的步长。具体的用法在下一节结合案例来说明
6.编辑状态发生改变时
QPlainTextEdit.modificationChanged()
这个主要是用在例如对文档进行编辑时,函数传递参数(bool)为True,这个时候是可以有撤销动作的,当文件被保存后,把这个状态重置一下,就不能有撤回了(就和word一样)
doc = pte.document()
doc.setModified(False)   #重置被编辑状态
6.复制、撤销、重做可用时
QPlainTextEdit.copyAvailable(bool)
QPlainTextEdit.undoAvailable(bool)
QPlainTextEdit.redoAvailable(bool)
复制可用——有选中的情况下;撤销可用——被编辑状态为True;重做——有撤销作业
三.内容更新请求
QPlainTextEdit里有个信号是updateRequest(),我们结合一个案例来使用一下
好多文本编辑器都有个行号,Pycharm就有,我们在上下滚动屏幕显示的时候行号是跟着切换的。
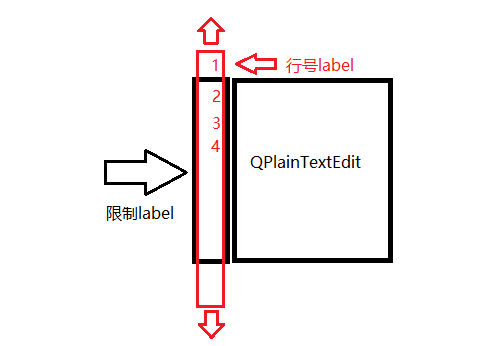
思路就是用一个label里放置所有的行号(红色的label),父级控件是和文本框高度一致的label(限制label),限制label和文本框同属window控件。由于限制label的尺寸固定,就限制了行号label显示出的内容,当文本框发生滚动时,由于事件函数传递有滚动的y的像素值,把行号的label在y轴上移动相应的像素值就可以了。
from PyQt5.Qt import *
import sys
app=QApplication(sys.argv)
window = QWidget()
window.resize(800,500)
pte = QPlainTextEdit(window)
pte.resize(300,300)
pte.move(300,100)
num_cut = QLabel(window)  #限制标签的大小
num_cut.resize(30,300)
num_cut.move(270,100)
num_cut.setStyleSheet('background-color:green')
num = QLabel(num_cut)
num.move(0,7)           #偏移一点保证label里的行号和文本框里的段落能对齐
line_nums = '
'.join([str(i) for i in range(1,101)])    #生成行号
num.setText(line_nums)
num.adjustSize()

def fun(rec,dy):
    num.move(num.x(),num.y()+dy)      #信号内传递有滚动的y像素值
pte.updateRequest.connect(fun)

window.show()
sys.exit(app.exec_())