一. 简介
1. 正宗的CodeFirst模式是不含有edmx模型,需要手动创建实体、创建EF上下文,然后生成通过代码来自动映射生成数据库。
2. 旨在:忘记SQL、忘记数据库。
3. 三类配置:One To One(one-to-zero-or-one)、One To Many、Many To Many。
注意:在该模块使用最简单的模式配置这三种关系,暂时先不考虑DataAnnotation和Fluent API
A. One To One(one-to-zero-or-one)
①:一个学生对应一个或零个地址,一个地址只能对应一个学生
②:实现方式:
a:Student表中添加StudentAddress属性,StudentAddress表中添加Student属性,然后给StudentAddress中的主键加上[ForeignKey("stu")] ,
特别注意stu代表Student属性的名字。
b:编写配置文件
发现的现象
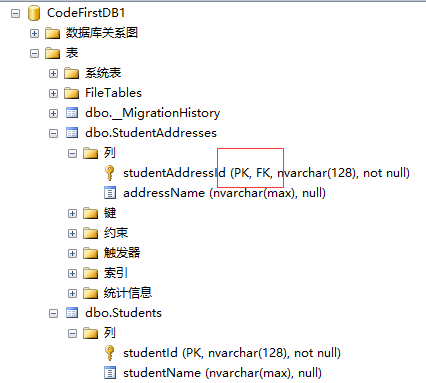
a.已经生成了一次数据库,修改表结构,会报错:数据添加失败支持“dbContext1”上下文的模型已在数据库创建后发生更改。
请考虑使用 Code First 迁移更新数据库(http://go.microsoft.com/fwlink/?LinkId=238269)。
b. 类名+Id结尾属性自动生成主键。
c.生成的数据库默认保存在数据库的安装目录下。
d.在数据库中:StudentAddress中的studentAddressId既是主键,又是外键
B. One To Many
①:一个年级有多个学生,一个学生只能在一个年级
②:实现方式:
a:Student2表中添加Grade1属性,Grade1表中添加ICollection<Student2>属性
b:编写配置文件
发现的现象:
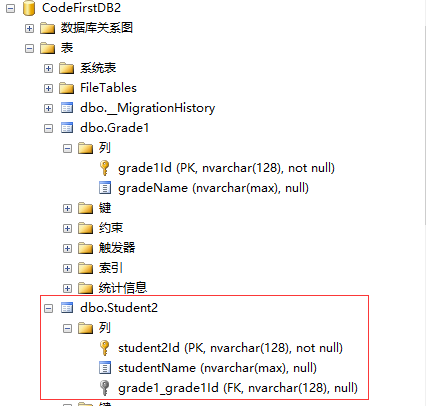
a. 数据库中:Student2表中,增加了一个新的字段grade1_grade1Id作为外键
C. Many To Many
①:一个学生有多门课,一门课有多个学生上
②:实现方式:
a:Student3表中添加ICollection<Course1>属性,Course1表中添加ICollection<Student3>属性
b:编写配置文件
发现的现象
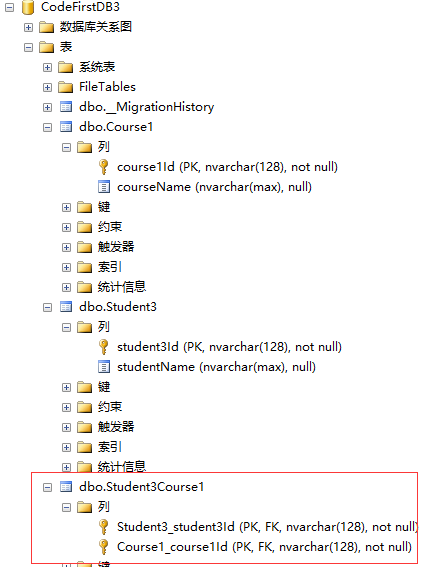
a. 数据库中多了一张表:Student3Course1,里面有两个外键
二. 代码实战
1. One To One(one-to-zero-or-one)
 1     /// <summary>
 2     /// 学生表(一个学生只能有一个地址或没有地址)
 3     /// </summary>
 4     public class Student
 5     {
 6         public Student()
 7         {
 8
 9         }
10         public string studentId { get; set; }
11
12         public string studentName { get; set; }
13
14         public virtual StudentAddress StudentAddress { get; set; }
15     }
16     /// <summary>
17     /// 学生地址表(一个地址只能对应一个学生)
18     /// </summary>
19     public class StudentAddress
20     {
21         public StudentAddress()
22         {
23
24         }
25
26         [ForeignKey("stu")]
27         //特别注意这个地方,stu对应下面的 Student stu;
28         //另外特别注意:studentAddressId,符合默认的Id生成规则,自动映射成主键,否则需要加【key】特性
29         public string studentAddressId { get; set; }
30
31         public string addressName { get; set; }
32
33         public virtual Student stu { get; set; }
34     }
 1  public class dbContext1:DbContext
 2     {
 3         public dbContext1()
 4             : base("name=dbContext1")
 5         {
 6
 7         }
 8         public DbSet<Student> Student { get; set; }
 9
10         public DbSet<StudentAddress> StudentAddress { get; set; }
11
12
13         protected override void OnModelCreating(DbModelBuilder modelBuilder)
14         {
15             base.OnModelCreating(modelBuilder);
16         }
17     }
<!--正宗的CodeFirst OneToOne-->
<add name="dbContext1" connectionString="data source=localhost;initial catalog=CodeFirstDB1;persist security info=True;user id=sa;password=123456;MultipleActiveResultSets=True;App=EntityFramework" providerName="System.Data.SqlClient" />
2. One To Many
    /// <summary>
    /// 年级表(一个年级有多个学生)
    /// </summary>
    public class Grade1
    {
        public string grade1Id { get; set; }

        public string gradeName { get; set; }

        public virtual ICollection<Student2> student2 { get; set; }
    }
    /// <summary>
    /// 学生表(一个学生只能在一个年级)
    /// </summary>
    public class Student2
    {
        public string student2Id { get; set; }

        public string studentName { get; set; }

        public virtual Grade1 grade1 { get; set; }

    }
 public class dbContext2 : DbContext
    {
        public dbContext2()
            : base("name=dbContext2")
        {

        }
        public DbSet<Student2> Student2 { get; set; }

        public DbSet<Grade1> Grade1 { get; set; }


        protected override void OnModelCreating(DbModelBuilder modelBuilder)
        {
            base.OnModelCreating(modelBuilder);
        }
    }
   <!--正宗的CodeFirst OneToMany-->
  <add name="dbContext2" connectionString="data source=localhost;initial catalog=CodeFirstDB2;persist security info=True;user id=sa;password=123456;MultipleActiveResultSets=True;App=EntityFramework" providerName="System.Data.SqlClient" />
3. Many To Many
    /// <summary>
    /// 学生表(一个学生有多门课)
    /// </summary>
    public class Student3
    {
        public string student3Id { get; set; }

        public string studentName { get; set; }

        public virtual ICollection<Course1> course { get; set; }
    }
    /// <summary>
    /// 课程表(一门课会有多个学生上)
    /// </summary>
    public class Course1
    {
        public string course1Id { get; set; }

        public string courseName { get; set; }


        public virtual ICollection<Student3> student { get; set; }
    }
 1  public class dbContext3 : DbContext
 2     {
 3         public dbContext3()
 4             : base("name=dbContext3")
 5         {
 6
 7         }
 8         public DbSet<Student3> Student3 { get; set; }
 9
10         public DbSet<Course1> Course1 { get; set; }
11
12
13         protected override void OnModelCreating(DbModelBuilder modelBuilder)
14         {
15             base.OnModelCreating(modelBuilder);
16         }
17     }
   <!--正宗的CodeFirst OneToMany-->
    <add name="dbContext3" connectionString="data source=localhost;initial catalog=CodeFirstDB3;persist security info=True;user id=sa;password=123456;MultipleActiveResultSets=True;App=EntityFramework" providerName="System.Data.SqlClient" />
三. 总结
上面的三种数据库表的对应关系主要都是采用的EF的默认协定,比如:
A: 类名+ID、类名+Id、类名+id自动生成主键(类名忽略大小写),
B: string类型自动映射成nvarchar(max)
但在实际开发中,默认协定显然不灵活,那么我们如何自定义配置呢(自定义主键、设置非空、设置类型、长度等),EF提供两种方式:DataAnnotations和Fluent API,但大多数情况都是两者配合使用,关于二者的详细使用,请见后面章节。
!
- 作 者 : Yaopengfei(姚鹏飞)
- 博客地址 : http://www.cnblogs.com/yaopengfei/
- 声 明1 : 本人才疏学浅,用郭德纲的话说“我是一个小学生”,如有错误,欢迎讨论,请勿谩骂^_^。
- 声 明2 : 原创博客请在转载时保留原文链接或在文章开头加上本人博客地址,否则保留追究法律责任的权利。