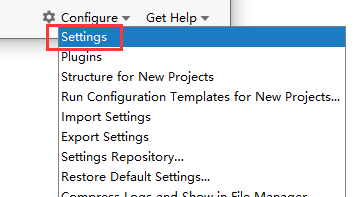
一. IDEA配置Maven
1. IDEA配置Maven
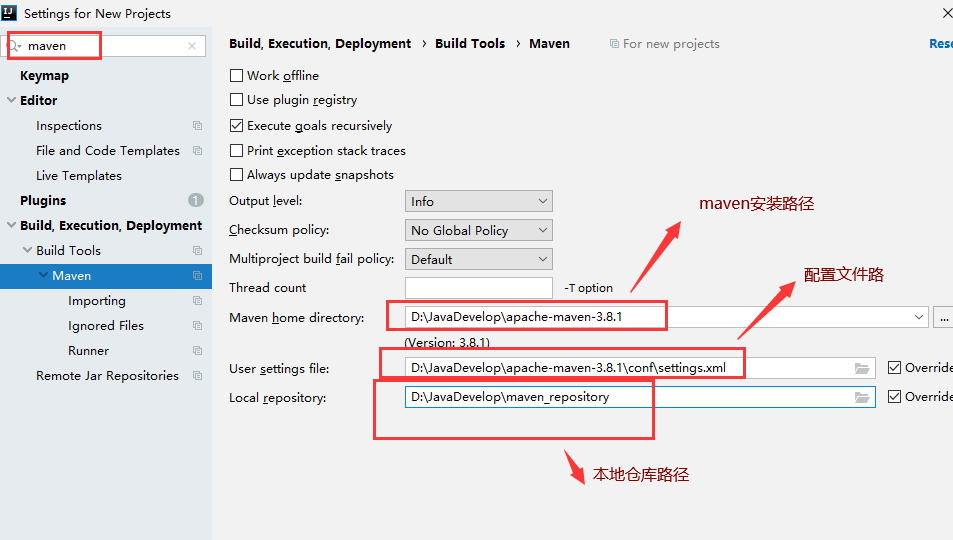
(1). 进入maven选项,配置maven安装路径、配置文件、本地仓库路径。(这里全局配置,如果针对某个项目没生效,则打开项目后针对项目再重新配置)
特别注意:上述这种改变方式,Maven home的路径经常就被重置了,所以还需要去IDEA的配置路径中,进行彻底修改一下,进入路径:C:UsersAdministratorAppDataRoamingJetBrainsIntelliJIdea2020.2optionsproject.default.xml
如下配置:


<application>
  <component name="ProjectManager">
    <defaultProject>
      <component name="CompilerConfiguration">
        <bytecodeTargetLevel target="11" />
      </component>
      <component name="MavenImportPreferences">
        <option name="generalSettings">
          <MavenGeneralSettings>
            <option name="localRepository" value="D:JavaDevelopmaven_repository" />
            <option name="mavenHome" value="D:JavaDevelopapache-maven-3.8.1" />
            <option name="userSettingsFile" value="D:JavaDevelopapache-maven-3.8.1confsettings.xml" />
          </MavenGeneralSettings>
        </option>
      </component>
      <component name="MavenRunner">
        <option name="jreName" value="#JAVA_HOME" />
        <option name="vmOptions" value="-DarchetypeCatalog=internal" />
      </component>
      <component name="PropertiesComponent">
        <property name="settings.editor.selected.configurable" value="reference.projectsettings.compiler.javacompiler" />
      </component>
    </defaultProject>
  </component>
</application>
(2). 每次创建项目时, IDEA 要使用插件进行创建,这些插件当你创建新的项目时,它每次都会去中央仓库下载,这样使得创建比较慢。应该创建时,让它找本地仓库中的插件进行创建项目。
如下图,配置:-DarchetypeCatalog=internal

二. 创建Maven项目
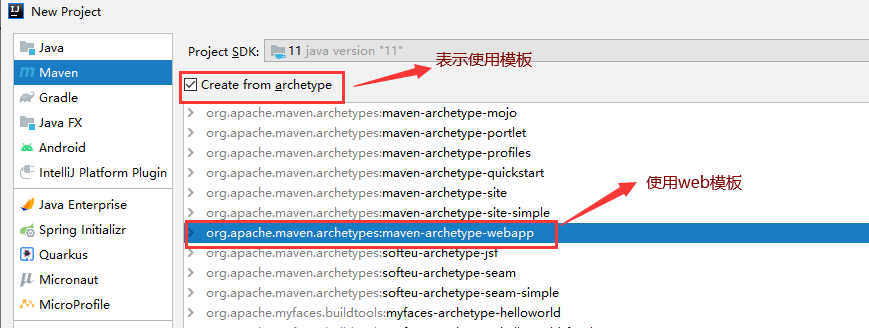
1. 选择Maven→勾选使用模板→选择web模板
PS:也可以不勾选模板,创建1个空marven项目,详见结尾处。
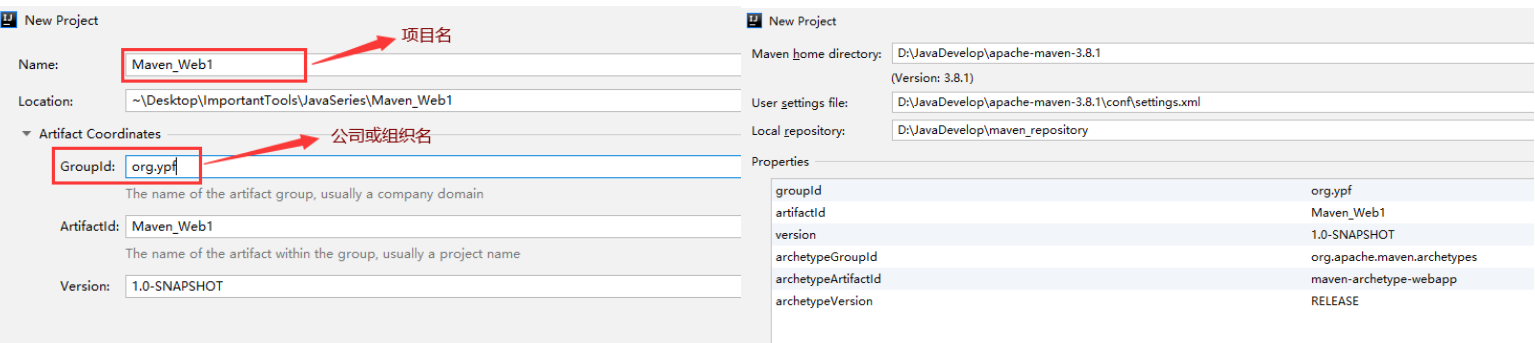
2. 填写项目名称、路径、公司名称、版本号等 → maven的相关路径(不需要修改)
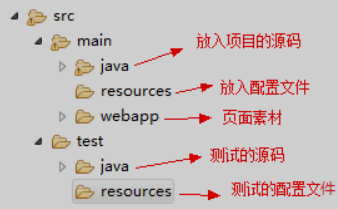
3. 默认生成的web项目只有webapp目录,如下图:
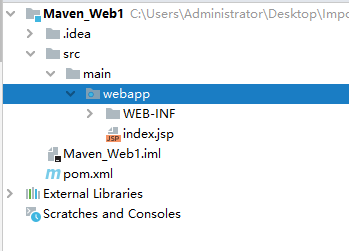
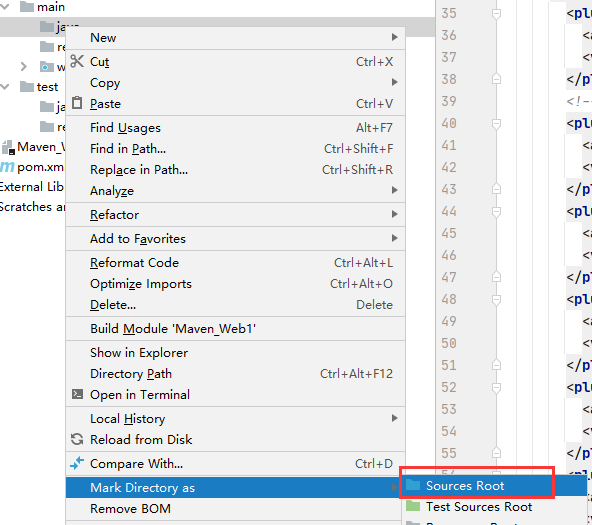
我们需要按照标准目录对其进行不全,其中java目录需要右键→Mark Directory as →Sources Root。
4. 默认生成pom.xml,如下图:
<?xml version="1.0" encoding="UTF-8"?>

<project xmlns="http://maven.apache.org/POM/4.0.0" xmlns:xsi="http://www.w3.org/2001/XMLSchema-instance"
  xsi:schemaLocation="http://maven.apache.org/POM/4.0.0 http://maven.apache.org/xsd/maven-4.0.0.xsd">
  <modelVersion>4.0.0</modelVersion>

  <groupId>org.ypf</groupId>
  <artifactId>Maven_Web1</artifactId>
  <version>1.0-SNAPSHOT</version>
  <packaging>war</packaging>

  <name>Maven_Web1 Maven Webapp</name>
  <!-- FIXME change it to the project's website -->
  <url>http://www.example.com</url>

  <properties>
    <project.build.sourceEncoding>UTF-8</project.build.sourceEncoding>
    <maven.compiler.source>1.7</maven.compiler.source>
    <maven.compiler.target>1.7</maven.compiler.target>
  </properties>

  <dependencies>
    <dependency>
      <groupId>junit</groupId>
      <artifactId>junit</artifactId>
      <version>4.11</version>
      <scope>test</scope>
    </dependency>
  </dependencies>

  <build>
    <finalName>Maven_Web1</finalName>
    <pluginManagement><!-- lock down plugins versions to avoid using Maven defaults (may be moved to parent pom) -->
      <plugins>
        <plugin>
          <artifactId>maven-clean-plugin</artifactId>
          <version>3.1.0</version>
        </plugin>
        <!-- see http://maven.apache.org/ref/current/maven-core/default-bindings.html#Plugin_bindings_for_war_packaging -->
        <plugin>
          <artifactId>maven-resources-plugin</artifactId>
          <version>3.0.2</version>
        </plugin>
        <plugin>
          <artifactId>maven-compiler-plugin</artifactId>
          <version>3.8.0</version>
        </plugin>
        <plugin>
          <artifactId>maven-surefire-plugin</artifactId>
          <version>2.22.1</version>
        </plugin>
        <plugin>
          <artifactId>maven-war-plugin</artifactId>
          <version>3.2.2</version>
        </plugin>
        <plugin>
          <artifactId>maven-install-plugin</artifactId>
          <version>2.5.2</version>
        </plugin>
        <plugin>
          <artifactId>maven-deploy-plugin</artifactId>
          <version>2.8.2</version>
        </plugin>
      </plugins>
    </pluginManagement>
  </build>
</project>
详细的解释见后面
5. 运行该项目
(PS:默认生成Maven项目依赖的是jkd1.7,且使用的 tomcat插件是6.x版本,显然已经不满足需求了,且无法直接运行)
(1). 修改pom文件中jdk版本,改为11,如下图
<properties>
    <project.build.sourceEncoding>UTF-8</project.build.sourceEncoding>
    <maven.compiler.source>11</maven.compiler.source>
    <maven.compiler.target>11</maven.compiler.target>
  </properties>
或者注释掉上述代码,在builder中添加编译插件,
 <!-- 设置编译版本和编码 -->
      <plugin>
        <groupId>org.apache.maven.plugins</groupId>
        <artifactId>maven-compiler-plugin</artifactId>
        <version>3.1</version>
        <configuration>
          <source>11</source>
          <target>11</target>
          <encoding>UTF-8</encoding>
        </configuration>
      </plugin>
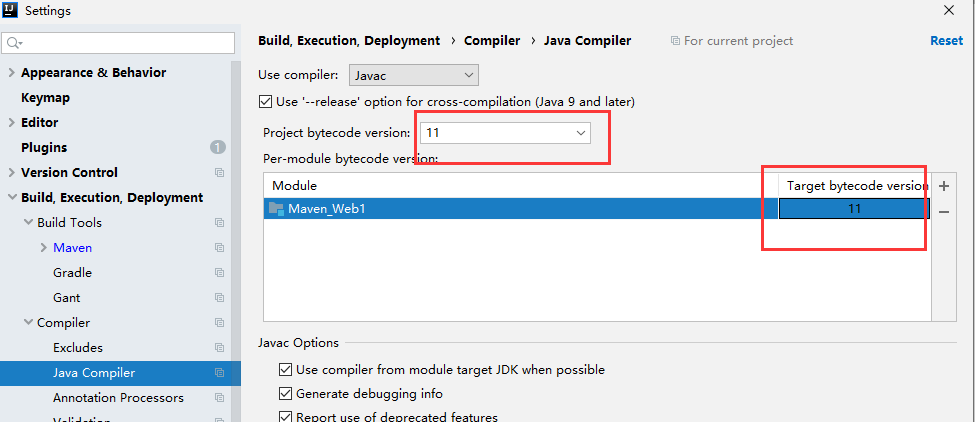
(2). 修改Java Compiler版本,都改为11,如下图:
(3). 在builder节点下的plugins节点下添加如下代码,并且把tomcat插件端口改为了8888,防止冲突。
        <plugin>
          <groupId>org.apache.tomcat.maven</groupId>
          <artifactId>tomcat7-maven-plugin</artifactId>
          <version>2.2</version>
          <configuration>
            <port>8888</port>
          </configuration>
        </plugin>
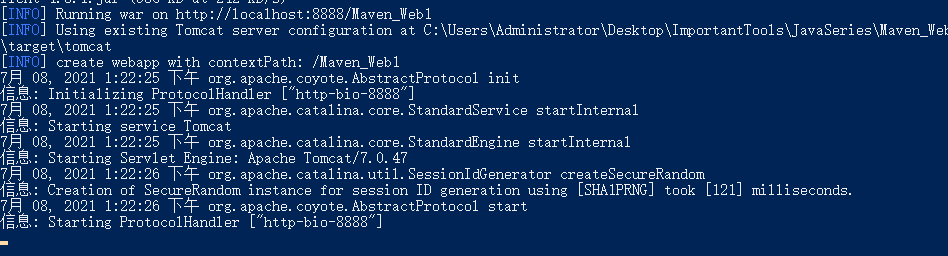
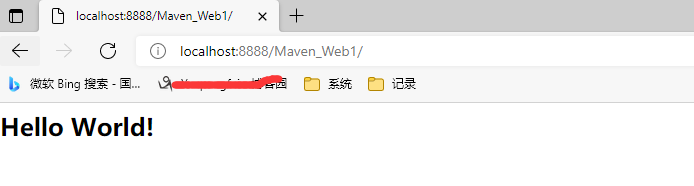
(4). 回到根目录,运行指令【mvn tomcat7:run】,然后输入地址: localhost:8888/Maven_Web1/ 进行访问。
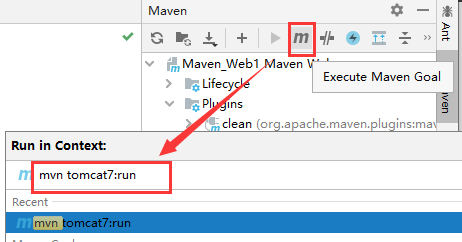
6. 如何直接在IDEA中运行呢?
方案一:
如下图,点击 M,然后输入【mvn tomcat7:run】,同样可以启动
方案二:
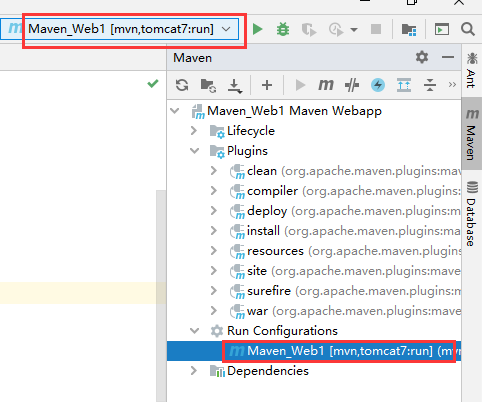
点击Add Configuration→+ Maven → 选择工作路径和输入运行指令 【tomcat7:run -f pom.xml】,确定即可。
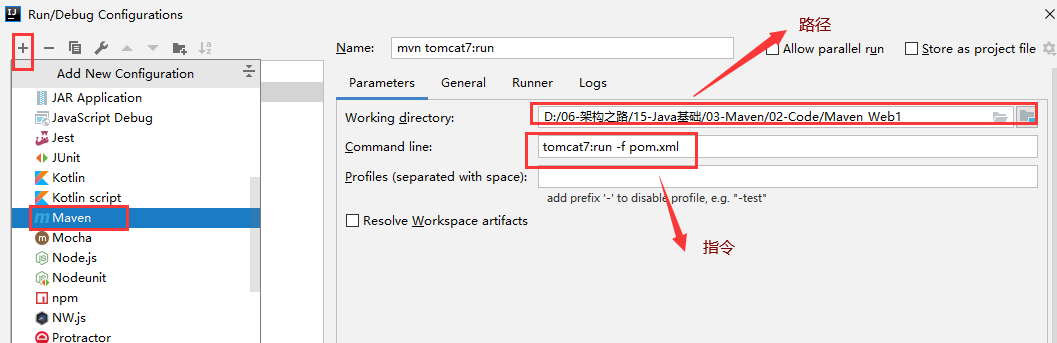
然后就会出现在下面位置,点击运行即可
三. 创建Maven项目(不用模板)
(案例:创建maven项目的时候选择不使用模板,然后链接mysql数据库,详细步骤如下:)
1. 不勾选模板→创建Maven_Mysql项目
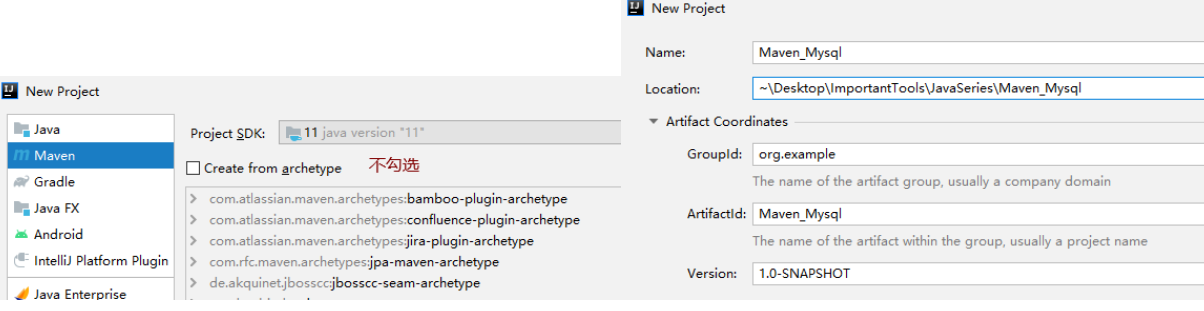
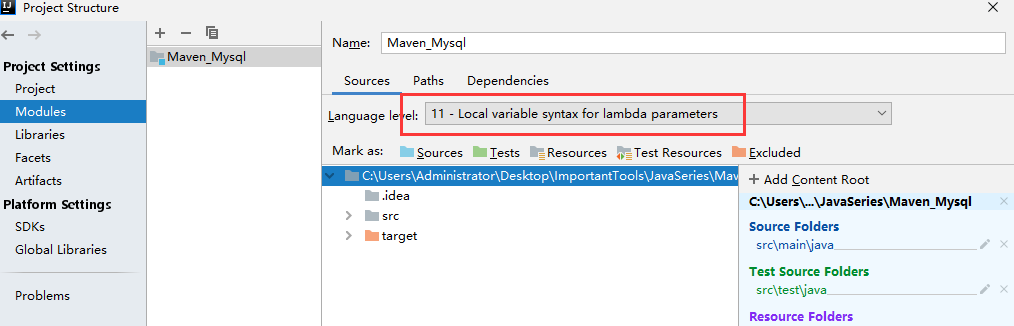
2. 检查一下maven的相关地址是否正确→检查一下编译版本是否正确(统一设为11)→检查对应Modules版本(设为11)
图1
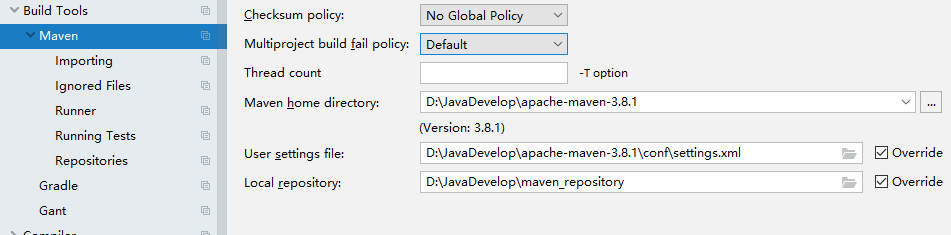
图2
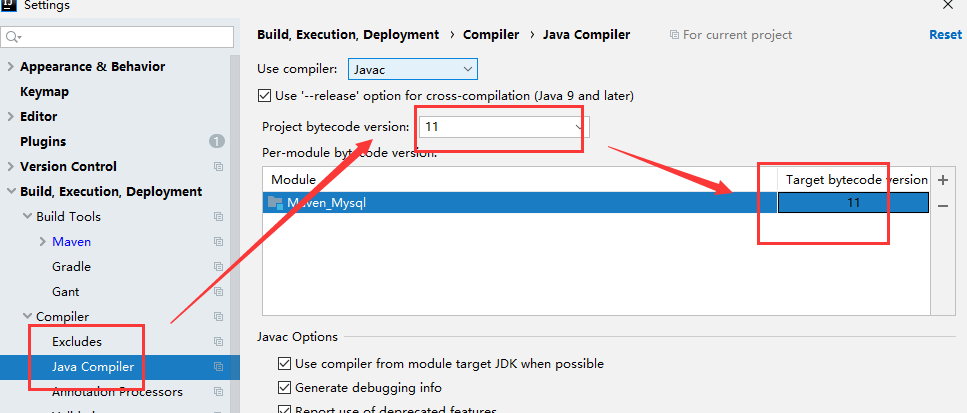
图3
3. 在pom.xml中导入相应配置和驱动
(1). 配置编译版本
    <!--编译版本    -->
    <properties>
        <project.build.sourceEncoding>UTF-8</project.build.sourceEncoding>
        <maven.compiler.source>11</maven.compiler.source>
        <maven.compiler.target>11</maven.compiler.target>
    </properties>
(2). 导入Junit和Mysql驱动
    <!--依赖jar包    -->
    <dependencies>
        <dependency>
            <groupId>mysql</groupId>
            <artifactId>mysql-connector-java</artifactId>
            <version>5.1.6</version>
            <scope>runtime</scope>
        </dependency>
        <dependency>
            <groupId>junit</groupId>
            <artifactId>junit</artifactId>
            <version>4.12</version>
        </dependency>
    </dependencies>
整个pom.xml文件
<?xml version="1.0" encoding="UTF-8"?>
<project xmlns="http://maven.apache.org/POM/4.0.0"
         xmlns:xsi="http://www.w3.org/2001/XMLSchema-instance"
         xsi:schemaLocation="http://maven.apache.org/POM/4.0.0 http://maven.apache.org/xsd/maven-4.0.0.xsd">
    <modelVersion>4.0.0</modelVersion>

    <groupId>com.itheima</groupId>
    <artifactId>maven_mysql</artifactId>
    <version>1.0-SNAPSHOT</version>

    <properties>
        <project.build.sourceEncoding>UTF-8</project.build.sourceEncoding>
        <maven.compiler.source>11</maven.compiler.source>
        <maven.compiler.target>11</maven.compiler.target>
    </properties>

    <dependencies>
        <dependency>
            <groupId>mysql</groupId>
            <artifactId>mysql-connector-java</artifactId>
            <version>5.1.6</version>
            <scope>runtime</scope>
        </dependency>
        <dependency>
            <groupId>junit</groupId>
            <artifactId>junit</artifactId>
            <version>4.12</version>
        </dependency>
    </dependencies>
</project>
4. 编写代码进行运行
(1). 编写Items类
package com.ypf.test;

public class Items {

    private Integer id;
    private String name;

    public Integer getId() {
        return id;
    }

    public void setId(Integer id) {
        this.id = id;
    }

    public String getName() {
        return name;
    }

    public void setName(String name) {
        this.name = name;
    }
}
(2). 编写链接DB代码
package com.ypf.test;

import java.sql.*;
import java.util.ArrayList;
import java.util.List;

public class main {
    public static void main(String[] args) throws SQLException {
        List<Items> list = new ArrayList<Items>();
        //先获取contection对象
        Connection connection = null;
        //获取真正操作数据的对象
        PreparedStatement pst = null;
        //执行数据库查询操作
        ResultSet rs = null;
        try {
            //加载驱动类
            Class.forName("com.mysql.jdbc.Driver");
            //先获取contection对象
            connection = DriverManager.getConnection("jdbc:mysql://xxxx/EFDB01","root", "xxx");
            //获取真正操作数据的对象
            pst = connection.prepareCall("select * from items");
            //执行数据库查询操作
            rs = pst.executeQuery();
            //把数据库结果集转成java的List集合

            while (rs.next()){
                Items items = new Items();
                items.setId(rs.getInt("id"));
                items.setName(rs.getString("name"));
                list.add(items);
            }
           // 将内容输出
            for (Items items : list) {
                System.out.println(items.getName());
            }

        }catch (Exception e){
            e.printStackTrace();
        }finally {
            connection.close();
            pst.close();
            rs.close();
        }
    }


}
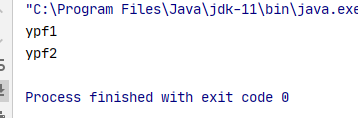
(3). 运行结果
四. 其它配置详解
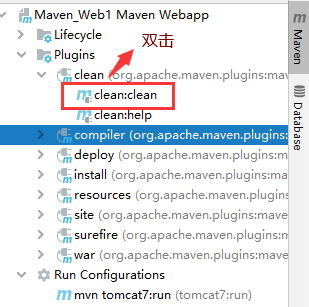
1. Maven常用指令
(1). clean
clean 是 maven 工程的清理命令,执行 clean 会删除 target 目录及内容
(2).compile
compile 是 maven 工程的编译命令,作用是将 src/main/java 下的文件编译为 class 文件输出到 target目录下。
(3).test
test 是 maven 工程的测试命令 mvn test,会执行src/test/java下的单元测试类。
(4)package
package 是 maven 工程的打包命令,对于 java 工程执行 package 打成 jar 包,对于web 工程打成war包。
(5). install
install 是 maven 工程的安装命令,执行 install 将 maven 打成 jar 包或 war 包发布到本地仓库。从运行结果中,可以看出:当后面的命令执行时,前面的操作过程也都会自动执行,
PS:上述指令的运行方式
方式1: 在根目录下,命令行中输入 【mvn clean】
方式2:在IDEA中快速运行
PS:Maven指令的生命周期
maven 对项目构建过程分为三套相互独立的生命周期,请注意这里说的是“三套”,而且“相互独立”,这三套生命周期分别是:
Clean Lifecycle 在进行真正的构建之前进行一些清理工作。
Default Lifecycle 构建的核心部分,编译,测试,打包,部署等等。
Site Lifecycle 生成项目报告,站点,发布站点。

2. pom.xml详解
(1). 坐标的定义
  <!-- 在 pom.xml 中定义坐标,内容包括:groupId、artifactId、version,详细内容如下:-->
  <!--项目名称,定义为组织名+项目名,类似包名-->
  <groupId>org.ypf</groupId>
  <!-- 模块名称 -->
  <artifactId>Maven_Web1</artifactId>
  <!-- 项目版本号 -->
  <version>1.0-SNAPSHOT</version>
  <!-- 打包类型, jar包、war包、   还有pom:用于maven工程的继承,通常父工程设置为pom -->
  <packaging>war</packaging>
(2). 内容详解
<project > :文件的根节点 .
<modelversion > : pom.xml 使用的对象模型版本
<groupId > :项目名称,一般写项目的域名
<artifactId > :模块名称,子项目名或模块名称
<version > :产品的版本号 .
<packaging > :打包类型,一般有 jar、war、pom 等
<name > :项目的显示名,常用于 Maven 生成的文档。
<description > :项目描述,常用于 Maven 生成的文档
<dependencies> :项目依赖构件配置,配置项目依赖构件的坐标
<build> :项目构建配置,配置编译、运行插件等
完整的pom.xml
<?xml version="1.0" encoding="UTF-8"?>

<project xmlns="http://maven.apache.org/POM/4.0.0" xmlns:xsi="http://www.w3.org/2001/XMLSchema-instance"
  xsi:schemaLocation="http://maven.apache.org/POM/4.0.0 http://maven.apache.org/xsd/maven-4.0.0.xsd">

  <!--  pom.xml 使用的对象模型版本-->
  <modelVersion>4.0.0</modelVersion>

  <!-- 在 pom.xml 中定义坐标,内容包括:groupId、artifactId、version,详细内容如下:-->
  <!--项目名称,定义为组织名+项目名,类似包名-->
  <groupId>org.ypf</groupId>
  <!-- 模块名称 -->
  <artifactId>Maven_Web1</artifactId>
  <!-- 项目版本号 -->
  <version>1.0-SNAPSHOT</version>
  <!-- 打包类型, jar包、war包、   还有pom:用于maven工程的继承,通常父工程设置为pom -->
  <packaging>war</packaging>

  <!-- 项目的显示名,常用于 Maven 生成的文档。-->
  <name>Maven_Web1 Maven Webapp</name>
  <!--项目描述,常用于 Maven 生成的文档 -->
  <url>http://www.example.com</url>

  <!--项目编译版本  -->
  <properties>
    <project.build.sourceEncoding>UTF-8</project.build.sourceEncoding>
    <maven.compiler.source>11</maven.compiler.source>
    <maven.compiler.target>11</maven.compiler.target>
  </properties>

  <!--  项目依赖构件配置,配置项目依赖构件的坐标-->
  <dependencies>
    <dependency>
      <groupId>junit</groupId>
      <artifactId>junit</artifactId>
      <version>4.11</version>
      <scope>test</scope>
    </dependency>
  </dependencies>

  <!--  项目构建配置,配置编译、运行插件等。-->
  <build>
    <finalName>Maven_Web1</finalName>
    <pluginManagement><!-- lock down plugins versions to avoid using Maven defaults (may be moved to parent pom) -->
      <plugins>
       <!--tomcat7插件  -->
        <plugin>
          <groupId>org.apache.tomcat.maven</groupId>
          <artifactId>tomcat7-maven-plugin</artifactId>
          <version>2.2</version>
          <configuration>
            <port>8888</port>
          </configuration>
        </plugin>
      <!-- 设置编译版本和编码 -->
        <!--<plugin>
          <groupId>org.apache.maven.plugins</groupId>
          <artifactId>maven-compiler-plugin</artifactId>
          <version>3.1</version>
          <configuration>
            <source>11</source>
            <target>11</target>
            <encoding>UTF-8</encoding>
          </configuration>
        </plugin>-->
        </plugins>
      </pluginManagement>
    </build>
  </project>
3. 依赖范围详解
A 依赖 B,需要在 A 的 pom.xml 文件中添加 B 的坐标,添加坐标时需要指定依赖范围,依赖范围包括:
(1). compile:编译范围,指 A在编译时依赖 B,此范围为默认依赖范围。编译范围的依赖会用在编译、测试、运行,由于运行时需要所以编译范围的依赖会被打包。
(2). provided:provided 依赖只有在当 JDK 或者一个容器已提供该依赖之后才使用, provided 依赖在编译和测试时需要,在运行时不需要,比如:servlet api 被 tomcat 容器提供。
(3). runtime:runtime 依赖在运行和测试系统的时候需要,但在编译的时候不需要。比如:jdbc的驱动包。由于运行时需要所以 runtime 范围的依赖会被打包。
(4). test:test 范围依赖 在编译和运行时都不需要,它们只有在测试编译和测试运行阶段可用,比如:junit。由于运行时不需要所以test范围依赖不会被打包。
(5). system:system 范围依赖与 provided 类似,但是你必须显式的提供一个对于本地系统中 JAR文件的路径,需要指定 systemPath 磁盘路径,system依赖不推荐使用。
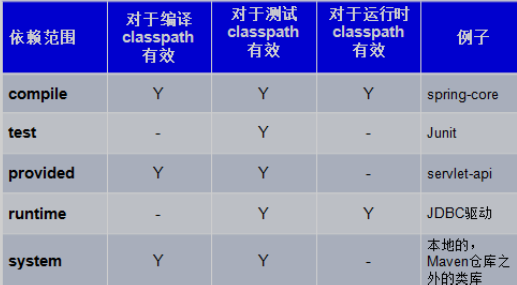
总结:
默认引入 的 jar 包 ------- compile 【默认范围 可以不写】(编译、测试、运行 都有效 )
servlet-api 、jsp-api ------- provided (编译、测试 有效, 运行时无效 防止和 tomcat 下 jar 冲突)
jdbc 驱动 jar 包 ---- runtime (测试、运行 有效 )
junit ----- test (测试有效)
依赖范围由强到弱的顺序是:compile>provided>runtime>test
!
- 作 者 : Yaopengfei(姚鹏飞)
- 博客地址 : http://www.cnblogs.com/yaopengfei/
- 声 明1 : 如有错误,欢迎讨论,请勿谩骂^_^。
- 声 明2 : 原创博客请在转载时保留原文链接或在文章开头加上本人博客地址,否则保留追究法律责任的权利。