1.背景
在单进程中对一个资源的并发操作需要加锁,而在分布式环境中加锁的方式则有所不同,需要分布式锁。
分布式锁在许多环境中是非常有用的原语,在这些环境中,不同的进程必须以互斥的方式使
用共享资源。[1]
一般来说,实现分布式锁的方式有以下几种:
- 使用MySQL,基于唯一索引。
- 使用ZooKeeper,基于临时有序节点。
- 使用Redis,基于setnx命令。
有许多库和博客文章描述了如何使用 Redis 实现 DLM(分布式锁管理器),但每个库使用的方法都有所不同,与使用稍微复杂一点的方法相比,许多库使用的方法和设计相对简单,并且只能保证较弱的可靠性。
Redis的作者antirez提出了一种称为 Redlock 的算法,它实现了比普通单实例方法更安全的 DLM,并可以用作实施更复杂或替代设计的基础。
尽管更加可靠的分布式锁需要考虑redis本身的集群拓扑,但是我们现在先不把这个逻辑放在客户端,看看单节点的redis是怎么做分布式锁的。
2.前置知识
这里有一些指向已经可用的实现的链接,可以用作参考。
Redlock-py (Python 实现)。
Pottery(Python 实现)。
Aioredlock(Asyncio Python 实现)。
Redsync(Go 实现)。
Redisson(Java 实现)。
Redlock-cpp(C++ 实现)。
2.1 redis分布式锁常识
1. 多个客户端要获取一个锁,根据设置key成功与否,表示客户端获取了这个锁。
在redis-cli中形如:set key value [EX seconds] [PX miliiseconds] [NX|XX]
set myset 2000 EX 10 NX
2.
redis支持lua脚本,各个lua脚本的执行是串行的。
在redis-cli中:SCRIPT LOAD命令 和 EVALSHA命令
SCRIPT LOAD: 导入一个str格式的lua脚本,返回该脚本的哈希值
EVALSHA:根据脚本哈希值执行前面的脚本
lua脚本中,KEYS代表字段名,ARGV代表KEYS对应的值,
EVALSHA搭配SCRIPT LOAD使用
SCRIPT LOAD "redis.call('SET', KEYS[1], ARGV[1]);redis.call('EXPIRE', KEYS[1], ARGV[2]); return 1;"
获得sha1后执行该sha1
evalsha <sha1>
利用set表示加锁的含义,有以下问题:
问题1:
为了防止加锁的时候异常,合并setnx和expire两个命令,防止出现异常,锁一直被持有。
setnx setnx
--> failed
expire(10) expire(10)
在set同时支持nx和过期的时候,已经不存在该问题;但是仍有问题2。
问题2:
为了防止A加锁之后crash掉,每个锁都需要加过期时间;为了防止A加锁的时候,在解锁的时候锁已经过期(key的存储已经过期),导致两种可能的后果:
1.A自己对这个锁进行两次解锁,返回错误;
2.锁在达到ttl之后被删除,B发现没有锁,直接进行加锁,
t1: A: lock+expire key=foo
t2: A: ttl过期,key失效 B: 获取lock中…
t3: A:process任务中 B: 成功lock,key=foo
t4: A:del lock(删掉了B的锁) B: process任务中
t5: A: … B:删除key=foo,发现失败
针对结果1:周期性持续地加锁,实现方式一般为新开一个线程,持续进行加锁直至锁被A释放。
针对结果2,解决方式1(不严谨):每个客户端加锁后在value设置自己的ID,删除的时候利用ID判断是否为自己持有的锁,如果不是则不删除;
解决方式2:利用lua脚本,也是判断value是否为客户端设置的ID,并且后续删除用lua脚本作为原子操作
3.python-redis-lock实现分析
下面以python-redis-lock为例,分析下redis分布式lock的实现
当然,这些都是没有考虑集群模式的redis部署的,如果想要更加完善地处理redis集群主从同步的问题,需要使用相应的redlock算法,后面再说。
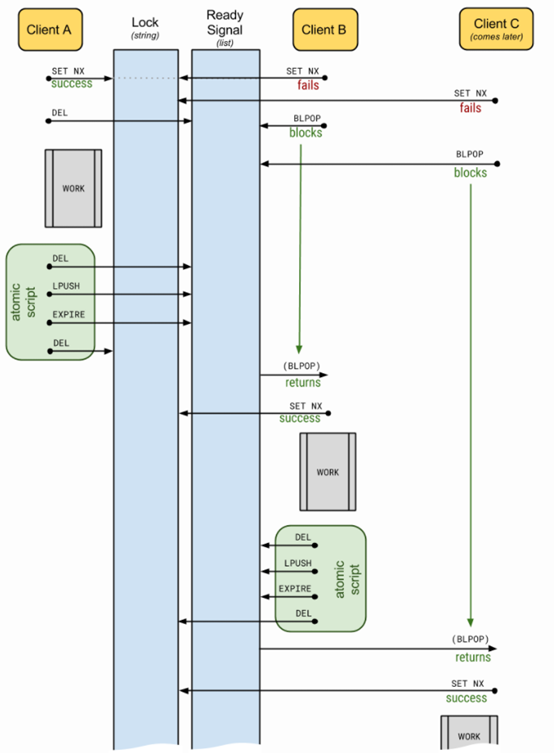
在该图中,加锁操作是SET_NX,原子脚本即是前面所说的lua脚本;
为了实现加锁,设置两个key,一个是目标锁,一个是辅助用的用来做ready signal;
对于clientB,在获取setnx失败之后,调用了BLPOP,当然,这个取决于acquire是不是使用了block选项,如果不是,就直接返回结果了;
BLPOP是blockpop,是阻塞在一个list上的pop操作,只有list非空才能往下执行;当list重新push值的时候只有一个client能获得加setnx的机会(当然如果这个时候又有一个新的client setnx成功了,clientB也只能等着)。这个实现也避免了惊群效应(也叫dogpile,狗堆效应)
代码如下:
    def acquire(self, blocking=True, timeout=None):
        """
        :param blocking:
            Boolean value specifying whether lock should be blocking or not.
        :param timeout:
            An integer value specifying the maximum number of seconds to block.
        """
        logger = loggers["acquire"]

        logger.debug("Getting %r ...", self._name)

        if self._held:
            raise AlreadyAcquired("Already acquired from this Lock instance.")

        if not blocking and timeout is not None:
            raise TimeoutNotUsable("Timeout cannot be used if blocking=False")

        if timeout:
            timeout = int(timeout)
            if timeout < 0:
                raise InvalidTimeout("Timeout (%d) cannot be less than or equal to 0" % timeout)

            if self._expire and not self._lock_renewal_interval and timeout > self._expire:
                raise TimeoutTooLarge("Timeout (%d) cannot be greater than expire (%d)" % (timeout, self._expire))

        busy = True
        blpop_timeout = timeout or self._expire or 0
        timed_out = False
        while busy:
            busy = not self._client.set(self._name, self._id, nx=True, ex=self._expire)
            if busy:
                if timed_out:
                    return False
                elif blocking:
                    timed_out = not self._client.blpop(self._signal, blpop_timeout) and timeout
                else:
                    logger.warning("Failed to get %r.", self._name)
                    return False

        logger.info("Got lock for %r.", self._name)
        if self._lock_renewal_interval is not None:
            self._start_lock_renewer()
        return True
该代码为加锁实例,其中有timeout参数表示加锁超时时间,block参数表示是否立即返回结果;blpop是list的pop命令;start_lock_renewer则实现了一个线程。
即使如此,思考一下,线程退出的时候需要注意线程的安全性,看看这个线程是怎么实现的
@staticmethod
def _lock_renewer(lockref, interval, stop):
    """
    Renew the lock key in redis every `interval` seconds for as long
    as `self._lock_renewal_thread.should_exit` is False.
    """
    while not stop.wait(timeout=interval):
        loggers["refresh.thread.start"].debug("Refreshing lock")
        lock = lockref()
        if lock is None:
            loggers["refresh.thread.stop"].debug(
                "The lock no longer exists, stopping lock refreshing"
            )
            break
        lock.extend(expire=lock._expire)
        del lock
    loggers["refresh.thread.exit"].debug("Exit requested, stopping lock refreshing")
这里可以看到是周期wait判断lock的;而且在另一个函数里是保证了先设置信号锁失效再删除该锁。
lua脚本示例为:
UNLOCK_SCRIPT = b"""
    if redis.call("get", KEYS[1]) ~= ARGV[1] then
        return 1
    else
        redis.call("del", KEYS[2])
        redis.call("lpush", KEYS[2], 1)
        redis.call("pexpire", KEYS[2], ARGV[2])
        redis.call("del", KEYS[1])
        return 0
    end
"""

# Covers both cases when key doesn't exist and doesn't equal to lock's id
EXTEND_SCRIPT = b"""
    if redis.call("get", KEYS[1]) ~= ARGV[1] then
        return 1
    elseif redis.call("ttl", KEYS[1]) < 0 then
        return 2
    else
        redis.call("expire", KEYS[1], ARGV[2])
        return 0
    end
其中UNLOCK_SCRIPT是解锁脚本,EXTEND_SCRIPT是续期脚本。
使用方式:
with redis_lock.Lock(conn, "name-of-the-lock"):
    print("Got the lock. Doing some work ...")
    time.sleep(5)
4.Redlock实现分析
pip install redlock-py
import redlock
class Redlock(object):

    default_retry_count = 3
    default_retry_delay = 0.2
    clock_drift_factor = 0.01
    unlock_script = """
    if redis.call("get",KEYS[1]) == ARGV[1] then
        return redis.call("del",KEYS[1])
    else
        return 0
    end"""

    def __init__(self, connection_list, retry_count=None, retry_delay=None):
        self.servers = []
        for connection_info in connection_list:
            try:
                if isinstance(connection_info, string_type):
                    server = redis.StrictRedis.from_url(connection_info)
                elif type(connection_info) == dict:
                    server = redis.StrictRedis(**connection_info)
                else:
                    server = connection_info
                self.servers.append(server)
            except Exception as e:
                raise Warning(str(e))
        self.quorum = (len(connection_list) // 2) + 1

        if len(self.servers) < self.quorum:
            raise CannotObtainLock(
                "Failed to connect to the majority of redis servers")
        self.retry_count = retry_count or self.default_retry_count
        self.retry_delay = retry_delay or self.default_retry_delay
   def lock(self, resource, ttl):
        retry = 0
        val = self.get_unique_id()

        # Add 2 milliseconds to the drift to account for Redis expires
        # precision, which is 1 millisecond, plus 1 millisecond min
        # drift for small TTLs.
        drift = int(ttl * self.clock_drift_factor) + 2

        redis_errors = list()
        while retry < self.retry_count:
            n = 0
            start_time = int(time.time() * 1000)
            del redis_errors[:]
            for server in self.servers:
                try:
                    if self.lock_instance(server, resource, val, ttl):
                        n += 1
                except RedisError as e:
                    redis_errors.append(e)
            elapsed_time = int(time.time() * 1000) - start_time
            validity = int(ttl - elapsed_time - drift)
            if validity > 0 and n >= self.quorum:
                if redis_errors:
                    raise MultipleRedlockException(redis_errors)
                return Lock(validity, resource, val)
            else:
                for server in self.servers:
                    try:
                        self.unlock_instance(server, resource, val)
                    except:
                        pass
                retry += 1
                time.sleep(self.retry_delay)
        return False
这里暂时不做分析,可以看到的是它已经把多个服务端加入到了自己的redis-lock中;显然要实现一个可用的分布式锁需要有更多的分布式组件支持增删节点,这里的分布式锁只是一个基础
5.总结
暂无
References
[1]Redis分布式锁 https://redis.io/topics/distlock
[2]Python-Redis-Lock库 https://pypi.org/project/python-redis-lock/
[3]Redis中使用lua脚本https://zhuanlan.zhihu.com/p/77484377