本文以源码分析+实际应用的形式,详细讲解了 Handler 机制的原理,以及在开发中的使用场景和要注意的地方。
一、基本原理回顾
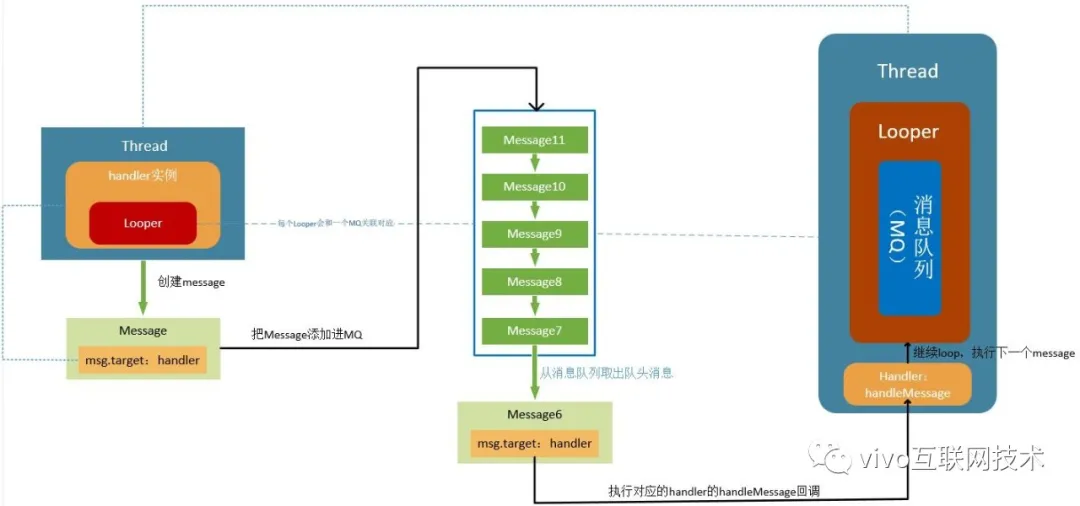
在 Android 开发中,Handler及相关衍生类的应用经常用到,Android的运行也是建立在这套机制上的,所以了解其中的原理细节,以及其中的坑对于每位开发者来说都是非常有必要的。Handler机制的五个组成部分:Handler、Thread(ThreadLocal)、Looper、MessageQueue、Message。
1、Thread(ThreadLocal)
Handler机制用到的跟Thread相关的,而根本原因是Handler必须和对应的Looper绑定,而Looper的创建和保存是跟Thread一一对应的,也就是说每个线程都可以创建唯一一个且互不相关的Looper,这是通过ThreadLocal来实现的,也就是说是用ThreadLocal对象来存储Looper对象的,从而达到线程隔离的目的。
static final ThreadLocal<Looper> sThreadLocal = new ThreadLocal<Looper>();

private static void prepare(boolean quitAllowed) {
    if (sThreadLocal.get() != null) {
        throw new RuntimeException("Only one Looper may be created per thread");
    }
    sThreadLocal.set(new Looper(quitAllowed));
}
2、Handler
Handler()
Handler(Callback callback)
Handler(Looper looper)
Handler(Looper looper, Callback callback)
Handler(boolean async)
Handler(Callback callback, boolean async)
Handler(Looper looper, Callback callback, boolean async)
2.1 创建Handler大体上有两种方式:
一种是不传Looper
这种就需要在创建Handler前,预先调用Looper.prepare来创建当前线程的默认Looper,否则会报错。
一种是传入指定的Looper
这种就是Handler和指定的Looper进行绑定,也就是说Handler其实是可以跟任意线程进行绑定的,不局限于在创建Handler所在的线程里。
2.2 async参数
这里Handler有个async参数,通过这个参数表明通过这个Handler发送的消息全都是异步消息,因为在把消息压入队列的时候,会把这个标志设置到message里.这个标志是全局的,也就是说通过构造Handler函数传入的async参数,就确定了通过这个Handler发送的消息都是异步消息,默认是false,即都是同步消息。至于这个异步消息有什么特殊的用途,我们在后面讲了屏障消息后,再联系起来讲。
private boolean enqueueMessage(MessageQueue queue, Message msg, long uptimeMillis) {
    msg.target = this;
    if (mAsynchronous) {
        msg.setAsynchronous(true);
    }
    return queue.enqueueMessage(msg, uptimeMillis);
}
2.3 callback参数
这个回调参数是消息被分发之后的一种回调,最终是在msg调用Handler的dispatchMessage时,根据实际情况进行回调:
public void dispatchMessage(Message msg) {
    if (msg.callback != null) {
        handleCallback(msg);
    } else {
        if (mCallback != null) {
            if (mCallback.handleMessage(msg)) {
                return;
            }
        }
        handleMessage(msg);
    }
}
3、Looper
用于为线程运行消息循环的类。默认线程没有与它们相关联的Looper;所以要在运行循环的线程中调用prepare(),然后调用loop()让它循环处理消息,直到循环停止。
private static void prepare(boolean quitAllowed) {
        if (sThreadLocal.get() != null) {
            throw new RuntimeException("Only one Looper may be created per thread");
        }
        sThreadLocal.set(new Looper(quitAllowed));
    }

    public static void loop() {
        ...

        for (;;) {
        ...
        }

        ...
    }

class LooperThread extends Thread {
    public Handler mHandler;

    public void run() {

        Looper.prepare();

        mHandler = new Handler() {
            public void handleMessage(Message msg) {

                Message msg=Message.obtain();
            }
        };

        Looper.loop();
    }
}
既然在使用Looper前,必须调用prepare创建Looper,为什么我们平常在主线程里没有看到调用prepare呢?这是因为Android主线程创建的时候,在ActivityThread的入口main方法里就已经默认创建了Looper。
public static void main(String[] args) {
    ...
    Looper.prepareMainLooper();
    ...
    Looper.loop();
    ...
}
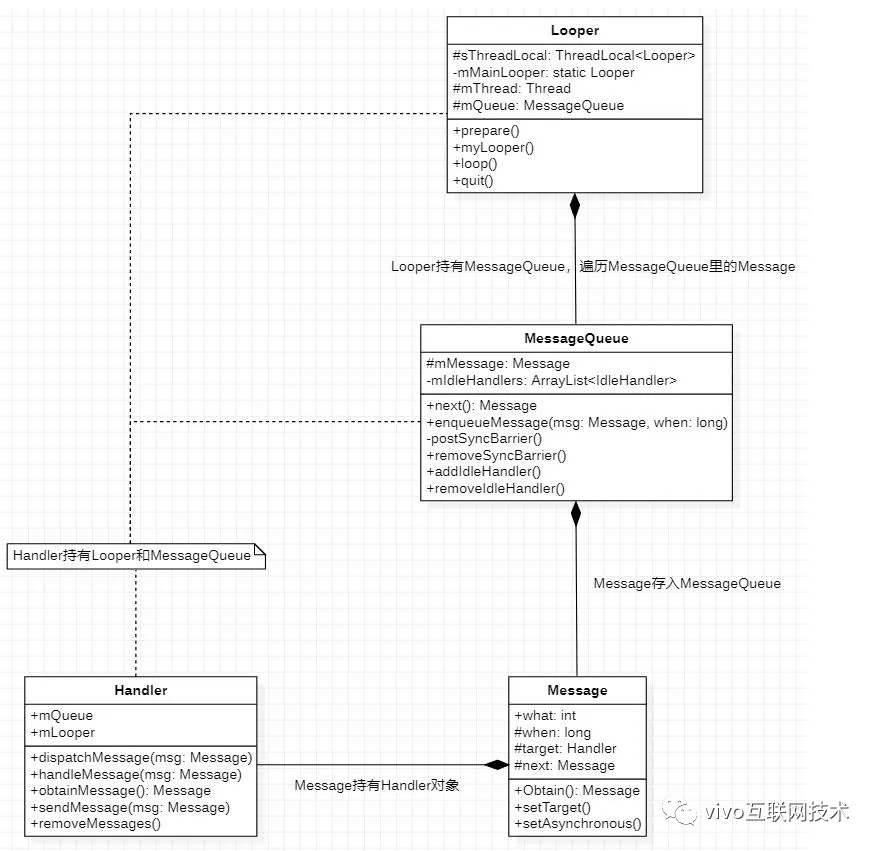
我们再来回顾一下Looper相关类的之间的联系:
![]()
4、MessageQueue 和 Message
MessageQueue是一个消息队列,Handler将Message发送到消息队列中,消息队列会按照一定的规则取出要执行的Message。Message并不是直接加到MessageQueue的,而是通过Handler对象和Looper关联到一起。
MessageQueue里的message是按时间排序的,越早加入队列的消息放在队列头部,优先执行,这个时间就是sendMessage的时候传过来的,默认是用的当前系统从启动到现在的非休眠的时间SystemClock.uptimeMillis()。
sendMessageAtFrontOfQueue 这个方法传入的时间是0,也就是说调用这个方法的message肯定会放到对消息队列头部,但是这个方法不要轻易用,容易引发问题。
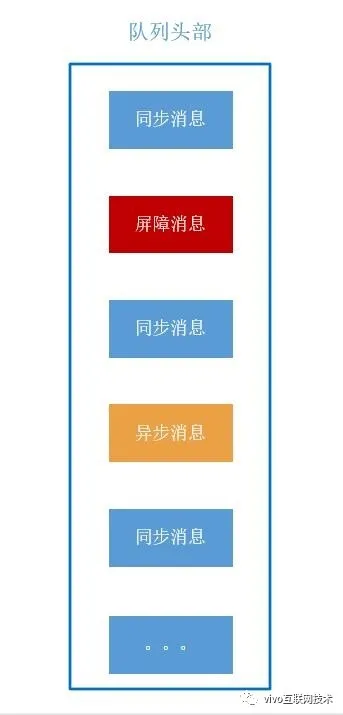
存到MessageQueue里的消息可能有三种:同步消息,异步消息,屏障消息。
![]()
4.1 同步消息
我们默认用的都是同步消息,即前面讲Handler里的构造函数参数的async参数默认是false,同步消息在MessageQueue里的存和取完全就是按照时间排的,也就是通过msg.when来排的。
4.2 异步消息
异步消息就是在创建Handler如果传入的async是true或者发送来的Message通过msg.setAsynchronous(true);后的消息就是异步消息,异步消息的功能要配合下面要讲的屏障消息才有效,否则和同步消息是一样的处理。
private boolean enqueueMessage(MessageQueue queue, Message msg, long uptimeMillis) {
    msg.target = this;
    // 这个mAsynchronous就是在创建Handler的时候传入async参数
    if (mAsynchronous) {
        msg.setAsynchronous(true);
    }
    return queue.enqueueMessage(msg, uptimeMillis);
}
4.3 Barrier(屏障)消息
屏障(Barrier) 是一种特殊的Message,它最大的特征就是target为null(只有屏障的target可以为null,如果我们自己设置Message的target为null的话会报异常),并且arg1属性被用作屏障的标识符来区别不同的屏障。屏障的作用是用于拦截队列中同步消息,放行异步消息。
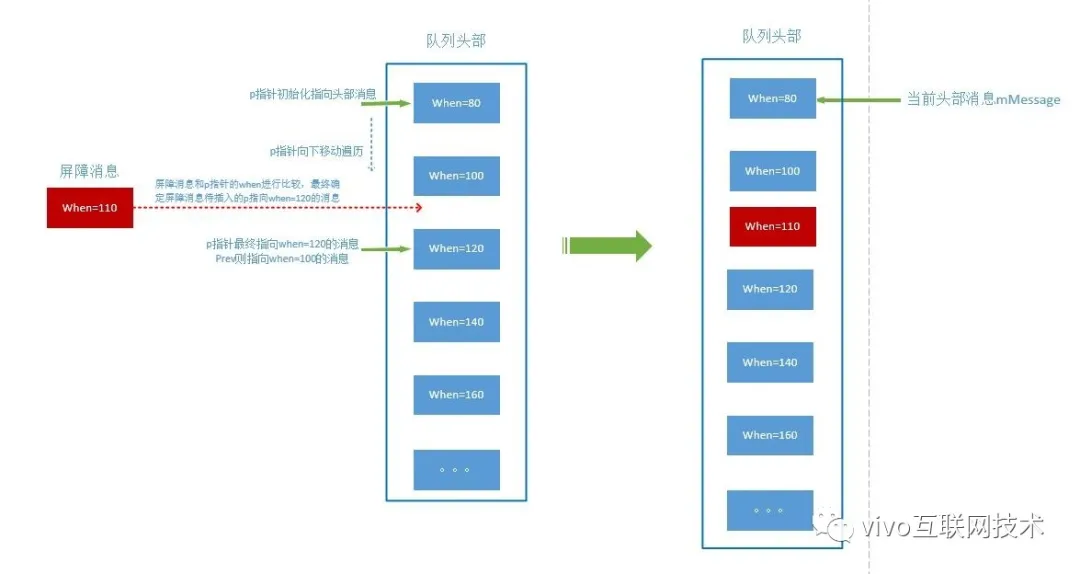
那么屏障消息是怎么被添加和删除的呢?我们可以看到在MessageQueue里有添加和删除屏障消息的方法:
private int postSyncBarrier(long when) {
    // Enqueue a new sync barrier token.
    // We don't need to wake the queue because the purpose of a barrier is to stall it.
    synchronized (this) {
        final int token = mNextBarrierToken++;
        final Message msg = Message.obtain();
        msg.markInUse();
        msg.when = when;
        msg.arg1 = token;

        Message prev = null;
        Message p = mMessages;
        if (when != 0) {
            // 这里是说如果p指向的消息时间戳比屏障消息小,说明这个消息比屏障消息先进入队列,
            // 那么这个消息不应该受到屏障消息的影响(屏障消息只影响比它后加入消息队列的消息),找到第一个比屏障消息晚进入的消息指针
            while (p != null && p.when <= when) {
                prev = p;
                p = p.next;
            }
        }
        // 上面找到第一个比屏障消息晚进入的消息指针之后,把屏障消息插入到消息队列中,也就是屏障消息指向第一个比它晚进入的消息p,
        // 上一个比它早进入消息队列的prev指向屏障消息,这样就完成了插入。
        if (prev != null) { // invariant: p == prev.next
            msg.next = p;
            prev.next = msg;
        } else {
        // 如果prev是null,说明上面没有经过移动,也就是屏障消息就是在消息队列的头部了。
            msg.next = p;
            mMessages = msg;
        }
        return token;
    }
}

public void removeSyncBarrier(int token) {
    // Remove a sync barrier token from the queue.
    // If the queue is no longer stalled by a barrier then wake it.
    synchronized (this) {
        Message prev = null;
        Message p = mMessages;
        // 前面在插入屏障消息后会生成一个token,这个token就是用来删除该屏障消息用的。
        // 所以这里通过判断target和token来找到该屏障消息,从而进行删除操作
        // 找到屏障消息的指针p
        while (p != null && (p.target != null || p.arg1 != token)) {
            prev = p;
            p = p.next;
        }
        if (p == null) {
            throw new IllegalStateException("The specified message queue synchronization "
                    + " barrier token has not been posted or has already been removed.");
        }
        final boolean needWake;
        // 上面找到屏障消息的指针p后,把前一个消息指向屏障消息的后一个消息,这样就把屏障消息移除了
        if (prev != null) {
            prev.next = p.next;
            needWake = false;
        } else {
            mMessages = p.next;
            needWake = mMessages == null || mMessages.target != null;
        }
        p.recycleUnchecked();

        // If the loop is quitting then it is already awake.
        // We can assume mPtr != 0 when mQuitting is false.
        if (needWake && !mQuitting) {
            nativeWake(mPtr);
        }
    }
}
4.4 屏障消息的作用
说完了屏障消息的插入和删除,那么屏障消息在哪里起作用的?它跟前面提到的异步消息又有什么关联呢?我们可以看到MessageQueue的next方法里有这么一段:
// 这里就是判断当前消息是否是屏障消息,判断依据就是msg.target==null, 如果存在屏障消息,那么在它之后进来的消息中,
// 只把异步消息放行继续执行,同步消息阻塞,直到屏障消息被remove掉。
if (msg != null && msg.target == null) {
    // Stalled by a barrier.  Find the next asynchronous message in the queue.
    do {
        prevMsg = msg;
        msg = msg.next;
        // 这里的isAsynchronous方法就是前面设置进msg的async参数,通过它判断如果是异步消息,则跳出循环,把该异步消息返回
        // 否则是同步消息,把同步消息阻塞。
    } while (msg != null && !msg.isAsynchronous());
}
4.5 屏障消息的实际应用
屏障消息的作用是把在它之后入队的同步消息阻塞,但是异步消息还是正常按顺序取出执行,那么它的实际用途是什么呢?我们看到ViewRootImpl.scheduleTraversals()用到了屏障消息和异步消息。
TraversalRunnable的run(),在这个run()中会执行doTraversal(),最终会触发View的绘制流程:measure(),layout(),draw()。为了让绘制流程尽快被执行,用到了同步屏障技术。
void scheduleTraversals() {
    if (!mTraversalScheduled) {
        mTraversalScheduled = true;
        // 这里先将主线程的MessageQueue设置了个消息屏障
        mTraversalBarrier = mHandler.getLooper().getQueue().postSyncBarrier();
        // 这里发送了个异步消息mTraversalRunnable,这个mTraversalRunnable最终会执行doTraversal(),也就是会触发View的绘制流程
        // 也就是说通过设置屏障消息,会把主线程的同步消息先阻塞,优先执行View绘制这个异步消息进行界面绘制。
        // 这很好理解,界面绘制的任务肯定要优先,否则就会出现界面卡顿。
        mChoreographer.postCallback(
                Choreographer.CALLBACK_TRAVERSAL, mTraversalRunnable, null);
        if (!mUnbufferedInputDispatch) {
            scheduleConsumeBatchedInput();
        }
        notifyRendererOfFramePending();
        pokeDrawLockIfNeeded();
    }
}

private void postCallbackDelayedInternal(int callbackType,
        Object action, Object token, long delayMillis) {
    if (DEBUG_FRAMES) {
        Log.d(TAG, "PostCallback: type=" + callbackType
                + ", action=" + action + ", token=" + token
                + ", delayMillis=" + delayMillis);
    }

    synchronized (mLock) {
        final long now = SystemClock.uptimeMillis();
        final long dueTime = now + delayMillis;
        mCallbackQueues[callbackType].addCallbackLocked(dueTime, action, token);

        if (dueTime <= now) {
            scheduleFrameLocked(now);
        } else {
            Message msg = mHandler.obtainMessage(MSG_DO_SCHEDULE_CALLBACK, action);
            msg.arg1 = callbackType;
            // 设置该消息是异步消息
            msg.setAsynchronous(true);
            mHandler.sendMessageAtTime(msg, dueTime);
        }
    }
}
4.6 我们能用屏障消息做什么?
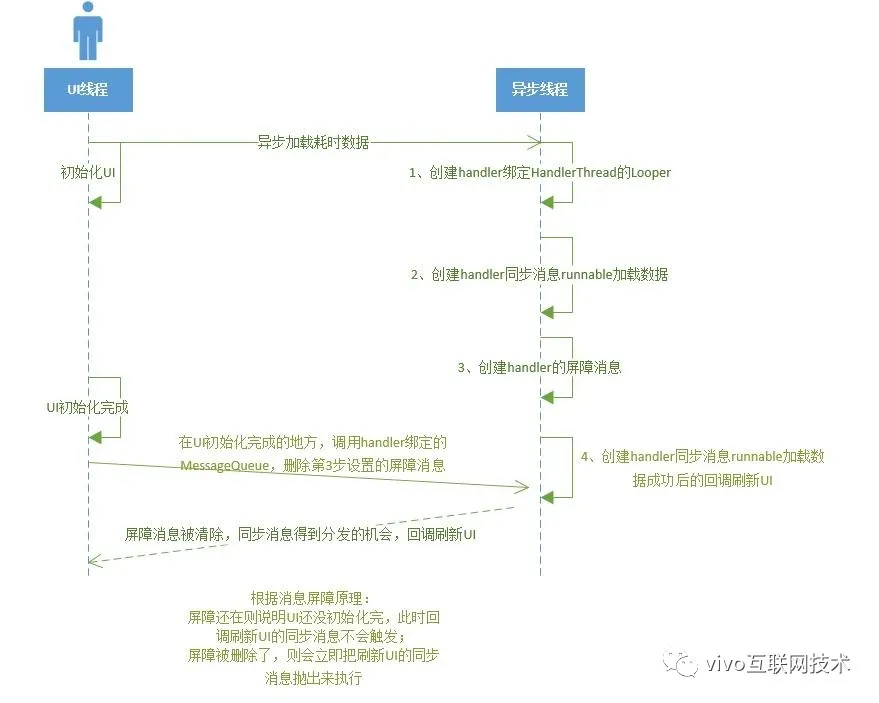
那么除了系统中使用到了屏障消息,我们在开发中有什么场景能派上用场吗? 运用屏障消息可以阻塞同步消息的特性,我们可以用来实现UI界面初始化和数据加载同时进行。
我们一般在Activity创建的时候,为了减少空指针异常的发生,都会在onCreate先setContent,然后findView初始化控件,然后再执行网络数据加载的异步请求,待网络数据加载完成后,再刷新各个控件的界面。
试想一下,怎么利用屏障消息的特性来达到界面初始化和异步网络数据的加载同时进行,而不影响界面渲染?先来看一个时序图:
![]()
我们通过下面伪代码进一步加深理解:
// 在上一个页面里异步加载下一个页面的数据
 // 网络请求返回的数据
    Data netWorkData;
    // 创建屏障消息会生成一个token,这个token用来删除屏障消息,很重要。
    int barrierToken;

    // 创建异步线程加载网络数据
    HandlerThread thread = new HandlerThread("preLoad"){
        @Override
        protected void onLooperPrepared() {
            Handler mThreadHandler = new Handler(thread.getLooper());
            // 1、把请求网络耗时消息推入消息队列
            mHandler.post(new Runnable() {
                @Override
                public void run() {
                    // 异步耗时操作:网络请求数据,赋值给netWorkData
                    netWorkData = xxx;

                }
            });

            // 2、然后给异步线程的队列发一个屏障消息推入消息队列
            barrierToken = thread.getLooper().getQueue().postSyncBarrier();

            // 3、然后给异步线程的消息队列发一个刷新UI界面的同步消息
            // 这个消息在屏障消息被remove前得不到执行的。
            mHandler.post(new Runnable() {
                @Override
                public void run() {
                    // 回调主线程, 把netWorkData赋给监听方法,刷新界面

                }
            });
        }
    };
    thread.start();


// 当前界面初始化界面
protected void onCreate(Bundle savedInstanceState) {
    setContentView(view);

    // 各种findview操作完成
    Button btn = findViewById(R.id.xxx);
    ...
    // 4、待控件初始化完成,把异步线程设置的屏障消息remove掉,这样异步线程请求数据完成后,3、处的刷新UI界面的同步消息就有机会执行,就可以安全得刷新界面了。
    thread.getLooper().getQueue().removeSyncBarrier(barrierToken);
}
但是,MessageQueue源码里我们我们看到,屏障消息的创建和删除都是隐藏方法(@hide),我们没法直接调用,只能用反射来调用,所以在实际使用中还得综合验证。
4.7 IdleHandler及应用
IdleHandler,字面意思就是空闲的处理器(就是说我是在消息队列空闲的时候才会执行的,如果消息队列里有其他非IdleHandler消息在执行,则我先不执行),它其实就是一个接口,我们就认为它是空闲消息吧,只不过它不是存在MessageQueue里,而是以数组的形式保存的。
public static interface IdleHandler {
    /**
     * Called when the message queue has run out of messages and will now
     * wait for more.  Return true to keep your idle handler active, false
     * to have it removed.  This may be called if there are still messages
     * pending in the queue, but they are all scheduled to be dispatched
     * after the current time.
     */
    boolean queueIdle();
}
我们看到MessageQueue有添加和删除IdleHandler的方法,IdleHandler被保存在一个ArrayList里:
private final ArrayList<IdleHandler> mIdleHandlers = new ArrayList<IdleHandler>();

...

public void addIdleHandler(@NonNull IdleHandler handler) {
    if (handler == null) {
        throw new NullPointerException("Can't add a null IdleHandler");
    }
    synchronized (this) {
        mIdleHandlers.add(handler);
    }
}

public void removeIdleHandler(@NonNull IdleHandler handler) {
    synchronized (this) {
        mIdleHandlers.remove(handler);
    }
}
那么,它是怎么实现在消息队列空闲的间隙得到执行的呢?还是看next()方法。
// If first time idle, then get the number of idlers to run.
// Idle handles only run if the queue is empty or if the first message
// in the queue (possibly a barrier) is due to be handled in the future.
// pendingIdleHandlerCount < 0是说for循环只执行第一次
// mMessages == null || now < mMessages.when) 是说当前消息队列没有消息或者要执行的消息晚于当前时间
// 说明现在消息队列处于空闲。
if (pendingIdleHandlerCount < 0
        && (mMessages == null || now < mMessages.when)) {
    pendingIdleHandlerCount = mIdleHandlers.size();
}
if (pendingIdleHandlerCount <= 0) {
    // No idle handlers to run.  Loop and wait some more.
    mBlocked = true;
    continue;
}
在上面这段代码判定当前消息队列处于空闲后,就会拿到空闲消息的大小,下面这段代码就是把把空闲消息执行一遍。
// Run the idle handlers.
// We only ever reach this code block during the first iteration.
for (int i = 0; i < pendingIdleHandlerCount; i++) {
    final IdleHandler idler = mPendingIdleHandlers[i];
    mPendingIdleHandlers[i] = null; // release the reference to the handler

    boolean keep = false;
    try {
        // 如果queueIdle返回true,则该空闲消息不会被自动删除,在下次执行next的时候,如果还出现队列空闲,会再次执行。
        // 如果返回false,则该空闲消息会在执行完后,被自动删除掉。
        keep = idler.queueIdle();
    } catch (Throwable t) {
        Log.wtf(TAG, "IdleHandler threw exception", t);
    }

    if (!keep) {
        synchronized (this) {
            mIdleHandlers.remove(idler);
        }
    }
}

// Reset the idle handler count to 0 so we do not run them again.
// 这里把空闲消息标志置为0,而不置为-1,就是说本次已经处理完,防止for循环反复执行,影响其他消息的执行
pendingIdleHandlerCount = 0;

// While calling an idle handler, a new message could have been delivered
// so go back and look again for a pending message without waiting.
nextPollTimeoutMillis = 0;
总结一下:
- 如果本次循环拿到的消息为空,或者这个消息是一个延时的消息而且还没到指定的触发时间,那么,就认定当前的队列为空闲状态。
- 接着就会遍历mPendingIdleHandlers数组(这个数组里面的元素每次都会到mIdleHandlers中去拿)来调用每一个IdleHandler实例的queueIdle方法, 如果这个方法返回false的话,那么这个实例就会从mIdleHandlers中移除,也就是当下次队列空闲的时候,不会继续回调它的queueIdle方法了。
- 处理完IdleHandler后会将nextPollTimeoutMillis设置为0,也就是不阻塞消息队列,当然要注意这里执行的代码同样不能太耗时,因为它是同步执行的,如果太耗时肯定会影响后面的message执行。
IdleHandler的原理大概就是上面讲的那样,那么能力决定用处,从本质上讲就是趁着消息队列空闲的时候干点事情,具体做什么,是在IdleHandler的queueIdle()方法里。那么IdleHandler在系统源码里使用场景是怎样的?我们可以看到它在主线程生命周期处理中使用比较多,比如在ActivityThread里有个 就有一个名叫GcIdler的内部类,实现的就是IdleHandler接口,它的作用就是在主线程空闲的时候对内存进行强制GC。
final class GcIdler implements MessageQueue.IdleHandler {
    @Override
    public final boolean queueIdle() {
        doGcIfNeeded();
        return false;
    }
}


// 这里的意思就是说判断距离上次GC的时间是否超过5秒,超过则执行后台强制GC
void doGcIfNeeded() {
    mGcIdlerScheduled = false;
    final long now = SystemClock.uptimeMillis();
    //Slog.i(TAG, "**** WE MIGHT WANT TO GC: then=" + Binder.getLastGcTime()
    //        + "m now=" + now);
    if ((BinderInternal.getLastGcTime()+MIN_TIME_BETWEEN_GCS) < now) {
        //Slog.i(TAG, "**** WE DO, WE DO WANT TO GC!");
        BinderInternal.forceGc("bg");
    }
}
我们看看它是在哪里添加到消息队列的:
// 这个方法是在mH的handleMessage方法里调的,也就是说也是通过AMS(ActivityManagerService)把消息发送到主线程消息队列
void scheduleGcIdler() {
    if (!mGcIdlerScheduled) {
        mGcIdlerScheduled = true;
        Looper.myQueue().addIdleHandler(mGcIdler);
    }
    mH.removeMessages(H.GC_WHEN_IDLE);
}
还有就是在ActivityThread的performLaunchActivity方法执行时,最终会执行到Instrumentation.callActivityOnCreate方法,在这个方法里,也有用到IdleHandler做一些额外的事情。
public void callActivityOnCreate(Activity activity, Bundle icicle) {
    prePerformCreate(activity);
    activity.performCreate(icicle);
    postPerformCreate(activity);
}

private void prePerformCreate(Activity activity) {
    if (mWaitingActivities != null) {
        synchronized (mSync) {
            final int N = mWaitingActivities.size();
            for (int i=0; i<N; i++) {
                final ActivityWaiter aw = mWaitingActivities.get(i);
                final Intent intent = aw.intent;
                if (intent.filterEquals(activity.getIntent())) {
                    aw.activity = activity;
                    mMessageQueue.addIdleHandler(new ActivityGoing(aw));
                }
            }
        }
    }
}
除此之外,在一些第三方库中都有使用IdleHandler,比如LeakCanary,Glide中有使用到。
那么对于我们来说,IdleHandler可以有些什么使用场景呢?根据它最核心的原理,在消息队列空闲的时候做点事情,那么对于主线程来讲,我们有很多的一些代码不是必须要跟随生命周期方法同步执行的,就可以用IdleHandler,减少主线程的耗时,也就减少应用或者Activity的启动时间。例如:一些第三方库的初始化,埋点尤其是延时埋点上报等,都可以用IdleHandler添加到消息队列里。
==好了,提个问题:前面我们说了在主线程创建的main函数里创建了Handler和Looper,回顾了上面的Handler机制的原理,我们都知道一般线程执行完就会退出,由系统回收资源,那Android UI线程也是基于Handler Looper机制的,那么为什么UI线程可以一直常驻?不会被阻塞呢?==
因为Looper在执行loop方法里,是一个for循环,也就是说线程永远不会执行完退出,所以打开APP可以一直显示,Activity的生命周期就是通过消息队列把消息一个一个取出来执行的,然后因为MessageQueue的休眠唤醒机制,当消息队列里没有消息时,消息队列会进入休眠,并释放CPU资源,当又有新消息进入队列时,会唤醒队列,把消息取出来执行。
二、Handler应用之HandlerThread
HandlerThread本质上是一个Thread,所不同的是,它充分利用了Handler机制,通过在内部创建Looper循环,外部通过Handler把异步任务推送给消息队列,从而达到不用重复创建多个Thread,即能将多个异步任务排队进行异步执行,它的原理很简单:
@Override
public void run() {
    mTid = Process.myTid();
    Looper.prepare();
    synchronized (this) {
        mLooper = Looper.myLooper();
        notifyAll();
    }
    Process.setThreadPriority(mPriority);
    onLooperPrepared();
    Looper.loop();
    mTid = -1;
}
在线程的run方法里创建了looper循环,这样这个线程不主动quit的话,不会销毁,有消息则执行消息,没有消息根据MessageQueue休眠机制,会释放CPU资源,进入休眠。
使用HandlerThread时,我们注意到,在创建Handler时,是要传入线程的Looper进行绑定的,所以必须先执行HandlerThread的start方法,因为执行start方法,才会执行HandlerThread的run方法,才会创建线程的Looper,创建Handler传入的Looper才不会是null。
所以我们一般使用是这样的:
- 创建HandlerThread后,调用start,然后再创建Handler;
- 从run方法里我们看到有个onLooperPrepared()方法,可以实现这个方法,在这个方法里创建Handler,这样就不受start位置的限制了,原理就是以为run方法是在调用start方法后才会执行。
那么怎么回收一个HandlerThread呢?我们看到HandlerThread里有个quit方法,这个方法最终会调用到MessageQueue的quit方法,从而结束消息分发,最终终止一个HandlerThread线程。
public boolean quit() {
    Looper looper = getLooper();
    if (looper != null) {
        looper.quit();
        return true;
    }
    return false;
}
三、Handler应用之IntentService
IntentService其实是Service和HandlerThread的结合体,我们可以看到在onCreate里创建了个HandlerThread并创建了个Handler和该HandlerThread绑定,然后在onStat方法里以消息的形式发送给HandlerThread执行
@Override
public void onCreate() {
    // TODO: It would be nice to have an option to hold a partial wakelock
    // during processing, and to have a static startService(Context, Intent)
    // method that would launch the service & hand off a wakelock.

    super.onCreate();
    // 创建HandlerThread
    HandlerThread thread = new HandlerThread("IntentService[" + mName + "]");
    thread.start();

    // 创建Handler和HandlerThread绑定
    mServiceLooper = thread.getLooper();
    mServiceHandler = new ServiceHandler(mServiceLooper);
}

@Override
public void onStart(@Nullable Intent intent, int startId) {
    Message msg = mServiceHandler.obtainMessage();
    msg.arg1 = startId;
    msg.obj = intent;
    // 想HandlerThread的消息队列发送消息
    mServiceHandler.sendMessage(msg);
}
最终在handleMessage里执行
private final class ServiceHandler extends Handler {
        public ServiceHandler(Looper looper) {
            super(looper);
        }

        @Override
        public void handleMessage(Message msg) {
            onHandleIntent((Intent)msg.obj);
            stopSelf(msg.arg1);
        }
    }
所以我们使用IntentService都必须实现onHandleIntent这个抽象方法,在这个抽象方法里做具体的业务操作。
我们都知道IntentService在执行完异步任务后,会自动销毁,这是怎么实现的?
public ServiceHandler(Looper looper) {
        super(looper);
    }

    @Override
    public void handleMessage(Message msg) {
        onHandleIntent((Intent)msg.obj);
        // 答案在这里:在这里会停止Service
        stopSelf(msg.arg1);
    }
}

// 然后在onDestory里会终止掉消息循环,从而达到销毁异步线程的目的:
@Override
public void onDestroy() {
    mServiceLooper.quit();
}
四、Handler.post和View.post
我们先来看个大家平常经常使用的案例:获取View的宽高。
@Override
protected void onCreate(Bundle savedInstanceState) {

    // 位置1
    Log.i("view_w_&_h", "onCreate " + mView.getWidth() + " " + mView.getHeight());
    mView.post(new Runnable() {
        @Override
        public void run() {
        // 位置2
            Log.i("view_w_&_h", "onCreate postRun " + mView.getWidth() + " " + mView.getHeight());
        }
    });

    new Handler(Looper.getMainLooper()).post(new Runnable() {
        @Override
        public void run() {
        // 位置3
            Log.i("view_w_&_h", "onCreate Handler " + mView.getWidth() + " " + mView.getHeight());
        }
    });
}

@Override
protected void onResume() {
    super.onResume();
    // 位置4
    Log.i("view_w_&_h", "onResume " + mView.getWidth() + " " + mView.getHeight());

    new Handler(Looper.getMainLooper()).post(new Runnable() {
        @Override
        public void run() {
            // 位置5
            Log.i("view_w_&_h", "onResume Handler " + mView.getWidth() + " " + mView.getHeight());
        }
    });
}
这几个位置,哪些能获取到mView的宽高?
我们都知道在View被attach到window之前,是获取不到View的宽高的,因为这个时候View还没有被Measure、layout、draw,所以在onCreate或者onResume直接调用View的宽高方法,都是0,Handler.post在onCreate里也是获取不到,但是在onResume里能获取到,而View.post无论放在onCreate或者onResume里,都能获取到View的宽高,为什么?
我们先看个简版的View的绘制流程:
![]()
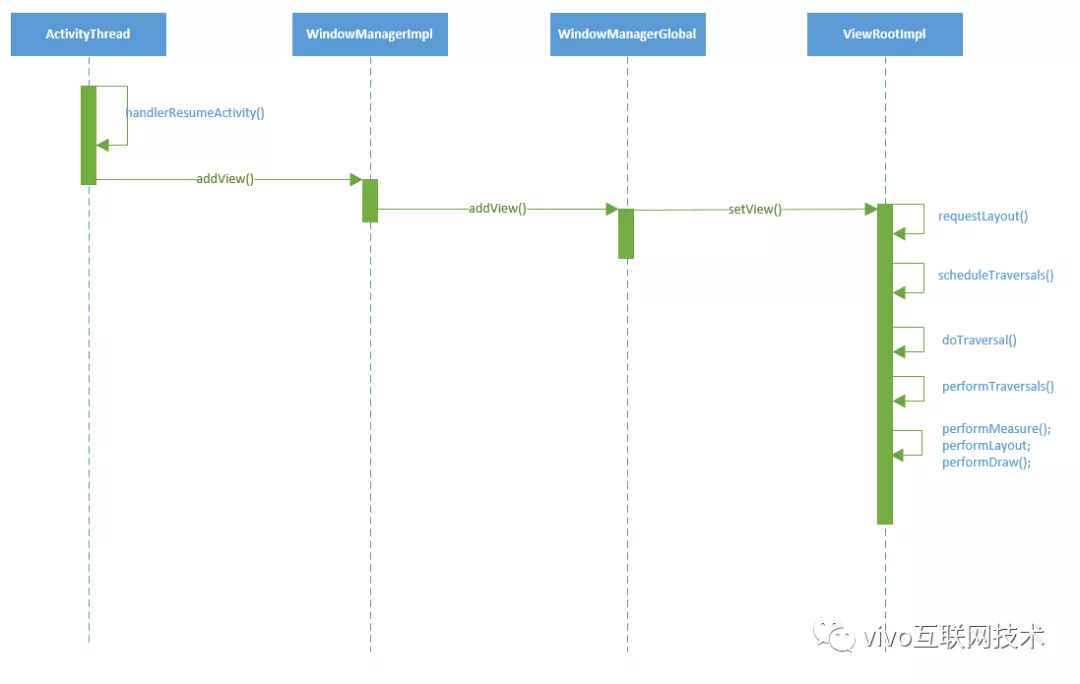
我们都知道View的最终绘制是在performTraversals()方法里,包括measure、layout、draw,从上面的图往上追溯,我们知道,View的绘制是在ActivityThread的handleResumeActivity方法里,这个方法相信大家不会陌生,这个方法就是会回调Activity的onResume方法的顶级方法。
final void handleResumeActivity(IBinder token, boolean clearHide, boolean isForward, boolean reallyResume, int seq, String reason) {
    ...
    // 这里追溯进去,最终会调用Activity的onStart方法和onResume方法
    r = performResumeActivity(token, clearHide, reason);

    ...

    // 调用WindowManager的addView方法,这里就是最终执行View绘制的地方
    wm.addView(decor, l);

    ...
}
从上面的代码片段执行顺序来看,Activity的onStart和onResume被执行的时候,其实界面还没有开始进行绘制(wm.addView(decor, l)还没执行到),这里就可以解释为什么用Handler.post在onCreate里拿不到宽高。因为Handler机制,它是把消息推送到主线程的消息队列里去,在onCreate里把消息推到消息队列时,onResume的消息都还没入队,也就没有执行,所以拿不到。那为什么onResume里能拿到呢?因为消息队列的机制,Handler.post推送的消息,必须得等上一个消息执行完才能得到执行,所以它必须得等handleResumeActivity执行完,而handleResumeActivity执行完成后,View已经绘制完成了,当然就能拿到宽高了。
好了,现在解释第二个疑问,为什么View.post在onCreate里能拿到View的宽高呢?我们先看下View.post方法:
public boolean post(Runnable action) {
    final AttachInfo attachInfo = mAttachInfo;
    // attachInfo不为null,说明View已经被attach到window,也就是完成了绘制,所以直接把消息推送到主线程的消息队列执行。
    if (attachInfo != null) {
        return attachInfo.mHandler.post(action);
    }

    // Postpone the runnable until we know on which thread it needs to run.
    // Assume that the runnable will be successfully placed after attach.
    // 关键就在这里,走到这里,说明attachInfo为null,也就是现在View还没attach到window,所以把消息临时保存到RunQueue里
    getRunQueue().post(action);
    return true;
}
上面我们可以看到,如果attachInfo为null,则Runnable会临时存储起来,保存到RunQueue里,并没有立即执行,那么保存到RunQueue是什么时候被执行的呢?
我们看到HandlerActionQueue有个executeActions方法,这个方法就是用来执行保存其中的Runnable的:
public void executeActions(Handler handler) {
    synchronized (this) {
        final HandlerAction[] actions = mActions;
        for (int i = 0, count = mCount; i < count; i++) {
            final HandlerAction handlerAction = actions[i];
            handler.postDelayed(handlerAction.action, handlerAction.delay);
        }

        mActions = null;
        mCount = 0;
    }
}
那么这个方法是在什么时机调用的呢?接着往下看:在View的dispatchAttachedToWindow方法里,我们看到调用了RunQueue的executeActions,执行保存在RunQueue里的runnable。
void dispatchAttachedToWindow(AttachInfo info, int visibility) {

    ...

    // Transfer all pending runnables.
    if (mRunQueue != null) {
        mRunQueue.executeActions(info.mHandler);
        mRunQueue = null;
    }

    onAttachedToWindow();

    ...
}
那么dispatchAttachedToWindow又是在什么时候被调用呢?在ViewRootImpl的performTraversals方法里,我们看到dispatchAttachedToWindow被执行。host就是DecorView。
private void performTraversals() {
    ...
    host.dispatchAttachedToWindow(mAttachInfo, 0);
    ...
    performMeasure();
    ...
    performLayout();
    ...
    performDraw();
}
从前面的View绘制的UML时序图,我们知道,performTraversals是在ActivityThread的handleResumeActivity被调用的。
总结一下:
系统在执行ActivityThread的handleResumeActivity的方法里,最终会调到ViewRootImpl的performTraversals()方法,performTraversals()方法调用host的dispatchAttachedToWindow()方法,host就是DecorView也就是View,接着在View的dispatchAttachedToWindow()方法中调用mRunQueue.executeActions()方法,这个方法内部会遍历HandlerAction数组,利用Handler来post之前存放的Runnable。
这里就可以解释为什么View.post在onCreate里同样可以得到View的宽高,是因为View.post发出的消息,它被执行的时机是在View被绘制之后。
==可能有同学要问了:dispatchAttachedToWindow 方法是在 performMeasure 方法之前调用的,既然在调用的时候还没有执行performMeasure来进行测量,那么为什么在执行完dispatchAttachedToWindow方法后就可以获取到宽高呢?==
还是回到Handler机制最基本的原理,消息是以队列的形式存在消息队列里,然后依次等待Loop执行的,而performTraversals的执行它本身就是在一个Runnable消息里,所以performTraversals在执行的时候,其他消息得等performTraversals执行完了才能得到执行,也就是说mRunQueue.executeActions()的消息必须得等performTraversals彻底执行完才能得到执行,所以View.post(runnable)中的runnable执行是要在performTraversals方法执行完之后的,并非一调用dispatchAttachedToWindow就会执行。
前面还遗留了一个问题:View.post方法里的mAttachInfo是在什么时候赋值的呢?
public ViewRootImpl(Context context, Display display) {
    ...

    mAttachInfo = new View.AttachInfo(mWindowSession, mWindow, display, this, mHandler, this,
        context);
    ...
}
我们看到它是在ViewRootImpl的构造函数里被赋值的,那么ViewRootImpl是什么时候被创建的呢?顺着往上找,我们看到,它是在WindowManagerGlobal的add方法里被创建的。
public void addView(View view, ViewGroup.LayoutParams params, Display display, Window parentWindow) {
    ...
    ViewRootImpl root;
    ...
    root = new ViewRootImpl(view.getContext(), display);
    ...
}
前面也讲了WindowManagerGlobal的addView方法是在ActivityThread的handleResumeActivity()方法里被执行的,所以问题就解开了,为什么View.post方法里会先判断mAttachInfo是否为空,不为空,说明View.post的调用时机是在onResume之后,也就是View绘制完成之后,这个时候直接推入主线程消息队列执行就可以。而如果mAttachInfo为空,说明View还没绘制完,先暂存起来,待绘制完后再依次推入主线程执行。
要注意的是View.post方法是有坑的,android版本 < 24,也就是7.0以下的系统。
// 7.0以下系统
public boolean post(Runnable action) {
    final AttachInfo attachInfo = mAttachInfo;
    if (attachInfo != null) {
        return attachInfo.mHandler.post(action);
    }
    // Assume that post will succeed later
    // 注意此处,不同于我7.0及以上系统,
    ViewRootImpl.getRunQueue().post(action);
    return true;
}
而我们看一下 ViewRootImpl 的RunQueue是怎么实现的:
static final ThreadLocal<RunQueue> sRunQueues = new ThreadLocal<RunQueue>();
static RunQueue getRunQueue() {
    RunQueue rq = sRunQueues.get();
    if (rq != null) {
        return rq;
    }
    rq = new RunQueue();
    sRunQueues.set(rq);
    return rq;
}
结合前面讲的ThreadLocal特性,它是跟线程相关的,也就是说保存其中的变量只在本线程内可见,其他线程获取不到。
好了,假设有这种场景,我们子线程里用View.post一个消息,从上面的代码看,它会保存子线程的ThreadLocal里,但是在执行RunQueue的时候,又是在主线程里去找runnable调用,因为ThreadLocal线程隔离,主线程永远也找不到这个消息,这个消息也就没法得到执行了。
而7.0及以上没有这个问题,是因为在post方法里把runnable保存在主线程里:getRunQueue().post(action)。
总结一下:
上面这个问题的前提有两个:View被绘制前,且在子线程里调用View.post。如果View.post是在View被绘制之后,也就是mAttachInfo非空,那么会立即推入主线程调用,也就不存在因线程隔离找不到runnable的问题。
作者:He Ying