最近换了一家公司,公司几乎所有的项目都采用的是Struts2+Spring+Ibatis+Oracle的架构,上一个东家一般用的就是JSF+Spring,所做的项目没有一个用过ORM的框架,至于Struts2也只是平时自己做做Demo玩玩,毕竟才出校园,不懂得东西还有太多太多,经过这么几天的摸索,对这套环境的搭建还算比较熟悉了,因此写一篇日志全当自我总结,也可以给那些初次接触这些框架的朋友一点小小小小小小的建议,当然文中的不足还望各位大神指出,帮助小弟快速地成长。
这个Demo的所有jar包我都上传上来了,有兴趣或者有需要的朋友可以直接下载。
http://pan.baidu.com/share/link?shareid=582164770&uk=772999987
开发环境是JDK1.6+Tomcat6.0
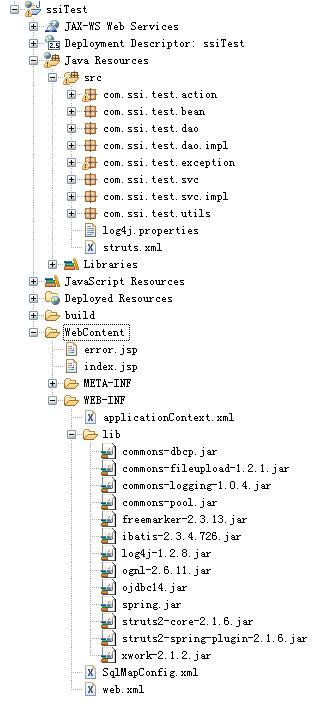
好了,不多说了,先上个项目的结构图。
让我先按照Action-Service-Dao的顺序把所有的层的代码贴出来。
(PS:这个Demo起初我是为了测试spring整合ibatis的事务管理,所以只有增删改的方法,并且测试数据都是写死在代码里的,有兴趣的朋友可以添加更多的方法和完善页面)
首先是Action层:


package com.ssi.test.action;

import org.apache.struts2.ServletActionContext;

import com.opensymphony.xwork2.ActionSupport;
import com.ssi.test.exception.TestException;
import com.ssi.test.svc.TestSvcIfc;

public class TestAction extends ActionSupport {

    private TestSvcIfc testSvc;

    public void setTestSvc(TestSvcIfc testSvc) {
        this.testSvc = testSvc;
    }

    //添加测试数据
    public String addTest() {
        try {
            testSvc.addTest();
        } catch (TestException e) {
            //所有异常集中在Action层处理
            ServletActionContext.getRequest().setAttribute("msg",
                    e.getMessage());
            return ERROR;
        }
        return null;
    }

    //删除测试数据
    public String deleteTest() {
        try {
            testSvc.deleteTest();
        } catch (TestException e) {
            //所有异常集中在Action层处理
            ServletActionContext.getRequest().setAttribute("msg",
                    e.getMessage());
            return ERROR;
        }
        return null;
    }

    //更新测试数据
    public String updateTest() {
        try {
            testSvc.updateTest();
        } catch (TestException e) {
            //所有异常集中在Action层处理
            ServletActionContext.getRequest().setAttribute("msg",
                    e.getMessage());
            return ERROR;
        }
        return null;
    }
}
接着是Service层的接口以及实现类:
package com.ssi.test.svc;

import com.ssi.test.exception.TestException;

public interface TestSvcIfc {

    public void addTest() throws TestException;

    public void deleteTest() throws TestException;

    public void updateTest() throws TestException;
}
package com.ssi.test.svc.impl;

import com.ssi.test.bean.TestBean;
import com.ssi.test.dao.TestDaoIfc;
import com.ssi.test.exception.TestException;
import com.ssi.test.svc.TestSvcIfc;
import com.ssi.test.utils.TestUtil;

public class TestSvcImpl implements TestSvcIfc {

    private TestDaoIfc testDao;

    public void setTestDao(TestDaoIfc testDao) {
        this.testDao = testDao;
    }

    @Override
    public void addTest() throws TestException {
        //这里我通过我的工具类随机生成了一些测试数据
        TestBean test = new TestBean();
        test.setTestData1(TestUtil.buildData());
        test.setTestData2(TestUtil.buildData());
        test.setTestData3(TestUtil.buildData());
        test.setFlag("0");
        testDao.addTest(test);
    }

    @Override
    public void deleteTest() throws TestException {
        //数据我是写死了的,我只对id为2的测试数据进行了删除操作
        TestBean test = new TestBean();
        test.setId(2);
        testDao.deleteTest(test);
    }

    @Override
    public void updateTest() throws TestException {
        //数据我是写死了的,并用工具类随机生成了新的测试数据,我只对id为2的测试数据进行了更新操作
        TestBean test = new TestBean();
        test.setId(2);
        test.setTestData1(TestUtil.buildData());
        test.setTestData2(TestUtil.buildData());
        test.setTestData3(TestUtil.buildData());
        test.setFlag("1");
    }
}
随机生成测试数据的工具类:
package com.ssi.test.utils;

import java.util.Random;

public class TestUtil {
    public static String buildData() {
        //定义随机生成数据的元素集
        String dataElement = "0123456789ABCDEFGHIJKLMNOPQRSTUVWXYZ";
        StringBuffer sb = new StringBuffer();
        Random random = new Random();
        //生成随机数据
        for (int i = 0; i < 5; i++) {
            sb.append(dataElement.charAt(random.nextInt(dataElement.length())));
        }
        return sb.toString();
    }
}
最后是Dao层接口以及其实现类:
package com.ssi.test.dao;

import com.ssi.test.bean.TestBean;
import com.ssi.test.exception.TestException;

public interface TestDaoIfc {
    public void addTest(TestBean test) throws TestException;

    public void deleteTest(TestBean test) throws TestException;

    public void updateTest(TestBean test) throws TestException;
}
package com.ssi.test.dao.impl;

import org.springframework.dao.DataAccessException;
import org.springframework.orm.ibatis.SqlMapClientTemplate;

import com.ssi.test.bean.TestBean;
import com.ssi.test.dao.TestDaoIfc;
import com.ssi.test.exception.TestException;

public class TestDaoImpl implements TestDaoIfc {

    private SqlMapClientTemplate sqlMapClientTemplate;

    public void setSqlMapClientTemplate(
            SqlMapClientTemplate sqlMapClientTemplate) {
        this.sqlMapClientTemplate = sqlMapClientTemplate;
    }

    @Override
    public void addTest(TestBean test) throws TestException {
        try {
            sqlMapClientTemplate.insert("addQuery", test);
        } catch (DataAccessException e) {
            e.printStackTrace();
            throw new TestException("Database error");
        }
    }

    @Override
    public void deleteTest(TestBean test) throws TestException {
        try {
            sqlMapClientTemplate.delete("deleteQuery", test);
        } catch (DataAccessException e) {
            e.printStackTrace();
            throw new TestException("Database error");
        }
    }

    @Override
    public void updateTest(TestBean test) throws TestException {
        try {
            sqlMapClientTemplate.update("updateQuery", test);
        } catch (DataAccessException e) {
            e.printStackTrace();
            throw new TestException("Database error");
        }
    }
}
当然还有用于和数据库表映射的实体Bean:
package com.ssi.test.bean;

public class TestBean {
    private Integer id;
    private String testData1;
    private String testData2;
    private String testData3;
    private String flag;

    public Integer getId() {
        return id;
    }

    public void setId(Integer id) {
        this.id = id;
    }

    public String getTestData1() {
        return testData1;
    }

    public void setTestData1(String testData1) {
        this.testData1 = testData1;
    }

    public String getTestData2() {
        return testData2;
    }

    public void setTestData2(String testData2) {
        this.testData2 = testData2;
    }

    public String getTestData3() {
        return testData3;
    }

    public void setTestData3(String testData3) {
        this.testData3 = testData3;
    }

    public String getFlag() {
        return flag;
    }

    public void setFlag(String flag) {
        this.flag = flag;
    }
}
晕,好像把顺序搞错了,最先应该出场的应该是数据库,好吧,赶紧补上。
在这里,我们建立了一个test的SEQUENCE和test的TABLE,具体Query如下:
CREATE SEQUENCE seq_test
INCREMENT BY 1
START WITH 1
NOMAXvalue
NOCYCLE
NOCACHE;
CREATE TABLE tb_test(
id int primary key,
test_data1 varchar(12) not null,
test_data2 varchar(12) not null,
test_data3 varchar(12),
flag varchar(1)
);
关于SEQUENCE中的各种参数的说明,请参考下面这位大神的博客。
http://blog.sina.com.cn/s/blog_a3ffb91101011yjj.html
OK,到目前为止,我们已经把基本要用到的类(除去一个Exception的类)都贴了出来,现在就是进行配置文件书写的时候了。
首先咱们来个log4j的配置文件(仅仅为Demo,所以网上copy的,具体的配置大家可以根据自己的口味进行修改):
log4j.rootLogger=info,Console,R

log4j.appender.Console=org.apache.log4j.ConsoleAppender

log4j.appender.Console.layout=org.apache.log4j.PatternLayout

#log4j.appender.Console.layout.ConversionPattern=%d [%t] %-5p %c - %m%n

log4j.appender.Console.layout.ConversionPattern=%d{yy-MM-dd HH:mm:ss} %5p %c{1}:%L - %m%n


log4j.appender.R=org.apache.log4j.DailyRollingFileAppender

log4j.appender.R.File=${catalina.home}/logs/tomcat.log

log4j.appender.R.layout=org.apache.log4j.PatternLayout

log4j.appender.R.layout.ConversionPattern=%d{yyyy.MM.dd HH:mm:ss} %5p %c{1}(%L):? %m%n


log4j.logger.org.apache=info,R

log4j.logger.org.apache.catalina.core.ContainerBase.[Catalina].[localhost]=DEBUG, R

log4j.logger.org.apache.catalina.core=info,R

log4j.logger.org.apache.catalina.session=info,R
接下来,让我们先配置ibatis的配置文件SqlMapConfig.xml以及映射实体Bean和数据库表的Map文件TestMap.xml:
<?xml version="1.0" encoding="UTF-8" ?>

<!DOCTYPE sqlMapConfig
    PUBLIC "-//ibatis.apache.org//DTD SQL Map Config 2.0//EN"
    "http://ibatis.apache.org/dtd/sql-map-config-2.dtd">

<sqlMapConfig>
    <sqlMap resource="com/ssi/test/bean/TestMap.xml" />
</sqlMapConfig>
<?xml version="1.0" encoding="UTF-8"?>
<!DOCTYPE sqlMap
    PUBLIC "-//ibatis.apache.org//DTD SQL Map 2.0//EN"
    "http://ibatis.apache.org/dtd/sql-map-2.dtd">

<sqlMap>
    <!-- TestBean Alias -->
    <typeAlias alias="test" type="com.ssi.test.bean.TestBean" />

    <!-- Query for add -->
    <insert id="addQuery" parameterClass="test">
    INSERT INTO tb_test
    values(seq_test.Nextval,#testData1#,#testData2#,#testData3#,#flag#)
    </insert>

    <!-- Query for delete -->
    <delete id="deleteQuery" parameterClass="test">
        DELETE FROM tb_test
        WHERE
        id=#id#
    </delete>

    <!-- Query for update -->
    <update id="updateQuery" parameterClass="test">
        UPDATE tb_test SET
        test_data1=#testData1#,test_data2=#testData2#,test_data3=#testData3#,flag=#flag#
        WHERE id=#id#
    </update>
</sqlMap>
关于更多关于ibatis的配置和参数使用说明,大家可以去问问“谷”大哥。
配置完ibatis之后,大家可以配置spring的配置文件了,因为类和ibatis的文件都创建好了,所以这会儿配spring文件时很合适的,配置文件中有很多命名不是很规范的,所以大家请不要盲目效仿,应该遵循一些比较规范的命名规则:
<?xml version="1.0" encoding="UTF-8"?>
<beans xmlns="http://www.springframework.org/schema/beans"
    xmlns:xsi="http://www.w3.org/2001/XMLSchema-instance" xmlns:context="http://www.springframework.org/schema/context"
    xmlns:aop="http://www.springframework.org/schema/aop" xmlns:tx="http://www.springframework.org/schema/tx"
    xsi:schemaLocation="http://www.springframework.org/schema/beans http://www.springframework.org/schema/beans/spring-beans-2.5.xsd
                http://www.springframework.org/schema/context http://www.springframework.org/schema/context/spring-context-2.5.xsd
                http://www.springframework.org/schema/tx http://www.springframework.org/schema/tx/spring-tx-2.5.xsd
                http://www.springframework.org/schema/aop http://www.springframework.org/schema/aop/spring-aop-2.5.xsd">
    <!-- DataSource -->
    <bean id="dataSource" destroy-method="close"
        class="org.apache.commons.dbcp.BasicDataSource">
        <property name="driverClassName" value="oracle.jdbc.driver.OracleDriver" />
        <property name="url" value="jdbc:oracle:thin:@127.0.0.1:1521:orcl" />
        <property name="username" value="test" />
        <property name="password" value="test" />
        <property name="maxWait" value="5000" />
        <property name="initialSize" value="2" />
        <property name="maxActive" value="10" />
        <property name="maxIdle" value="3" />
        <property name="minIdle" value="1" />
        <property name="removeAbandoned" value="true" />
        <property name="removeAbandonedTimeout" value="100" />
        <property name="logAbandoned" value="false" />
    </bean>

    <!-- DataSource Transaction Manager -->
    <bean id="txManager"
        class="org.springframework.jdbc.datasource.DataSourceTransactionManager">
        <property name="dataSource" ref="dataSource" />
    </bean>

    <!-- DataSource Transaction Manager -->
    <bean id="testTM"
        class="org.springframework.jdbc.datasource.DataSourceTransactionManager">
        <property name="dataSource" ref="dataSource" />
    </bean>


    <!-- SqlMapClient -->
    <bean id="sqlMapClient" class="org.springframework.orm.ibatis.SqlMapClientFactoryBean">
        <property name="configLocation" value="/WEB-INF/SqlMapConfig.xml" />
        <property name="dataSource" ref="dataSource" />
    </bean>

    <!-- SqlMapClientTemplate -->
    <bean id="sqlMapClientTemplate" class="org.springframework.orm.ibatis.SqlMapClientTemplate">
        <property name="sqlMapClient" ref="sqlMapClient" />
    </bean>

    <!-- TestDao -->
    <bean id="testDao" class="com.ssi.test.dao.impl.TestDaoImpl">
        <property name="sqlMapClientTemplate" ref="sqlMapClientTemplate" />
    </bean>

    <!-- TestSvc -->
    <bean id="testSvc" class="com.ssi.test.svc.impl.TestSvcImpl">
        <property name="testDao" ref="testDao" />
    </bean>

    <!-- TestAction -->
    <bean id="testAction" class="com.ssi.test.action.TestAction">
        <property name="testSvc" ref="testSvc" />
    </bean>

    <!-- txAdvice -->
    <tx:advice id="testAdvice" transaction-manager="testTM">
        <tx:attributes>
            <tx:method name="add*" propagation="REQUIRED" />
            <tx:method name="del*" propagation="REQUIRED" />
            <tx:method name="update*" propagation="REQUIRED" />
        </tx:attributes>
    </tx:advice>

    <!-- aop -->
    <aop:config>
        <aop:pointcut id="allManagerMethod" expression="execution(* com.ssi.test.svc.*.*(..))" />
        <aop:advisor advice-ref="testAdvice" pointcut-ref="allManagerMethod" />
    </aop:config>
</beans>
接着SSI就还差一个S了,那就是struts2的配置文件,由于是整合了spring,所以配置文件中
<constant name="struts.objectFactory" value="org.apache.struts2.spring.StrutsSpringObjectFactory" />
这句话尤为关键,在action中的class那里直接输入spring中配置好的Action的id就好了,至于另外一句<constan ....>大家可以不管,这个只是为了取消Struts2标签自带的一些样式罢了:
<?xml version="1.0" encoding="UTF-8"?>
<!DOCTYPE struts PUBLIC
     "-//Apache Software Foundation//DTD Struts Configuration 2.0//EN"
     "http://struts.apache.org/dtds/struts-2.0.dtd">

<struts>
    <constant name="struts.objectFactory" value="org.apache.struts2.spring.StrutsSpringObjectFactory" />
    <constant name="struts.ui.theme" value="simple" />

    <package name="default" extends="struts-default">
        <action name="testAction" class="testAction">
            <result name="error">/error.jsp</result>
        </action>
    </package>
</struts>
接着,随便写两个页面,一个操作页面一个error页面,由于我的测试数据是在代码里生成的,所以页面上就三个按钮,直接触发后台的action:
index.jsp
<%@ page language="java" import="java.util.*" pageEncoding="UTF-8"%>
<%
    String path = request.getContextPath();
    String basePath = request.getScheme() + "://"
            + request.getServerName() + ":" + request.getServerPort()
            + path + "/";
%>
<%@ taglib prefix="s" uri="/struts-tags"%>
<!DOCTYPE HTML PUBLIC "-//W3C//DTD HTML 4.01 Transitional//EN">
<html>
<head>
<base href="<%=basePath%>">
<title>My JSP 'index.jsp' starting page</title>
<meta http-equiv="pragma" content="no-cache">
<meta http-equiv="cache-control" content="no-cache">
<meta http-equiv="expires" content="0">
<meta http-equiv="keywords" content="keyword1,keyword2,keyword3">
<meta http-equiv="description" content="This is my page">

<!--
        <link rel="stylesheet" type="text/css" href="styles/styles.css">
        <script type="text/javascript" src="scripts/xx.js"></script>
        -->
</head>
<body>
    <h3>Add Test Data</h3>
    <s:form action="testAction!addTest" method="post">
        <s:submit value="Add Test" />
    </s:form>
    <hr />
    <h3>Delete Test Data</h3>
    <s:form action="testAction!deleteTest" method="post">
        <s:submit value="Delete Test" />
    </s:form>
    <hr />
    <h3>Update Test Data</h3>
    <s:form action="testAction!updateTest" method="post">
        <s:submit value="Update Test" />
    </s:form>
    <hr />
</body>
</html>
error.jsp
<%@ page language="java" import="java.util.*" pageEncoding="UTF-8"%>
<%
    String path = request.getContextPath();
    String basePath = request.getScheme() + "://"
            + request.getServerName() + ":" + request.getServerPort()
            + path + "/";
%>
<%@ taglib prefix="s" uri="/struts-tags"%>
<!DOCTYPE HTML PUBLIC "-//W3C//DTD HTML 4.01 Transitional//EN">
<html>
<head>
<base href="<%=basePath%>">
<title>My JSP 'index.jsp' starting page</title>
<meta http-equiv="pragma" content="no-cache">
<meta http-equiv="cache-control" content="no-cache">
<meta http-equiv="expires" content="0">
<meta http-equiv="keywords" content="keyword1,keyword2,keyword3">
<meta http-equiv="description" content="This is my page">

<!--
        <link rel="stylesheet" type="text/css" href="styles/styles.css">
        <script type="text/javascript" src="scripts/xx.js"></script>
        -->
</head>
<body>
    <h3>
        <s:property value="#request.msg" />
    </h3>
</body>
</html>
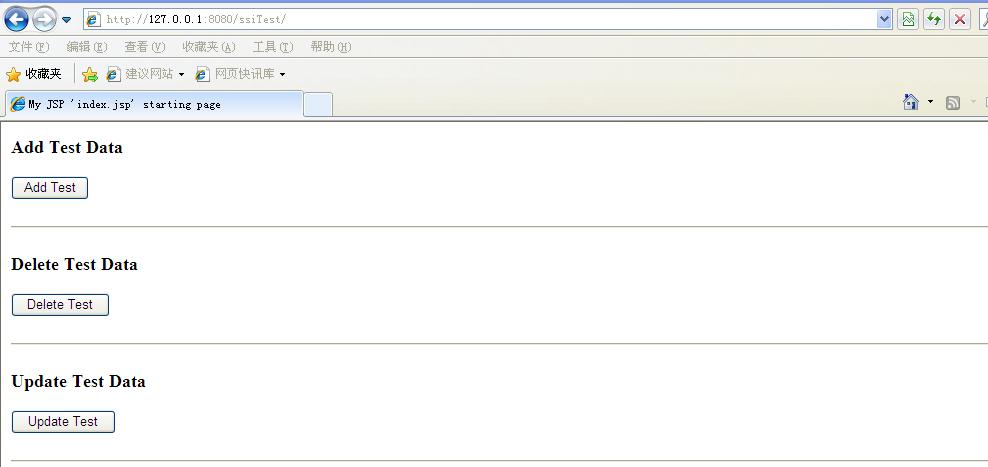
好了,所有的配置均已完成,让我启动万恶的Tomcat的吧,启动后的页面如下,哇靠,太丑了,不过将就了呗。
接下来,让我们点击Add Test,如果你出现了空白页面,如下,恭喜你,你的数据插入成功了(因为插入成功返回了一个null,没有相对于的页面,当然是空白的,哈哈):

为了添加更多的测试数据,让我们把url中action后面从冒号开始的字符串删掉,然后不停地点击再回车(重复提交这个action),这样就会向数据库插入若干的测试数据,在这里,就引申出如何防止重复提交的问题,关于这一点,还请大家继续咨询“谷”大哥。

打开数据库,看看刚才的杰作吧:

至此,一个SSI的Demo就算是搭建成功了,关于删除和更新,大家可以再去试试,因为是写死了,所以只会对id=2的这一条记录进行删除或更新的操作。
那么是否就此结束了呢,当然没有,起初做这个demo的时候是为了测试一下事务管理的功能,所以,让我们修改一下Dao层的代码,就拿deleteTest方法做测试吧,我直接把原有的try{}catch{}代码块删除掉,在进行删除作业后直接抛出一个自定义的异常,如图所示:
    @Override
    public void deleteTest(TestBean test) throws TestException {
        sqlMapClientTemplate.delete("deleteQuery", test);
        throw new TestException("Database error");
    }
这样子的话当我点击页面的Delete Test的时候,页面应该跳转至error.jsp,数据库被删除掉的数据应该回滚,也就是id为2的值应该还存在,so,如下:


好的,事实证明一切都成功了,但在成功之前,我却先见过他妈咪,最开始页面也会跳转到error.jsp,但是数据库中的数据却被删除了,为什么呢,这个时候前文一直提到却没现身的Exception类该登场了。
package com.ssi.test.exception;

public class TestException extends RuntimeException {
    public TestException() {

    }

    public TestException(String msg) {
        super(msg);
    }
}
在这里,大家注意,我的异常类是继承了RuntimeException而不是Excepetion,各位基础扎实和有经验的朋友或许明白我之前犯了什么错了,因为在成功之前,我的这个Exception继承的是Excpeition而非现在的RuntimeException,所以出现了页面跳转正确,事务管理失败的情况,至于为什么,请参考下面这位大神。http://java.chinaitlab.com/configure/899978.html
好了好了,不说了,都下班了,不足的还望大家指出。
#####################################################################
忘了还有个最关键的东西,当然,大家熟悉web开发的话应该都知道,那就是web.xml的配置,记得把Struts2的核心filter和spring容器的listener加上:
<?xml version="1.0" encoding="UTF-8"?>
<web-app xmlns:xsi="http://www.w3.org/2001/XMLSchema-instance"
         xmlns="http://java.sun.com/xml/ns/javaee"
         xmlns:web="http://java.sun.com/xml/ns/javaee/web-app_2_5.xsd"
         xsi:schemaLocation="http://java.sun.com/xml/ns/javaee http://java.sun.com/xml/ns/javaee/web-app_2_5.xsd" id="WebApp_ID" version="2.5">
  <display-name>ssiTest</display-name>

    <filter>
        <filter-name>struts2</filter-name>
        <filter-class>
            org.apache.struts2.dispatcher.FilterDispatcher
        </filter-class>
    </filter>

    <filter-mapping>
        <filter-name>struts2</filter-name>
        <url-pattern>/*</url-pattern>
        <dispatcher>REQUEST</dispatcher>
        <dispatcher>FORWARD</dispatcher>
    </filter-mapping>

    <listener>
        <listener-class>org.springframework.web.context.ContextLoaderListener</listener-class>
    </listener>

    <context-param>
        <param-name>contextConfigLocation</param-name>
        <param-value>/WEB-INF/applicationContext.xml</param-value>
    </context-param>

    <welcome-file-list>
        <welcome-file>index.jsp</welcome-file>
    </welcome-file-list>
</web-app>