9.1 数据持久化概述
9.2 iOS应用程序目录结构
9.3 读写属性列表
9.4 对象归档
9.5 访问SQLite
9.1 数据持久化概述
iOS中可以有四种持久化数据的方式: 属性列表、对象归档、SQLite3和Core Data
9.2 iOS应用程序目录结构
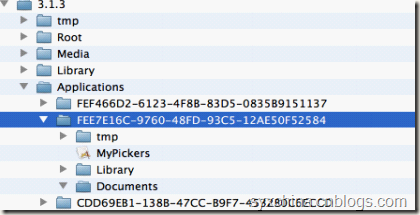
iOS应用程序运行在Mac os模拟器时候,有一下临时目录模拟器3.1.3为例子:
/Users/tony/Library/Application Support/iPhone Simulator/3.1.3/Applications
IOS应用程序采用沙盒原理设计,ios每个应用程序都有自己的3个目录(Document,Library,tmp),互相之间不能访问。
Documents存放应用程序的数据。
Library目录下面还有Preferences和Caches目录,Preferences目录存放应用程序的使用偏好,Caches目录与Documents很相 似可以存放应用程序的数据。
tmp目录供应用程序存储临时文件。
9.3 读写属性列表
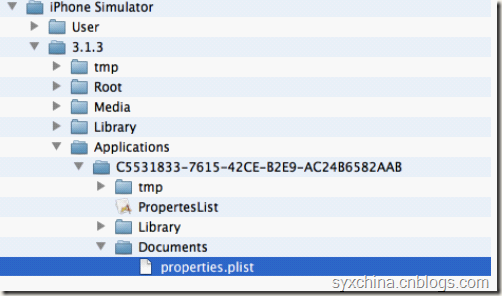
读取Documents目录下文件
可以获得应用程序的Documents文件夹。
    NSArray* myPaths = NSSearchPathForDirectoriesInDomains(NSDocumentDirectory, NSUserDomainMask, YES);
    NSString* myDocPath = [myPaths objectAtIndex:0];
获取文件的完整路径。
- (NSString*)filePath:(NSString*)fileName {
    NSArray* myPaths = NSSearchPathForDirectoriesInDomains(NSDocumentDirectory, NSUserDomainMask, YES);
    NSString* myDocPath = [myPaths objectAtIndex:0];
    NSString* filePath = [myDocPath stringByAppendingPathComponent:fileName];
    return filePath;
}
获取tmp目录
获取应用程序的tmp目录要比获取Documents目录容易的多。使用函数NSTemporaryDirectory ()可以获得tmp目录路径。
NSString* tempPath = NSTemporaryDirectory();
获取文件的完整路径。
NSString* tempFile = [tempPath stringByAppendingPathComponent:@"properties.plist"];
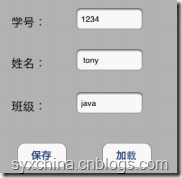
属性列表文件实例 :PropertesList
PropertesListViewController.h
#import "Student.h"

@interface ViewController : UIViewController

@property (retain, nonatomic) IBOutlet UITextField *studentNo;
@property (retain, nonatomic) IBOutlet UITextField *studentName;
@property (retain, nonatomic) IBOutlet UITextField *studentClass;
- (IBAction)save:(id)sender;
- (IBAction)load:(id)sender;
- (IBAction)endEditing:(id)sender;
- (IBAction)saveToArchiver:(id)sender;
- (IBAction)loadFromArchiver:(id)sender;
- (NSString*)filePath:(NSString*)fileName;
@end
PropertesListViewController.m
@synthesize studentNo;
@synthesize studentName;
@synthesize studentClass;

- (NSString*)filePath:(NSString*)fileName {
    NSArray* myPaths = NSSearchPathForDirectoriesInDomains(NSDocumentDirectory, NSUserDomainMask, YES);
    NSString* myDocPath = [myPaths objectAtIndex:0];
    NSString* filePath = [myDocPath stringByAppendingPathComponent:fileName];
    return filePath;
}

- (IBAction)save:(id)sender {

    NSString* fileName = [self filePath:@"properties.plist"];
    NSLog(fileName);
    NSMutableArray* data = [[NSMutableArray alloc]init];

    [data addObject:studentNo.text];
    [data addObject:studentName.text];
    [data addObject:studentClass.text];
    [data writeToFile:fileName atomically:YES];
}

- (IBAction)load:(id)sender {
    NSString* fileName = [self filePath:@"properties.plist"];
    if ([[NSFileManager defaultManager]fileExistsAtPath:fileName]) {
        NSArray* data = [[NSArray alloc]initWithContentsOfFile:fileName];
        studentNo.text = [data objectAtIndex:0];
        studentName.text = [data objectAtIndex:1];
        studentClass.text = [data objectAtIndex:2];
        [data release];
    }

}

- (IBAction)endEditing:(id)sender {
    [sender resignFirstResponder];
}
9.4 对象归档
对象归档实例:Encoding
对象归档
“归档”是值另一种形式的序列化,对模型对象进行归档的技术可以轻松将复杂的对象写入文件,然后再从中读取它们,只要在类中实现的每个属性都是基本数据类型(如int或float)或都是符合NSCoding协议的某个类的实例,你就可以对你的对象进行完整归档。
实现NSCoding协议
NSCoding协议声明了两个方法: -(void)encodeWithCoder:(NSCoder *)aCoder,是将对象写入到文件中。
-(id)initWithCoder:(NSCoder *)aDecoder,是将文件中数据读入到对象中。
实现NSCopying协议
NSCopying协议声明了一个方法: -(id)copyWithZone:(NSZone *)zone ,是将对象复制方法。
Student.h
@interface Student : NSObject<NSCoding, NSCopying>

@property (retain, nonatomic) NSString* studentNo;
@property (retain, nonatomic) NSString* studentName;
@property (retain, nonatomic) NSString* studentClass;

@end
Student.m
#import "Student.h"

@implementation Student

@synthesize studentNo = _studentNo;
@synthesize studentName = _studentName;
@synthesize studentClass = _studentClass;

#pragma mark NSCopying

- (id)copyWithZone:(NSZone *)zone {
    Student* copy = [[[self class]allocWithZone:zone]init];
    copy.studentNo = [_studentNo copyWithZone:zone];
    copy.studentName = [_studentName copyWithZone:zone];
    copy.studentClass = [_studentClass copyWithZone:zone];
    return copy;
}

#pragma mark  NSCoding

- (void)encodeWithCoder:(NSCoder *)aCoder {
    [aCoder encodeObject:_studentNo forKey:@"studentNo"];
    [aCoder encodeObject:_studentName forKey:@"studentName"];
    [aCoder encodeObject:_studentClass forKey:@"studentClass"];
}
- (id)initWithCoder:(NSCoder *)aDecoder {
    _studentNo = [aDecoder decodeObjectForKey:@"studentNo"];
    _studentName = [aDecoder decodeObjectForKey:@"studentName"];
    _studentClass = [aDecoder decodeObjectForKey:@"studentClass"];
    return self;
}
-(NSString*)description {
    return [[[NSString alloc]initWithFormat:@"no:%@ name:%@ class:%@", _studentNo, _studentName, _studentClass]autorelease];
}

- (void)dealloc {
    [_studentName release];
    [_studentClass release];
    [_studentNo release];
    [super dealloc];
}
@end
EncodingViewController.h
详细见上。
EncodingViewController.m
- (IBAction)saveToArchiver:(id)sender {
    NSString* fileName = [self filePath:@"student.archiver"];
    NSMutableData* data = [NSMutableData data];
    NSKeyedArchiver* archiver = [[NSKeyedArchiver alloc]initForWritingWithMutableData:data];
    Student* student = [[Student alloc]init];
    student.studentNo = studentNo.text;
    student.studentName = studentName.text;
    student.studentClass = studentClass.text;
    [archiver encodeObject:student forKey:@"myStudent"];
    [archiver finishEncoding];
    [data writeToFile:fileName atomically:YES];
    [archiver release];
    [student release];
}
NSMutableData * theData = [NSMutableData data];用于包含编码的数据。
NSKeyedArchiver * archiver = [[NSKeyedArchiver alloc] initForWritingWithMutableData:theData];创建NSKeyedArchiver实例,用于将对象归档到此theData实例中。
[archiver encodeObject:student forKey:@"mystudent"]; 使用“键-值”对编码来对希望包含在归档中的对象进行归档。
[theData writeToFile:filename atomically:YES]; 写入数据到归档文件。
EncodingViewController.m
- (IBAction)loadFromArchiver:(id)sender {
    NSString* fileName = [self filePath:@"student.archiver"];
    NSData* data = [NSData dataWithContentsOfFile:fileName];
    if ([data length] > 0) {
        NSKeyedUnarchiver* unArchiver = [[NSKeyedUnarchiver alloc]initForReadingWithData:data];
        Student* student = [unArchiver decodeObjectForKey:@"myStudent"];
        studentNo.text = student.studentNo;
        studentName.text = student.studentName;
        studentClass.text = student.studentClass;
        [unArchiver finishDecoding];
        [unArchiver release];
    }
}
NSData * theData =[NSData dataWithContentsOfFile:filename];从归档文件中获得NSData实例。
NSKeyedUnarchiver * archiver = [[NSKeyedUnarchiver alloc] initForReadingWithData:theData];
创建一个NSKeyedUnarchiver实例对数据进行解码。Student *student = [archiver decodeObjectForKey:@"mystudent"];
使用与归档编码使用相同的键对象进行解码。
9.5 访问SQLite
SQLite数据库
SQLite是一个开源的嵌入式关系数据库,它在2000年由D. Richard Hipp发布,它的减少应用程序管理数据的开销,SQLite可移植性好,很容易使用,很小,高效而且可靠。
SQLite嵌入到使用它的应用程序中,它们共用相同的进程空间,而不是单独的一个进程。从外部看,它并不像一个RDBMS,但在进程内部,它却是完整的,自包含的数据库引擎。 嵌入式数据库的一大好处就是在你的程序内部不需要网络配置,也不需要管理。因为客户端和服务器在同一进程空间运行。SQLite 的数据库权限只依赖于文件系统,没有用户帐户的概念。SQLite 有数据库级锁定,没有网络服务器。它需要的内存,其它开销很小,适合用于嵌入式设备。你需要做的仅仅是把它正确的编译到你的程序。
SQLite数据类型
SQLite是无类型的,这意味着你可以保存任何类型的数据到你所想要保存的任何表的任何列中, 无
论这列声明的数据类型是什么,对于SQLite来说对字段不指定类型是完全有效的,如:
Create Table ex1(a, b, c);
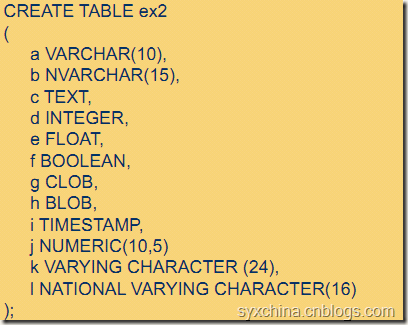
SQLite允许忽略数据类型,但是仍然建议在你的Create Table语句中指定数据类型, 因为数据类型对于你和其他的程序员交流, 或者你准备换掉你的数据库引擎。 SQLite支持常见的数据类型, 如:
在iOS中使用SQLite3
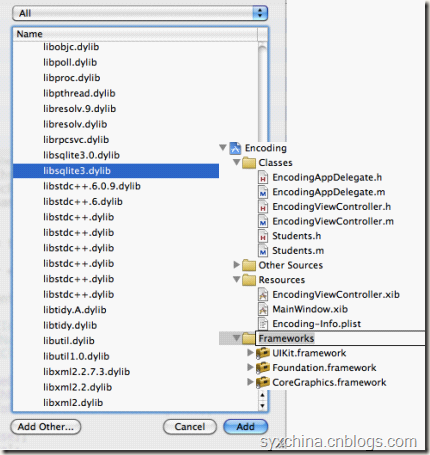
为了能够在iOS中使用SQLite3需要是将libsqlite3.dylib类库添加到Xcode工程中,在工程的Frameworks(框架) 文件夹右键添加存在Frameworks
或者导航到 /Developer/Platforms/iPhoneSimulator.platform/Developer/SDKs/ iPhoneSimulator<version>.sdk/usr/lib 目录下面找到libsqlite3.dylib.
实例:StudentSQLite3
StudentSQLite3ViewController.h
#import "sqlite3.h"

#define DATA_FILE @"data.sqlite3"
#define TABLE_NAME @"student"
#define FIELDS_NAME_SID @"studentId"
#define FIELDS_NAME_SNAME @"studentName"
#define FIELDS_NAME_SCLASS @"studentClass"

@interface ViewController : UIViewController {
    sqlite3* db;
}
@property (retain, nonatomic) IBOutlet UITextField *studentId;
@property (retain, nonatomic) IBOutlet UITextField *studentName;
@property (retain, nonatomic) IBOutlet UITextField *studentClass;
- (IBAction)saveFromSqlite:(id)sender;
- (IBAction)loadFromSqlite:(id)sender;


-(NSString*)dataFile;
-(IBAction)textFieldDoneEditing:(id)sender;

@end
StudentSQLite3ViewController.m
@synthesize studentId;
@synthesize studentName;
@synthesize studentClass;

-(NSString*)dataFile {
    NSArray* myPaths = NSSearchPathForDirectoriesInDomains(NSDocumentDirectory, NSUserDomainMask, YES);
    NSString* myDocPath = [myPaths objectAtIndex:0];
    NSString* fileName = [myDocPath stringByAppendingFormat:DATA_FILE];
    return fileName;
}
无参数SQLite3处理过程
1、打开数据库sqlite3_open。
2、创建数据库表和执行SQL语句sqlite3_exec。
3、释放资源sqlite3_close。
创建数据库
- (void)viewDidLoad {
    [super viewDidLoad];
    NSString* fileName = [self dataFile];
    NSLog(@"%@", fileName);
    if (sqlite3_open([fileName UTF8String], &db) != SQLITE_OK) {
        sqlite3_close(db);
        NSAssert(NO, @"OPEN SQLITE DATABASE ERROR!");
    } else {
        char* error;
        NSString* createSQL = [NSString stringWithFormat:@"CREATE TABLE IF NOT EXISTS %@(%@ TEXT PRIMARY KEY, %@ TEXT, %@% TEXT);",
                                  TABLE_NAME, FIELDS_NAME_SID, FIELDS_NAME_SNAME, FIELDS_NAME_SCLASS];
        if (sqlite3_exec(db, [createSQL UTF8String], NULL, NULL, &error)) {
            sqlite3_close(db);
            NSAssert1(NO, @"CREATE TABLE ERROR", error);
        } else {
            sqlite3_close(db);
        }
    }
}
sqlite3_open([[self dataFilePath] UTF8String], &db) != SQLITE_OK sqlite3_open打开数据库,注意:在sqlite3中的函数都是使用C字符串[self dataFilePath] UTF8String]是将NSString字符串转换为C字符串,&db是sqlite3指针(* db)的地址。
该函数sqlite3_open返回SQLITE_OK打开成功。
sqlite3_exec(db, [tablesql UTF8String], NULL, NULL, &err) != SQLITE_OK
sqlite3_exec是执行任何不带返回值sql语句,第2个参数是要执行的sql语句,第3个参数是要回调函数,第4个参数是要回调函数的参数,第5个参数是执行出错的字符串。
sqlite3_close(db); 是关闭数据库。
NSAssert是断言函数,当断言失败时候打印信息。
NSAssert1是带有一个参数的NSAssert函数,此外还有NSAssert2等函数。
有参数的SQLite3处理过程
1、打开数据库sqlite3_open。
2、预处理SQL语句sqlite3_prepare_v2。
3、绑定参数sqlite3_bind_text。
4、执行语句sqlite3_step(statement) 。
5、释放资源sqlite3_finalizesqlite3_close。
数据保存
- (IBAction)saveFromSqlite:(id)sender {
    NSString* fileName = [self dataFile];
    NSLog(@"%@", fileName);
    if (sqlite3_open([fileName UTF8String], &db)) {
        sqlite3_close(db);
        NSAssert(NO, @"OPEN DATABASE ERROR");
    } else {
        NSString* sqlStr = [NSString stringWithFormat:@"INSERT OR REPLACE INTO %@(%@, %@, %@) VALUES(?, ?, ?)",TABLE_NAME, FIELDS_NAME_SID, FIELDS_NAME_SNAME, FIELDS_NAME_SCLASS];
        sqlite3_stmt* statement;
        //预处理过程
        if (sqlite3_prepare(db, [sqlStr UTF8String], -1, &statement, NULL) == SQLITE_OK) {
            //绑定参数开始
            sqlite3_bind_text(statement, 1, [studentId.text UTF8String], -1, NULL);
            sqlite3_bind_text(statement, 2, [studentName.text UTF8String], -1, NULL);
            sqlite3_bind_text(statement, 3, [studentClass.text UTF8String], -1, NULL);
            //执行插入
            if (sqlite3_step(statement) != SQLITE_DONE) {
                NSAssert(0, @"INSERT DATABASE ERROR!");
            }
        }
        sqlite3_finalize(statement);
        sqlite3_close(db);
    }
}
sqlite3_prepare_v2(db, [sqlStr UTF8String], -1, &statement, nil) == SQLITE_OK
sqlite3_prepare_v2执行sql语句,第3个参数-1代表全部sql字符串长度,第4个参数&statement是sqlite3_stmt指针(* statement)的地址,第5个参数是sql语句没有被执行的部分语句。
sqlite3_bind_text(statement, 1, [studentId.text UTF8String], -1, NULL);
是绑定参数,第2个参数为序号(从1开始),第3个参数为字符串值,第4个参数为字符串长度。 第5个参数为一个函数指针,SQLITE3执行完操作后回调此函数,通常用于释放字符串占用的内存。
sqlite3_step(statement) != SQLITE_DONE判断是否执行完成sql语句执行。
sqlite3_finalize(statement)和sqlite3_close(db)释放资源。
查询数据
- (IBAction)loadFromSqlite:(id)sender {
    NSString* fileName = [self dataFile];
    NSLog(@"%@", fileName);
    if (sqlite3_open([fileName UTF8String], &db) != SQLITE_OK) {
        sqlite3_close(db);
        NSAssert(NO, @"OPEN DATABASE ERROR!");
    } else {
        NSString* sqlStr = [NSString stringWithFormat:@"SELECT %@,%@,%@ FROM %@ WHERE %@=?",
                            FIELDS_NAME_SID, FIELDS_NAME_SNAME, FIELDS_NAME_SCLASS, TABLE_NAME, FIELDS_NAME_SID];
        sqlite3_stmt* statement;
        //预处理过程
        if (sqlite3_prepare_v2(db, [sqlStr UTF8String], -1, &statement, NULL) == SQLITE_OK) {
            //绑定参数开始
            sqlite3_bind_text(statement, 1, "1000", -1, NULL);
            //执行
            while (sqlite3_step(statement) == SQLITE_ROW) {
                char* field1 = (char*)sqlite3_column_text(statement, 0);
                NSString* field1Str = [[NSString alloc]initWithUTF8String:field1];
                studentId.text = field1Str;

                char* field2 = (char*)sqlite3_column_text(statement, 1);
                NSString* field2Str = [[NSString alloc]initWithUTF8String:field2];
                studentName.text = field2Str;

                char* field3 = (char*)sqlite3_column_text(statement, 2);
                NSString* field3Str = [[NSString alloc]initWithUTF8String:field3];
                studentClass.text = field3Str;

                [field1Str release];
                [field2Str release];
                [field3Str release];
            }
        }
        sqlite3_finalize(statement);
        sqlite3_close(db);
    }
}
while (sqlite3_step(statement) == SQLITE_ROW) sqlite3_step(statement) == SQLITE_ROW单步执行并判断sql语句执行的状态。
char *field1 = (char *) sqlite3_column_text(statement, 0); sqlite3_column_text(statement, 0);取出字段值,第2个参数是列的顺序,序号是从0开始。
NSString *field1Str = [[NSString alloc] initWithUTF8String: field1];构建NSSting字符串。
其它部分代码
-(IBAction)textFieldDoneEditing:(id)sender {
    [sender resignFirstResponder];
}
- (void)viewDidUnload
{
    [self setStudentId:nil];
    [self setStudentName:nil];
    [self setStudentClass:nil];
    [super viewDidUnload];
}

- (void)dealloc {
    [studentId release];
    [studentName release];
    [studentClass release];
    [super dealloc];
}
注:
1 本教程是基于关东升老师的教程
2 基于黑苹果10.6.8和xcode4.2
3 本人初学,有什么不对的望指教
4 教程会随着本人学习,持续更新
5 教程是本人从word笔记中拷贝出来了,所以格式请见谅
