前言
swagger2 是什么,我这里就不说了,就是一个简单的接口文档,方便前后端联调。
其实之前没有想要到要使用swagger 的。因为我之前用的是YAPI ,不过这个是一个单独的工具。并且是开源的,整个团队协作使用起来非常方便。但是这里我们坐个人项目的话,就使用比较简单的swagger2了,我们在在springboot中使用swagger2 比较简单。
pom.xml
一切从配置开始的,我们映入swagger2 ,需要先引入依赖。如下:
<dependency>
            <groupId>io.springfox</groupId>
            <artifactId>springfox-swagger2</artifactId>
            <version>2.9.2</version>
        </dependency>
        <dependency>
            <groupId>io.springfox</groupId>
            <artifactId>springfox-swagger-ui</artifactId>
            <version>2.9.2</version>
        </dependency>
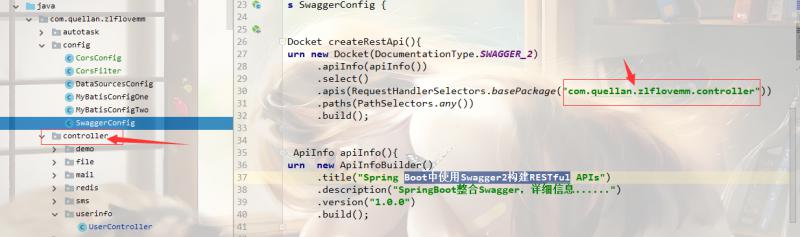
SwaggerConfig
引入依赖后,我们就需要来写一个配置,我们在config 目录下创建一个SwaggerConfig类。内容如下:
@Configuration
@EnableSwagger2
public class SwaggerConfig {

    @Bean
    public Docket createRestApi(){
        return new Docket(DocumentationType.SWAGGER_2)
                .apiInfo(apiInfo())
                .select()
                .apis(RequestHandlerSelectors.basePackage("com.quellan.zlflovemm.controller"))
                .paths(PathSelectors.any())
                .build();
    }

    private ApiInfo apiInfo(){
        return  new ApiInfoBuilder()
                .title("Spring Boot中使用Swagger2构建RESTful APIs")
                .description("SpringBoot整合Swagger,详细信息......")
                .version("1.0.0")
                .build();
    }
}
可以看到代码不复杂,就是创建了一个Docket 的bean。唯一需要注意的是注意配置好接口的目录。
其实到了这一步,我们就已经配置好了。我们启动项目测试一下。启动项目后,在浏览器上输入:
http://localhost:9090/zlflovemm/swagger-ui.html

可以看到我们之前写的接口已经在界面上显示出来了。不过现在的接口还惨不忍睹,你们自己实践的时候可以看看,需要我们再做些工作。到这里有些朋友可能会出现问题,发现没有出现这种界面,可能是配置不对,要不就是你们的配置了拦截器。我自己开始弄的时候就出现了页面访问不了的情况。然后发现是我们上篇文章番外中设置的拦截器导致的。我们可以先把注释掉。
接口中的配置
我们就用用户类的接口来写吧,毕竟还是写文档还是很麻烦的。写好后的代码如下:
@Slf4j
@RestController
@RequestMapping("/user")
@Api(tags = "用户管理相关接口")
public class UserController {

    @Autowired
    private UserService userService;

    @ApiOperation("获取用户列表")
    @RequestMapping(value = "/list")
    public List<UserEntry> findUserList(){
        return userService.findUserList();
    }


    @ApiOperation("新增用户信息")
    @ApiImplicitParams({
            @ApiImplicitParam(name = "userName",value = "用户名",defaultValue = "zlf"),
            @ApiImplicitParam(name="password",value = "密码",defaultValue = "zlf"),
            @ApiImplicitParam(name = "email",value = "邮箱",defaultValue = "11@qq.com")
    })
    @RequestMapping(value = "/add",method = RequestMethod.GET)
    public String addUser(@RequestParam(value = "userName")String uaserName,@RequestParam(value = "password")String password,@RequestParam(value = "email")String email){
        int falg=userService.addUser(uaserName,password,email);
        if(falg>0){
            return "success";
        }
        return "error";
    }

    @ApiOperation("删除用户信息")
    @ApiImplicitParam(name = "id",value = "1",defaultValue = "1")
    @RequestMapping(value = "/delete",method = RequestMethod.GET)
    public String deleteUser(@RequestParam(value = "id")int id){
        if(userService.deleteUser(id)>0){
            return "success";
        }
        return "error";
    }


    @ApiOperation("获取用户列表2")
    @RequestMapping(value = "/list2",method = RequestMethod.GET)
    public List<UserEntry> findUserList2(){
        return userService.findUserList2();
    }

    @ApiOperation("新增用户信息2")
    @ApiImplicitParams({
            @ApiImplicitParam(name = "userName",value = "用户名",defaultValue = "zlf"),
            @ApiImplicitParam(name="password",value = "密码",defaultValue = "zlf"),
            @ApiImplicitParam(name = "email",value = "邮箱",defaultValue = "11@qq.com")
    })
    @RequestMapping(value = "/add2",method = RequestMethod.GET)
    public String addUser2(@RequestParam(value = "userName")String uaserName,@RequestParam(value = "password")String password,@RequestParam(value = "email")String email){
        int falg= userService.addUser2(uaserName,password,email);
        if(falg>0){
            return "success";
        }
        return "error";
    }

    @ApiOperation("删除用户信息2")
    @ApiImplicitParam(name = "id",value = "1",defaultValue = "1")
    @RequestMapping(value = "/delete2",method = RequestMethod.GET)
    public String deleteUser2(@RequestParam(value = "id")int id){
        if(userService.deleteUser2(id)>0){
            return "success";
        }
        return "error";
    }
}
在类上加入@Api(tags = "用户管理相关接口") 表示这个类的作用。
在单个接口上,我们通过@ApiOperation,@ApiImplicitParams,@ApiImplicitParam来写备注了。
@ApiOperation 用来注明接口的功能。
@ApiImplicitParam 用来设置接口有单个参数的,
@ApiImplicitParams 用来设置接口多个参数的,怎么使用,代码中有样例。
接下来,我们来看下界面上。
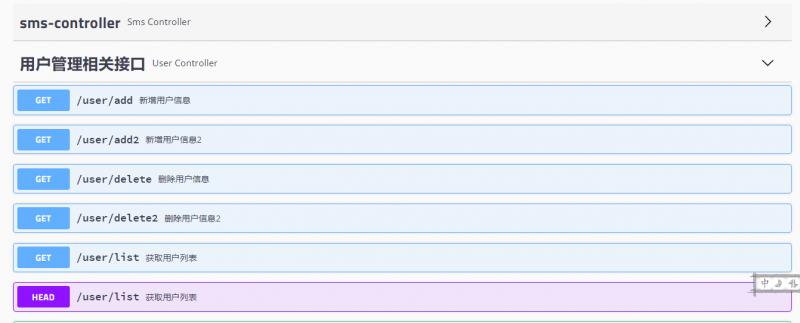
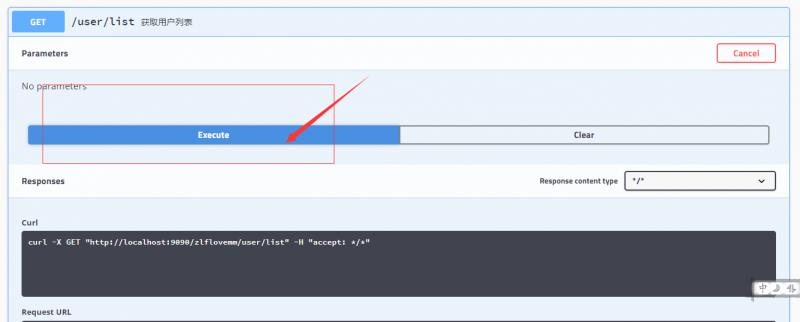
可以看到,界面上已经可以显示出来了,这比我们刚刚开始没有配置一些注释要友好了很多,点击 execute 可以调试接口,还是可以满足基本需求的。但是大家也同样发现了,swagger 对我们的代码侵入是非常严重的,我们项目中本来代码就很多,我们还要加上这么多的注解代码,对我们写代码是很不友好的。
番外
到此为止,springboot 配置swagger2 就已经实现好了,整体上比较简单,这些希望对大家有帮助。
好了,就说这么多啦
代码上传到github:
https://github.com/QuellanAn/zlflovemm
后续加油♡
欢迎大家关注个人公众号 "程序员爱酸奶"
分享各种学习资料,包含java,linux,大数据等。资料包含视频文档以及源码,同时分享本人及投递的优质技术博文。
如果大家喜欢记得关注和分享哟❤