图片上传请求由Node处理,图片访问请求由Nginx处理。
1、Nginx配置


#user  nobody;
worker_processes  1;

#error_log  logs/error.log;
#error_log  logs/error.log  notice;
#error_log  logs/error.log  info;

#pid        logs/nginx.pid;


events {
    worker_connections  1024;
}


http {
    include       mime.types;
    default_type  application/octet-stream;

    #log_format  main  '$remote_addr - $remote_user [$time_local] "$request" '
    #                  '$status $body_bytes_sent "$http_referer" '
    #                  '"$http_user_agent" "$http_x_forwarded_for"';

    #access_log  logs/access.log  main;

    sendfile        on;
    tcp_nopush     on;
    sendfile_max_chunk 256K;

    #keepalive_timeout  0;
    keepalive_timeout  65;

    #gzip  on;

    upstream localhost {
        server localhost:3000;#node服务器
    }

    server {
        listen       80;
        server_name  localhost;


        #开启索引功能
        autoindex    on;

        #关闭计算文件确切大小
        autoindex_exact_size off;

        #charset koi8-r;

        #access_log  logs/host.access.log  main;

        #上传操作由node服务器处理
        location / {
            proxy_pass    http://localhost;
            index    index.html;
        }

        #映射图片访问url
        location /image/ {
            expires 30d;#缓存时间
            root    E:/Study/nginx/nginx-1.7.6/files;
        }

        #error_page  404              /404.html;

        # redirect server error pages to the static page /50x.html
        #
        error_page   500 502 503 504  /50x.html;
        location = /50x.html {
            root   html;
        }

        # proxy the PHP scripts to Apache listening on 127.0.0.1:80
        #
        #location ~ .php$ {
        #    proxy_pass   http://127.0.0.1;
        #}

        # pass the PHP scripts to FastCGI server listening on 127.0.0.1:9000
        #
        #location ~ .php$ {
        #    root           html;
        #    fastcgi_pass   127.0.0.1:9000;
        #    fastcgi_index  index.php;
        #    fastcgi_param  SCRIPT_FILENAME  /scripts$fastcgi_script_name;
        #    include        fastcgi_params;
        #}

        # deny access to .htaccess files, if Apache's document root
        # concurs with nginx's one
        #
        #location ~ /.ht {
        #    deny  all;
        #}
    }


    # another virtual host using mix of IP-, name-, and port-based configuration
    #
    #server {
    #    listen       8000;
    #    listen       somename:8080;
    #    server_name  somename  alias  another.alias;

    #    location / {
    #        root   html;
    #        index  index.html index.htm;
    #    }
    #}


    # HTTPS server
    #
    #server {
    #    listen       443 ssl;
    #    server_name  localhost;

    #    ssl_certificate      cert.pem;
    #    ssl_certificate_key  cert.key;

    #    ssl_session_cache    shared:SSL:1m;
    #    ssl_session_timeout  5m;

    #    ssl_ciphers  HIGH:!aNULL:!MD5;
    #    ssl_prefer_server_ciphers  on;

    #    location / {
    #        root   html;
    #        index  index.html index.htm;
    #    }
    #}

}
2、nodejs项目架构
1)项目结构图
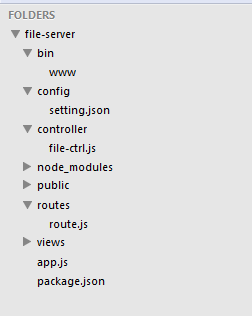
2)bin/www 是启动脚本
#!/usr/bin/env node
var debug = require('debug')('file-server');
var app = require('../app');

app.set('port', process.env.PORT || 3000);

var server = app.listen(app.get('port'), function() {
  console.log('Express server listening on port ' + server.address().port);
  debug('Express server listening on port ' + server.address().port);
});
3)config/setting.json 是程序中用的一些常量以json格式配置
{
    "image_url":"http://localhost/image",
    "image_dir":"E:/Study/nginx/nginx-1.7.6/files/image",
    "tmp_dir":"E:/Study/nginx/nginx-1.7.6/tmp"
}
4)controller/file-ctrl.js 是文件上传的处理代码
var fs = require('fs');
var path = require('path');
var    formidable = require('formidable');
var util = require('util');
var fs = require('fs');
var path = require('path');

var setting = require('../config/setting.json');


/**
 * 上传
 */
exports.upload = function(req,res){

    var form = new formidable.IncomingForm();
    form.encoding = 'utf-8';

    //如果需要临时文件保持原始文件扩展名,设置为true
    form.keepExtensions = false;

    //文件大小限制,默认2MB
    form.maxFieldsSize = 2 * 1024 * 1024;


    //图片存放目录
    var imageDir = setting.image_dir;

    //上传临时目录
    var tmpDir = setting.tmp_dir;

    form.uploadDir = tmpDir;//目录需要已存在
    /**
     * fields 表单中的其他属性
     * files  文件集合
     */
    form.parse(req, function(err, fields, files) {

        //图片完整路径
        var imagePath = path.resolve(imageDir, files.file.name);


        //将临时目录中的图片移动到图片存放目录下
        fs.rename(files.file.path,imagePath,function(err){
            if(err) {
                res.json({'success':false,'msg':err});
            }else{
                var image_url = setting.image_url+'/'+files.file.name;
                res.json({'success':true,'msg':'上传成功!','image_url':image_url});
                //res.json({'success':true,'msg':'上传成功!','image_url':image_url,'fields':util.inspect({fields: fields, files: files})});
            }
        });
    });
}


/**
 * 下载
 */
exports.download = function(req,res){
    var filename = req.params.filename;
    var dir = setting.file_dir;
    var file_path = path.resolve(dir,filename);
    fs.exists(file_path,function(exists) {
        if(!exists) {
            res.json({'success':false,'msg':'文件不存在!'});
        }else{
            res.download(file_path,function(err){
                if(err) {
                    res.json({'success':false,'msg':err});
                }
            });

        }
    });
}
5)routes/route.js 是整个项目的路由控制
var express = require('express');
var router = express.Router();

var file_ctrl = require('../controller/file-ctrl')

/**上传文件*/
router.post('/upload',file_ctrl.upload);

module.exports = router;
6)app.js 是项目的全局配置
var express = require('express');
var path = require('path');
var favicon = require('static-favicon');
var logger = require('morgan');
var cookieParser = require('cookie-parser');
var bodyParser = require('body-parser');

var routes = require('./routes/route');

var app = express();

// view engine setup
app.set('views', path.join(__dirname, 'views'));
app.set('view engine', 'jade');

app.use(favicon());
app.use(logger('dev'));
app.use(bodyParser.json());
app.use(bodyParser.urlencoded());
app.use(cookieParser());
app.use(express.static(path.join(__dirname, 'public')));

app.use('/', routes);

/// catch 404 and forward to error handler
app.use(function(req, res, next) {
    var err = new Error('Not Found');
    err.status = 404;
    next(err);
});

/// error handlers

// development error handler
// will print stacktrace
if (app.get('env') === 'development') {
    app.use(function(err, req, res, next) {
        res.status(err.status || 500);
        res.render('error', {
            message: err.message,
            error: err
        });
    });
}

// production error handler
// no stacktraces leaked to user
app.use(function(err, req, res, next) {
    res.status(err.status || 500);
    res.render('error', {
        message: err.message,
        error: {}
    });
});


module.exports = app;
6)package.json 是依赖包管理
{
  "name": "file-server",
  "version": "0.0.1",
  "private": true,
  "scripts": {
    "start": "node ./bin/www"
  },
  "dependencies": {
    "express": "~4.2.0",
    "static-favicon": "~1.0.0",
    "morgan": "~1.0.0",
    "cookie-parser": "~1.0.1",
    "body-parser": "~1.0.0",
    "debug": "~0.7.4",
    "jade": "~1.3.0",
    "formidable":"*"
  }
}
项目用到了expressjs框架。
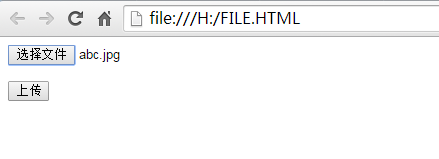
3、简单写一个html上传页面
<!DOCTYPE HTML PUBLIC "-//W3C//DTD HTML 4.01 Transitional//EN">
<html>
  <head>

    <title>upload</title>
    <meta http-equiv="pragma" content="no-cache">
    <meta http-equiv="cache-control" content="no-cache">
    <meta http-equiv="expires" content="0">
    <meta http-equiv="keywords" content="keyword1,keyword2,keyword3">
    <meta http-equiv="description" content="This is my page">
    <!--
    <link rel="stylesheet" type="text/css" href="styles.css">
    -->
  </head>

  <body>
        <form action="http://localhost/upload" method="post" enctype="multipart/form-data">
            <input type="file" name="file">
            <p>
            <input type="submit" value="上传">
        </form>
  </body>
</html>
4、启动node服务器和Nginx服务器
进入项目根目录,执行 node binwww 或 npm start (这个是在package.json中配置的脚本命令"scripts")
5、测试
1)上传图片
2)上传成功
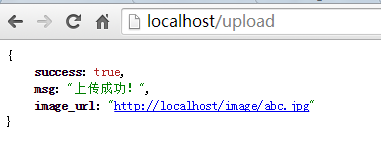
3)直接访问image_url就可以看到图片了