一、这里的案例相对比较简单,主要就是通过学习验证码的识别来认识深度学习中我们一般在工作中,需要处理的东西会存在哪些东西。
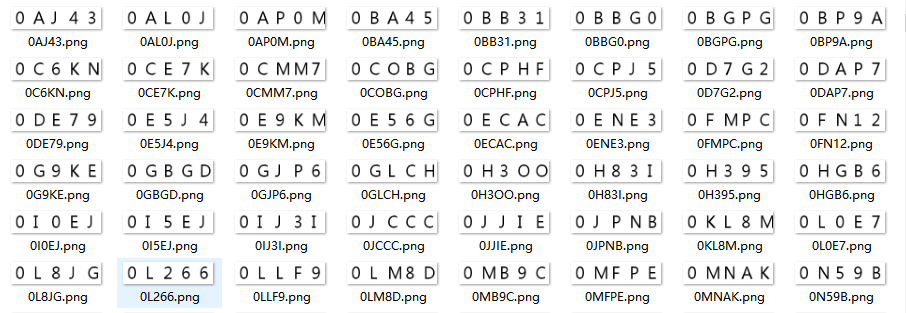
二、因为我没有数据集,没有关系,这里自己写了一个数据集,来做测试,为了方便我把这个数据集,写成了*.tfrecords格式的文件。
三、生成数据集
1)生成验证码图片
# 生成验证码训练集
def gen_captcha():
    captcha_char_list = list("0123456789ABCDEFGHIJKLMNOPQRSTUVWXYZ")
    font = ImageFont.truetype(font="font/msyh.ttf", size=36)
    for n in range(2000):
        image = Image.new('RGB', (200, 50), (255, 255, 255))
        draw = ImageDraw.Draw(image)
        chars = ""
        for i in range(5):
            captcha_char = captcha_char_list[random.randint(0, 25)]
            chars += captcha_char
            draw.text((10 + i * 40, 0), captcha_char, (0, 0, 0), font=font)
        image.save(open("data/captcha/" + chars + ".png", 'wb'), 'png')
说明:我这里都是采用的白底黑字的方式来写的,字体使用微软的字体。如果需要做干扰,可以自己在网上查找教程

2)写入tfrecords格式文件
# 将图片数据和目标值写到tfrecords文件中
def captcha_data_write():
    # 获取图片名称和所有数据
    file_names, image_batch = get_image_name_batch()

    # 获取目标值
    target = get_target(file_names)

    # 写入文件
    write_tf_records(image_batch, target)

def get_image_name_batch():
    # 1、读取图片目录,生成文件名称列表
    file_names = os.listdir("data/captcha")
    file_list = [os.path.join("data/captcha", file_name) for file_name in file_names]
    print(file_list)
    # 2、放入队列(shuffle=False,一定要设置,不然会乱序)
    file_queue = tf.train.string_input_producer(file_list, shuffle=False)
    # 3、读取图片数据
    reader = tf.WholeFileReader()
    key, value = reader.read(file_queue)
    # 4、解码图片数据
    image = tf.image.decode_png(value)
    # 改变形状(根据具体的图片大小来)
    image.set_shape([50, 200, 3])
    # 5、获取图片批次
    image_batch = tf.train.batch([image], batch_size=2000, num_threads=1, capacity=2000)
    return file_names, image_batch

def get_target(file_names):
    # 6、获取目标值
    labels = [file_name.split(".")[0] for file_name in file_names]
    print(labels)
    # 7、将目标值装换成具体数值
    captcha_char = "0123456789ABCDEFGHIJKLMNOPQRSTUVWXYZ"
    # 转换成字典,然后反转(0:0, 1:1, ...,z:35)
    num_char = dict(enumerate(list(captcha_char)))
    char_num = dict(zip(num_char.values(), num_char.keys()))
    # 8、构建标签列表
    array = []
    for label in labels:
        nums = []
        for char in label:
            nums.append(char_num[char])
        array.append(nums)
    # [[2, 11, 8, 2, 7] ...]
    print(array)
    # 9、转换为tensor张量,注意这里的类型一定要给出来,这里我踩过坑,如果没有,读数据是存在问题的
    target = tf.constant(array, dtype=tf.uint8)
    return target

def write_tf_records(image_batch, target):
    # 10、上面主要准备图片数据和目标值,下面主要是写入到*.tfrecords中
    with tf.Session() as sess:
        coord = tf.train.Coordinator()
        threads = tf.train.start_queue_runners(sess=sess, coord=coord)
        # 运算获取图片批次数据
        image_batch = sess.run(image_batch)
        # 转换一下数据为uint8
        image_batch = tf.cast(image_batch, tf.uint8)
        # 写入数据
        with tf.python_io.TFRecordWriter("data/tf_records/captcha.tfrecords") as writer:
            for i in range(2000):
                # 全部使用string保存
                image_string = image_batch[i].eval().tostring()
                label_string = target[i].eval().tostring()
                example = tf.train.Example(features=tf.train.Features(feature={
                    "image": tf.train.Feature(bytes_list=tf.train.BytesList(value=[image_string])),
                    "label": tf.train.Feature(bytes_list=tf.train.BytesList(value=[label_string]))
                }))
                writer.write(example.SerializeToString())
                print("写入第%d数据" % (i + 1))
        coord.request_stop()
        coord.join(threads)
四、训练和测试
def captcha_train_test(n):
    # 读取数据
    image_batch, label_batch = tfrecords_read_decode()

    # 1、建立占位符(数据更具图片和目标数据而定)
    with tf.variable_scope("data"):
        x = tf.placeholder(dtype=tf.uint8, shape=[None, 50, 200, 3], name="x")
        label = tf.placeholder(dtype=tf.uint8, shape=[None, 5], name="label")

    # 2、建立模型
    y_predict = model(x)

    # y_predict为[None, 5 * 36] label_batch为[None, 5], 因此需要one-hot[None, 5, 36]
    y_true = tf.one_hot(label, depth=36, axis=2, on_value=1.0, name="one_hot")
    # 需要变形为[None 5 * 36]
    y_true_reshape = tf.reshape(y_true, [-1, 5 * 36], name="y_true_reshape")

    # 4、计算损失值
    with tf.variable_scope("loss"):
        softmax_cross = tf.nn.softmax_cross_entropy_with_logits(labels=y_true_reshape, logits=y_predict)
        loss = tf.reduce_mean(softmax_cross)

    # 5、训练
    with tf.variable_scope("optimizer"):
        train_op = tf.train.GradientDescentOptimizer(learning_rate=0.001).minimize(loss=loss)

    # 6、计算准确率
    with tf.variable_scope("accuracy"):
        # 因为这里的真实值是2维结果,所以需要把y_predict,转化为2位数据
        equal_list = tf.equal(tf.argmax(y_true, axis=2), tf.argmax(tf.reshape(y_predict, [-1, 5, 36]), 2))
        accuracy = tf.reduce_mean(tf.cast(equal_list, tf.float32))

    # 收集数据
    tf.add_to_collection("y_predict", y_predict)
    if n == 1:
        # 7、会话
        with tf.Session() as sess:
            # 变量初始化
            sess.run(tf.global_variables_initializer())

            coord = tf.train.Coordinator()
            threads = tf.train.start_queue_runners(sess=sess, coord=coord)

            saver = tf.train.Saver()
            # 如果模型存在,则加载模型
            if os.path.exists("model/captcha/checkpoint"):
                saver.restore(sess, "model/captcha/captcha")

            for i in range(2000):
                # 读取数据
                # 训练,记住这里的数据类型为uint8需要转换为tf.float32
                image_train, label_train = sess.run([image_batch, label_batch])
                sess.run(train_op, feed_dict={x: image_train, label: label_train})
                # 保存模型
                if (i + 1) % 100 == 0:
                    saver.save(sess, "model/captcha/captcha")
                acc = sess.run(accuracy, feed_dict={x: image_train, label: label_train})
                print("第%d次,准确率%f" % ((i + 1), acc))

            coord.request_stop()
            coord.join(threads)
    else:
        # 1、读取指定目录下图片数据
        file_names_test = os.listdir("data/captcha_test")
        file_list_test = [os.path.join("data/captcha_test", file_name) for file_name in file_names_test]
        file_queue_test = tf.train.string_input_producer(file_list_test, shuffle=False)
        # 2、读取和解码数据
        reader = tf.WholeFileReader()
        key, value = reader.read(file_queue_test)
        image = tf.image.decode_png(value)
        image.set_shape([50, 200, 3])
        # 3、批处理
        image_batch_test = tf.train.batch([tf.cast(image, tf.uint8)], batch_size=len(file_names_test), capacity=len(file_names_test))
        # 4、加载模型
        with tf.Session() as sess:
            coord = tf.train.Coordinator()
            threads = tf.train.start_queue_runners(sess=sess, coord=coord)
            # 1、加载模型
            saver = tf.train.Saver()
            saver.restore(sess, "model/captcha/captcha")

            # 4、预测[None, 5 * 36]
            predict = sess.run(y_predict, feed_dict={x: sess.run(image_batch_test)})
            captcha_list = list("0123456789ABCDEFGHIJKLMNOPQRSTUVWXYZ")
            for i in range(len(file_names_test)):
                predict_reshape = tf.reshape(predict, [-1, 5, 36])
                captcha = ""
                for j in range(5):
                    captcha += captcha_list[tf.argmax(predict_reshape[i][j], 0).eval()]
                print("预测值:%s, 真实值:%s" % (captcha, file_names_test[i].split(".")[0]))
            coord.request_stop()
            coord.join(threads)

def model(x):
    # # 第一层卷积
    # with tf.variable_scope("conv_1"):
    #     # 卷积[None, 50, 200, 3] -> [None, 50, 200, 32]
    #     w_1 = gen_weight([5, 5, 3, 32])
    #     b_1 = gen_bias([32])
    #     # 在进行模型计算的时候需要使用tf.float32数据进行计算
    #     x_conv_1 = tf.nn.conv2d(tf.cast(x, tf.float32), filter=w_1, strides=[1, 1, 1, 1], padding="SAME") + b_1
    #     # 激活
    #     x_relu_1 = tf.nn.relu(x_conv_1)
    #     # 池化[None, 50, 200, 32] -> [None, 25, 100, 32]
    #     x_pool_1 = tf.nn.max_pool(x_relu_1, ksize=[1, 2, 2, 1], strides=[1, 2, 2, 1], padding="SAME")
    # # 第二层卷积
    # with tf.variable_scope("conv_2"):
    #     # 卷积[None, 25, 100, 32] -> [None, 25, 100, 64]
    #     w_2 = gen_weight([5, 5, 32, 64])
    #     b_2 = gen_bias([64])
    #     x_conv_2 = tf.nn.conv2d(x_pool_1, filter=w_2, strides=[1, 1, 1, 1], padding="SAME") + b_2
    #     # 激活
    #     x_relu_2 = tf.nn.relu(x_conv_2)
    #     # 池化[None, 25, 100, 64] -> [None, 13, 50, 64]
    #     x_pool_2 = tf.nn.max_pool(x_relu_2, ksize=[1, 2, 2, 1], strides=[1, 2, 2, 1], padding="SAME")
    # # 全连接层
    # with tf.variable_scope("full_connection"):
    #     # 生成权重和偏置
    #     # 为什么是5 * 36主要是我们的字符串个数36个,使用one-hot.每个值为36个值,一个验证码5个值,所以为5 * 36个
    #     w_fc = gen_weight([13 * 50 * 64, 5 * 36])
    #     b_fc = gen_bias([5 * 36])
    #     # 修改数据形状
    #     x_fc = tf.reshape(x_pool_2, shape=[-1, 13 * 50 * 64])
    #     # [None, 5 * 36]
    #     y_predict = tf.matmul(x_fc, w_fc) + b_fc
    with tf.variable_scope("model"):
        # 生成权重和偏置
        # 为什么是5 * 36主要是我们的字符串个数36个,使用one-hot.每个值为36个值,一个验证码5个值,所以为5 * 36个
        w_fc = gen_weight([50 * 200 * 3, 5 * 36])
        b_fc = gen_bias([5 * 36])
        # 修改数据形状
        x_fc = tf.reshape(tf.cast(x, tf.float32), shape=[-1, 50 * 200 * 3])
        # [None, 5 * 36]
        y_predict = tf.matmul(x_fc, w_fc) + b_fc
    return y_predict

# 生成权重值
def gen_weight(shape):
    return tf.Variable(tf.random_normal(shape=shape, mean=0.0, stddev=1.0, dtype=tf.float32))

# 生成偏值
def gen_bias(shape):
    return tf.Variable(tf.constant(0.0, dtype=tf.float32, shape=shape))

# 读取数据
def tfrecords_read_decode():
    # 将文件加入队列
    file_queue = tf.train.string_input_producer(["data/tf_records/captcha.tfrecords"])
    # 读取tfrecords文件
    reader = tf.TFRecordReader()
    key, value = reader.read(file_queue)
    # value的格式为example
    features = tf.parse_single_example(value, features={
        "image": tf.FixedLenFeature([], tf.string),
        "label": tf.FixedLenFeature([], tf.string)
    })
    # 解码
    image_data = tf.decode_raw(features["image"], tf.uint8)
    label_data = tf.decode_raw(features["label"], tf.uint8)
    # 改变形状
    image_reshape = tf.reshape(image_data, [50, 200, 3])
    label_reshape = tf.reshape(label_data, [5])
    # 获取批次数据
    image_batch, label_batch = tf.train.batch([image_reshape, label_reshape], batch_size=200, num_threads=1, capacity=200)
    return image_batch, label_batch
说明:因为我这里使用的是cpu计算,所以速度上面会很慢,为了看到效果,我这里,使用的全连接层,实际可以使用卷积神经网络测试。
one-hot:中间有一步是进行了数据one-hot处理的,也就是[5, 23, 15, 20]-->[[0,0,0,0,1,...],[0,0,0,...,1,...],[0,0,0,...,1,...],[0,0,0,...,1,...]]这样的形式。为什么要这样做呢?目的是为了计算,在前面的类别我们说明过,计算得出的是概率,这里的5是验证码数据的下标,不是概率。我们为了计算概率就需要得出,预测中得出每一个值的概率,然后选取最大的值。
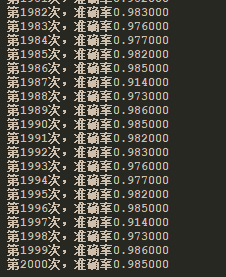
训练结果:

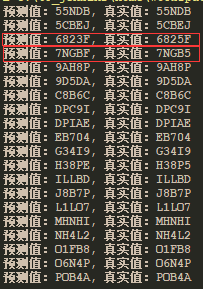
测试结果:

可以看出,测试结果,还是存在错误的情况,不过从准确率上面来说还是很不错了。