参考
https://docs.openstack.org/openstack-ansible/latest
一、服务器规划
| hostname | category | hardware | br-ex (vlan100 eth0) | br-mgmt (vlan120 eth0) | br-storage-pub (vlan121 eth0) | br-storage-prv (vlan122 eth1) | br-vxlan (vlan123 eth1) | br-vlan(vlan124 eth1) |
|---|---|---|---|---|---|---|---|---|
| vm-210 | deploy | core*4 / 8g / 20GB | 192.168.100.210 | 10.0.100.210 | 10.0.110.210 | |||
| vm-211 | control, network | core*4 / 8g / 20GB | 192.168.100.211 | 10.0.100.211 | 10.0.110.211 | 10.0.130.211 | 10.0.140.x | |
| vm-212 | control, network | core*4 / 8g / 20GB | 192.168.100.212 | 10.0.100.213 | 10.0.110.212 | 10.0.130.212 | 10.0.140.x | |
| vm-213 | control, network | core*4 / 8g / 20GB | 192.168.100.213 | 10.0.100.213 | 10.0.110.213 | 10.0.130.213 | 10.0.140.x | |
| vm-214 | compute, storage | core*8 / 8g / 20GB,50GB | 192.168.100.214 | 10.0.100.214 | 10.0.110.214 | 10.0.130.214 | 10.0.140.x | |
| vm-215 | compute, storage | core*8 / 8g / 20GB,50GB | 192.168.100.215 | 10.0.100.215 | 10.0.110.215 | 10.0.130.215 | 10.0.140.x | |
| vm-216 | compute, storage | core*8 / 8g / 20GB,50GB | 192.168.100.216 | 10.0.100.216 | 10.0.110.216 | 10.0.130.216 | 10.0.140.x | |
| vm-201 | ceph-mon | core*1 / 2g / 20GB | 192.168.100.201 | 10.0.100.201 | 10.0.110.201 | 10.0.120.201 | ||
| vm-202 | ceph-mon | core*1 / 2g / 20GB | 192.168.100.202 | 10.0.100.202 | 10.0.110.202 | 10.0.120.202 | ||
| vm-203 | ceph-mon | core*1 / 2g / 20GB | 192.168.100.203 | 10.0.100.203 | 10.0.110.203 | 10.0.120.203 | ||
| vm-204 | ceph-osd | core*4 / 4g / 20GB,10GBx2,30GBx4 | 192.168.100.204 | 10.0.100.204 | 10.0.110.204 | 10.0.120.204 | ||
| vm-205 | ceph-osd | core*4 / 4g / 20GB,10GBx2,30GBx4 | 192.168.100.205 | 10.0.100.205 | 10.0.110.205 | 10.0.120.205 | ||
| vm-206 | ceph-osd | core*4 / 4g / 20GB,10GBx2,30GBx4 | 192.168.100.206 | 10.0.100.206 | 10.0.110.206 | 10.0.120.206 |
二、proxmox宿主机配置
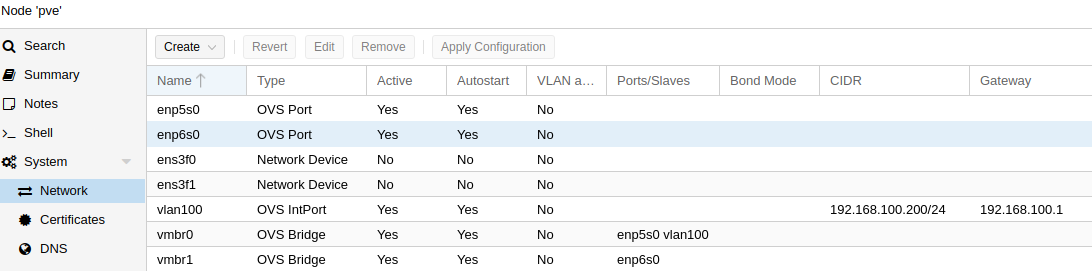

服务器网卡enp5s0接三层交换机的g1/0/1端口,端口类型trunk,开放vlan 8,12,100,120,121;服务器网卡enp6s0接三层交换机的g1/0/2端口,端口类型trunk,开放vlan 8,12,122,123,124;vlan8有线办公,vlan12无线办公,vlan100物理机,vlan120-124 overlay网络
三层交换机分别建立vlan 100, 120, 121, 122, 123, 124的接口: 10.0.100.1/24, 10.0.110.1/24, 10.0.120.1/24, 10.0.130.1/24, 10.0.140.1/24; 端口49上联端口,连接有线及无线办公网
# proxmox 网络配置文件 /etc/network/interface
auto lo
iface lo inet loopback
iface ens3f0 inet manual
iface ens3f1 inet manual
auto enp5s0
iface enp5s0 inet manual
ovs_type OVSPort
ovs_bridge vmbr0
ovs_options trunks=8,12,100,120,121
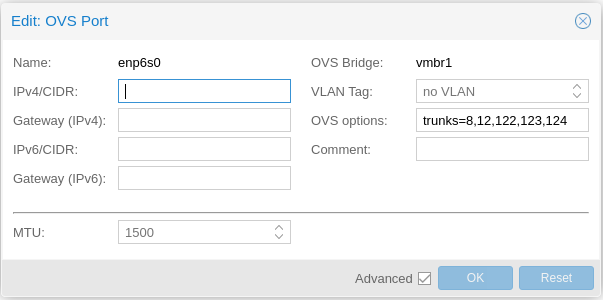
auto enp6s0
iface enp6s0 inet manual
ovs_type OVSPort
ovs_bridge vmbr1
ovs_options trunks=8,12,122,123,124
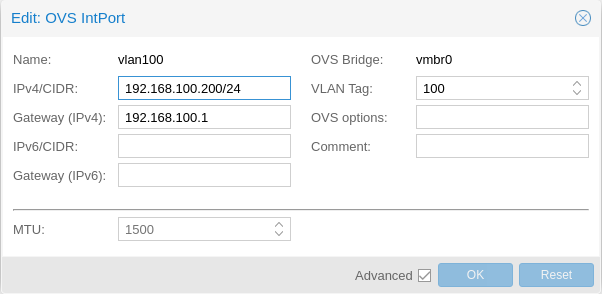
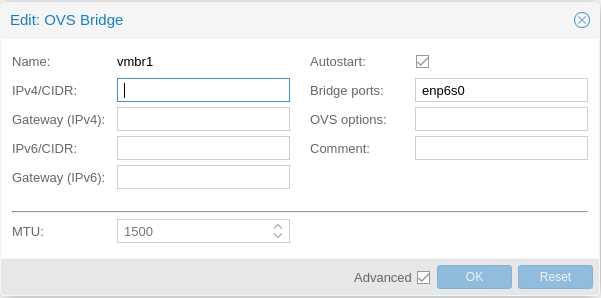
auto vlan100
iface vlan100 inet static
address 192.168.100.200/24
gateway 192.168.100.1
ovs_type OVSIntPort
ovs_bridge vmbr0
ovs_options tag=100
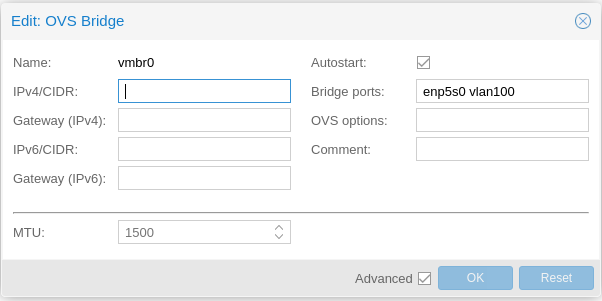
auto vmbr0
iface vmbr0 inet manual
ovs_type OVSBridge
ovs_ports enp5s0 vlan100
auto vmbr1
iface vmbr1 inet manual
ovs_type OVSBridge
ovs_ports enp6s0
三、虚拟机准备
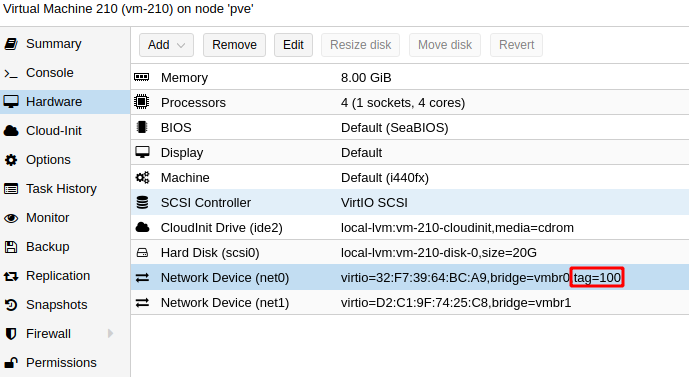
配置tag=100, 才能访问虚拟机192.168.100.xxx,在配置ovs网桥后,由于ovs已加tag的选项,需要在虚拟机模板去除
1. 安装openvswitch
cat > /etc/sysconfig/network <<EOF
NETWORKING=yes
NOZEROCONF=yes
EOF

yum install -y centos-release-openstack-train

sed -e 's|^mirrorlist|#mirrorlist|g'
    -e 's|^#baseurl=http://mirror.centos.org/$contentdir|baseurl=https://mirrors.nju.edu.cn/centos|g'
    -e 's|^#baseurl=https://mirror.centos.org/$contentdir|baseurl=https://mirrors.nju.edu.cn/centos|g'
    -e 's|^gpgcheck=1|gpgcheck=0|g'
    -i /etc/yum.repos.d/CentOS-*

yum install -y openvswitch libibverbs
systemctl enable openvswitch
systemctl start openvswitch
2. 建立ovs网桥
临时生效
ovs-vsctl add-br br-eth0
ovs-vsctl add-port br-eth0 eth0

ovs-vsctl add-br br-ex

ovs-vsctl add-port br-eth0 patch-eth0-ex
ovs-vsctl set interface patch-eth0-ex type=patch
ovs-vsctl set interface patch-eth0-ex options:peer=patch-ex-eth0,tag=100

ovs-vsctl add-port br-ex patch-ex-eth0
ovs-vsctl set interface patch-eth0-ex type=patch
ovs-vsctl set interface patch-eth0-ex options:peer=patch-eth0-ex

ovs-vsctl add-br br-mgmt

ovs-vsctl add-port br-eth0 patch-eth0-mgmt
ovs-vsctl set interface patch-eth0-mgmt type=patch
ovs-vsctl set interface patch-eth0-mgmt options:peer=patch-mgmt-eth0,tag=120

ovs-vsctl add-port br-mgmt patch-mgmt-eth0
ovs-vsctl set interface patch-mgmt-eth0 type=patch
ovs-vsctl set interface patch-mgmt-eth0 options:peer=patch-eth0-mgmt
3. 查看ovs网桥
# ovs-vsctl show
ed70650b-0ead-403f-812d-497cbad85ac3
    Bridge "br-eth0"
        Port "eth0"
            Interface "eth0"
        Port "br-eth0"
            Interface "br-eth0"
                type: internal
        Port "patch-eth0-ex"
            tag: 100
            Interface "patch-eth0-ex"
                type: patch
                options: {peer="patch-ex-eth0"}
        Port "patch-eth0-mgmt"
            tag: 120
            Interface "patch-eth0-mgmt"
                type: patch
                options: {peer="patch-mgmt-eth0"}
    Bridge br-ex
        Port br-ex
            Interface br-ex
                type: internal
        Port "patch-ex-eth0"
            Interface "patch-ex-eth0"
                type: patch
                options: {peer="patch-eth0-ex"}
    Bridge br-mgmt
        Port "patch-mgmt-eth0"
            Interface "patch-mgmt-eth0"
                type: patch
                options: {peer="patch-eth0-mgmt"}
        Port br-mgmt
            Interface br-mgmt
                type: internal
    ovs_version: "2.12.0"
4. 配置ovs网桥ip地址
ip addr flush eth0
ip addr add 192.168.100.210/24 dev br-ex
ip link set dev br-ex up
ip route add default via 192.168.100.1

ip addr add 10.0.100.210/24 dev br-mgmt
ip link set dev br-mgmt up
5. 写入配置文件永久生效
cd  /etc/sysconfig/network-scripts

cat > ifcfg-br-eth0 <<EOF
DEVICE=br-eth0
ONBOOT=yes
DEVICETYPE=ovs
TYPE=OVSBridge
BOOTPROTO=none
HOTPLUG=no
EOF

cat > ifcfg-eth0 <<EOF
DEVICE=eth0
ONBOOT=yes
DEVICETYPE=ovs
TYPE=OVSPort
OVS_BRIDGE=br-eth0
BOOTPROTO=none
HOTPLUG=no
EOF

cat > ifcfg-br-ex  <<EOF
DEVICE=br-ex
ONBOOT=yes
DEVICETYPE=ovs
TYPE=OVSBridge
BOOTPROTO=static
IPADDR=192.168.100.210
NETMASK=255.255.255.0
GATEWAY=192.168.100.1
HOTPLUG=no
EOF

cat > ifcfg-patch-eth0-ex <<EOF
DEVICE=patch-eth0-ex
ONBOOT=yes
DEVICETYPE=ovs
TYPE=OVSPatchPort
OVS_BRIDGE=br-eth0
OVS_PATCH_PEER=patch-ex-eth0
OVS_OPTIONS="tag=100"
EOF

cat > ifcfg-patch-ex-eth0 <<EOF
DEVICE=patch-ex-eth0
ONBOOT=yes
DEVICETYPE=ovs
TYPE=OVSPatchPort
OVS_BRIDGE=br-ex
OVS_PATCH_PEER=patch-eth0-ex
EOF

cat > ifcfg-br-mgmt  <<EOF
DEVICE=br-mgmt
ONBOOT=yes
DEVICETYPE=ovs
TYPE=OVSBridge
BOOTPROTO=static
IPADDR=10.0.100.210
NETMASK=255.255.255.0
HOTPLUG=no
EOF

cat > ifcfg-patch-eth0-mgmt <<EOF
DEVICE=patch-eth0-mgmt
ONBOOT=yes
DEVICETYPE=ovs
TYPE=OVSPatchPort
OVS_BRIDGE=br-eth0
OVS_PATCH_PEER=patch-mgmt-eth0
OVS_OPTIONS="tag=120"
EOF

cat > ifcfg-patch-mgmt-eth0 <<EOF
DEVICE=patch-mgmt-eth0
ONBOOT=yes
DEVICETYPE=ovs
TYPE=OVSPatchPort
OVS_BRIDGE=br-mgmt
OVS_PATCH_PEER=patch-eth0-mgmt
EOF
6. 按服务器规划配置剩余虚拟机的ovs网桥和ip地址
cd  /etc/sysconfig/network-scripts

cat > ifcfg-br-eth0 <<EOF
DEVICE=br-eth0
ONBOOT=yes
DEVICETYPE=ovs
TYPE=OVSBridge
BOOTPROTO=none
HOTPLUG=no
EOF

cat > ifcfg-eth0 <<EOF
DEVICE=eth0
ONBOOT=yes
DEVICETYPE=ovs
TYPE=OVSPort
OVS_BRIDGE=br-eth0
BOOTPROTO=none
HOTPLUG=no
EOF

cat > ifcfg-br-eth1 <<EOF
DEVICE=br-eth1
ONBOOT=yes
DEVICETYPE=ovs
TYPE=OVSBridge
BOOTPROTO=none
HOTPLUG=no
EOF

cat > ifcfg-eth1 <<EOF
DEVICE=eth1
ONBOOT=yes
DEVICETYPE=ovs
TYPE=OVSPort
OVS_BRIDGE=br-eth1
BOOTPROTO=none
HOTPLUG=no
EOF

#

cat > ifcfg-br-ex  <<EOF
DEVICE=br-ex
ONBOOT=yes
DEVICETYPE=ovs
TYPE=OVSBridge
BOOTPROTO=static
IPADDR=192.168.100.206
NETMASK=255.255.255.0
GATEWAY=192.168.100.1
HOTPLUG=no
EOF

cat > ifcfg-patch-eth0-ex <<EOF
DEVICE=patch-eth0-ex
ONBOOT=yes
DEVICETYPE=ovs
TYPE=OVSPatchPort
OVS_BRIDGE=br-eth0
OVS_PATCH_PEER=patch-ex-eth0
OVS_OPTIONS="tag=100"
EOF

cat > ifcfg-patch-ex-eth0 <<EOF
DEVICE=patch-ex-eth0
ONBOOT=yes
DEVICETYPE=ovs
TYPE=OVSPatchPort
OVS_BRIDGE=br-ex
OVS_PATCH_PEER=patch-eth0-ex
EOF

cat > ifcfg-br-mgmt  <<EOF
DEVICE=br-mgmt
ONBOOT=yes
DEVICETYPE=ovs
TYPE=OVSBridge
BOOTPROTO=static
IPADDR=10.0.100.206
NETMASK=255.255.255.0
HOTPLUG=no
EOF

cat > ifcfg-patch-eth0-mgmt <<EOF
DEVICE=patch-eth0-mgmt
ONBOOT=yes
DEVICETYPE=ovs
TYPE=OVSPatchPort
OVS_BRIDGE=br-eth0
OVS_PATCH_PEER=patch-mgmt-eth0
OVS_OPTIONS="tag=120"
EOF

cat > ifcfg-patch-mgmt-eth0 <<EOF
DEVICE=patch-mgmt-eth0
ONBOOT=yes
DEVICETYPE=ovs
TYPE=OVSPatchPort
OVS_BRIDGE=br-mgmt
OVS_PATCH_PEER=patch-eth0-mgmt
EOF

#

cat > ifcfg-br-storage-pub  <<EOF
DEVICE=br-storage-pub
ONBOOT=yes
DEVICETYPE=ovs
TYPE=OVSBridge
BOOTPROTO=static
IPADDR=10.0.110.206
NETMASK=255.255.255.0
HOTPLUG=no
EOF

cat > ifcfg-patch-eth0-storage-pub <<EOF
DEVICE=patch-eth0-storage-pub
ONBOOT=yes
DEVICETYPE=ovs
TYPE=OVSPatchPort
OVS_BRIDGE=br-eth0
OVS_PATCH_PEER=patch-storage-pub-eth0
OVS_OPTIONS="tag=121"
EOF

cat > ifcfg-patch-storage-pub-eth0 <<EOF
DEVICE=patch-storage-pub-eth0
ONBOOT=yes
DEVICETYPE=ovs
TYPE=OVSPatchPort
OVS_BRIDGE=br-storage-pub
OVS_PATCH_PEER=patch-eth0-storage-pub
EOF

#

cat > ifcfg-br-storage-prv  <<EOF
DEVICE=br-storage-prv
ONBOOT=yes
DEVICETYPE=ovs
TYPE=OVSBridge
BOOTPROTO=static
IPADDR=10.0.120.206
NETMASK=255.255.255.0
HOTPLUG=no
EOF

cat > ifcfg-patch-eth1-storage-prv <<EOF
DEVICE=patch-eth1-storage-prv
ONBOOT=yes
DEVICETYPE=ovs
TYPE=OVSPatchPort
OVS_BRIDGE=br-eth1
OVS_PATCH_PEER=patch-storage-prv-eth1
OVS_OPTIONS="tag=122"
EOF

cat > ifcfg-patch-storage-prv-eth1 <<EOF
DEVICE=patch-storage-prv-eth1
ONBOOT=yes
DEVICETYPE=ovs
TYPE=OVSPatchPort
OVS_BRIDGE=br-storage-prv
OVS_PATCH_PEER=patch-eth1-storage-prv
EOF

#

cat > ifcfg-br-vxlan  <<EOF
DEVICE=br-vxlan
ONBOOT=yes
DEVICETYPE=ovs
TYPE=OVSBridge
BOOTPROTO=static
IPADDR=10.0.130.216
NETMASK=255.255.255.0
HOTPLUG=no
EOF

cat > ifcfg-patch-eth1-vxlan  <<EOF
DEVICE=patch-eth1-vxlan
ONBOOT=yes
DEVICETYPE=ovs
TYPE=OVSPatchPort
OVS_BRIDGE=br-eth1
OVS_PATCH_PEER=patch-vxlan-eth1
OVS_OPTIONS="tag=123"
EOF

cat > ifcfg-patch-vxlan-eth1 <<EOF
DEVICE=patch-vxlan-eth1
ONBOOT=yes
DEVICETYPE=ovs
TYPE=OVSPatchPort
OVS_BRIDGE=br-vxlan
OVS_PATCH_PEER=patch-eth1-vxlan
EOF

cat > ifcfg-br-vlan  <<EOF
DEVICE=br-vlan
ONBOOT=yes
DEVICETYPE=ovs
TYPE=OVSBridge
BOOTPROTO=none
HOTPLUG=no
EOF

cat > ifcfg-patch-eth1-vlan  <<EOF
DEVICE=patch-eth1-vlan
ONBOOT=yes
DEVICETYPE=ovs
TYPE=OVSPatchPort
OVS_BRIDGE=br-eth1
OVS_PATCH_PEER=patch-vlan-eth1
OVS_OPTIONS="tag=124"
EOF

cat > ifcfg-patch-vlan-eth1 <<EOF
DEVICE=patch-vlan-eth1
ONBOOT=yes
DEVICETYPE=ovs
TYPE=OVSPatchPort
OVS_BRIDGE=br-vlan
OVS_PATCH_PEER=patch-eth1-vlan
EOF
四、安装前准备
1.静态解析
cat >> /etc/hosts << EOF
# admin
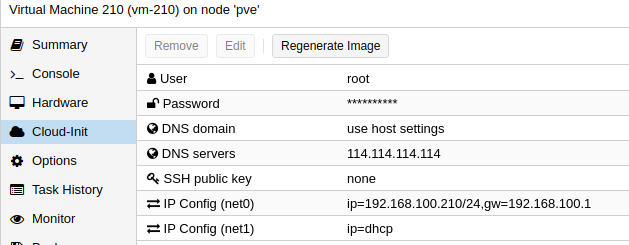
10.0.100.210 vm-210
# openstack
10.0.100.211 vm-211
10.0.100.212 vm-212
10.0.100.213 vm-213
10.0.100.214 vm-214
10.0.100.215 vm-215
10.0.100.216 vm-216
# ceph
10.0.100.201 vm-201
10.0.100.202 vm-202
10.0.100.203 vm-203
10.0.100.204 vm-204
10.0.100.205 vm-205
10.0.100.206 vm-206
EOF
2.管理机到节点机信任登录
ssh-keygen -b 1024 -t rsa -P '' -f ~/.ssh/id_rsa

for i in {211..216}; do ssh-copy-id -i .ssh/id_rsa.pub vm-$i; done
for i in {201..206}; do ssh-copy-id -i .ssh/id_rsa.pub vm-$i; done
3. OpenStack-Ansible 部署安装
3.1 Prepare the deployment host
yum install -y git chrony openssh-server python3-devel sudo
yum group install -y "Development Tools"

git clone -b stable/train https://opendev.org/openstack/openstack-ansible
or
国内镜像: git clone -b stable/train https://hub.fastgit.org/openstack/openstack-ansible

cd openstack-ansible

sed -e 's|https://opendev.org/|https://hub.fastgit.org/|g'
    -e 's|https://github.com/|https://hub.fastgit.org/|g'
    -i ansible-role-requirements.yml

scripts/bootstrap-ansible.sh

* 可以使用国内镜像 pip install --index https://pypi.tuna.tsinghua.edu.cn/simple pip==19.3

3.2 Prepare the target hosts
yum -y install iputils lsof openssh-server sudo tcpdump python3
3.3 Configure the deployment
cp -rf /root/openstack-ansible/etc/openstack_deploy /etc/
cd /etc/openstack_deploy
/etc/openstack_deploy/openstack_user_config.yml
---
cidr_networks:
  container: 10.0.100.0/24
  tunnel: 10.0.130.0/24
  storage: 10.0.110.0/24

used_ips:
  - "10.0.100.1,10.0.100.20"
  - "10.0.100.201,10.0.100.220"
  - "10.0.110.1,10.0.110.20"
  - "10.0.110.201,10.0.110.220"
  - "10.0.130.1,10.0.130.20"
  - "10.0.130.201,10.0.130.220"

global_overrides:
  external_lb_vip_address: 192.168.100.240
  internal_lb_vip_address: 10.0.100.240

  management_bridge: "br-mgmt"

  provider_networks:
    - network:
        container_bridge: "br-mgmt"
        container_type: "veth"
        container_interface: "eth1"
        ip_from_q: "container"
        type: "raw"
        group_binds:
          - all_containers
          - hosts
        is_container_address: true
        is_ssh_address: true

    - network:
        container_bridge: "br-vxlan"
        container_type: "veth"
        container_interface: "eth10"
        ip_from_q: "tunnel"
        type: "vxlan"
        range: "1:1000"
        net_name: "vxlan"
        group_binds:
          - neutron_openvswitch_agent

    - network:
        container_bridge: "br-provider"
        container_type: "veth"
        type: "vlan"
        range: "101:200,301:400"
        net_name: "physnet1"
        network_interface: "br-eth1"
        group_binds:
          - neutron_openvswitch_agent

    - network:
        container_bridge: "br-storage-pub"
        container_type: "veth"
        container_interface: "eth2"
        ip_from_q: "storage"
        type: "raw"
        group_binds:
          - glance_api
          - cinder_api
          - cinder_volume
          - nova_compute

infrastructure_hosts: &infrastructure_hosts
  vm-211:
    ip: 10.0.100.211
  vm-212:
    ip: 10.0.100.212
  vm-213:
    ip: 10.0.100.213

compute_hosts: &compute_hosts
  vm-214:
    ip: 10.0.100.214
  vm-215:
    ip: 10.0.100.215
  vm-216:
    ip: 10.0.100.216

# Galera SQL database cluster, RabbitMQ, and Memcached
shared-infra_hosts: *infrastructure_hosts

# Package repository
repo-infra_hosts: *infrastructure_hosts

# glance API, nova API, heat API, and horizon
os-infra_hosts: *infrastructure_hosts

# placement
placement-infra_hosts: *infrastructure_hosts

# nova api, conductor, etc services
compute-infra_hosts: *infrastructure_hosts

# cinder api services
storage-infra_hosts: *infrastructure_hosts

# neutron services, agents
network_hosts: *infrastructure_hosts

# load balancer
haproxy_hosts: *infrastructure_hosts

# keystone service
identity_hosts: *infrastructure_hosts

# cinder volume service
storage_hosts: *compute_hosts

# glance
image_hosts: *infrastructure_hosts

# horizon
dashboard_hosts: *infrastructure_hosts

# nova compute service
compute_hosts: *compute_hosts

# rsyslog server
log_hosts:
  vm-213:
    ip: 10.0.100.213
    no_containers: true
cat /etc/openstack_deploy/user_variables.yml
---
debug: false
install_method: distro
apply_security_hardening: false
neutron_plugin_type: ml2.ovs
neutron_ml2_drivers_type: "vlan,vxlan"


haproxy_keepalived_external_vip_cidr: "192.168.100.240/24"
haproxy_keepalived_internal_vip_cidr: "10.0.100.240/24"
haproxy_keepalived_external_interface: br-ex
haproxy_keepalived_internal_interface: br-mgmt
cat /etc/openstack_deploy/group_vars/network_hosts
openstack_host_specific_kernel_modules:
  - name: "openvswitch"
3.4 Run playbooks
国内源加速
# /etc/ansible/roles/openstack_hosts/defaults/main.yml
openstack_hosts_centos_mirror_url: 'https://mirrors.nju.edu.cn/centos'
openstack_hosts_rdo_mirror_url: 'https://trunk.rdoproject.org'

# /etc/ansible/roles/lxc_hosts/defaults/main.yml
lxc_image_cache_server_mirrors:
  - https://mirrors.tuna.tsinghua.edu.cn/lxc-images

lxc_centos_epel_mirror: "{{ centos_epel_mirror | default('https://mirrors.nju.edu.cn/epel') }}"
lxc_centos_epel_key: "{{ centos_epel_key | default('https://mirrors.nju.edu.cn/epel/RPM-GPG-KEY-EPEL-7') }}"

lxc_centos_package_baseurl: https://copr-be.cloud.fedoraproject.org/results/thm/lxc2.0/epel-7-x86_64/
lxc_centos_package_key: https://copr-be.cloud.fedoraproject.org/results/thm/lxc2.0/pubkey.gpg
包冲突解决方法
# 安装包产生依赖冲突python2-qpid-proton >= 0.28.0

在执行setup-hosts.yml前,只保留centos-base源,否则repo文件会拷贝到/var/lib/lxc目录所有容器的yum.repos.d目录,想清除他们,要么删除容器的yum.repos.d目录多余的repo文件,要么删除所有容器目录
执行playbook
cd /root/openstack-ansible
./scripts/pw-token-gen.py --file /etc/openstack_deploy/user_secrets.yml --regen

cd /root/openstack-ansible/playbooks
openstack-ansible setup-hosts.yml --syntax-check
openstack-ansible setup-infrastructure.yml --syntax-check
openstack-ansible setup-openstack.yml --syntax-check

openstack-ansible setup-hosts.yml
openstack-ansible setup-infrastructure.yml
openstack-ansible setup-openstack.yml
3.5 Verifying OpenStack operation
lxc-ls | grep utility
lxc-attach -n infra1_utility_container-xxxxx

source ~/openrc
openstack user list --os-cloud=default

https://external_lb_vip_address
admin / admin
4.部署工具
| 部署工具 | 容器化 | 要求 | 操作系统 |
|---|---|---|---|
| kolla-ansible | docker, podman | centos8 | |
| tripleO | docker, podman | ipmi | centos 7 & 8 |
| OpenStack-Ansible | lxc | centos 7 & 8 |
OpenStack-Ansible 需要lxc现场构建容器,源基本都无国内镜像,安装比较耗费时间; 每个构建的容器需要占用IP资源