前言
我几乎没有用过 Fetch. 第一次接触 Fetch 是 AngularJS (那年 es6 还没有普及). 但是 AngularJS 已经封装它了. 后来只是阅读了一些教程.
发现它有一个致命缺点, 不支持 upload 进度. 于是就再也没有关注它了. 再后来用了 Angular 2 的 Http 到 Angular 4 的 HttpClient 都是上层封装.
一直到最近看了一篇文章说 Fetch 比以前好一点了, 好像是支持了 abort, 但依然没有支持 upload 进度. 趁着我在复习 JavaScript 也一起整理它吧.
参考
Fetch 的好处
Fetch 是 es6 的产物, 它简化了以前 XMLHttpRequest 的使用方式. 可以算是 XMLHttpRequest 的替代品 (唯一无法替代的地方是, Fetch 不支持 upload 进度, 真的是唯一败笔啊)
Fetch 有 3 个好处:
1. 它基于 Promise. Promise 比 XMLHttpRequest.onreadystatechange 好太多了. 搭配 await 更理想.
2 Request, Header, Response class, Fetch 用了 3 个主要的 class 来完成工作, 对比 XMLHttpRequest 就一个 class 太臃肿了
3. 支持下载分段, 通过 body.getReader 可以一部分一部分的提前使用 response data. 而像 XMLHttpRequest 必须等所有 data 下载完了才可以开始用.
1 和 2 主要是在代码优化上面加分. 第 3 点则是具体的功能 (虽然很少项目需要).
吐槽 XMLHttpRequest
下面这个是 XMLHttpRequest 的写法
const xhttp = new XMLHttpRequest();
xhttp.onreadystatechange = () => {
  if (xhttp.readyState === 4) {
    console.log(xhttp.status);
  }
};
xhttp.open('GET', 'https://localhost:7063/WeatherForecast', true);
xhttp.send();
下面这个是 Fetch 的写法
const response = await fetch('https://localhost:7063/WeatherForecast');
console.log(response.status);
没有对比没有伤害, XMLHttpRequest 的调用接口设计糟糕透了...
Send Request (GET)
simplest
先从最简单的 GET 说起
fetch('https://localhost:7063/WeatherForecast')
因为 fetch 默认的 method 是 GET, 所以只要给一个地址, 它就会发 GET 请求了.
with query params
query params 没有被 Fetch 封装, 直接用 URLSearchParams build 好后拼接到 URL 即可
const queryParams = new URLSearchParams({
  param1: 'param1',
  param2: 'param2',
});
fetch(`https://localhost:7063/WeatherForecast?${queryParams.toString()}`);
with headers
fetch('https://localhost:7063/WeatherForecast', {
  headers: {
    Custom: 'custom header value',
    Accept: 'application/json; charset=utf-8',
  },
});
Fetch 的第二个参数可以配置所以的 options
headers 属性的 interface 是

下面这 2 种写法都是 ok 的

with credentials
允许同域发送 cookie
fetch('https://localhost:7063/WeatherForecast', {
  credentials: 'same-origin',
});
with Request
fetch('https://localhost:7063/WeatherForecast', {
  headers: {
    Accept: 'application/json; charset=utf-8',
  },
});
也可以先创建 Request 才传入 fetch
const request = new Request('https://localhost:7063/WeatherForecast', {
  headers: {
    Accept: 'application/json; charset=utf-8',
  },
});
const response = await fetch(request);
new Request 的参数和 fetch 是同样的. Request 的好处是可以 clone, 修改, 容易复用.
Read Response
response 分 2 part. 一个是 header info, status 这类. 它们是马上可以读取的 (同步)
另一 part 是 body, 它是异步读取的. 而且可以分段式读.
read status
const response = await fetch('https://localhost:7063/WeatherForecast');
const status = response.status; // 200;
const succeed = response.ok; // true
response.ok 是一个方便. 只要 status 是 200 – 299 都算 ok.
read header
使用 header 对象. 它提供了一些方便的接口, 比如 get, has, keys, values, entries 等等
const response = await fetch('https://localhost:7063/WeatherForecast');
const contentType = response.headers.get('Content-Type'); // application/json; charset=utf-8
const customHeaderValue = response.headers.get('custom'); // 'a, b' 如果有 2 个会 combine by common + space
重复 header?
如果有重复的 header 那么它会合并起来

结果是 'a, b'
跨域 custom header
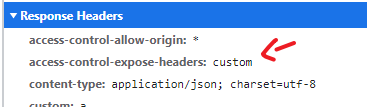
服务端记得返回 expose header, 不然跨域情况下是拿不到 custom header 的哦
read body text
所以 body 都是异步读取的.
const textContent = await response.text();
如果返回的是 plain text 或者你想拿到 json string 就可以使用 .text()
read body json
const parsedJsonValue = await response.json();
.json() 还会帮你把 json string 拿去 parse 哦.
blob, arrayBuffer, formData
还有 3 种 read from body, 比较少用到.
blob 用在拿 image, files
arrayBuffer 用在拿 audio, video
formData 用在 Service Worker 拦截 formData post request
multiple read body
const response = await fetch('https://localhost:7063/WeatherForecast');
const jsonText = await response.text();
const jsonValue = await response.json();
一个 response 不能被读取超过 1 次. 上面这样 .text 又 .json 是不 ok 的. 会报错

解决方法是先 clone 一个 response 就可以了.
const jsonText = await response.clone().text(); // 加了 clone
const jsonValue = await response.json();
body reader 分段式读取
const response = await fetch('https://localhost:7063/WeatherForecast');
const reader = response.body!.getReader();
while (true) {
  const { done, value } = await reader.read();
  if (done) {
    break;
  }
  console.log(`Received ${value.length} bytes`);
}
下面是我 request 一个 mp4 的效果
配上 header 的 Content-Length 配上 data.length 就可以显示下载进度了, 这种分段式读取是 XMLHttpRequest 做不到的.
Send Request (POST)
之前写过一篇 HTML – Native Form 原生表单功能集, 里面的 Ajax Form 有介绍了如何用 XMLHttpRequest send post request.
Fetch 的逻辑也差不多
发 JSON
fetch('https://localhost:7063/WeatherForecast', {
  headers: {
    'Content-Type': 'application/json; charset=utf-8',
  },
  method: 'POST',
  body: JSON.stringify({ username: 'Derrick' }),
});
记得要添加 header Content-Type 哦.
发 application/x-www-form-urlencoded 和 multipart/form-data
fetch('https://localhost:7063/WeatherForecast', {
  method: 'POST',
  body: new URLSearchParams({ username: 'Derrick' }), // application/x-www-form-urlencoded
  body: new FormData(document.querySelector('form')!), // multipart/form-data
});
记得, 不要添加 header Content-Type, 游览器会自己添加.
Abort Request
abort 是用来中断请求的, 可能 user 按错, 或者后悔了.
通常只有那些很耗时的操作才需要设计 abort. 比如批量修改.
当前端 abort 以后, 后端就好也是处理一下. 避免不必要的消耗.
创建 abort controller
const abortCtrl = new AbortController();
把 signal 放入 fetch
const request = new Request('https://localhost:7063/WeatherForecast', {
  signal: abortCtrl.signal
});
发送, 一秒后 abort
await fetch(request);

setTimeout(() => {
  abortCtrl.abort();
}, 1000);
前端监听 abort
可以通过 signal 监听和查看当前 abort status
abortCtrl.signal.addEventListener('abort', () => {
  console.log('abort done');
});
后端判断 abort

ASP.NET Core 有一个 cancellationToken, 可以随时查看是否前端已经 abort 了 request, 如果已经 abort 那么就没有必要继续执行了, 直接返回就是了.