一、前言
前一篇文章总结了对 java 并发中的内置锁的理解,这篇文章来说说线程 ,并发与线程总有剪不断理还乱的关系。关于 java 线程的基本概念、线程与进程的关系以及如何创建线程,想必大家都很清楚了。之前总结过,存疑新同学的传送门:Java 多线程
二、线程框架
线程的三种创建方式:
我们知道,java 线程的三种创建方式:
- 继承自 Thread 类创建线程;
new Thread(){
    @Override
    public void run() {
        super.run();
    }
}.start()
- 实现Runnable接口创建线程;
new Thread(new Runnable() {
    @Override
    public void run() {

    }
}).start();
- 使用 Callable 和 Future 创建线程
new Thread(new FutureTask<Integer>(new Callable<Integer>() {
        @Override
        public Integer call() throws Exception {
            return null;
        }
    })
).start();
看源码
先看 Runnable 接口源码:
@FunctionalInterface
public interface Runnable {
    /**
     * When an object implementing interface <code>Runnable</code> is used
     * to create a thread, starting the thread causes the object's
     * <code>run</code> method to be called in that separately executing
     * thread.
     * <p>
     * The general contract of the method <code>run</code> is that it may
     * take any action whatsoever.
     *
     * @see     java.lang.Thread#run()
     */
    public abstract void run();
}
函数式接口,只有一个 run() 方法。
再看 Thread 类源码,我们发现,Thread 类实现了 Runnable 接口:
public
class Thread implements Runnable {

    ...

    /* What will be run. */
    private Runnable target;

    ...

    /* Java thread status for tools,
     * initialized to indicate thread 'not yet started'
     */
    private volatile int threadStatus = 0;

    ...

    /**
     * Causes this thread to begin execution; the Java Virtual Machine
     * calls the <code>run</code> method of this thread.
     * <p>
     * The result is that two threads are running concurrently: the
     * current thread (which returns from the call to the
     * <code>start</code> method) and the other thread (which executes its
     * <code>run</code> method).
     * <p>
     * It is never legal to start a thread more than once.
     * In particular, a thread may not be restarted once it has completed
     * execution.
     *
     * @exception  IllegalThreadStateException  if the thread was already
     *               started.
     * @see        #run()
     * @see        #stop()
     */
    public synchronized void start() {
        /**
         * This method is not invoked for the main method thread or "system"
         * group threads created/set up by the VM. Any new functionality added
         * to this method in the future may have to also be added to the VM.
         *
         * A zero status value corresponds to state "NEW".
         */
        if (threadStatus != 0)
            throw new IllegalThreadStateException();

        /* Notify the group that this thread is about to be started
         * so that it can be added to the group's list of threads
         * and the group's unstarted count can be decremented. */
        group.add(this);

        boolean started = false;
        try {
            start0();
            started = true;
        } finally {
            try {
                if (!started) {
                    group.threadStartFailed(this);
                }
            } catch (Throwable ignore) {
                /* do nothing. If start0 threw a Throwable then
                  it will be passed up the call stack */
            }
        }
    }

    @Override
    public void run() {
        if (target != null) {
            target.run();
        }
    }
我们看到,Thread 类有一个 Runnable 类型的 target 域。Thread 的 run 方法就是调用的 target 的 run 方法。而启动线程则需要调用线程的 start 方法。在 Thread 类中,还有一个 volatile 修饰的 threadStatus 域,用来表示线程的状态,初始值为0,当我们重复调用线程的 start 方法时,会抛出 java.lang.IllegalThreadStateException 的异常。
当我们需要获取线程中方法执行的返回值时,使用 FutureTask 和 Callable 的方式创建。看 Thread 源码可知,Thread 类构造方法可传入 Runnable 对象,方式三,这里传入 FutureTask 对象,可以猜想: FutureTask 一定是实现了 Runnable 接口。而 FutureTask 的构造方法又传入了 Callable 对象,我们重写了 call 方法。我们看看相关类的源码,梳理一下。
java.lang.Runnable
@FunctionalInterface
public interface Runnable {
    public abstract void run();
}
java.util.concurrent.Future
public interface Future<V> {
    boolean cancel(boolean mayInterruptIfRunning);

    boolean isCancelled();

    boolean isDone();

    V get() throws InterruptedException, ExecutionException;

    V get(long timeout, TimeUnit unit)
        throws InterruptedException, ExecutionException, TimeoutException;
}
java.util.concurrent.Callable
@FunctionalInterface
public interface Callable<V> {
    V call() throws Exception;
}
java.util.concurrent.RunnableFuture
public interface RunnableFuture<V> extends Runnable, Future<V> {
    /**
     * Sets this Future to the result of its computation
     * unless it has been cancelled.
     */
    void run();
}
java.util.concurrent.FutureTask
public class FutureTask<V> implements RunnableFuture<V> {

    ...

    /** The underlying callable; nulled out after running */
    private Callable<V> callable;

    ...

    /**
     * Creates a {@code FutureTask} that will, upon running, execute the
     * given {@code Callable}.
     *
     * @param  callable the callable task
     * @throws NullPointerException if the callable is null
     */
    public FutureTask(Callable<V> callable) {
        if (callable == null)
            throw new NullPointerException();
        this.callable = callable;
        this.state = NEW;       // ensure visibility of callable
    }


    /**
     * Creates a {@code FutureTask} that will, upon running, execute the
     * given {@code Runnable}, and arrange that {@code get} will return the
     * given result on successful completion.
     *
     * @param runnable the runnable task
     * @param result the result to return on successful completion. If
     * you don't need a particular result, consider using
     * constructions of the form:
     * {@code Future<?> f = new FutureTask<Void>(runnable, null)}
     * @throws NullPointerException if the runnable is null
     */
    public FutureTask(Runnable runnable, V result) {
        this.callable = Executors.callable(runnable, result);
        this.state = NEW;       // ensure visibility of callable
    }


    public void run() {
        if (state != NEW ||
            !UNSAFE.compareAndSwapObject(this, runnerOffset,
                                         null, Thread.currentThread()))
            return;
        try {
            Callable<V> c = callable;
            if (c != null && state == NEW) {
                V result;
                boolean ran;
                try {
                    result = c.call();
                    ran = true;
                } catch (Throwable ex) {
                    result = null;
                    ran = false;
                    setException(ex);
                }
                if (ran)
                    set(result);
            }
        } finally {
            // runner must be non-null until state is settled to
            // prevent concurrent calls to run()
            runner = null;
            // state must be re-read after nulling runner to prevent
            // leaked interrupts
            int s = state;
            if (s >= INTERRUPTING)
                handlePossibleCancellationInterrupt(s);
        }
    }

    /**
     * Executes the computation without setting its result, and then
     * resets this future to initial state, failing to do so if the
     * computation encounters an exception or is cancelled.  This is
     * designed for use with tasks that intrinsically execute more
     * than once.
     *
     * @return {@code true} if successfully run and reset
     */
    protected boolean runAndReset() {
        if (state != NEW ||
            !UNSAFE.compareAndSwapObject(this, runnerOffset,
                                         null, Thread.currentThread()))
            return false;
        boolean ran = false;
        int s = state;
        try {
            Callable<V> c = callable;
            if (c != null && s == NEW) {
                try {
                    c.call(); // don't set result
                    ran = true;
                } catch (Throwable ex) {
                    setException(ex);
                }
            }
        } finally {
            // runner must be non-null until state is settled to
            // prevent concurrent calls to run()
            runner = null;
            // state must be re-read after nulling runner to prevent
            // leaked interrupts
            s = state;
            if (s >= INTERRUPTING)
                handlePossibleCancellationInterrupt(s);
        }
        return ran && s == NEW;
    }

}
java.util.concurrent.Executors
    public static <T> Callable<T> callable(Runnable task, T result) {
        if (task == null)
            throw new NullPointerException();
        return new RunnableAdapter<T>(task, result);
    }

    /**
     * A callable that runs given task and returns given result
     */
    static final class RunnableAdapter<T> implements Callable<T> {
        final Runnable task;
        final T result;
        RunnableAdapter(Runnable task, T result) {
            this.task = task;
            this.result = result;
        }
        public T call() {
            task.run();
            return result;
        }
    }
结论:
- FutureTask
实现了 RunnableFuture 接口,而 RunnableFuture 继承了 Runnable 和 Future 接口。 这样应证了之前的猜想 —— FutureTask 实现了 Runnable 接口。 - FutureTask
有一个 Callable 的域 callable。FutureTask 有两个构造方法,一个传入 Callable ,赋值给了域, 另一个一个传入 Runnable, 最终调用 Executors.callable() 方法,返回了一个 Callable 对象,并且 Call 方法,调用的就是 run 方法。再讲 callable 对象赋值给了域。且两个构造方法的参数都使用了 @NotNull 修饰。 - FutureTask 最后调用的 run 方法,实际又是调用的域 Callable 对象的 call 方法。这就是面向对象中的多态的思想,熟悉设计模式的同学也应该能看出来,这里真是适配器模式的实现。最后通过 FutureTask 的 get 方法可以获取线程体执行后的返回值。
使用形式:
new Thread(new FutureTask(new Callable(){
    @override
    public void call(){
        xxx
    }
})).start();
或者
new Thread(new FutureTask(new Runnable(){
    @override
    public void run(){
        xxx
    }
},"hello,world")).start();
看过源码之后,我感觉这第二种方式一般不建议写,除非返回的结果跟线程体执行无关。FutureTask 表示的计算如果是通过 Callable 来实现额,相当于一种可生成结果的 Runnable ,并且可以处于 3 中状态:运行等待、正在运行、运行完成。 其中运行完成包括可能的结束方式,正常运行,由于取消而结束和由于异常而结束等。当FutureTask处于运行完成状态后,它会永远停止在这个状态。
需要注意的是: Future.get 这个方法取决于任务的状态。如果任务已经完成,那么 get 立即返回结果。否则 get 将阻塞知道任务进入完成状态,然后返回结果或者抛出异常。 FutureTask 保证将计算结果从执行计算的线程安全地发布到获取这个结果的线程。
三、线程池
使用线程池来管理线程
上面说的创建和启动线程的本质几乎一样:new Thread(Runnable r).start() ,通过这种方式创建的线程称之为“野线程”,当线程体执行完之后线程就销毁了,再加上线程的创建,销毁和线程的调度,都是需要系统资源的开销。想象一下,在高并发场景下,不对线程数量加以控制,无限制创建线程,当达到系统性能的阈值,系统必然崩溃。所以创建野线程的这种方式实际项目中一般不用,而是使用线程池来管理线程。
线程池的优点:
- 可重用存在的线程,减少对象创建、消亡的开销,性能佳
- 可有效控制最大并发线程数,提高系统资源的使用率,同时避免过多资源竞争,避免堵塞
- 提供定时执行、定期执行、单线程、并发数控制等功能
线程池框架
从网上扒来一张 java 线程池的框架图:
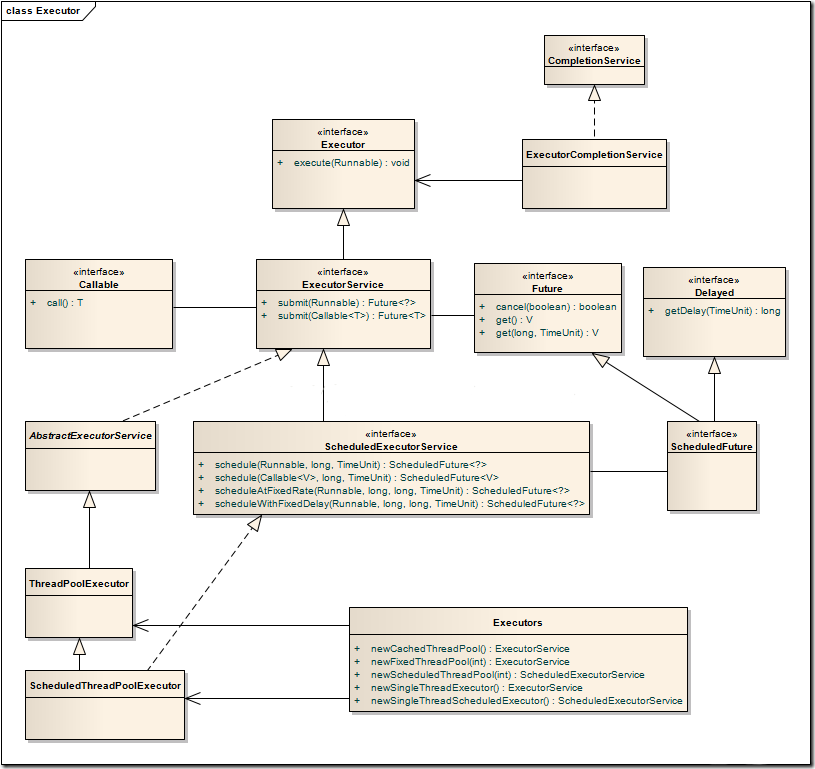
java 类库中,任务执行的主要抽象,不是 Thread, 而是 Executor , 看看 Executor 接口:
package java.util.concurrent;

public interface Executor {
    void execute(java.lang.Runnable runnable);
}
ExecutorService 接口继承了 Executor 接口,扩充了一些方法。线程池的核心实现类是 ThreadPoolExecutor 和 ScheduledThreadPoolExecutor,前者用来执行被提交的任务,而ScheduledThreadPoolExecutor 可以在给定的延迟后运行任务,或者定期执行命令。
ThreadPoolExecutor 提供了四个构造方法:
public class ThreadPoolExecutor extends AbstractExecutorService {
    .....
    public ThreadPoolExecutor(int corePoolSize,int maximumPoolSize,long keepAliveTime,TimeUnit unit,
            BlockingQueue<Runnable> workQueue);

    public ThreadPoolExecutor(int corePoolSize,int maximumPoolSize,long keepAliveTime,TimeUnit unit,
            BlockingQueue<Runnable> workQueue,ThreadFactory threadFactory);

    public ThreadPoolExecutor(int corePoolSize,int maximumPoolSize,long keepAliveTime,TimeUnit unit,
            BlockingQueue<Runnable> workQueue,RejectedExecutionHandler handler);

    public ThreadPoolExecutor(int corePoolSize,int maximumPoolSize,long keepAliveTime,TimeUnit unit,
        BlockingQueue<Runnable> workQueue,ThreadFactory threadFactory,RejectedExecutionHandler handler);
    ...
}
参数最多的构造方法的参数说明:
- corePoolSize:核心线程数。
- maximumPoolSize:最大线程数。
- keepAliveTime:线程存活时间。当线程数大于core数,那么超过该时间的线程将会被终结。
- unit:keepAliveTime的单位。java.util.concurrent.TimeUnit类存在静态静态属性: NANOSECONDS、MICROSECONDS、MILLISECONDS、SECONDS
- workQueue:Runnable的阻塞队列。若线程池已经被占满,则该队列用于存放无法再放入线程池中的Runnable
- threadFactory -执行创建新线程的工厂
- handler -处理程序时因为达到线程边界和队列容量,使用的执行受阻
ScheduledThreadPoolExecutor 继承自 ThreadPoolExecutor ,同样有四个类似的构造方法,就不列举了。
Executors 是一个工厂类,提供了一些静态的方法操作线程池。通常创建线程池,我们不直接用调用 ThreadPoolExecutor 和 ScheduledThreadPoolExecutor 的构造方法,而是通过 Executors 类的五个静态工厂方法创建。
newFixedThreadPool(...)
newSingleThreadExecutor(...)
newCachedThreadPool(...)
newScheduledThreadPool(...)
newSingleThreadScheduledExecutor()
newSingleThreadExecutor 创建单线程的线程池 这个线程池只有一个线程在工作,也就是相当于单线程串行执行所有任务。 返回单线程的Executor,将多个任务交给此Exector时,这个线程处理完一个任务后接着处理下一个任务,若该线程出现异常,将会有一个新的线程来替代。此线程池保证所有任务的执行顺序按照任务的提交顺序执行。 ``` public static ExecutorService newSingleThreadExecutor() { return new FinalizableDelegatedExecutorService (new ThreadPoolExecutor(1, 1, 0L, TimeUnit.MILLISECONDS, new LinkedBlockingQueue
newFixedThreadPool 创建一个包含指定数目线程的线程池,如果任务数量多于线程数目,那么没有执行的任务必须等待,直到有任务完成为止。每次提交一个任务就创建一个线程,直到线程达到线程池的最大小。任务线程池的大小一旦达到最大值就会保持不变,如果某个线程因为执行异常而结束,那么线程池会补充一个新线程。 ``` public static ExecutorService newFixedThreadPool(int nThreads) { return new ThreadPoolExecutor(nThreads, nThreads, 0L, TimeUnit.MILLISECONDS, new LinkedBlockingQueue
newCachedThreadPool 创建一个可缓存的线程池,线程池可以自动的扩展线程池的容量,核心线程数量为0.如果线程池的大小超过了处理任务所需要的线程,那么就会回收部分空闲(60秒不执行任务)的线程,当任务数增加时,此线程池又可以智能的添加新线程来处理任务。此线程池不会对线程池大小做限制,线程池大小完全依赖于操作系统(或者说JVM)能够创建的最大线程大小。 ``` public static ExecutorService newCachedThreadPool() { return new ThreadPoolExecutor(0, Integer.MAX_VALUE, 60L, TimeUnit.SECONDS, new SynchronousQueue
SynchronousQueue是个特殊的队列。 SynchronousQueue队列的容量为0。当试图为SynchronousQueue添加Runnable,则执行会失败。只有当一边从SynchronousQueue取数据,一边向SynchronousQueue添加数据才可以成功。SynchronousQueue仅仅起到数据交换的作用,并不保存线程。但newCachedThreadPool()方法没有线程上限。Runable添加到SynchronousQueue会被立刻取出。
根据用户的任务数创建相应的线程来处理,该线程池不会对线程数目加以限制,完全依赖于JVM能创建线程的数量,可能引起内存不足。
newScheduledThreadPool
创建一个指定大小的定时任务调度的线程池。此线程池支持定时以及周期性执行任务的需求。
public static ScheduledExecutorService newScheduledThreadPool(int corePoolSize) {
    return new ScheduledThreadPoolExecutor(corePoolSize);
}
newSingleThreadScheduledExecutor 创建一个单线程的定时任务调度线程池,此线程池支持定时以及周期性执行任务的需求。 ``` public static ScheduledExecutorService newSingleThreadScheduledExecutor() { return new DelegatedScheduledExecutorService (new ScheduledThreadPoolExecutor(1)); } ```
四、线程辅助类
闭锁 CountDownLatch
CountDownLatch 的概念
想起了多线程下载,将整个文件分成了多段,然后多个线程提供下载,每个线程下载一段。当所有的下载线程都执行完之后,主线程通知用户,文件下载完成了。这里存在一个问题,主线程如何知道所有的下载线程都执行完了?
解决思路有很多种,比如我们可以定义一个计数的变量,初始值为下载线程的数量,每个线程执行完,计数变量值 -1,计数器的值为 0 ,我们就知道所有的下载线程都执行完了。这里,我们可能需要对计数器进行相应的同步操作,确保任何时候读取它的状态都是正确的。
幸运的是,java 提供了一个类似计算器的工具类,可以达到此目的。——CountDownLatch 类。
CountDownLatch 位于 java.util.concurrent 包下。是一个同步工具类,用来协调多个线程之间的同步,
CountDownLatch 能够使一个线程在等待另外一些线程完成各自工作之后,再继续执行。使用一个计数器进行实现。计数器初始值为线程的数量。当每一个线程完成自己任务后,计数器的值就会减一。当计数器的值为0时,表示所有的线程都已经完成了任务,然后在CountDownLatch上等待的线程就可以恢复执行任务。
CountDownLatch 的用法
CountDownLatch类只提供了一个构造器:
public CountDownLatch(int count) //参数count为计数值
CountDownLatch 类中有 3 个重要方法:
- public void await() throws InterruptedException //调用await()方法的线程会被挂起,它会等待直到count值为0才继续执行
- public boolean await(long timeout, TimeUnit unit) throws InterruptedException //和await()类似,只不过等待一定的时间后count值还没变为0的话就会继续执行
- public void countDown() //将count值减1
CountDownLatch 用法举例:
public class Test {
    public static void main(String[] args) {
        final CountDownLatch latch = new CountDownLatch(2);

        new Thread(){
            public void run() {
                try {
                    System.out.println("子线程"+Thread.currentThread().getName()+"正在执行");
                    Thread.sleep(2000);
                    System.out.println("子线程"+Thread.currentThread().getName()+"执行完毕");
                    latch.countDown();
                } catch (InterruptedException e) {
                    e.printStackTrace();
                }
            };
        }.start();

        new Thread(){
            public void run() {
                try {
                    System.out.println("子线程"+Thread.currentThread().getName()+"正在执行");
                    Thread.sleep(3000);
                    System.out.println("子线程"+Thread.currentThread().getName()+"执行完毕");
                    latch.countDown();
                } catch (InterruptedException e) {
                    e.printStackTrace();
                }
            };
        }.start();

        try {
            System.out.println("等待2个子线程执行完毕...");
            latch.await();
            System.out.println("2个子线程已经执行完毕");
            System.out.println("继续执行主线程");
        } catch (InterruptedException e) {
            e.printStackTrace();
        }
    }
}
执行结果:
线程Thread-0正在执行
线程Thread-1正在执行
等待2个子线程执行完毕...
线程Thread-0执行完毕
线程Thread-1执行完毕
2个子线程已经执行完毕
继续执行主线程
CountDownLatch的不足
CountDownLatch是一次性的,计数器的值只能在构造方法中初始化一次,之后没有任何机制再次对其设置值,当CountDownLatch使用完毕后,它不能再次被使用。
栅栏 CyclicBarrier
CyclicBarrier的概念
栅栏(有的书籍中称为同步屏障)CyclicBarrier,字面意思是可循环使用(Cyclic)的屏障(Barrier)。它要做的事情是,让一组线程到达一个屏障(也可以叫同步点)时被阻塞,直到最后一个线程到达屏障时,屏障才会开门,所有被屏障拦截的线程才会继续干活。CyclicBarrier默认的构造方法是CyclicBarrier(int parties),其参数表示屏障拦截的线程数量,每个线程调用 await 方法告诉 CyclicBarrier 我已经到达了屏障,然后当前线程被阻塞。
CyclicBarrier的用法
CyclicBarrier类位于java.util.concurrent包下,CyclicBarrier提供2个构造器:
public CyclicBarrier(int parties, Runnable barrierAction)

public CyclicBarrier(int parties)
参数parties指让多少个线程或者任务等待至barrier状态;参数barrierAction为当这些线程都达到barrier状态时会执行的内容。
CyclicBarrier 最重要的方法就是 await 方法,它有2个重载版本:
public int await() throws InterruptedException, BrokenBarrierException

public int await(long timeout, TimeUnit unit)throws InterruptedException,BrokenBarrierException,TimeoutException
第一个版本比较常用,用来挂起当前线程,直至所有线程都到达barrier状态再同时执行后续任务;
第二个版本是让这些线程等待至一定的时间,如果还有线程没有到达barrier状态就直接让到达barrier的线程执行后续任务。
CyclicBarrier 用法举例:
public class Test {
    public static void main(String[] args) {
        int N = 4;
        CyclicBarrier barrier  = new CyclicBarrier(N,new Runnable() {
            @Override
            public void run() {
                System.out.println("当前线程"+Thread.currentThread().getName());
            }
        });

        for(int i=0;i<N;i++)
            new Writer(barrier).start();
    }
    static class Writer extends Thread{
        private CyclicBarrier cyclicBarrier;
        public Writer(CyclicBarrier cyclicBarrier) {
            this.cyclicBarrier = cyclicBarrier;
        }

        @Override
        public void run() {
            System.out.println("线程"+Thread.currentThread().getName()+"正在写入数据...");
            try {
                Thread.sleep(5000);      //以睡眠来模拟写入数据操作
                System.out.println("线程"+Thread.currentThread().getName()+"写入数据完毕,等待其他线程写入完毕");
                cyclicBarrier.await();
            } catch (InterruptedException e) {
                e.printStackTrace();
            }catch(BrokenBarrierException e){
                e.printStackTrace();
            }
            System.out.println("所有线程写入完毕,继续处理其他任务...");
        }
    }
}
执行了两次结果分别如下:

从上面输出结果可以看出,每个写入线程执行完写数据操作之后,就在等待其他线程写入操作完毕。
当所有线程线程写入操作完毕之后,进行额外的其他操作为 CyclicBarrie 提供 Runnable 参数。当四个线程都到达barrier状态后,会从四个线程中选择一个线程去执行Runnable。然后所有线程就继续进行后续的操作了。
另外需要注意的是:CyclicBarrier 是可以重用的。
信号量 Semaphore
Semaphore 的概念
Semaphore翻译成字面意思为 信号量,Semaphore可以控同时访问的线程个数,通过 acquire() 获取一个许可,如果没有就等待,而 release() 释放一个许可。
Semaphore 的用法
Semaphore类位于java.util.concurrent包下,它提供了2个构造器:
public Semaphore(int permits) {          //参数permits表示许可数目,即同时可以允许多少线程进行访问
    sync = new NonfairSync(permits);
}
public Semaphore(int permits, boolean fair) {    //这个多了一个参数fair表示是否是公平的,即等待时间越久的越先获取许可
    sync = (fair)? new FairSync(permits) : new NonfairSync(permits);
}
Semaphore 类中比较重要的几个方法,首先是acquire()、release()方法:
public void acquire() throws InterruptedException {  }     //获取一个许可
public void acquire(int permits) throws InterruptedException { }    //获取permits个许可
public void release() { }          //释放一个许可
public void release(int permits) { }    //释放permits个许可
acquire()用来获取一个许可,若无许可能够获得,则会一直等待,直到获得许可。
release()用来释放许可(调用一次增加一个许可)。
这4个方法都会被阻塞,如果想立即得到执行结果,可以使用下面几个方法:
public boolean tryAcquire()    //尝试获取一个许可,若获取成功,则立即返回true,若获取失败,则立即返回false
public boolean tryAcquire(long timeout, TimeUnit unit) throws InterruptedException  //尝试获取一个许可,若在指定的时间内获取成功,则立即返回true,否则则立即返回false
public boolean tryAcquire(int permits) //尝试获取permits个许可,若获取成功,则立即返回true,若获取失败,则立即返回false
public boolean tryAcquire(int permits, long timeout, TimeUnit unit) throws InterruptedException //尝试获取permits个许可,若在指定的时间内获取成功,则立即返回true,否则则立即返回false
另外还可以通过 availablePermits() 方法得到可用的许可数目:
使用举例:
假若一个工厂有5台机器,但是有8个工人,一台机器同时只能被一个工人使用,只有使用完了,其他工人才能继续使用。那么我们就可以通过Semaphore来实现:
public class Test {
    public static void main(String[] args) {
        int N = 8;            //工人数
        Semaphore semaphore = new Semaphore(5); //机器数目
        for(int i=0;i<N;i++)
            new Worker(i,semaphore).start();
    }

    static class Worker extends Thread{
        private int num;
        private Semaphore semaphore;
        public Worker(int num,Semaphore semaphore){
            this.num = num;
            this.semaphore = semaphore;
        }

        @Override
        public void run() {
            try {
                semaphore.acquire();
                System.out.println("工人"+this.num+"占用一个机器在生产...");
                Thread.sleep(2000);
                System.out.println("工人"+this.num+"释放出机器");
                semaphore.release();
            } catch (InterruptedException e) {
                e.printStackTrace();
            }
        }
    }
}
运行结果:
五、线程辅助类总结
- FutureTask 能够实现某个线程A等待另一个线程执行完任务,然后线程A再执行。并且线程A可以获取另一个线程执行的结果。
- CountDownLatch 一般用于某个线程A等待若干个其他线程执行完任务之后,它才执行。
- CyclicBarrier 一般用于一组线程互相等待至某个状态,然后这一组线程再同时执行;
- CountDownLatch和CyclicBarrier都能够实现线程之间的等待,只不过它们侧重点不同。另外,CountDownLatch 不能够重用的,而 CyclicBarrier 是可以重用的。
- Semaphore 其实和锁有点类似,它一般用于控制对某组资源的访问权限。
参考资料:
《java并发编程实战》
Java并发编程:CountDownLatch、CyclicBarrier和 Semaphore
并发工具类(一)等待多线程完成的CountDownLatch
并发工具类(二)同步屏障CyclicBarrier
并发工具类(三)控制并发线程数的Semaphore