better-scroll的使用
1.下载better-scroll
cnpm install better-scroll --save
2.在vue中使用它,由于我们可能在很多情况下使用better-scroll,来达到监听页面滚动的位置,实现例如上拉加载,下拉刷新的操作,
所以我们需要把better-scroll进行封装,把它变成一个供我们使用的组件。
2.1首先我们在新建立的vue页面中,把better-scroll引入,“B_scroll”,是你自己自定义的别名

2.2使用第三方插件使用前,与自定义组件不同,自定义组件需要在componentS中注册它,但是使用第三方插件,你需要new一下它,它是一个对象:
new B_scroll(this.$refs.home_wrapper,{
          //配置鼠标滚动,页面控制
	        mouseWheel: true,
	        disableMouse: false, //启用鼠标拖动
	        disableTouch: false, //启用手指触摸
	        //设置html传统样式可点击
	        click: true,
	        //根据传值绝对是否监听滚动位置,0,1表示不监听,2表示监听(除惯性滚动),3监听所有
	        probeType: this.probeType,
	        //根据传值绝对是否上拉加载更多
	        pullUpLoad: this.pullUpLoad
        })
      },
就这样我们把一个第三方组件就使用了。
下面是我把better-scroll封装的组件源码:
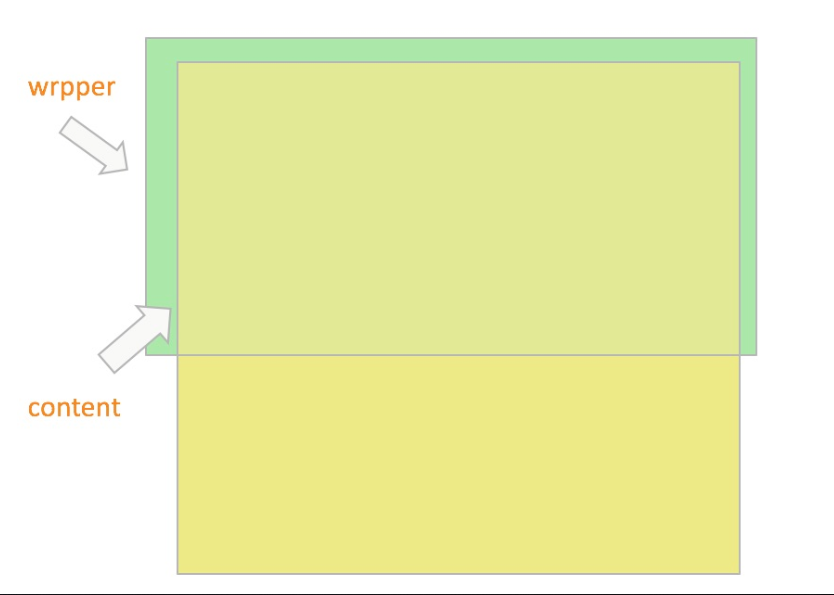
注意:使用类似better-scroll的滚动插件原理都一样,你必须给它定义一个内容 <div class="content">,与包装纸 <div class="wrapper" ref="home_wrapper">
原理图:

当内容大于包装纸它才可以滚动,所以你在父组件中使用scroll,你需要再给你封装的scroll组件定义一个包装纸与包装的内容,这样你才可以滚动。
说白了你就是要给它外层的样式高度:100vh;内层高度:100%
虽然你可能想说已经在你封装的子组件当中已经定义了包装纸与包装的内容,按道理它会把你的内容插进slot里面,不用在父组件继续定义包装纸与包装内容,的确这样。
但是为了更好的依照不同情况,自定义scroll可以滚动的区域,你会发现,我们封装的组件当中并没有给它的包装纸与包装内容定义样式,而是建议你在哪里使用我们封装
的scroll,再去哪里定义它的包装纸与包装内容
<template>
      <div class="wrapper" ref="home_wrapper">
        <div class="content">
          <slot>

          </slot>
        </div>
      </div>
    </template>
    <script>
      import BScroll from 'better-scroll'
      export default {
        name: 'Scroll',
        props: {
          probeType: {
            type: Number,
            default: 0
          },
          pullUpLoad: {
            type: Boolean,
            default: false
          }
        },
        data() {
          return {
            scroll: null
          }
        },
        mounted() {
          //1.创建BScroll对象,使用ref能够准确拿到对应的对象
          this.scroll = new BScroll(this.$refs.home_wrapper, {
            scrollbar: {
              fade: false,
              interactive: false // 1.8.0 新增
            },
            //配置鼠标滚动,页面控制
            mouseWheel: true,
            disableMouse: false, //启用鼠标拖动
            disableTouch: false, //启用手指触摸
            //设置html传统样式可点击
            click: true,
            //根据传值绝对是否监听滚动位置,0,1表示不监听,2表示监听(除惯性滚动),3监听所有
            probeType: this.probeType,
            //根据传值绝对是否上拉加载更多
            pullUpLoad: this.pullUpLoad
          })

          //2.监听滚动对象的滚动位置
          if (this.probeType === 2 || this.probeType === 3) {
            // 通过$emit把position传出去,谁想拿到这position,就得定义监听scroll的方法
            this.scroll.on('scroll', (position) => {
              this.$emit('scroll', position)
            })
          }

          //刷新上拉加载更多的高度
          // this.scroll.refresh();
          //监听上拉加载更多,pullingUp属性
          if (this.pullUpLoad) {
            this.scroll.on('pullingUp', () => {
              console.log('监听滚到底部!');
              // 通过this.$emit()提交到外面
              this.$emit('pullingUp', )
            })
          }

        },
        //封装scrollTo的方法,提供监听事件
        methods: {
          scrollTo(x, y, time = 500) {
            // 判断scroll是否创建再去那天的属性
            this.scroll && this.scroll.scrollTo(x, y, time)
          },
          finishPullUp() {
            this.scroll.finishPullUp()
          },
          refresh() {
            this.scroll && this.scroll.refresh();
            // console.log('您调用了better-scroll的refresh')
          }
        },

      }

    </script>
    <style>
    </style>