Git分布式版本控制系统
git remote -v 查看仓库
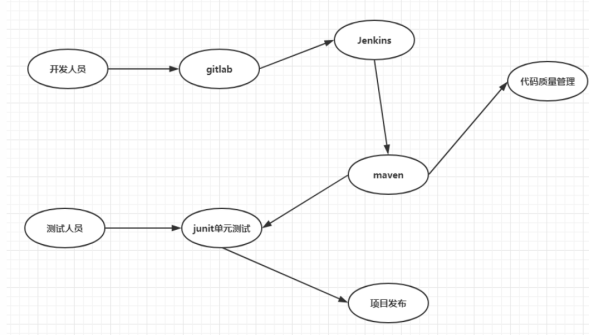
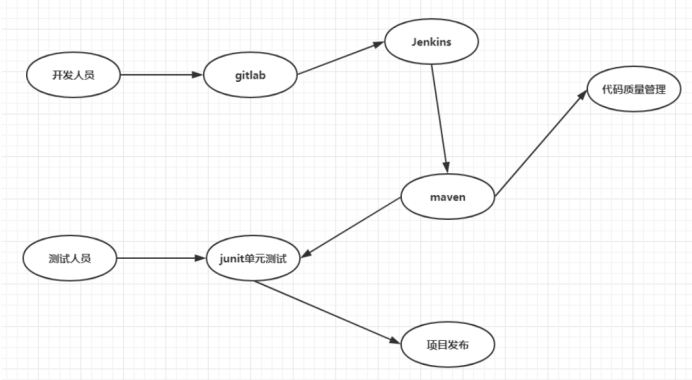
一 企业高效持续集成平台场景介绍:
二,GIT分布式版本控制系统:
2.1 Git简介:
2.1.1 git是什么?
- Git在Wikipedia上的定义:它是一个免费的、分布式的版本控制工具,或是一个强调了速度快的源代码管理工具。Git最初被Linus Torvalds开发出来用于管理Linux内核的开发。每一个Git的工作目录都是一个完全独立的代码库,并拥有完整的历史记录和版本追踪能力,不依赖 于网络和中心服务器。
- Git的出现减轻了许多开发者和开源项目对于管理分支代码的压力,由于对分支的良好控制,更鼓励开发者对自己感兴趣的项目做出贡献。其实许多开源项目 包括Linux kernel, Samba, X.org Server, Ruby on Rails,都已经过渡到使用Git作为自己的版本控制工具。对于我们这些喜欢写代码的开发者嘛,有两点最大的好处,我们可以在任何地点(在上班的地铁 上)提交自己的代码和查看代码版本;我们可以开许许多多个分支来实践我们的想法,而合并这些分支的开销几乎可以忽略不计。
2.1.2 什么是版本控制呢?
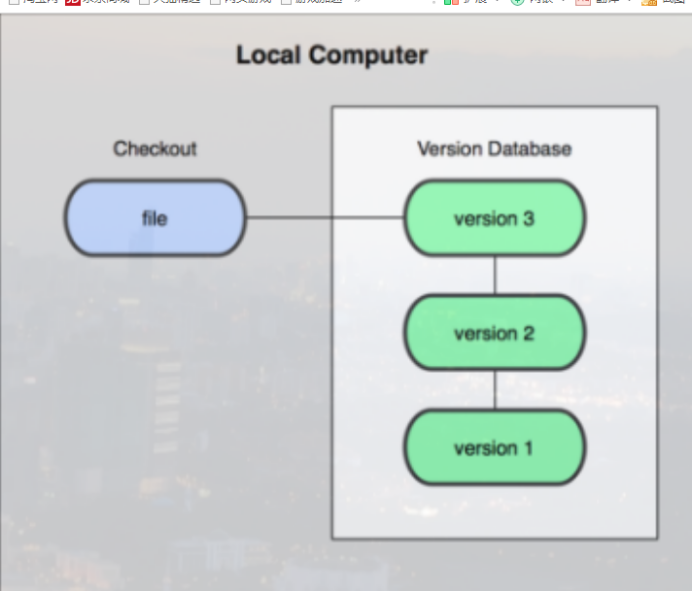
本地版本控制系统:
- 许多人习惯用复制整个项目目录的方式来保存不同的版本,或许还会改名加上备份时间以示区别。这么做唯一的好处就是简单。不过坏处也不少:有时候会混淆所在的工作目录,一旦弄错文件丢了数据就没法撤销恢复。
- 为了解决这个问题,人们很久以前就开发了许多种本地版本控制系统,大多都是采用某种简单的数据库来记录文件的历次更新差异

- 其中最流行的一种叫做 rcs,现今许多计算机系统上都还看得到它的踪影。甚至在流行的 Mac OS X 系统上安装了开发者工具包之后,也可以使用 rcs 命令。它的工作原理基本上就是保存并管理文件补丁(patch)。文件补丁是一种特定格式的文本文件,记录着对应文件修订前后的内容变化。所以,根据每次 修订后的补丁,rcs 可以通过不断打补丁,计算出各个版本的文件内容。
集中化的版本控制系统:
- 接下来人们又遇到一个问题,如何让在不同系统上的开发者协同工作?于是,集中化的版本控制系统( Centralized Version Control Systems,简称 CVCS )应运而生。这类系统,诸如 CVS,Subversion 以及 Perforce 等,都有一个单一的集中管理的服务器,保存所有文件的修订版本,而协同工作的人们都通过客户端连到这台服务器,取出最新的文件或者提交更新。多年以来,这 已成为版本控制系统的标准做法
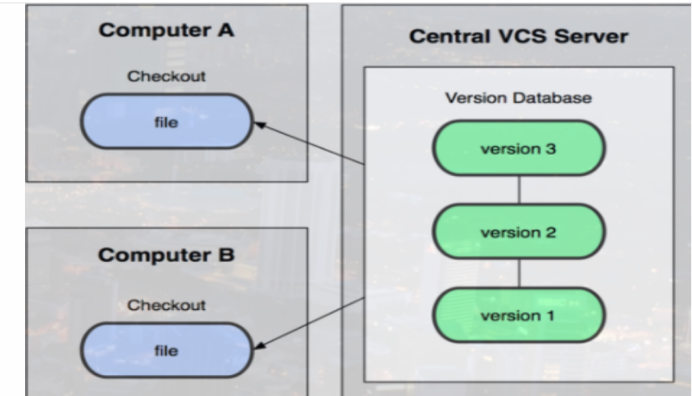
- 这种做法带来了许多好处,特别是相较于老式的本地 VCS来说。现在,每个人都可以在一定程度上看到项目中的其他人正在做些什么。而管理员也可以轻松掌控每个开发者的权限,并且管理一个 CVCS 要远比在各个客户端上维护本地数据库来得轻松容易。
- 事分两面,有好有坏。这么做最显而易见的缺点是中央服务器的单点故障。如果宕机一小时,那么在这一小时内,谁都无法提交更新,也就无法协同工作。要 是中央服务器的磁盘发生故障,碰巧没做备份,或者备份不够及时,就还是会有丢失数据的风险。最坏的情况是彻底丢失整个项目的所有历史更改记录,而被客户端 提取出来的某些快照数据除外,但这样的话依然是个问题,你不能保证所有的数据都已经有人事先完整提取出来过。本地版本控制系统也存在类似问题,只要整个项 目的历史记录被保存在单一位置,就有丢失所有历史更新记录的风险。
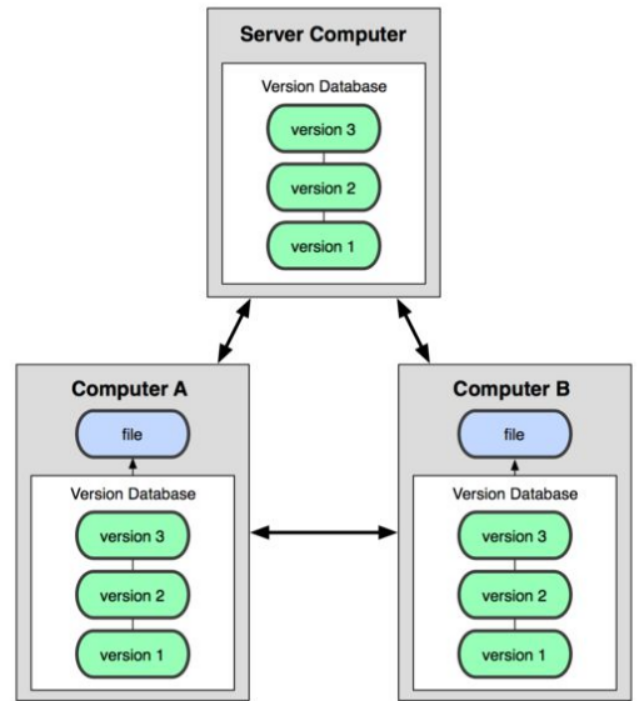
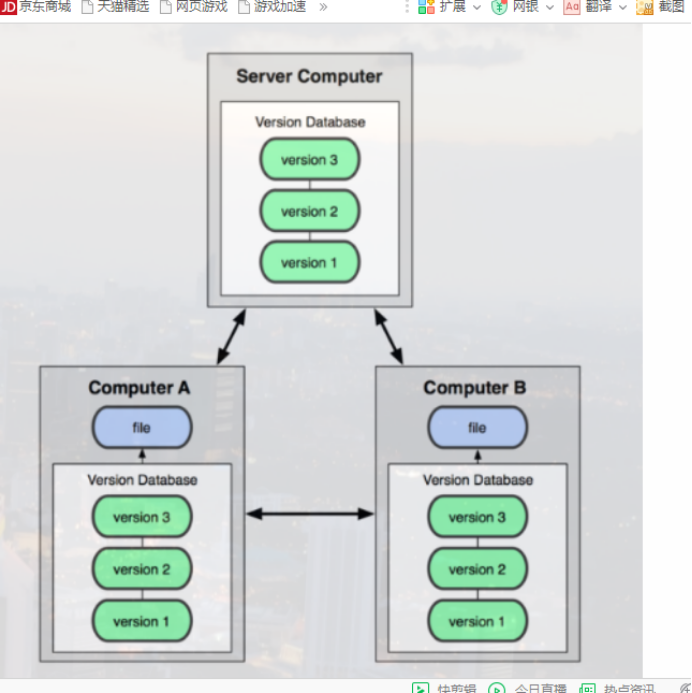
分布式版本控制系统:
- 于是分布式版本控制系统( Distributed Version Control System,简称 DVCS )面世了。在这类系统中,像 Git,Mercurial,Bazaar 以及 Darcs 等,客户端并不只提取最新版本的文件快照,而是把原始的代码仓库完整地镜像下来。这么一来,任何一处协同工作用的服务器发生故障,事后都可以用任何一个镜 像出来的本地仓库恢复。因为每一次的提取操作,实际上都是一次对代码仓库的完整备份
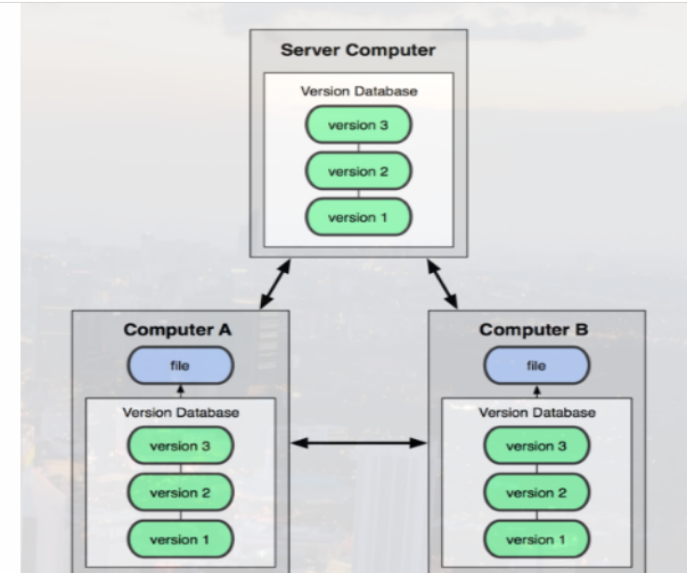
- 更进一步,许多这类系统都可以指定和若干不同的远端代码仓库进行交互。籍此,你就可以在同一个项目中,分别和不同工作小组的人相互协作。你可以根据需要设定不同的协作流程,比如层次模型式的工作流,而这在以前的集中式系统中是无法实现的。
2.1.3 git的优势在哪?
与同类型版本控制软件:svn,cvs
SVN===>集中式版本控制系统
GIT===>分布式版本控制系统
实际的例子:
- 以前我所 在的小组使用SVN作为版本控制工具,当我正在试图增强一个模块,工作做到一半,由于会改变原模块的行为导致代码服务器上许多测试的失败,所以并没有提交 代码。这时候上级对我说,现在有一个很紧急的Bug需要处理, 必须在两个小时内完成。我只好将本地的所有修改diff,并输出成为一个patch文件,然后回滚有关当前任务的所有代码,再开始修改Bug的任务,等到 修改好后,在将patch应用回来。前前后后要完成多个繁琐的步骤,这还不计中间代码发生冲突所要进行的工作量。
- 可是如果使用Git, 我们只需要开一个分支或者转回到主分支上,就可以随时开始Bug修改的任务,完成之后,只要切换到原来的分支就可以优雅的继续以前的任务。只要你愿意,每 一个新的任务都可以开一个分支,完成后,再将它合并到主分支上,轻松而优雅。
- 因此,分布式的版本控制系统,在每个使用者电脑上就有一个完整的数据仓库,没有网络依然可以使用Git。当然为了习惯及团队协作,会将本地数据同步到Git服务器或者GitHub等远程代码仓库
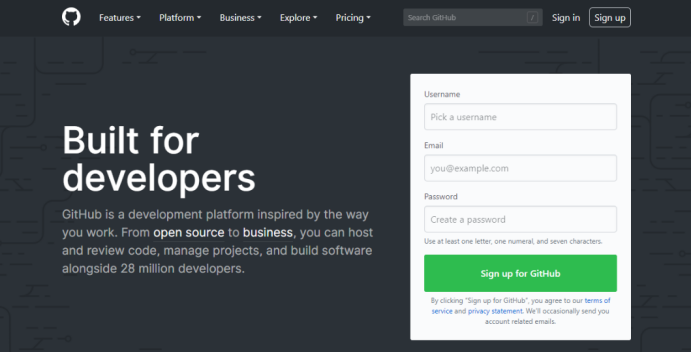
https://github.com
2.2 Git的安装
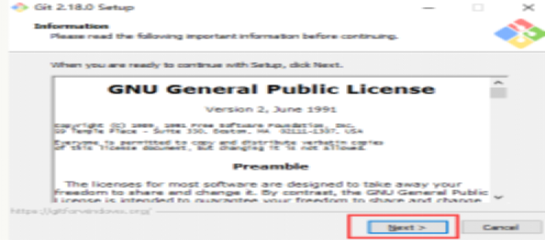
2.2.1 Windows安装git客户端
客户端下载地址:https://www.git-scm.com/downloads
双击安装包一路下一步即可。
在桌面上创建一个空目录,右键点击目录
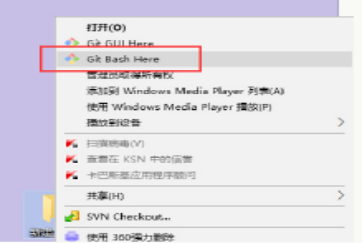
选择Git Bash Here,进入git命令界面
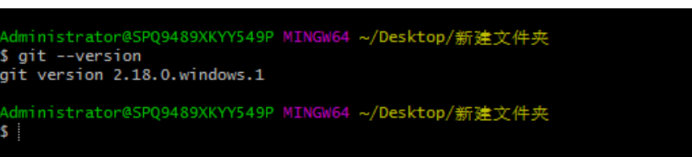
到此windows的git客户端就安装好了
2.2.2 Linux利用yum安装git客户端
- #安装环境查看
- [root@Git01 ~]# cat /etc/redhat-release
- CentOS Linux release 7.5.1804 (Core)
- [root@Git01 ~]# uname -r
- 3.10.0-862.3.3.el7.x86_64
- #安装git客户端
- [root@Git01 ~]# yum -y install git
- [root@Git01 ~]# which git
- /usr/bin/git
- [root@Git01 ~]# git --version
- git version 1.8.3.1
- #Git全局配置
- [root@Git02 ~]# git config --global user.name "Mr.ke" #配置git使用用户
- [root@Git02 ~]# git config --global user.email "1140180652@qq.com" #配置git使用邮箱
- [root@Git02 ~]# git config --global color.ui true #语法高亮
- [root@Git02 ~]# git config --list #查看全局配置
- user.email=1140180652@qq.com
- user.name=Mr.ke
- color.ui=true
- 说明:
- 如果没有提前设置Git的全局配置,那么在第一次进行代码提交的时候,会要求输入使用者的邮箱和姓名
到此利用Yum安装Linux操作系统的git客户端就安装好了
2.2.3 Linux源码安装git客户端:
如果我们想要安装最新版本的git,那么就只能源码包安装了:
- #回退之前的yum安装
- [root@Git01 ~]# yum history
- 已加载插件:fastestmirror
- ID | 登录用户 | 日期和时间 | 操作 | 变更数
- -------------------------------------------------------------------------------
- 6 | root <root> | 2018-09-11 21:30 | Install | 6
- 5 | root <root> | 2018-07-02 20:08 | I, U | 60
- 4 | root <root> | 2018-07-03 03:54 | Install | 93
- 3 | root <root> | 2018-07-03 03:53 | Install | 1
- 2 | root <root> | 2018-07-03 03:53 | Install | 1
- 1 | 系统 <空> | 2018-07-03 03:46 | Install | 313
- [root@Git01 ~]# yum history undo 6
- #源码安装git-2.9.5.tar.gz
- [root@Git01 ~]# yum -y install curl-devel expat-devel gettext-devel openssl-devel zlib-devel
- [root@Git01 ~]# yum -y install gcc perl-ExtUtils-MakeMaker
- [root@Git01 ~]# tar xf git-2.9.5.tar.gz -C /usr/src/
- [root@Git01 ~]# cd /usr/src/git-2.9.5/
- [root@Git01 git-2.9.5]# ./configure --prefix=/usr/local/git
- [root@Git01 git-2.9.5]# make && make install
- [root@Git01 ~]# ln -sf /usr/local/git/bin/* /usr/bin/
- [root@Git01 ~]# which git
- /usr/bin/git
- #源码编译需要链接git的命令库
- [root@Git01 ~]# ln -s /usr/libexec/git-core/* /usr/bin/
- [root@Git01 ~]# git --version
- git version 2.9.5
至此,利用源码包安装Linux操作系统的git客户端就安装好了:
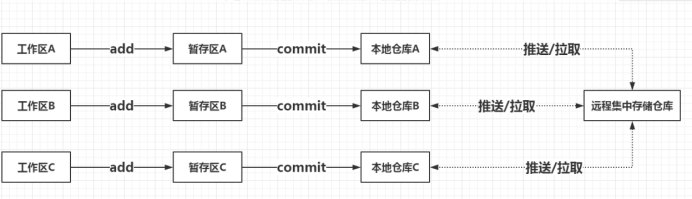
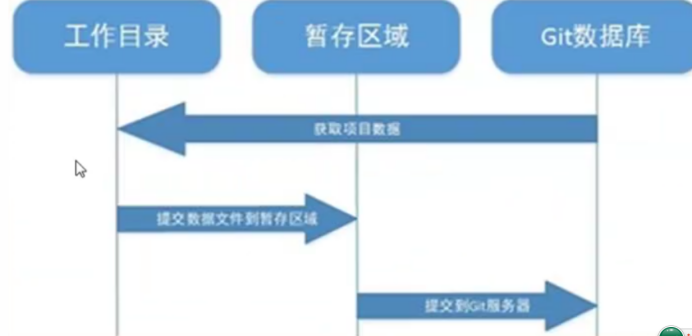
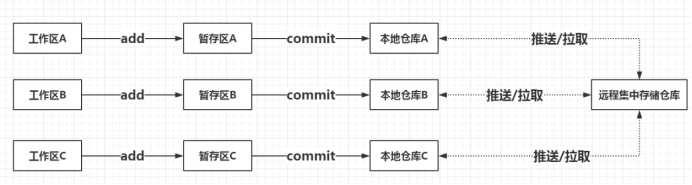
2.3 Git的命令入门
- 工作区
- 你建立的本地git项目目录
- 暂存区
- 将工作区里的变更部分(与上一版本不同的部分)暂时存储起来的地方
- 本地仓库
- 在本地创建的git版本仓库,用于提交工作区的变更。
- 远程仓库
- githab,gitlab或者队友机器上所建立的一个仓库
|
主机名 |
IP |
备注 |
|
Git01 |
192.168.200.186 |
git测试客户端一 |
|
Git02 |
192.168.200.187 |
git测试客户端二 |
2.3.1 git帮助文档:
- [root@Git ~]# git
- usage: git [--version] [--help] [-C <path>] [-c name=value]
- [--exec-path[=<path>]] [--html-path] [--man-path] [--info-path]
- [-p | --paginate | --no-pager] [--no-replace-objects] [--bare]
- [--git-dir=<path>] [--work-tree=<path>] [--namespace=<name>]
- <command> [<args>]
- 这些是各种场合常见的 Git 命令:
- 开始一个工作区(参见:git help tutorial)
- clone 克隆一个仓库到一个新目录
- init 创建一个空的 Git 仓库或重新初始化一个已存在的仓库
- 在当前变更上工作(参见:git help everyday)
- add 添加文件内容至索引
- mv 移动或重命名一个文件、目录或符号链接
- reset 重置当前 HEAD 到指定状态
- rm 从工作区和索引中删除文件
- 检查历史和状态(参见:git help revisions)
- bisect 通过二分查找定位引入 bug 的提交
- grep 输出和模式匹配的行
- log 显示提交日志
- show 显示各种类型的对象
- status 显示工作区状态
- 扩展、标记和调校您的历史记录
- branch 列出、创建或删除分支
- checkout 切换分支或恢复工作区文件
- commit 记录变更到仓库
- diff 显示提交之间、提交和工作区之间等的差异
- merge 合并两个或更多开发历史
- rebase 在另一个分支上重新应用提交
- tag 创建、列出、删除或校验一个 GPG 签名的标签对象
- 协同(参见:git help workflows)
- fetch 从另外一个仓库下载对象和引用
- pull 获取并整合另外的仓库或一个本地分支
- push 更新远程引用和相关的对象
- 命令 'git help -a' 和 'git help -g' 显示可用的子命令和一些概念帮助。
- 查看 'git help <命令>' 或 'git help <概念>' 以获取给定子命令或概念的
- 帮助。
export LANG=zh_CN.UTF8
2.3.2 git init初始化GIT工作目录
- #在Linux上
- [root@Git01 ~]# mkdir -p /mycode
- [root@Git01 ~]# cd /mycode
- [root@Git01 mycode]# git init
- 初始化空的 Git 仓库于 /mycode/.git/
- [root@Git01 mycode]# ls
- [root@Git01 mycode]# ls -la
- 总用量 0
- drwxr-xr-x 3 root root 18 9月 11 23:55 .
- dr-xr-xr-x. 18 root root 238 9月 11 23:55 ..
- drwxr-xr-x 7 root root 119 9月 11 23:55 .git
2.3.3 git add将变更添加进入暂存区
- #在Linux上
- [root@Git01 mycode]# touch test.txt
- [root@Git01 mycode]# git add test.txt
- #查看git工作目录的暂存区状态
- [root@Git01 mycode]# git status
- 位于分支 master
- 您的分支与上游分支 'test/master' 一致。
- 要提交的变更:
- (使用 "git reset HEAD <文件>..." 以取消暂存)
- 修改: test.txt
2.3.4 git commit将变更从暂存区提交到本地仓库
- #在linux上
- [root@Git01 mycode]# git commit -m "test"
- *** Please tell me who you are. #请告诉我你是谁
- Run #运行
- git config --global user.email "you@example.com" #运行命令告诉git你的邮箱
- git config --global user.name "Your Name" #运行命令告诉git你的名字
- to set your accounts default identity.
- Omit --global to set the identity only in this repository.
- fatal: unable to auto-detect email address (got 'root@Git.(none)')
- 说明:
- 因为我们安装git时,并没有注册自己的个人信息。但是当变更的代码初次提交到本地仓库上时是需要注册你的个人信息的。因此,我们执行这两条命令注册自己的个人信息
- #注册自己的个人信息
- [root@Git01 mycode]# git config --global user.email "215379068@qq.com"
- [root@Git01 mycode]# git config --global user.name "Mr.chen"
- #再次尝试提交
- [root@Git01 mycode]# git commit -m "test"
- [master(根提交) 6bff4b4] test
- 1 file changed, 0 insertions(+), 0 deletions(-)
- create mode 100644 test.txt
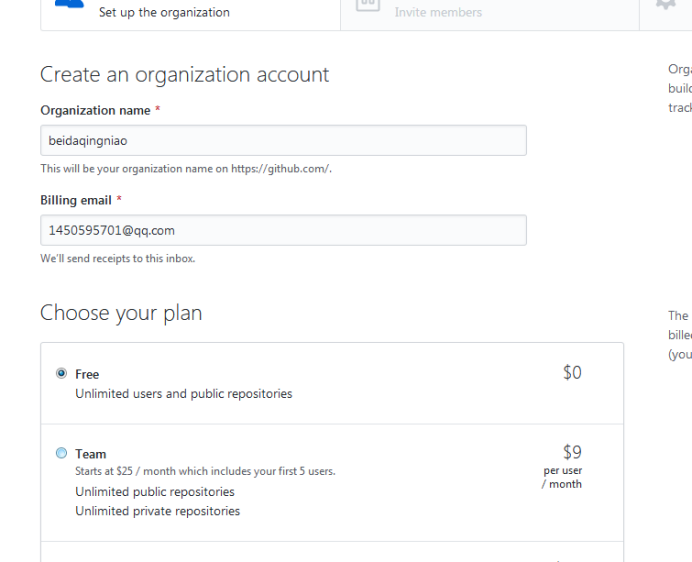
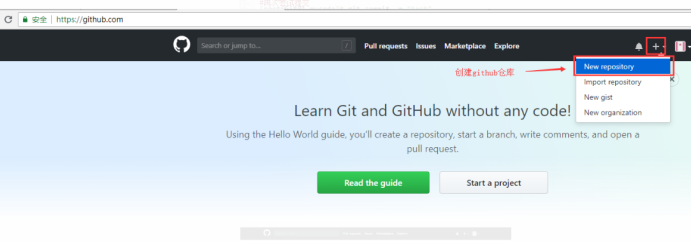
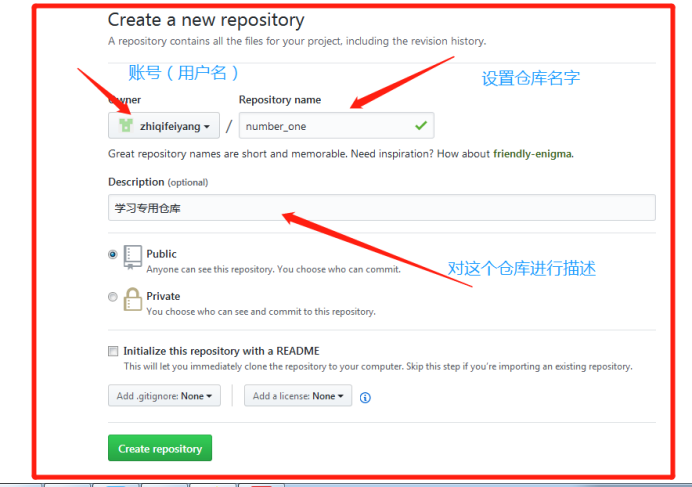
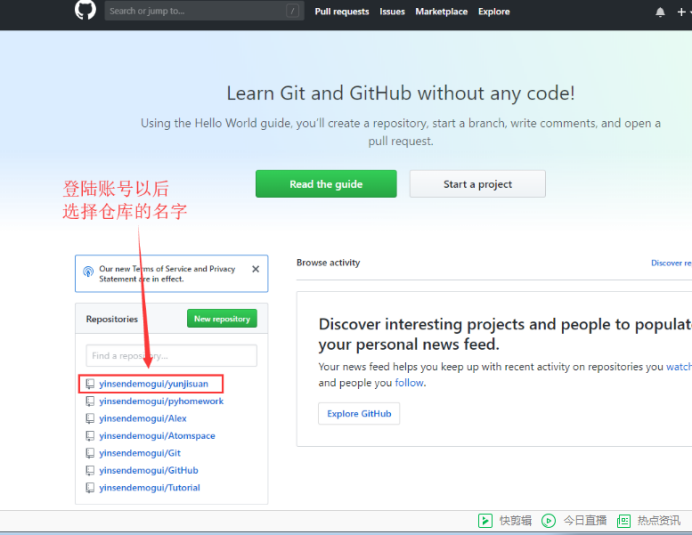
2.3.5 创建github账号,并创建个人github远程仓库
创建完github账号后,我们就可以创建远程仓库了,如下图所示:

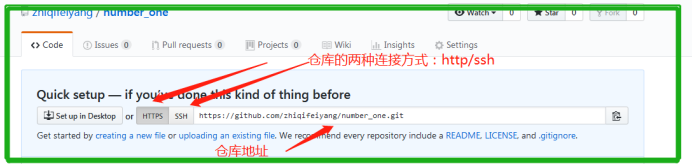
(我的仓库地址:
http方式地址: https://github.com/zhiqifeiyang/number_one.git
Sshf方式地址: https://github.com/zhiqifeiyang/number_one.git
)
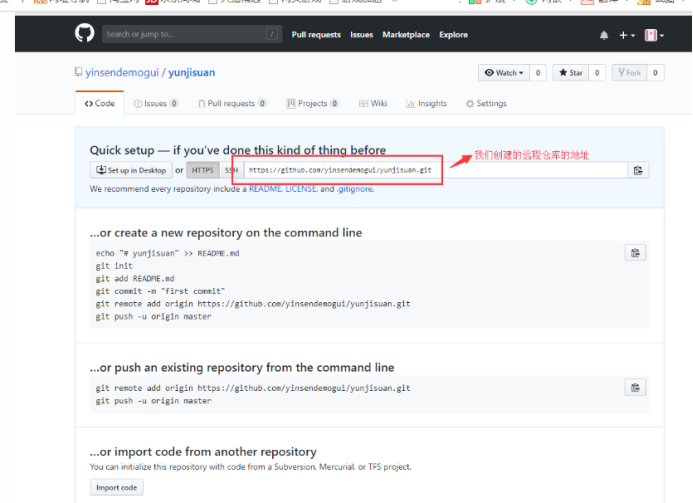
2.3.6 git remote用于管理远程仓库
git remote -v 查看所有远程查看
- [root@Git mycode]# git remote add --help
- 用法:git remote add [<选项>] <名称> <地址>
- -f, --fetch 抓取远程的分支
- --tags 抓取时导入所有的标签和关联对象
- 或不抓取任何标签(--no-tags)
- -t, --track <分支> 跟踪的分支
- -m, --master <分支> 主线分支
- --mirror[=<push|fetch>]
- 把远程设置为用以推送或抓取的镜像
(1)git remote add 把本地仓库添加到远程仓库
git remote add 代号 url
添加一个远程仓库的URL
命令格式:git remote add <仓库的名字> <仓库的URL>
- #在Linux上
- [root@Git01 mycode]# git remote add test https://github.com/yinsendemogui/yunjisuan.git
2.3.7 git push将本地仓库的变更推送到远程仓库的某个分支
命令格式:
git push -u <远程仓库的名字> <远程仓库的某一分支名字>
- #在Linux上推送本地仓库变更到远程仓库的master分支
- [root@Git01 mycode]# git push -u test master
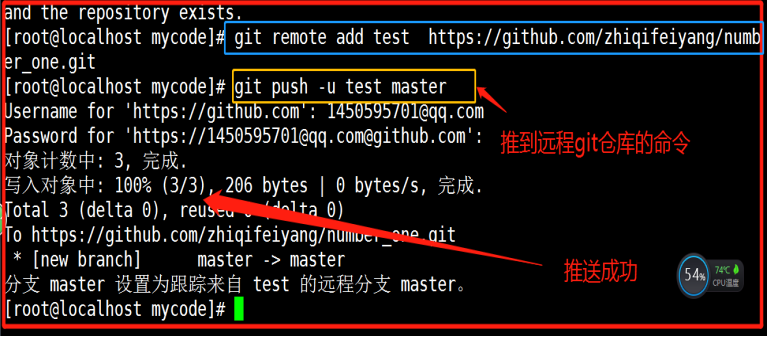
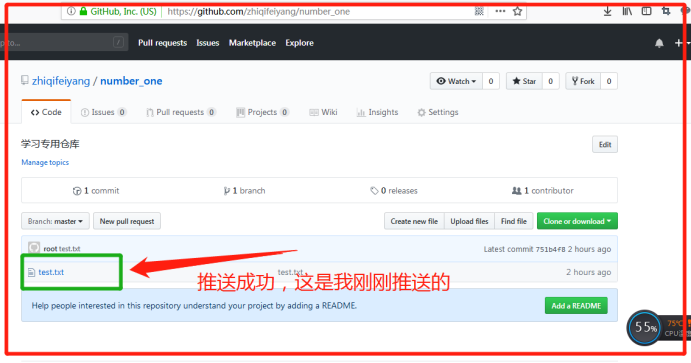
到git远程仓库查看如下:
扩展如若出现报错如下:
- fatal: Unable to find remote helper for 'https'
- 说明:
- 这是因为我们在源码编译的时候,git功能没有安装全。
- 环境变量PATH找不到/usr/libexec/git-core目录
- #我们添加一个软连接
- [root@Git01 mycode]# ln -s /usr/libexec/git-core/* /usr/bin/
- #再次推送本地仓库的变更
- [root@Git01 mycode]# git push -u test master
- Username for 'https://github.com': 215379068@qq.com #第一次推送需要输入登陆账号和密码
- Password for 'https://215379068@qq.com@github.com':
- 对象计数中: 3, 完成.
- 写入对象中: 100% (3/3), 201 bytes | 0 bytes/s, 完成.
- Total 3 (delta 0), reused 0 (delta 0)
- remote:
- remote: Create a pull request for 'master' on GitHub by visiting:
- remote: https://github.com/yinsendemogui/yunjisuan/pull/new/master
- remote:
- To https://github.com/yinsendemogui/yunjisuan.git
- * [new branch] master -> master
- 分支 master 设置为跟踪来自 test 的远程分支 master。
再次在浏览器进行访问查看你的github地址: https://github.com

2.3.8 git clone克隆一个现有仓库到本地
我们在另一台Git02上来模拟其他客户端进行对远程仓库克隆到本地仓库的操作
- [root@Git02 ~]# yum -y install git
- [root@Git02 ~]# mkdir -p /mycode2
- [root@Git02 ~]# cd /mycode2
- #初始化GIT工作目录并将已有远程仓库克隆到本地
- [root@Git01 mycode2]# git init
- 初始化空的 Git 仓库于 /mycode2/.git/
- [root@Git02 mycode2]# git clone https://github.com/yinsendemogui/yunjisuan.git
- 正克隆到 'yunjisuan'...
- remote: Counting objects: 3, done.
- remote: Total 3 (delta 0), reused 3 (delta 0), pack-reused 0
- Unpacking objects: 100% (3/3), done.
- [root@Git02 mycode2]# tree
- .
- └── yunjisuan
- └── test.txt
- 1 directory, 1 file
- #修改仓库里的文件内容,并提交变更到本地,推送变更到远程仓库
- [root@Git02 mycode2]# echo "welcome" >> yunjisuan/test.txt
- [root@Git02 mycode2]# cd yunjisuan/
- #将变更加入缓存区
- [root@Git02 yunjisuan]# git add test.txt
- #将缓存区的变更提交到本地仓库
- [root@Git02 yunjisuan]# git commit -m "修改了test.txt"
- [master 40f3e3d] 修改了test.txt
- 1 file changed, 2 insertions(+)
- #由于我们并没有添加对远程仓库的管理,所以我们要直接推送远程仓库的URL
- [root@Git02 yunjisuan]# git push https://github.com/yinsendemogui/yunjisuan.git master
- Username for 'https://github.com': 215379068@qq.com
- Password for 'https://215379068@qq.com@github.com':
- Counting objects: 5, done.
- Writing objects: 100% (3/3), 271 bytes | 0 bytes/s, done.
- Total 3 (delta 0), reused 0 (delta 0)
- To https://github.com/yinsendemogui/yunjisuan.git
- 6bff4b4..40f3e3d master -> master
- #添加对远程仓库的管理
- [root@Git02 yunjisuan]# git remote add test https://github.com/yinsendemogui/yunjisuan.git
- #查看所有已经纳入git管理的远程仓库URL
- [root@Git02 yunjisuan]# git remote -v
- origin https://github.com/yinsendemogui/yunjisuan.git (fetch) #clone时自动添加
- origin https://github.com/yinsendemogui/yunjisuan.git (push) #clone时自动添加
- test https://github.com/yinsendemogui/yunjisuan.git (fetch) #新添加的
- test https://github.com/yinsendemogui/yunjisuan.git (push) #新添加的
- #再次改动test.txt文件并将变更提交到远程github仓库
- [root@Git02 yunjisuan]# echo "wwww" >> test.txt
- [root@Git02 yunjisuan]# git add test.txt
- [root@Git02 yunjisuan]# git commit -m "再次改动一次test.txt"
- [master cb1cf08] 再次改动一次test.txt
- 1 file changed, 1 insertion(+)
- [root@Git02 yunjisuan]# git push test master
- Username for 'https://github.com': 215379068@qq.com
- Password for 'https://215379068@qq.com@github.com':
- Counting objects: 5, done.
- Writing objects: 100% (3/3), 287 bytes | 0 bytes/s, done.
- Total 3 (delta 0), reused 0 (delta 0)
- To https://github.com/yinsendemogui/yunjisuan.git
- 40f3e3d..cb1cf08 master -> master
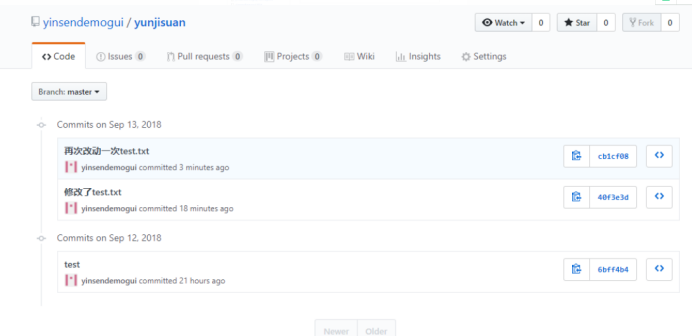
浏览器打开github查看变更提交情况

2.3.9 git fetch 将远程仓库的变更拉取到本地仓库
- #在Git01上
- [root@Git01 mycode]# git fetch
- remote: Counting objects: 6, done.
- remote: Compressing objects: 100% (2/2), done.
- remote: Total 6 (delta 0), reused 6 (delta 0), pack-reused 0
- 展开对象中: 100% (6/6), 完成.
- 来自 https://github.com/yinsendemogui/yunjisuan
- 6bff4b4..cb1cf08 master -> test/master
- #查看文件是否修改
- [root@Git01 mycode]# cat test.txt #没有被修改
- 说明:
- 应用git fetch拉取到本地仓库时,并不修改本地工作目录中的代码
- 如果要修改,那么需要进行git merge变更合并
- #检查本地工作目录与本地仓库的差异
- [root@Git02 yunjisuan]# git checkout
- 您的分支落后 'origin/master' 共 2 个提交,并且可以快进。
- (使用 "git pull" 来更新您的本地分支)
- #在Git01上
- [root@Git01 mycode]# git merge test/master
- 更新 6bff4b4..b666246
- Fast-forward
- test.txt | 5 +++++
- 1 file changed, 5 insertions(+)
- [root@Git01 mycode]# cat test.txt
- sdfsdfsadf
- welcome
- wwww
- wwww
- wwww
2.3.10 get checkout检查工作目录代码与本地仓库中的代码的差异
- #检查本地工作目录与本地仓库的差异
- [root@Git02 yunjisuan]# git checkout
- 您的分支落后 'origin/master' 共 2 个提交,并且可以快进。
- (使用 "git pull" 来更新您的本地分支)
2.3.11 git merge 将远程仓库的变更,更新到本地工作目录中
- #在Git01上
- [root@Git01 mycode]# git merge test/master
- 更新 6bff4b4..b666246
- Fast-forward
- test.txt | 5 +++++
- 1 file changed, 5 insertions(+)
- [root@Git01 mycode]# cat test.txt
- sdfsdfsadf
- welcome
- wwww
- wwww
- wwww
2.3.12 git pull 将远程仓库的变更拉取到本地仓库,并更新本地工作目录。
git pull ====> git fetch + git merge
- #在Git01上对文件进行改动,并推送到github远程仓库
- [root@Git01 mycode]# ls
- test.txt
- [root@Git01 mycode]# echo "welcome to yunjisuan" >> test.txt
- [root@Git01 mycode]# cat test.txt
- sdfsdfsadf
- welcome
- wwww
- wwww
- wwww
- welcome to yunjisuan
- [root@Git01 mycode]# git add *
- [root@Git01 mycode]# git commit -m "git01修改了test.txt"
- [master 4cc28a4] git01修改了test.txt
- 1 file changed, 1 insertion(+)
- [root@Git01 mycode]# git push -u test master
- Username for 'https://github.com': 215379068@qq.com
- Password for 'https://215379068@qq.com@github.com':
- 对象计数中: 3, 完成.
- 压缩对象中: 100% (2/2), 完成.
- 写入对象中: 100% (3/3), 294 bytes | 0 bytes/s, 完成.
- Total 3 (delta 0), reused 0 (delta 0)
- To https://github.com/yinsendemogui/yunjisuan.git
- b666246..4cc28a4 master -> master
- 分支 master 设置为跟踪来自 test 的远程分支 master。
- #在Git02上,拉取远程仓库的变更后直接合并进本地仓库的master分支
- [root@Git02 ~]# cd /mycode2/yunjisuan/
- [root@Git02 yunjisuan]# git pull test master
- remote: Counting objects: 3, done.
- remote: Compressing objects: 100% (2/2), done.
- remote: Total 3 (delta 0), reused 3 (delta 0), pack-reused 0
- Unpacking objects: 100% (3/3), done.
- 来自 https://github.com/yinsendemogui/yunjisuan
- * branch master -> FETCH_HEAD
- 更新 b666246..4cc28a4
- Fast-forward
- test.txt | 1 +
- 1 file changed, 1 insertion(+)
- [root@Git02 yunjisuan]# cat test.txt
- sdfsdfsadf
- welcome
- wwww
- wwww
- wwww
- welcome to yunjisuan
- #如果文件还没有被添加到暂存区,那么Linux命令直接改名即可
- [root@Git01 mycode]# git status
- 位于分支 master
- 您的分支与上游分支 'test/master' 一致。
- nothing to commit, working tree clean
- [root@Git01 mycode]# touch benet.txt
- [root@Git01 mycode]# git status
- 位于分支 master
- 您的分支与上游分支 'test/master' 一致。
- 未跟踪的文件:
- (使用 "git add <文件>..." 以包含要提交的内容)
- benet.txt #还未提交到暂存区,但是git已经判断出你的变化文件了
- 提交为空,但是存在尚未跟踪的文件(使用 "git add" 建立跟踪)
- [root@Git01 mycode]# mv benet.txt yunjisuan.txt #直接改名
- [root@Git01 mycode]# git status
- 位于分支 master
- 您的分支与上游分支 'test/master' 一致。
- 未跟踪的文件:
- (使用 "git add <文件>..." 以包含要提交的内容)
- yunjisuan.txt #git判断的变化文件也同时改变了
- 提交为空,但是存在尚未跟踪的文件(使用 "git add" 建立跟踪)
- #假如变动文件已经添加到了暂存区
- [root@Git01 mycode]# git add *
- [root@Git01 mycode]# git status
- 位于分支 master
- 您的分支与上游分支 'test/master' 一致。
- 要提交的变更:
- (使用 "git reset HEAD <文件>..." 以取消暂存)
- 新文件: yunjisuan.txt #变动文件已经添加到了暂存区
- #通过git mv 来给已经添加到暂存区的文件改名
- [root@Git01 mycode]# git mv yunjisuan.txt benet.txt
- [root@Git01 mycode]# git status
- 位于分支 master
- 您的分支与上游分支 'test/master' 一致。
- 要提交的变更:
- (使用 "git reset HEAD <文件>..." 以取消暂存)
- 新文件: benet.txt
- [root@Git01 mycode]# ls
- benet.txt test.txt #我们发现本地文件同时改名了
- ##通过git reset 来给已经添加到暂存区的文件撤销掉
- [root@Git01 mycode]# git status
- 位于分支 master
- 您的分支领先 'test/master' 共 2 个提交。
- (使用 "git push" 来发布您的本地提交)
- 要提交的变更:
- (使用 "git reset HEAD <文件>..." 以取消暂存)
- 新文件: benet.txt
- [root@Git01 mycode]# git reset benet.txt
- [root@Git01 mycode]# git status
- 位于分支 master
- 您的分支领先 'test/master' 共 2 个提交。
- (使用 "git push" 来发布您的本地提交)
- 未跟踪的文件:
- (使用 "git add <文件>..." 以包含要提交的内容)
- benet.txt
- 提交为空,但是存在尚未跟踪的文件(使用 "git add" 建立跟踪)
2.3.13 git mv && git reset 暂存区文件的修改和撤销
- #如果文件还没有被添加到暂存区,那么Linux命令直接改名即可
- [root@Git01 mycode]# git status
- 位于分支 master
- 您的分支与上游分支 'test/master' 一致。
- nothing to commit, working tree clean
- [root@Git01 mycode]# touch benet.txt
- [root@Git01 mycode]# git status
- 位于分支 master
- 您的分支与上游分支 'test/master' 一致。
- 未跟踪的文件:
- (使用 "git add <文件>..." 以包含要提交的内容)
- benet.txt #还未提交到暂存区,但是git已经判断出你的变化文件了
- 提交为空,但是存在尚未跟踪的文件(使用 "git add" 建立跟踪)
- [root@Git01 mycode]# mv benet.txt yunjisuan.txt #直接改名
- [root@Git01 mycode]# git status
- 位于分支 master
- 您的分支与上游分支 'test/master' 一致。
- 未跟踪的文件:
- (使用 "git add <文件>..." 以包含要提交的内容)
- yunjisuan.txt #git判断的变化文件也同时改变了
- 提交为空,但是存在尚未跟踪的文件(使用 "git add" 建立跟踪)
- #假如变动文件已经添加到了暂存区
- [root@Git01 mycode]# git add *
- [root@Git01 mycode]# git status
- 位于分支 master
- 您的分支与上游分支 'test/master' 一致。
- 要提交的变更:
- (使用 "git reset HEAD <文件>..." 以取消暂存)
- 新文件: yunjisuan.txt #变动文件已经添加到了暂存区
- #通过git mv 来给已经添加到暂存区的文件改名
- [root@Git01 mycode]# git mv yunjisuan.txt benet.txt
- [root@Git01 mycode]# git status
- 位于分支 master
- 您的分支与上游分支 'test/master' 一致。
- 要提交的变更:
- (使用 "git reset HEAD <文件>..." 以取消暂存)
- 新文件: benet.txt
- [root@Git01 mycode]# ls
- benet.txt test.txt #我们发现本地文件同时改名了
- ##通过git reset 来给已经添加到暂存区的文件撤销掉
- [root@Git01 mycode]# git status
- 位于分支 master
- 您的分支领先 'test/master' 共 2 个提交。
- (使用 "git push" 来发布您的本地提交)
- 要提交的变更:
- (使用 "git reset HEAD <文件>..." 以取消暂存)
- 新文件: benet.txt
- [root@Git01 mycode]# git reset benet.txt
- [root@Git01 mycode]# git status
- 位于分支 master
- 您的分支领先 'test/master' 共 2 个提交。
- (使用 "git push" 来发布您的本地提交)
- 未跟踪的文件:
- (使用 "git add <文件>..." 以包含要提交的内容)
- benet.txt
- 提交为空,但是存在尚未跟踪的文件(使用 "git add" 建立跟踪)
2.3.14 git rm 提交文件的删除变更到暂存区
git add 可以提交新增文件,修改文件的变更到暂存区;
git rm 则是提交删除文件的变更到暂存区
- [root@Git01 mycode]# ls
- 1 10 2 3 4 5 6 7 8 9 benet.txt test.txt
- [root@Git01 mycode]# rm -f 1 2 3 4
- [root@Git01 mycode]# git status
- 位于分支 master
- 您的分支领先 'test/master' 共 1 个提交。
- (使用 "git push" 来发布您的本地提交)
- 尚未暂存以备提交的变更:
- (使用 "git add/rm <文件>..." 更新要提交的内容)
- (使用 "git checkout -- <文件>..." 丢弃工作区的改动)
- 删除: 1
- 删除: 2
- 删除: 3
- 删除: 4
- 修改尚未加入提交(使用 "git add" 和/或 "git commit -a")
- [root@Git01 mycode]# git rm 1 2 3 4
- rm '1'
- rm '2'
- rm '3'
- rm '4'
- [root@Git01 mycode]# git status
- 位于分支 master
- 您的分支领先 'test/master' 共 1 个提交。
- (使用 "git push" 来发布您的本地提交)
- 要提交的变更:
- (使用 "git reset HEAD <文件>..." 以取消暂存)
- 删除: 1
- 删除: 2
- 删除: 3
- 删除: 4
- [root@Git01 mycode]# git commit -m "delte 1 2 3 4"
- [master 58ad6f1] delte 1 2 3 4
- 4 files changed, 0 insertions(+), 0 deletions(-)
- delete mode 100644 1
- delete mode 100644 2
- delete mode 100644 3
- delete mode 100644 4
2.3.15 git diff 文件对比利器
git diff命令可以将本地工作目录中的文件与本地仓库中的文件进行对比
- [root@Git01 mycode]# git diff benet.txt
- [root@Git01 mycode]# echo "welcome" >> benet.txt
- [root@Git01 mycode]# echo "welcome" >> benet.txt
- [root@Git01 mycode]# git diff benet.txt
- diff --git a/benet.txt b/benet.txt
- index d510880..e672336 100644
- --- a/benet.txt
- +++ b/benet.txt
- @@ -2,3 +2,5 @@ www
- www
- www
- www
- +welcome #工作目录文件与本地仓库对比,多了此行内容
- +welcome #工作目录文件与本地仓库对比,多了此行内容
2.3.16 git log 查看git提交历史纪录
- git log:查看提交历史记录
- git log -2 :查看最近几条记录
- git log -p -1 : -p显示每次提交的内容差异
- git log --stat -2 : stat简要显示数据增改行数,这样就能看到提交中修改过的内容
- git log --pretty=oneline :一行显示提交的历史记录
- #查看最近两条记录
- [root@Git01 mycode]# git log -2
- commit 0e94052ab30676d118fb6e838c1a23083b9cf9d1
- Author: Mr.chen <215379068@qq.com>
- Date: Thu Sep 13 21:44:12 2018 +0800
- test
- commit d9cd2d8777bc33a44b749005279f14c6d8d1b0f4
- Merge: eed7cab 7122274
- Author: Mr.chen <215379068@qq.com>
- Date: Thu Sep 13 21:32:31 2018 +0800
- Merge remote-tracking branch 'test/master'
- #显示最近一次提交的内容差异
- [root@Git01 mycode]# git log -p -1
- commit 0e94052ab30676d118fb6e838c1a23083b9cf9d1
- Author: Mr.chen <215379068@qq.com>
- Date: Thu Sep 13 21:44:12 2018 +0800
- test
- diff --git a/benet.txt b/benet.txt
- index e69de29..5587dab 100644
- --- a/benet.txt
- +++ b/benet.txt
- @@ -0,0 +1,4 @@
- +wwww
- +wwww
- +wwww
- +wwww
- #显示提交内容的修改概要
- [root@Git01 mycode]# git log --stat -2
- commit 0e94052ab30676d118fb6e838c1a23083b9cf9d1
- Author: Mr.chen <215379068@qq.com>
- Date: Thu Sep 13 21:44:12 2018 +0800
- test
- benet.txt | 4 ++++
- 1 file changed, 4 insertions(+)
- commit d9cd2d8777bc33a44b749005279f14c6d8d1b0f4
- Merge: eed7cab 7122274
- Author: Mr.chen <215379068@qq.com>
- Date: Thu Sep 13 21:32:31 2018 +0800
- Merge remote-tracking branch 'test/master'
- #用一行显示提交的历史记录
- [root@Git01 mycode]# git log --pretty=oneline
- 0e94052ab30676d118fb6e838c1a23083b9cf9d1 test
- d9cd2d8777bc33a44b749005279f14c6d8d1b0f4 Merge remote-tracking branch 'test/master'
- eed7cab86dd33689151bce33380126623a54bac1 tttt
- 71222749ac1d3c0cb64eb9cb18b52ac51dec308c test
- ae42e7600b66d5368ba865b0d5b4992b11aa9c1e test
- 540b738327018eb201ec01e3847a584ce7e69f9a test2
- cf36f74f5cfcddfa7356bd01e2b818e8c39cb31e test
- 2090db9778298377b90bf0bc56030cf6062a13c9 111
- 4cc28a41a62ebab7fb023b00e3e0ab8107a447e0 git01修改了test.txt
- b6662463c1f8a0c5d04faf9e146b13c92734587a 再次改动一次test.txt
- 45c319df640a45bf1ce0cd4e4187b106b222e93c 再次改动一次test.txt
- cb1cf08c325fab21e7ee29f67946866863fdedb2 再次改动一次test.txt
- 40f3e3d488d059a190652c05e8c28f52459acceb 修改了test.txt
- 6bff4b4c5f37c78e2a3b1e855057edbbeb4a9b4e test
2.4 追根溯源-git log
2.4.1 Git还原历史数据
Git服务程序中有一个叫做HEAD的版本指针,当用户申请还原数据时,其实就是将HEAD指针指向到某个特定的提交版本,但是因为Git是分布式版本控制系统,为了避免历史记录冲突,故使用了SHA-1计算出十六进制的哈西字符串来区分每个提交版本,另外默认的HEAD版本指针会指向到最近的一次提交版本记录,而上一个提交版本会叫HEAD^,上上一个版本则会叫做HEAD^^,当然一般会用HEAD~5来表示往上数第五个提交版本。
- git reset --hard HEAD^ #-->还原历史提交版本上一次
- git reset --hard 3de15d4 #-->找到历史还原点的SHA-1值后,就可以还原(值不写全,系统会自动匹配)
- #修改一个文件,并提交到本地仓库
- [root@Git01 mycode]# ls
- 1 10 2 3 4 5 6 7 8 9 benet.txt test.txt
- [root@Git01 mycode]# echo "www" >> benet.txt
- [root@Git01 mycode]# echo "www" >> benet.txt
- [root@Git01 mycode]# echo "www" >> benet.txt
- [root@Git01 mycode]# cat benet.txt
- www
- www
- www
- [root@Git01 mycode]# git add *
- [root@Git01 mycode]# git commit -m "benet.txt添加了内容"
- [master d811fd3] benet.txt添加了内容
- 1 file changed, 3 insertions(+)
- #查看历史提交记录,并回滚到上一个提交版本
- [root@Git01 mycode]# git log --pretty=oneline
- d811fd378becc148db827c77ab2701df159f66bd benet.txt添加了内容 #当前工作区目录内容所处的位置
- d9cd2d8777bc33a44b749005279f14c6d8d1b0f4 Merge remote-tracking branch 'test/master'
- eed7cab86dd33689151bce33380126623a54bac1 tttt
- 71222749ac1d3c0cb64eb9cb18b52ac51dec308c test
- ae42e7600b66d5368ba865b0d5b4992b11aa9c1e test
- 540b738327018eb201ec01e3847a584ce7e69f9a test2
- cf36f74f5cfcddfa7356bd01e2b818e8c39cb31e test
- 2090db9778298377b90bf0bc56030cf6062a13c9 111
- 4cc28a41a62ebab7fb023b00e3e0ab8107a447e0 git01修改了test.txt
- b6662463c1f8a0c5d04faf9e146b13c92734587a 再次改动一次test.txt
- 45c319df640a45bf1ce0cd4e4187b106b222e93c 再次改动一次test.txt
- cb1cf08c325fab21e7ee29f67946866863fdedb2 再次改动一次test.txt
- 40f3e3d488d059a190652c05e8c28f52459acceb 修改了test.txt
- 6bff4b4c5f37c78e2a3b1e855057edbbeb4a9b4e test
- #回滚到前一个版本
- [root@Git01 mycode]# git reset --hard HEAD^
- HEAD 现在位于 d9cd2d8 Merge remote-tracking branch 'test/master'
- [root@Git01 mycode]# git log --pretty=oneline
- d9cd2d8777bc33a44b749005279f14c6d8d1b0f4 Merge remote-tracking branch 'test/master' #当前工作区目录内容所处的位置
- eed7cab86dd33689151bce33380126623a54bac1 tttt
- 71222749ac1d3c0cb64eb9cb18b52ac51dec308c test
- ae42e7600b66d5368ba865b0d5b4992b11aa9c1e test
- 540b738327018eb201ec01e3847a584ce7e69f9a test2
- cf36f74f5cfcddfa7356bd01e2b818e8c39cb31e test
- 2090db9778298377b90bf0bc56030cf6062a13c9 111
- 4cc28a41a62ebab7fb023b00e3e0ab8107a447e0 git01修改了test.txt
- b6662463c1f8a0c5d04faf9e146b13c92734587a 再次改动一次test.txt
- 45c319df640a45bf1ce0cd4e4187b106b222e93c 再次改动一次test.txt
- cb1cf08c325fab21e7ee29f67946866863fdedb2 再次改动一次test.txt
- 40f3e3d488d059a190652c05e8c28f52459acceb 修改了test.txt
- 6bff4b4c5f37c78e2a3b1e855057edbbeb4a9b4e test
- #查看之前改动的文件
- [root@Git01 mycode]# cat benet.txt #没有任何内容
- [root@Git01 mycode]#
- #回滚到指定提交的版本
- [root@Git01 mycode]# git log --pretty=oneline
- d9cd2d8777bc33a44b749005279f14c6d8d1b0f4 Merge remote-tracking branch 'test/master'
- eed7cab86dd33689151bce33380126623a54bac1 tttt
- 71222749ac1d3c0cb64eb9cb18b52ac51dec308c test
- ae42e7600b66d5368ba865b0d5b4992b11aa9c1e test
- 540b738327018eb201ec01e3847a584ce7e69f9a test2
- cf36f74f5cfcddfa7356bd01e2b818e8c39cb31e test
- 2090db9778298377b90bf0bc56030cf6062a13c9 111
- 4cc28a41a62ebab7fb023b00e3e0ab8107a447e0 git01修改了test.txt
- b6662463c1f8a0c5d04faf9e146b13c92734587a 再次改动一次test.txt
- 45c319df640a45bf1ce0cd4e4187b106b222e93c 再次改动一次test.txt #计划回滚到这个版本
- cb1cf08c325fab21e7ee29f67946866863fdedb2 再次改动一次test.txt
- 40f3e3d488d059a190652c05e8c28f52459acceb 修改了test.txt
- 6bff4b4c5f37c78e2a3b1e855057edbbeb4a9b4e test
- #查看test.txt文件内容
- [root@Git01 mycode]# cat test.txt
- sdfsdfsadf
- welcome
- wwww
- wwww
- wwww
- welcome to yunjisuan
- www
- #回滚到45c319df640a45bf1ce0cd4e4187b106b222e93c提交的版本
- [root@Git01 mycode]# git reset --hard 45c319d
- HEAD 现在位于 45c319d 再次改动一次test.txt
- [root@Git01 mycode]# git log --pretty=oneline
- 45c319df640a45bf1ce0cd4e4187b106b222e93c 再次改动一次test.txt
- cb1cf08c325fab21e7ee29f67946866863fdedb2 再次改动一次test.txt
- 40f3e3d488d059a190652c05e8c28f52459acceb 修改了test.txt
- 6bff4b4c5f37c78e2a3b1e855057edbbeb4a9b4e test
- [root@Git01 mycode]# cat test.txt
- sdfsdfsadf
- welcome
- wwww
- wwww
2.4.2 Git还原未来数据
当我们回滚到历史某个提交版本了以后;
我们发现我们已经没有在那个版本之后的提交记录了;
也就是说,我们一旦还原了历史版本,想要再次还原回去,那么就回不去了。
如此一来,一旦错了。我们怎么办呢?
- git reflog:查看未来历史更新点
- #查看未来历史更新点
- [root@Git01 mycode]# git reflog
- 45c319d HEAD@{0}: reset: moving to 45c319d
- d9cd2d8 HEAD@{1}: reset: moving to HEAD^
- d811fd3 HEAD@{2}: commit: benet.txt添加了内容 #计划还原到最初的这个版本
- d9cd2d8 HEAD@{3}: reset: moving to HEAD^
- 0e94052 HEAD@{4}: commit: test
- d9cd2d8 HEAD@{5}: merge test/master: Merge made by the 'recursive' strategy.
- eed7cab HEAD@{6}: commit: tttt
- 540b738 HEAD@{7}: commit: test2
- cf36f74 HEAD@{8}: commit: test
- 2090db9 HEAD@{9}: commit: 111
- 4cc28a4 HEAD@{10}: commit: git01修改了test.txt
- b666246 HEAD@{11}: merge refs/remotes/test/master: Fast-forward
- 6bff4b4 HEAD@{12}: commit (initial): test
- #还原到之前的版本
- [root@Git01 mycode]# ls
- test.txt
- [root@Git01 mycode]# git reset --hard d811fd3
- HEAD 现在位于 d811fd3 benet.txt添加了内容
- [root@Git01 mycode]# ls
- 1 10 2 3 4 5 6 7 8 9 benet.txt test.txt
- [root@Git01 mycode]# git log --pretty=oneline
- d811fd378becc148db827c77ab2701df159f66bd benet.txt添加了内容
- d9cd2d8777bc33a44b749005279f14c6d8d1b0f4 Merge remote-tracking branch 'test/master'
- eed7cab86dd33689151bce33380126623a54bac1 tttt
- 71222749ac1d3c0cb64eb9cb18b52ac51dec308c test
- ae42e7600b66d5368ba865b0d5b4992b11aa9c1e test
- 540b738327018eb201ec01e3847a584ce7e69f9a test2
- cf36f74f5cfcddfa7356bd01e2b818e8c39cb31e test
- 2090db9778298377b90bf0bc56030cf6062a13c9 111
- 4cc28a41a62ebab7fb023b00e3e0ab8107a447e0 git01修改了test.txt
- b6662463c1f8a0c5d04faf9e146b13c92734587a 再次改动一次test.txt
- 45c319df640a45bf1ce0cd4e4187b106b222e93c 再次改动一次test.txt
- cb1cf08c325fab21e7ee29f67946866863fdedb2 再次改动一次test.txt
- 40f3e3d488d059a190652c05e8c28f52459acceb 修改了test.txt
- 6bff4b4c5f37c78e2a3b1e855057edbbeb4a9b4e test
2.4.3 Git的标签使用
前面回滚使用的是一串字符串,又长又难记
git tag <标签> -m "描述"
每次提交都可以打一个标签
- git tag v1.0 : 给当前提交内容打一个标签(方便回滚)
- git tag : 查看当前所有的标签
- git show v1.0 :查看当前1.0版本的详细信息
- git tag v1.2 -m "描述"
- git tag -d v1.0 :删除之前的v1.0标签
- #查看所有标签
- [root@Git01 mycode]# git tag
- #添加v1.0标签给当前提交的内容
- [root@Git01 mycode]# git tag v1.0
- #查看标签为v1.0的提交的详细内容
- [root@Git01 mycode]# git show v1.0
- commit def8bf29afbd2bd7b899bf1472f9e1d290995afe
- Author: Mr.chen <215379068@qq.com>
- Date: Thu Sep 13 23:08:24 2018 +0800
- test3
- diff --git a/benet.txt b/benet.txt
- index 529c2d0..d510880 100644
- --- a/benet.txt
- +++ b/benet.txt
- @@ -1,3 +1,4 @@
- www
- www
- www
- +www #本次提交内容的变更信息
- #修改benet文件内容,再次进行提交
- [root@Git01 mycode]# echo "www" >> benet.txt
- [root@Git01 mycode]# echo "www" >> benet.txt
- [root@Git01 mycode]# git add *
- [root@Git01 mycode]# git commit -m "test"
- [master 942131a] test
- 1 file changed, 2 insertions(+)
- #给本次提交添加v2.0标签
- [root@Git01 mycode]# git tag v2.0
- [root@Git01 mycode]# git tag
- v1.0
- v2.0
- #查看标签为v1.0的提交的详细变更内容
- [root@Git01 mycode]# git show v1.0
- commit def8bf29afbd2bd7b899bf1472f9e1d290995afe
- Author: Mr.chen <215379068@qq.com>
- Date: Thu Sep 13 23:08:24 2018 +0800
- test3
- diff --git a/benet.txt b/benet.txt
- index 529c2d0..d510880 100644
- --- a/benet.txt
- +++ b/benet.txt
- @@ -1,3 +1,4 @@
- www
- www
- www
- +www
- #查看标签为v2.0的提交的详细变更内容
- [root@Git01 mycode]# git show v2.0
- commit 942131a50893184fb627f7d113531602dc42970a
- Author: Mr.chen <215379068@qq.com>
- Date: Thu Sep 13 23:29:09 2018 +0800
- test
- diff --git a/benet.txt b/benet.txt
- index d510880..b8cf22e 100644
- --- a/benet.txt
- +++ b/benet.txt
- @@ -2,3 +2,5 @@ www
- www
- www
- www
- +www
- +www
- #删除v2.0标签,重新设定附带描述信息的标签
- [root@Git01 mycode]# git tag -d v2.0
- 已删除标签 'v2.0'(曾为 942131a)
- [root@Git01 mycode]# git tag
- v1.0
- [root@Git01 mycode]# git tag v2.0 -m "给文件benet.txt增加两行代码"
- [root@Git01 mycode]# git tag
- v1.0
- v2.0
- [root@Git01 mycode]# git show v2.0
- tag v2.0
- Tagger: Mr.chen <215379068@qq.com>
- Date: Thu Sep 13 23:31:15 2018 +0800
- 给文件benet.txt增加两行代码
- commit 942131a50893184fb627f7d113531602dc42970a
- Author: Mr.chen <215379068@qq.com>
- Date: Thu Sep 13 23:29:09 2018 +0800
- test
- diff --git a/benet.txt b/benet.txt
- index d510880..b8cf22e 100644
- --- a/benet.txt
- +++ b/benet.txt
- @@ -2,3 +2,5 @@ www
- www
- www
- www
- +www
- +www
- #通过标签进行历史提交回滚,回滚到v1.0版本
- [root@Git01 mycode]# cat benet.txt
- www
- www
- www
- www
- www
- www
- [root@Git01 mycode]# git reset --hard v1.0
- HEAD 现在位于 def8bf2 test3
- [root@Git01 mycode]# cat benet.txt
- www
- www
- www
- www
2.5 gitignore文件
- 为什么使用.gitignore文件
- 大量与项目无关的文件全推到远程仓库上,同步的时候会非常慢,且跟编辑器相关的一些配置推上去之后,别人更新也会受到影响。所以,我们使用该文件,对不必要的文件进行忽略,使其不被git追踪。
- 一般情况下, .gitignore文件,在项目一开始创建的时候就创建,并推送到远程服务器上。这样大家初次同步项目的时候,就是用到该文件,避免以后,团队成员把与项目无关的文件,传到远程服务器上。
- gitignore文件匹配规则
- *.log 表示忽略项目中所有以.log结尾的文件
- 123?.log 表示忽略项目中所有以123加任意一个字符的文件
- /error.log 表示忽略根目录下的error.log文件
- **/java/ 匹配所有java目录下的所有文件
- !/error.log 表示在前面的匹配规则中,被忽略了的文件,你不想它被忽略,那么就可以在文件前加叹号
- #在Git01上
- [root@Git01 mycode]# ls
- 10 5 6 7 8 9 access.log benet.txt test.txt x.idea xx.idea
- [root@Git01 mycode]# git status
- 位于分支 master
- 您的分支领先 'test/master' 共 2 个提交。
- (使用 "git push" 来发布您的本地提交)
- 未跟踪的文件:
- (使用 "git add <文件>..." 以包含要提交的内容)
- access.log #三个文件需要被add
- x.idea #三个文件需要被add
- xx.idea #三个文件需要被add
- 提交为空,但是存在尚未跟踪的文件(使用 "git add" 建立跟踪)
- #添加.gitignore文件
- [root@Git01 mycode]# cat .gitignore
- target
- *.log #忽略任意开头.log结尾文件
- ?.idea #忽略任意一个字符开头.idea结尾文件
- #查看git工作目录文件状态
- [root@Git01 mycode]# git status
- 位于分支 master
- 您的分支领先 'test/master' 共 2 个提交。
- (使用 "git push" 来发布您的本地提交)
- 未跟踪的文件:
- (使用 "git add <文件>..." 以包含要提交的内容)
- .gitignore #刚才被规则覆盖的文件没了
- xx.idea #刚才被规则覆盖的文件没了
- 提交为空,但是存在尚未跟踪的文件(使用 "git add" 建立跟踪)
三,GIT分支管理
3.1 分支的结构概述
在实际的项目开发中,尽量保证master分支稳定,仅用于发布新版本,平时不要随便直接修改里面的数据文件。
那在哪干活呢?干活都在dev分支上。每个人从dev分支创建自己个人分支,开发完合并到dev分支,最后dev分支合并到master分支。
所以,团队的合作分支看起来会像下图那样。
分支管理工作流程:
在工作中,为了保证master分支稳定,产品经理通常会从master分支上复制一份代码作为dev分支;
然后成员开发A在从dev分支上复制一份代码叫做michael;
然后成员开发B再从dev分支上复制一份代码叫做bob;
平时开发A和开发B推送和拉取代码都在自己的个人分支michael和bob上。
当一个新功能开发完毕,或者一个bug修改完毕以后。开发人员会先将代码变更推送到自己的个人分支,然后再把个人分支的变更合并到dev分支里;
当开发经理和测试人员拉取dev分支的代码进行测试以后,如果没问题,那么开发经理会把dev分支的变更合并进master版本;
最后,由于master版本新增了测试过的新功能,那么就需要进行项目发布或者代码上线了。
3.2 GIT本地分支管理
3.2.1 本地分支的创建与切换
- git branch : 查看当前分支情况,当前分支前有*号
- git branch linux : 创建分支
- git checkout: 检查本地分支与远程分支的变更差异
- git checkout linux:切换分支
- #检查当前分支情况
- [root@Git01 mycode]# git branch
- * master #当前所处分支
- [root@Git01 mycode]# git branch linux #创建linux分支
- [root@Git01 mycode]# git branch
- linux
- * master #当前所处分支
- [root@Git01 mycode]# git checkout linux #切换到linux分支
- 切换到分支 'linux'
- [root@Git01 mycode]# git branch
- * linux #当前所处分支
- master
3.2.2 尝试在linux本地分支进行代码提交
- [root@Git01 mycode]# git branch
- * linux
- master
- [root@Git01 mycode]# cat benet.txt
- www
- www
- www
- [root@Git01 mycode]# echo "linux分支新增一行" >> benet.txt
- [root@Git01 mycode]# git add *
- [root@Git01 mycode]# git status
- 位于分支 linux
- 要提交的变更:
- (使用 "git reset HEAD <文件>..." 以取消暂存)
- 修改: benet.txt
- #此时我们先将改变提交到本地linux分支以后在切换分支
- #将变更提交到本地linux分支
- [root@Git01 mycode]# git commit -m "test"
- [linux 2592cd6] test
- 1 file changed, 1 insertion(+)
- #查看修改过的文件
- [root@Git01 mycode]# cat benet.txt
- www
- www
- www
- linux分支新增一行 #linux分支比master分支新增一行数据
- #切换分支到master分支
- [root@Git01 mycode]# git checkout master
- 切换到分支 'master'
- 您的分支与上游分支 'test/master' 一致。
- #查看benet.txt文件
- [root@Git01 mycode]# cat benet.txt
- www
- www
- www
- 说明:
- 我们发现切换分支以后,在linux分支修改过的文件数据,完全还原成了master分支的文件内容
- 但是这里存在一个问题,假如我们在linux分支下,修改了文件,但是并未提交到本地仓库linux分支,而只是放到了暂存区就切换到master分支的话,那么会发生什么呢?
- #切换到linux分支
- [root@Git01 mycode]# git checkout linux
- 切换到分支 'linux'
- [root@Git01 mycode]# cat benet.txt
- www
- www
- www
- linux分支新增一行
- #再次新增一行数据
- [root@Git01 mycode]# echo "linux分支新增第二行" >> benet.txt
- [root@Git01 mycode]# cat benet.txt
- www
- www
- www
- linux分支新增一行
- linux分支新增第二行
- #文件变更添加到暂存区
- [root@Git01 mycode]# git add *
- [root@Git01 mycode]# git status
- 位于分支 linux
- 要提交的变更:
- (使用 "git reset HEAD <文件>..." 以取消暂存)
- 修改: benet.txt
- #切换分支master,但由于没有提交暂存区的改变,因此切换分支失败
- [root@Git01 mycode]# git checkout master
- error: Your local changes to the following files would be overwritten by checkout:
- benet.txt
- Please commit your changes or stash them before you switch branches.
- 终止中
- [root@Git01 mycode]# git branch
- * linux #仍旧在linux分支
- master
- 说明:
- 当linux的本地分支仓库和master本地分支仓库的代码不同时,如果你没把变更从暂存区提交到分支仓库,那么默认是不能切换分支的。
- 但是,这里还有一个问题,假如linux分支和master分支的本地仓库的代码相同,但是我仍旧没把linux分支的变更提交到本地linux分支仓库,那么能直接切换master分支吗?
- #将本地分支master和linux的代码保存为一致。
- [root@Git01 mycode]# git branch
- linux
- * master
- [root@Git01 mycode]# cat benet.txt
- www
- www
- www
- [root@Git01 mycode]# git checkout linux
- 切换到分支 'linux'
- [root@Git01 mycode]# cat benet.txt
- www
- www
- www
- #在linux分支修改benet.txt文件
- [root@Git01 mycode]# echo "修改第一次" >> benet.txt
- [root@Git01 mycode]# cat benet.txt
- www
- www
- www
- 修改第一次
- [root@Git01 mycode]# git branch
- * linux #当前在linux分支
- master
- [root@Git01 mycode]# git add *
- #切换到master分支
- [root@Git01 mycode]# git checkout master
- M benet.txt
- 切换到分支 'master'
- 您的分支与上游分支 'test/master' 一致。
- [root@Git01 mycode]# cat benet.txt
- www
- www
- www
- 修改第一次 #之前的修改仍旧存在
- [root@Git01 mycode]# git status #切换分支前的暂存区内容还在
- 位于分支 master
- 您的分支与上游分支 'test/master' 一致。
- 要提交的变更:
- (使用 "git reset HEAD <文件>..." 以取消暂存)
- 修改: benet.txt
- 说明:
- 如果本地分支仓库间的代码一致,那么就算不把变更提交到本地分支仓库,那么也可以切换分支,这点同学们要注意。
- 在工作中,为了避免意外,在切换分支前,务必要先将暂存区提交或者清空。
- #清空暂存区内容
- [root@Git01 mycode]# git reset
- 重置后取消暂存的变更:
- M benet.txt
3.3 本地分支的合并与删除
想把linux的工作成果合并到master分支上;
先切换到master分支
git merge linux : 合并linux分支到master
git branch -d linux :确定合并完成后,可以放心的删除Linux分支。
3.3.1 自动合并本地分支
- [root@Git01 mycode]# git branch
- linux
- * master
- [root@Git01 mycode]# cat benet.txt
- www
- www
- www
3.3.2 本地分支的删除
- [root@Git01 mycode]# git merge linux #将分支linux的变更合并到当前分支
- 更新 4da08fc..23e5b98
- Fast-forward
- benet.txt | 1 +
- 1 file changed, 1 insertion(+)
- [root@Git01 mycode]# cat benet.txt
- www
- www
- www
- 修改第一次
- #将linux分支删除(当前不能在linux分支上)
- [root@Git01 mycode]# git branch -d linux
- 已删除分支 linux(曾为 23e5b98)。
- [root@Git01 mycode]# git branch
- * master
- #假如linux分支的变更没有合并到当前分支,那么必须用-D参数强制删除分支
- [root@Git01 mycode]# git branch
- linux
- * master
- [root@Git01 mycode]# git branch -d linux
- error: 分支 'linux' 没有完全合并。
- 如果您确认要删除它,执行 'git branch -D linux'。
- [root@Git01 mycode]# git branch -D linux
- 已删除分支 linux(曾为 7212474)。
3.3.3 手动合并本地分支===>本地分支代码冲突解决方案
当本地分支之间的同名目录-同名文件-同一行内容不同时,在进行分支合并时就会产生冲突,故为了解决代码冲突,就需要进行人工手动合并;
在工作中,为了尽量避免冲突,一般开发人员之间尽可能不负责相同的功能模块,也就不至于同时修改同一个文件。
- #在Git01上进行操作,让linux分支和master分支产生文件代码冲突
- [root@Git01 mycode]# git checkout linux
- 切换到分支 'linux'
- [root@Git01 mycode]# cat benet.txt
- www
- www
- www
- test
- linux #本地linux分支benet.txt文件的第五行是linux
- [root@Git01 mycode]# git status #查看文件状态,已经提交暂存区无内容
- 位于分支 linux
- nothing to commit, working tree clean
- #切换到master分支
- [root@Git01 mycode]# git checkout master
- 切换到分支 'master'
- [root@Git01 mycode]# cat benet.txt
- www
- www
- www
- test
- master ##本地master分支benet.txt文件的第五行是master
- [root@Git01 mycode]# git status
- 位于分支 master
- nothing to commit, working tree clean
- 说明:
- 由上可知,本地linux分支的benet.txt文件和本地master分支的benet.txt文件的第五行代码产生冲突。如果此时,我们将本地linux分支的变更合并到本地master分支中,那么就会产生代码冲突。
- #合并本地linux分支
- [root@Git01 mycode]# git branch
- linux
- * master
- [root@Git01 mycode]# git merge linux
- 自动合并 benet.txt
- 冲突(内容):合并冲突于 benet.txt #报错说明,冲突在benet.txt文件
- 自动合并失败,修正冲突然后提交修正的结果。
- #找出文件冲突内容,并修改。(此时冲突的benet.txt文件里已经被标注了冲突内容)
- [root@Git01 mycode]# cat benet.txt
- www
- www
- www
- test
- <<<<<<< HEAD #HEAD:表示当前所在的分支
- master #此行表示当前所在分支本行的master和下边的linux所在分支的linux冲突
- ======= #隔离符号
- linux #和上边的master内容冲突
- >>>>>>> linux #linux分支
- #到了这里我们只能手动排除,选择保留后的内容,假如我们要保留linux分支的内容,然后再将工作目录中的变更提交即可人工解决代码冲突,并完成分支合并
- [root@Git01 mycode]# vim benet.txt
- [root@Git01 mycode]# cat benet.txt
- www
- www
- www
- test
- linux
- [root@Git01 mycode]# git add *
- [root@Git01 mycode]# git commit -m "修改了一个分支冲突"
- [master 001ef0b] 修改了一个分支冲突
- [root@Git01 mycode]# git status
- 位于分支 master
- 您的分支领先 'test/master' 共 1 个提交。
- (使用 "git push" 来发布您的本地提交)
- nothing to commit, working tree clean
3.4 GIT远程分支管理
3.4.1 将linux本地分支代码和标签推送到github远程仓库的linux分支
- #在Git01上,创建本地分支linux,复制master分支代码。
- [root@Git01 mycode]# git branch
- * master
- [root@Git01 mycode]# git status
- 位于分支 master
- 您的分支与上游分支 'test/master' 一致。
- nothing to commit, working tree clean
- #创建本地linux分支
- [root@Git01 mycode]# git branch linux
- [root@Git01 mycode]# git checkout linux
- 切换到分支 'linux'
- #将工作目录代码的benet.txt文件修改后提交到本地linux分支
- [root@Git01 mycode]# echo "远程分支提交测试" >> benet.txt
- [root@Git01 mycode]# cat benet.txt
- www
- www
- www
- test
- linux
- 远程分支提交测试
- [root@Git01 mycode]# git add *
- [root@Git01 mycode]# git commit -m "test"
- 位于分支 linux
- nothing to commit, working tree clean
- [root@Git01 mycode]# git status
- 位于分支 linux
- nothing to commit, working tree clean
- #将本地linux分支推送到远程github的linux分支
- [root@Git01 mycode]# git push test linux
- Username for 'https://github.com': 215379068@qq.com
- Password for 'https://215379068@qq.com@github.com':
- Total 0 (delta 0), reused 0 (delta 0)
- remote:
- remote: Create a pull request for 'linux' on GitHub by visiting:
- remote: https://github.com/yinsendemogui/yunjisuan/pull/new/linux
- remote:
- To https://github.com/yinsendemogui/yunjisuan.git
- * [new branch] linux -> linux
浏览器访问:https://github.com

- #创建本地标签,并推送到github
- [root@Git01 mycode]# git tag v1.0 -m "这就是一个测试"
- [root@Git01 mycode]# git tag
- v1.0
- [root@Git01 mycode]# git push test v1.0
- Username for 'https://github.com': 215379068@qq.com
- Password for 'https://215379068@qq.com@github.com':
- 对象计数中: 1, 完成.
- 写入对象中: 100% (1/1), 183 bytes | 0 bytes/s, 完成.
- Total 1 (delta 0), reused 0 (delta 0)
- To https://github.com/yinsendemogui/yunjisuan.git
- * [new tag] v1.0 -> v1.0
浏览器访问:https://github.com
3.4.2 从github远程仓库克隆一个linux分支到本地linux分支
(1)克隆远程仓库master分支后,通过checkout切换成远程linux分支
- #在Git02上进行操作
- [root@Git02 ~]# mkdir -p /mycode
- [root@Git02 ~]# cd /mycode
- [root@Git02 mycode]# git init
- 初始化空的 Git 版本库于 /mycode/.git/
- #克隆远程仓库到本地
- [root@Git02 mycode]# git clone https://github.com/yinsendemogui/yunjisuan.git
- 正克隆到 'yunjisuan'...
- remote: Counting objects: 61, done.
- remote: Compressing objects: 100% (33/33), done.
- remote: Total 61 (delta 16), reused 53 (delta 8), pack-reused 0
- Unpacking objects: 100% (61/61), done.
- [root@Git02 mycode]# ls
- yunjisuan
- [root@Git02 mycode]# cd yunjisuan/
- [root@Git02 yunjisuan]# cat benet.txt
- www
- www
- www
- test
- linux #不是之前上传的linux分支版本
- [root@Git02 yunjisuan]# git branch #克隆下来的是master分支
- * master
- 说明:
- 如果clone时不用-b linux指定分支进行克隆那么默认克隆的都是master分支;我们可以通过checkout切换远程分支的方式对于已经下载下来的master工作目录进行代码替换。
- #查看github远程仓库分支情况
- [root@Git02 yunjisuan]# git branch -a
- * master
- remotes/origin/HEAD -> origin/master #当前分支为origin/master分支
- remotes/origin/linux
- remotes/origin/master
- #检查origin/linux远程分支
- [root@Git02 yunjisuan]# git checkout origin/linux
- Note: checking out 'origin/linux'.
- You are in 'detached HEAD' state. You can look around, make experimental
- changes and commit them, and you can discard any commits you make in this
- state without impacting any branches by performing another checkout.
- If you want to create a new branch to retain commits you create, you may
- do so (now or later) by using -b with the checkout command again. Example:
- git checkout -b new_branch_name
- HEAD 目前位于 c89123d... test2
- [root@Git02 yunjisuan]# cat benet.txt
- www
- www
- www
- test
- linux
- 远程分支提交测试 #文件内容已经变了
- [root@Git02 yunjisuan]# git branch
- * (分离自 origin/linux) #当前分支是origin/linux分支
- master
- [root@Git02 yunjisuan]# git branch linux #创建本地linux分支
- [root@Git02 yunjisuan]# git branch
- * (分离自 origin/linux)
- linux
- master
- [root@Git02 yunjisuan]# git checkout linux #切换到本地linux分支
- 切换到分支 'linux'
- [root@Git02 yunjisuan]# git branch
- * linux #当前工作目录代码已经作为本地linux分支代码
- master
(2)通过git clone -b linux URL直接指定远程仓库分支进行克隆
- #克隆一个远程分支linux到本地工作目录(-b linux指定分支)
- [root@Git02 mycode]# git clone -b linux https://github.com/yinsendemogui/yunjisuan.git
- 正克隆到 'yunjisuan'...
- remote: Counting objects: 61, done.
- remote: Compressing objects: 100% (33/33), done.
- remote: Total 61 (delta 16), reused 53 (delta 8), pack-reused 0
- Unpacking objects: 100% (61/61), done.
- [root@Git02 mycode]# ls
- yunjisuan
- [root@Git02 mycode]# cat yunjisuan/benet.txt
- www
- www
- www
- test
- linux
- 远程分支提交测试