先来几张实现图
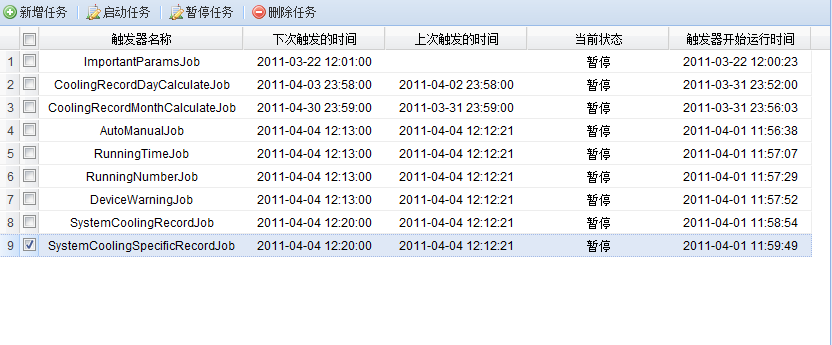
任务管理页
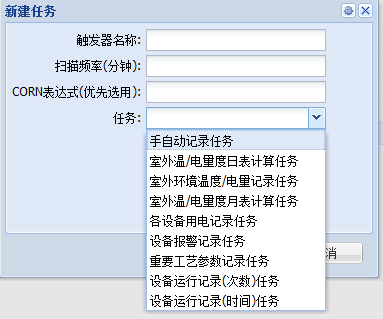
新建任务管理.目前实现叫简单的需求...若各位同学要实现复杂的设计...quartz都有提供强大的支持.小弟目前的需求做到这已经够用了.
接下来.我们如何实现quartz的热部署编码呢?
小弟是利用spring整合quzrtz实现的.但是会产生两个小问题.
我们先看看quartz如何与spring整合
<bean name="quartzScheduler" class="org.springframework.scheduling.quartz.SchedulerFactoryBean">
        <property name="dataSource" ref="dataSource"/>
        <property name="applicationContextSchedulerContextKey" value="applicationContextKey"/>
        <property name="configLocation" value="classpath:quartz.properties"/><!--
        这个是必须的,QuartzScheduler 延时启动,应用启动完后 QuartzScheduler 再启动
        -->
        <property name="startupDelay" value="30"/><!--
        这个是可选,QuartzScheduler 启动时更新己存在的Job,这样就不用每次修改targetObject后删除qrtz_job_details表对应记录了
        -->
        <property name="overwriteExistingJobs" value="true"/>
        <property name="jobDetails" >
            <list>
                <ref bean="xxxJobDetail"/>

            </list>
        </property>
    </bean>
首先.我们需要添加一个数据源给quzrtz.允许其序列化JobDetail到数据库.之后有注释.呵呵.我就不必多说了.
<bean id="xxxJobDetail" class="frameworkx.springframework.scheduling.quartz.MethodInvokingJobDetailFactoryBean">
        <!--shouldRecover属性为true,则当Quartz服务被中止后,再次启动任务时会尝试恢复执行之前未完成的所有任务-->
        <!--<property name="shouldRecover" value="true"/>-->
        <!-- 标识job是持久的,删除触发器的时候不被删除 -->
        <property name="durable" value="true"/>
        <property name="targetObject" ref="xxxxJob"/>
       <!-- 此处是需要执行的任务的方法 -->
        <property name="targetMethod" value="executeJob"/>
    </bean>
凡是使用过quartz跟spring整合的同学会发现.为什么class的命名空间不是org.springframework.scheduling.quartz.MethodInvokingJobDetailFactoryBean呢?
因为spring技术小组的class会报NotSerializableException.且功能不强shouldRecover,durable这些基础属性不提供...大概spring的MethodInvokingJobDetailFactoryBean根本不支持JobDetail的序列化...想详细了解原因.可以看spring的源码.目前小弟使用的spring3,spring小组依然没解决这问题,应该说还不支持JobDetail序列化.但国外牛人们已经帮我们解决好了.详细见下连接
http://jira.springframework.org/browse/SPR-3797
好了.接下来我们需要配置quzrtz的properties(放到classpath下.quzrtz就能找到)
org.quartz.scheduler.instanceName = DefaultQuartzScheduler
org.quartz.scheduler.rmi.export = false
org.quartz.scheduler.rmi.proxy = false
org.quartz.scheduler.wrapJobExecutionInUserTransaction = false

org.quartz.threadPool.class = org.quartz.simpl.SimpleThreadPool
org.quartz.threadPool.threadCount = 10
org.quartz.threadPool.threadPriority = 5
org.quartz.threadPool.threadsInheritContextClassLoaderOfInitializingThread = true

org.quartz.jobStore.misfireThreshold = 60000

#org.quartz.jobStore.class = org.quartz.simpl.RAMJobStore

org.quartz.jobStore.class = org.quartz.impl.jdbcjobstore.JobStoreTX
#org.quartz.jobStore.driverDelegateClass=org.quartz.impl.jdbcjobstore.HSQLDBDelegate
org.quartz.jobStore.driverDelegateClass=org.quartz.impl.jdbcjobstore.StdJDBCDelegate
#org.quartz.jobStore.useProperties = true
org.quartz.jobStore.tablePrefix = QRTZ_
org.quartz.jobStore.isClustered = false
org.quartz.jobStore.maxMisfiresToHandleAtATime=1
我们这次是选择org.quartz.jobStore.class = org.quartz.impl.jdbcjobstore.JobStoreTX
而不是默认的org.quartz.jobStore.class = org.quartz.simpl.RAMJobStore简单存储在内存中.
接来下,我们需要一个quartz的scheduler管理类.
protected final Log log = LogFactory.getLog(getClass());
    private Scheduler scheduler;
    private QuartzDao quartzDao;

    private static final Logger logger = LoggerFactory.getLogger(SchedulerServiceImpl.class);


    public void setScheduler(Scheduler scheduler) {
        this.scheduler = scheduler;
    }


    public void setQuartzDao(QuartzDao quartzDao) {
        this.quartzDao = quartzDao;
    }

    /**
     * 根据job的名称获取job,进而添加到trigger
     * @param name
     * @param jobName
     * @param cronExpression
     * @param group
     * @throws SchedulerException
     */

    public void schedule(String name, String jobName, String cronExpression,String group) throws SchedulerException {
        if (name == null || name.trim().equals("")) {
            name = UUID.randomUUID().toString();
        }

        try {
            JobDetail jobDetail = scheduler.getJobDetail(jobName, group);

            if(jobDetail != null) {
                scheduler.addJob(jobDetail, true);

                CronTrigger cronTrigger = new CronTrigger(name, group, jobDetail.getName(),
                        Scheduler.DEFAULT_GROUP);
                cronTrigger.setCronExpression(new CronExpression(cronExpression));
                scheduler.scheduleJob(cronTrigger);
                scheduler.rescheduleJob(cronTrigger.getName(), cronTrigger.getGroup(), cronTrigger);
            }else
                log.error("无法找到对应的job.所以无法建立trigger");


        } catch (SchedulerException e) {
            log.error(e.getMessage());
            throw new SchedulerException();
        } catch (ParseException e) {
            log.error(e.getMessage());
        }
    }

    public List<Map<String, Object>> getQrtzTriggers(){
        return quartzDao.getQrtzTriggers();
    }


    public void pauseTrigger(String triggerName,String group) throws SchedulerException{
        try {
            scheduler.pauseTrigger(triggerName, group);//停止触发器
        } catch (SchedulerException e) {
            log.error(e.getMessage());
            throw new SchedulerException();
        }
    }


    public void resumeTrigger(String triggerName,String group) throws SchedulerException{
        try {
            scheduler.resumeTrigger(triggerName, group);//重启触发器
        } catch (SchedulerException e) {
            log.error(e.getMessage());
            throw new SchedulerException();
        }
    }


    public boolean removeTrigdger(String triggerName,String group) throws SchedulerException{
        try {

            scheduler.pauseTrigger(triggerName, group);//停止触发器
            return scheduler.unscheduleJob(triggerName, group);//移除触发器
        } catch (SchedulerException e) {
            log.error(e.getMessage());
            throw new SchedulerException();
        }
    }


    public String[] getJobNames(String group) throws SchedulerException {
        String[] jobNames = null;
        try {
            jobNames = scheduler.getJobNames(group);
        } catch (SchedulerException e) {
            log.error(e.getMessage());
            throw new SchedulerException();
        }
        return jobNames;
    }
但前只是简单实现通过cornexpression.若有复杂配置trigger规则的.或需要对trigger添加calendar...可以自己进行扩展.
一下是quzrtzDao的实现
private DataSource dataSource;

    public void setDataSource(DataSource dataSource) {
        this.dataSource = dataSource;
    }

    public List<Map<String, Object>> getQrtzTriggers() {
        List<Map<String, Object>> results = getJdbcTemplate().queryForList("select * from QRTZ_TRIGGERS order by start_time");
        long val = 0;
        String temp = null;
        for (Map<String, Object> map : results) {
            temp = MapUtils.getString(map, "trigger_name");
            if(StringUtils.indexOf(temp, "#") != -1){
                map.put("display_name", StringUtils.substringBefore(temp, "#"));
            }else{
                map.put("display_name", temp);
            }

            val = MapUtils.getLongValue(map, "next_fire_time");
            if (val > 0) {
                map.put("next_fire_time", DateFormatUtils.format(val, "yyyy-MM-dd HH:mm:ss"));
            }

            val = MapUtils.getLongValue(map, "prev_fire_time");
            if (val > 0) {
                map.put("prev_fire_time", DateFormatUtils.format(val, "yyyy-MM-dd HH:mm:ss"));
            }

            val = MapUtils.getLongValue(map, "start_time");
            if (val > 0) {
                map.put("start_time", DateFormatUtils.format(val, "yyyy-MM-dd HH:mm:ss"));
            }

            val = MapUtils.getLongValue(map, "end_time");
            if (val > 0) {
                map.put("end_time", DateFormatUtils.format(val, "yyyy-MM-dd HH:mm:ss"));
            }

            map.put("statu",status.get(MapUtils.getString(map, "trigger_state")));
        }

        return results;
    }


    public static final Map<String,String> status = new HashMap<String,String>();


    static{
        status.put("ACQUIRED", "运行");
        status.put("PAUSED", "暂停");
        status.put("WAITING", "等待");

    }

    private JdbcTemplate getJdbcTemplate() {
        return new JdbcTemplate(this.dataSource);
    }
同学们可以根据自己的风格,修改一下其代码.
此时我们就可以创建一个简单的quzrtz的热部署管理.
我之前讲过会有两个问题.第二个问题是什么呢?还记得讲过我们需要讲jobDetail序列化到数据库吗?因为我们使用了spring 系统中的manager类通过spring的IOC依赖注入.那我们的跟quartz相关的manager都需要声明实现Serializable序列化接口.
此时我们可以想到用ContextLoader.getCurrentWebApplicationContext()把相应的manage通过bean id get出来.
public class SpringBeanProvide implements Serializable/*, ApplicationContextAware*/{


    /**
     *
     */
    private static final long serialVersionUID = 8430477279431126488L;
    private ApplicationContext context;

    @SuppressWarnings("unchecked")
    public <T> T getBean(Class<T> clazz, String beanName){
        context = ContextLoader.getCurrentWebApplicationContext();
        return (T)context.getBean(beanName);
    }

    public ServletContext getServletContext() {
        WebApplicationContext webContext = ContextLoader.getCurrentWebApplicationContext();
        return webContext.getServletContext();
    }

    /*@Autowired
    public void setApplicationContext(ApplicationContext context)
            throws BeansException {
        this.context = context;

    }*/
}
我们看看ContextLoader.getCurrentWebApplicationContext()的源码
/**
     * Obtain the Spring root web application context for the current thread
     * (i.e. for the current thread's context ClassLoader, which needs to be
     * the web application's ClassLoader).
     * @return the current root web application context, or <code>null</code>
     * if none found
     * @see org.springframework.web.context.support.SpringBeanAutowiringSupport
     */
    public static WebApplicationContext getCurrentWebApplicationContext() {
        ClassLoader ccl = Thread.currentThread().getContextClassLoader();
        if (ccl != null) {
            WebApplicationContext ccpt = currentContextPerThread.get(ccl);
            if (ccpt != null) {
                return ccpt;
            }
        }
        return currentContext;
    }
currentContextPerThread是一个final的ConcurrentHashMap.也是IOC容器存储bean的一个hash表.
到底什么时候才把ccl设置到currentContextPerThread中呢?
我们往上看源码
try {
            // Determine parent for root web application context, if any.
            ApplicationContext parent = loadParentContext(servletContext);

            // Store context in local instance variable, to guarantee that
            // it is available on ServletContext shutdown.
            this.context = createWebApplicationContext(servletContext, parent);
            servletContext.setAttribute(WebApplicationContext.ROOT_WEB_APPLICATION_CONTEXT_ATTRIBUTE, this.context);

            ClassLoader ccl = Thread.currentThread().getContextClassLoader();
            if (ccl == ContextLoader.class.getClassLoader()) {
                currentContext = this.context;
            }
            else if (ccl != null) {
                currentContextPerThread.put(ccl, this.context);
            }
其中...currentContextPerThread.put(ccl, this.context);是在ApplicationContext parent = loadParentContext(servletContext);之下.
ContextLoader.getCurrentWebApplicationContext()只能在容器完全初始化后才能使用..这对于单元测试时...ccpt返回出来的是一个null...
这就是我为什么会在SpringBeanProvide出现注释了ApplicationContextAware的原因...因为本人有点懒...哈哈..没重新整理一份spring的bean xml作为单元测试使用...所以...在单元测试时...改一下注释...就去跑了..呵呵...此时...我们已经可以使用quzrtz的热部署.不必重启服务器就可以对任务进行管理了.
以上的实现.参考了javaeye中的部分文章.
本文转自:http://www.cnblogs.com/pigwing/archive/2011/04/04/2005158.html