本文系笔者学习原生javascript动效的笔记。内容基于某非著名培训机构的视频教程。并重新做了归类整理。删除了一些过时的内容。并重做了GIF图,加上了自己的一些分析。
一. 运动学基础
引子:从左到右的div
<input id="btn1" type="button" value="开始运动!" onclick="startMove();" />
 <div id="div1" style="100px;height:100px;background:red;position:absolute;left:0;"></div>
点击按钮,一个红色div从左向右运动!
运动的要素在于一个绝对定位的主体,一个定时器。和一个不断变化的量度值(比如说style.left)。
因此js代码应该是:
function startMove(){
    var oBtn=document.getElementById('btn1');
    var oDiv=document.getElementById('div1');

    setInterval(function(){
        oDiv.style.left=oDiv.offsetLeft+4+'px';
    },30);
}

第一个startMove就完成了。
改进
当前这个运动有太多的需要改进。
改进1:运动终点
用户像看到的效果是基于就实际生活经验,而不是太空运动状态。运动应该有个终点。
比如说,我让运动到屏幕偏移左侧300px停下来:
只需要判断offsetLeft到300px就停掉定时器:
function startMove(){
    var oBtn=document.getElementById('btn1');
    var oDiv=document.getElementById('div1');

    setInterval(function(){

        if(oDiv.offsetLeft==300){
            clearInterval();
        }else{
            oDiv.style.left=oDiv.offsetLeft+4+'px';
        }
    },30);
}
好了。那么到了目标位置,这个定时器就停下来了。
改进二: 初步封装
为了让运动函数可扩展,我把这个速度值4改为一个变量iSpeed.
function startMove(){
    var iSpeed=4;
    var oBtn=document.getElementById('btn1');
    var oDiv=document.getElementById('div1');

    setInterval(function(){
        if(oDiv.offsetLeft==300){
            clearInterval();
        }else{
            oDiv.style.left=oDiv.offsetLeft+iSpeed+'px';
        }
    },30);
}
改进三:永不停下的定时器
定义了速度值,给startMove提供了很大的灵活性,以至于当我onclick="startMove(7);由于不能整除。定时器跳过了300px的运动终点。
暂时这样处理吧:把判断条件改为:
if(oDiv.offsetLeft>=300)
不管怎样,都能停下来了。事实上这只是暂时的处理方法。
改进四:事件累加
如果我连续点击button,就会触发多次startMove。div的运动速度会成倍加快。不可接受。
解决方法很简单,在下次触发定时器时,不管三七二十一先把div身上的定时器清了再说。为了方便,我定义了一个全局变量timer,startMove执行时,他将作为定时器的载体:
所以最终完善的版本是这样:
var timer=null;
function startMove(){
    var oDiv=document.getElementById('div1');

    clearInterval(timer);

    timer=setInterval(function (){
        var iSpeed=5;

        if(oDiv.offsetLeft>=300){
            clearInterval(timer);
        }else{
           oDiv.style.left=oDiv.offsetLeft+iSpeed+'px';
        }
    }, 30);
}
小结:
正如初中物理课的流程——现在我们已经拥有了一个匀速直线运动的框架。麻雀虽小,五脏俱全。
- 一个运动终点
- 一个运动的速度值
- 停止事件叠加的机制
但是封装星还是不足,那还是来做一个框架吧。

二. 运动框架
为了说明这个框架的靠谱和种种不靠谱,先看一个案例
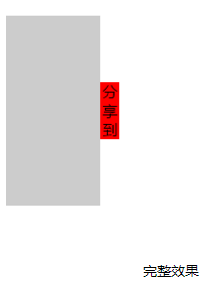
案例2.1:左侧伸缩导航条
项目需求:有一个导航条缩在屏幕左侧。当鼠标悬停,出现在左边。

布局:
<div id="div1">
    <span>分享到</span>
</div>
#div1{
    background: #ccc;
     100px;height: 200px;
    position: absolute;
    top:100px;left: -100px;
}
span{
     20px;height: 60px;
    line-height: 20px;
    text-align:center;
    position: absolute;
    left: 100px;
    top: 70px;
    background: red;
}
- 这里有两个事件(鼠标一入一出),要改的就是div的绝对定位的left值。事件对象应该用span的父级容器div,而不是span!
- 运动对象(obj):
#div1 - 运动终点(iTarget):#div1的宽度(0和-100px),
根据运动框架,可以很快写出js。
window.onload=function(){
    var oDiv=document.getElementById('div1');
    var oSpan=oDiv.getElementsByTagName('span')[0];
    var timer=null;

    oDiv.onmouseover=function(){
        clearInterval(timer);

        timer=setInterval(function(){
            if(oDiv.offsetLeft>=0){
                clearInterval(timer);
            }else{
                oDiv.style.left=oDiv.offsetLeft+5+'px';
            }
        },30);
    };


    oDiv.onmouseout=function(){
        clearInterval(timer);

        timer=setInterval(function(){
            if(oDiv.offsetLeft<=-100){
                clearInterval(timer);
            }else{
                oDiv.style.left=oDiv.offsetLeft-5+'px';
            }
        },30);
    };
};
效果已经出来了。但是重复代码太多。
因此,有三个可以作为参数:运动终点,运动对象,速度是可设置的。根据这个可以封装函数了。
var timer=null;
function startMove(obj,iTarget,iSpeed){
    clearInterval(timer);

    timer=setInterval(function(){
        if(obj.offsetLeft==iTarget){
            clearInterval(timer);
        }else{
            obj.style.left=obj.offsetLeft+iSpeed+'px';
        }
    },30);
}
在这个框架里,可以设置速度值,可以设置对象,也可以设置运动终点。在调用时:
window.onload=function(){
    var oDiv=document.getElementById('div1');

    oDiv.onmouseover=function(){
        startMove(this,0,5);
    };

    oDiv.onmouseout=function(){
        startMove(this,-100,-5);
    };
};
看起来大大精简了代码冗余。效果如下:
透明度的匀速运动框架
有了算法,意味着网页所有可见的量度都可以进行运算。在这里把透明度加进运动框架中:
案例2.2 淡入淡出的图片。
假设有一张图片:
<img id="img1" src="images/1.jpg" />
默认透明度为0.3
#img1{
    filter: alpha(opacity:30);/*兼容万恶的ie*/
    opacity: 0.3;/*兼容火狐。chrome*/
}
实现悬停后透明度为1!
【思路】如果我们不用任何运动框架,代码应该是这样的:
window.onload=function(){
    var oImg=document.getElementById('img1');
    var timer=null;
    var alpha=30;

    oImg.onmouseover=function(){

        var iSpeed=5;

        timer=setInterval(function(){
            if(oImg.style.opacity==1){
                clearInterval(timer);
            }else{
                alpha+=iSpeed;
                oImg.style.opacity=(alpha)/100;
                oImg.style.filter='alpha(opacity:'+alpha+')';
            }
        },30);
    };

    oImg.onmouseout=function(){
        //console.log('heh');
        clearInterval(timer);
        var iSpeed=5;

        timer=setInterval(function(){
            if(oImg.style.opacity==0.3){
                clearInterval(timer);
            }else{
                alpha-=iSpeed;
                oImg.style.opacity=(alpha)/100;
                oImg.style.filter='alpha(opacity:'+alpha+')';
            }
        },30);

    };
};
好长好长。
在这个透明度运动中,oImg的运动终点是100和30;
所以这个透明度框架应该是:
var alpha=30;
var timer=null;

function startMoveOpacity(obj,iTarget,iSpeed){
    clearInterval(timer);

    timer=setInterval(function(){
        if(obj.style.opacity==iTarget/100){
            clearInterval(timer);
        }else{
            alpha+=iSpeed;
            obj.style.filter='alpha(opacity:'+alpha+')';
            obj.style.opacity=alpha/100;
        }
    },30);
}
在调用时应该是:
window.onload=function(){
    var oImg=document.getElementById('img1');

    oImg.onmouseover=function(){
        startMoveOpacity(oImg,100,5);
    };

    oImg.onmouseout=function(){
        startMoveOpacity(oImg,30,-5);
    };
};
效果:
运动研究方法
回到点击按钮div从左往右运动的场景。并在300px处加上一条黑线:
<input id="btn1" type="button" value="开始运动!" onclick="startMove(300);" />
    <div id="div1" style="100px;height:100px;background:red;position:absolute;left:500px;"></div>
    <span style="1px;height:300px;background:black;left:300px;position:absolute;top:0;left:300px;"></span>
    <textarea></textarea>
在匀速运动框架内做速度分析。用一个textarea记录每次执行函数的运动速度。
这个div在300px线的右边,所以速度应该为负。
var timer=null;
function startMove(obj,iTarget,iSpeed){
    clearInterval(timer);
    var oTxt=document.getElementsByTagName('textarea')[0];

    timer=setInterval(function(){
        if(obj.offsetLeft==iTarget){
            clearInterval(timer);
        }else{
            obj.style.left=obj.offsetLeft+iSpeed+'px';
            oTxt.value+=iSpeed+'
';//记录速度!
        }
    },30);
}

window.onload=function(){
    var oDiv=document.getElementById('div1');
    var oBtn=document.getElementById('btn1');

    oBtn.onclick=function(){
        startMove(oDiv,300,-10);
    };
};
在这个运动框架内做速度分析。用一个textarea记录每次执行函数的运动速度。
运行:

速度值就打到了多行文本框上面。
对该数据做图表分析:
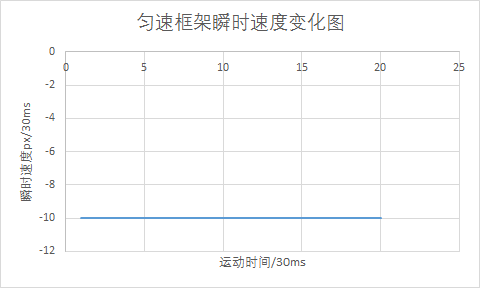
匀速运动显然是条水平线。好像没什么说的。
以后会借助此方法进行运动分析。
三.缓冲运动
所谓缓冲运动就是缓动。比如手风琴效果——逐级变慢——越接近终点,速度越小。距离越大速度越大。相对于匀速运动,缓动更能接近实际效果。
定义速度
每当我看到运动方向相关的资料时,都会想起这个句子:
I find the great thing in this world is not so much where we stand, as in what direction we are moving. - Oliver Wendell Holmes
“我认为现代世界里最重要的不是我们所处的位置,而是我们前进的方向。”——老奥利弗·温德尔·霍姆斯
对于缓动框架,我们似乎不必再设置iSpeed参数,直接给他设定速度值计算方法就行了。至于运动方向是正是负,全部有iTarget决定!
在框架中,iTarget-iSpeed就是到右边终点的距离。让它和速度关联起来:
var timer=null;
function startMove(obj,iTarget){
    clearInterval(timer);
    var oTxt=document.getElementsByTagName('textarea')[0];

    timer=setInterval(function(){
        var iSpeed=(iTarget-obj.offsetLeft)/8;//关键语句:实现了速动缓停。正负完全交给算法决定!

        if(obj.offsetLeft==iTarget){
            clearInterval(timer);
        }else{
            obj.style.left=obj.offsetLeft+iSpeed+'px';
            oTxt.value+=iSpeed+'
';//运动分析
        }
    },30);
}

window.onload=function(){
    var oDiv=document.getElementById('div1');
    var oBtn=document.getElementById('btn1');

    oBtn.onclick=function(){
        startMove(oDiv,300);
    };
};
看看效果:

效果似乎不错,不必定义速度方向的正负,就可以实现div向指定的目标运动。但是发现了一个很大的问题:没到300px线就停下来了。
运动分析:
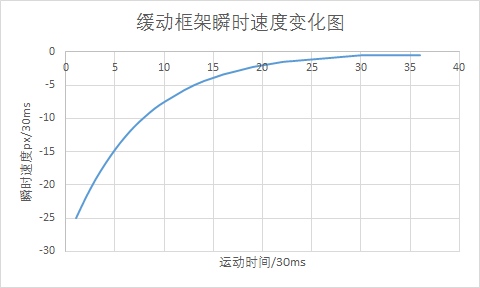
这是之前速度框架留下的一个天坑。
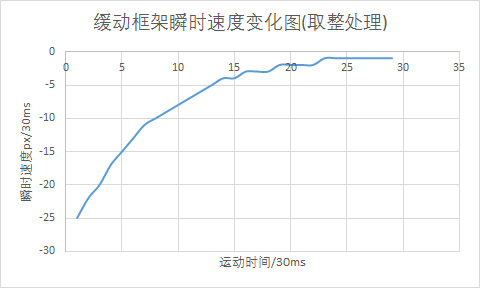
取整问题
我们发现速度应该是无限接近于0.但是浏览器只识别整数单位的px,结果速度到了-0.5px,就再也无法前进了。由于无法到达运动终点,实际上定时器还没停。
1像素是计算机所能处理的最小单位。计算出来的offsetLeft值在浏览器解析后,全部经过了整处理。200.9px,转化为200px。
所以停下来累积误差为297px。ispeed必须做人工取整处理。
取整方法:
Math.cell()向上取整。
Math.ceil(-12.5)//12
Math.ceil(12.3)//13
Math.floor()向下取整。
Math.floor(12.9)//12
那么究竟是向上取整还是向下取整呢?由于取整的特殊性。应当明确:
- 如果运动速度方向为负值,向上取整
- 速度为正:向下取整。
所以iSpeed的表达式可以这么写:
var iSpeed=(iTarget-obj.offsetLeft)/8;//实现了速动缓停。
            if(iSpeed>0){
                iSpeed=Math.ceil(iSpeed);
            }else {
                iSpeed=Math.floor(iSpeed);
            }
看看效果:
当速度为-1时定时器已经停了。
而且左右自如:
迄今为止我们的运动框架是这样:
var timer=null;
function startMove(obj,iTarget){
    clearInterval(timer);
    //var oTxt=document.getElementsByTagName('textarea')[0];

    timer=setInterval(function(){
        var iSpeed=(iTarget-obj.offsetLeft)/8;//实现了速动缓停。
        if(iSpeed>0){
            iSpeed=Math.ceil(iSpeed);
        }else {
            iSpeed=Math.floor(iSpeed);
        }

        if(obj.offsetLeft==iTarget){
            clearInterval(timer);
        }else{
            obj.style.left=obj.offsetLeft+iSpeed+'px';
            //oTxt.value+=iSpeed+'
';//运动分析
        }
    },30);
}
解决无法判断终点问题
现在到了填坑的时候了。匀速运动解决速度值不准的问题。
function startMove(obj,iTarget){
    clearInterval(timer);

    timer=setInterval(function (){
        //var iSpeed=(iTarget-obj.offsetLeft)/8;
        var iSpeed=iSpeed>0?iSpeed=7:iSpeed=-7;

        if(obj.offsetLeft==iTarget){
            clearInterval(timer);
        }else{
           obj.style.left=obj.offsetLeft+iSpeed+'px';
        }
    }, 30);
}

window.onload=function(){
    var oDiv=document.getElementById('div1');
    var oBtn=document.getElementById('btn1');

    oBtn.onclick=function(){
        startMove(oDiv,300);
    };
};
如果你让div停在300px,绝对不停。这时候可以在定时器里做一个判断:
怎么办呢?给定一个范围,进入到范围附近时,把距离人工改为0
用到Math.abs()函数。这就是绝对值。
判断语句为:
if(Math.abs(obj.offsetLeft-iTarget)<Math.abs(iSpeed)){//认为到达终点,再让物体撞线。
    obj.style.left=iTarget+'px';
}
缓动应用:上下滑动的侧边栏
在ie6时代,右边居中固定的“广告窗口”是可以通过js来实现的。当用户滚动滚动条,显然通过运动的方式使广告窗居中是最合适的。
在做滚动之前应该了解这张图
如果你无从下手,那么再次回想之前的话:重要的是运动目标!
滚动目标位置(iTarget)=设备高度的一半-滚动物体高度的一半+滚动高度+滚动距离
在这里需要注意一个问题:偏移值不能是小数。所以需要用parseInt取整。
结构和样式:
<div id="div1"></div>
<textarea  id="txt1"  style="position:fixed;top:0;"/><!--运动分析-->
css
#div1{
     100px;height: 100px;
    background: red;
    position: absolute;
    right: 0;
}
body{
    height: 5000px;
}/*滚动空间*/
我们把startMove改写为下面的样子:
var timer=null;
function startMove(obj,iTarget){
    clearInterval(timer);

    timer=setInterval(function(){
        var iSpeed=(iTarget-obj.offsetTop)/8;
        iSpeed=iSpeed>0?Math.ceil(iSpeed):Math.floor(iSpeed);

        if(obj.offsetTop==iTarget){
            clearInterval(timer);
        }else{
            obj.style.top=iSpeed+obj.offsetTop+'px';
        }
        txt1.value=obj.offsetTop+' iTarget:'+iTarget;//运动分析:
    },30);
}
其实就是把offsetLfet改成了offsetTop,而已。
接下来调用就是
window.onscroll=function(){
    var oDiv=document.getElementById('div1');
    var scrolltop=document.documentElement.scrollTop||document.body.scrollTop;//滚动距离
    var target=(document.documentElement.clientHeight-oDiv.offsetHeight)/2+scrolltop;//滚动目标偏移(offsetTop)=设备高度的一半-滚动物体高度的一半+滚动高度+滚动距离

    target=parseInt(target);
    startMove(oDiv,target);
};
效果
四. 多物体运动框架
先看一个小案例:变宽的div
当鼠标移入div,div由100变宽为300,移出鼠标后消失。
样式如下
<div id="div1" style="100px;height:100px;background:red;"></div>
只是框架的量度值变为offsetWidth就可以了。把框架默写出来吧!
var timer=null;

function startMove(obj,iTarget){
    clearInterval(timer);

    timer=setInterval(function(){
        var iSpeed=(iTarget-obj.offsetWidth)/8;
        iSpeed=iSpeed>0?Math.ceil(iSpeed):Math.floor(iSpeed);


        if(iSpeed==iTarget){
            clearInterval(timer);
        }else{
            obj.style.width=obj.offsetWidth+iSpeed+'px';
        }
    },30);
}

window.onload=function(){
    var oDiv=document.getElementById('div1');

    oDiv.onmouseover=function(){
        startMove(this,300);
    };

    oDiv.onmouseout=function(){
        startMove(this,100);
    };
};
效果挺好,但录制效果有卡顿:
扩展到多个div
假设我的页面有五个div:
<div id="div1"></div>
<div id="div2"></div>
<div id="div3"></div>
<div id="div4"></div>
<div id="div5"></div>
样式为:
div{
     100px;
    height: 50px;
}
#div1{
    background: red;
}
#div2{
    background: yellow;
}
#div3{
    background: tomato;
}
#div4{
    background: pink;
}
#div5{
    background: orange;
}
对5个div实现悬停变宽效果!
照着写就是了:
window.onload=function(){
    var aDiv=document.getElementsByTagName('div');

    for(var i=0;i<aDiv.length;i++){
        aDiv[i].onmouseover=function(){
            startMove(this,300);
        };
        aDiv[i].onmouseout=function(){
            startMove(this,100);
        };
    }
};
然而效果令人奔溃:

多个事件同时进行的时候,因为共享同一个定时器timer,各种事件频繁发生。有的定时器就停在半路上了。
解决思路:把timer绑定到事件对象身上。(私有化),也趁早解决那个令人反感的全局变量timer
function startMove(obj,iTarget){
    clearInterval(obj.timer);

    obj.timer=setInterval(function(){
        var iSpeed=(iTarget-obj.offsetWidth)/8;
        iSpeed=iSpeed>0?Math.ceil(iSpeed):Math.floor(iSpeed);

        if(iSpeed==iTarget){
            clearInterval(obj.timer);
        }else{
            obj.style.width=obj.offsetWidth+iSpeed+'px';
        }
    },30);
}
效果就正常了。反正定时器又不要钱,多搞几个吧。
多个物体的淡入淡出:
同样的把它运用到透明度上面去:
还是5个#div1-5——样式:
div{
     100px;
    height: 50px;
    opacity: 0.3;
    filter: opacity(0.3);
}
#div1{
    background: red;
}
#div2{
    background: yellow;
}
#div3{
    background: tomato;
}
#div4{
    background: pink;
}
#div5{
    background: orange;
}
于是想当然地这么写:
var alpha=30;//初始化透明度!
function startMoveOpacity(obj,iTarget){
    clearInterval(obj.timer);
    obj.timer=setInterval(function(){
        var iSpeed=(iTarget-alpha)/8;
        iSpeed=iSpeed>0?Math.ceil(iSpeed):Math.floor(iSpeed);


        if(alpha==iTarget){
            clearInterval(obj.timer);
        }else{
            alpha+=iSpeed;
            obj.style.filter='alpha(opacity:'+alpha+')';
            obj.style.opacity=alpha/100;
        }
    },30);
}
在这个例子中,定义了又一个全局变量alpha。alpha存在的特殊性,但所有的div都用这个alpha就乱了。
那么就把alpha也私有了吧。反正又不要钱。
function startMoveOpacity(obj,iTarget){
    clearInterval(obj.timer);
    //obj.alpha=30;
    obj.timer=setInterval(function(){
        var iSpeed=(iTarget-obj.alpha)/8;
        iSpeed=iSpeed>0?Math.ceil(iSpeed):Math.floor(iSpeed);

        if(obj.alpha==iTarget){
            clearInterval(obj.timer);
        }else{
            obj.alpha+=iSpeed;
            obj.style.filter='alpha(opacity:'+obj.alpha+')';
            obj.style.opacity=obj.alpha/100;
        }
    },30);
}

window.onload=function(){
    var aDiv=document.getElementsByTagName('div');

    for(var i=0;i<aDiv.length;i++){
        aDiv[i].alpha=30;//私有了
        aDiv[i].onmouseover=function(){
            startMoveOpacity(this,100);
        };
        aDiv[i].onmouseout=function(){
            startMoveOpacity(this,30);
        };
    }
};
效果:
实际上alpha在透明度运动框架中扮演的是offset一类的角色。
五. 设置任意属性值的运动
前面实现了高度,上下方向的位置,宽度和透明度的变化。都是用极其相似的算法。现在是时候把他们整合到一起了。可以说是见证奇迹的时刻。
页面有以下3个div
    <div id="div1"></div>
    <div id="div2"></div>
    <div id="div3"></div>
css
div{
     100px;
    height: 50px;

}
#div1{
    background: red;
}
#div2{
    background: yellow;
}
#div3{
    background: tomato;
    opacity: 0.3;
    filter: opacity(30);
}
需求:让第一个div移入时宽度变化;第二个移入移出时位置变化,第三个移入移出是透明度变化。让他们通过一套运动框架把所有都实现!
看起来真的越来越麻烦了。但是每解决一个问题,框架就向前走了一步。现在把注意力集中回框架优化上来:
之前为什么要用offset,alpha之类的值呢?因为我们无法获取元素的真实样式。现在为了解决这个问题,把大名鼎鼎的getStyle请出来吧
function getStyle(obj,attr){
    if(obj.crrentStyle){
        return obj.currentStyle[attr];
        //兼容IE8以下
    }else{
        return getComputedStyle(obj,false)[attr];
        //参数false已废。照用就好
    }
}
有了它,就可以实现获取计算后的样式了。但是获取的值是个字符串。所以需要parseInt转化一下。存到变量iCur里边。
注意透明度值没有单位,而且getStyle返回的是一个两位小数,小数直接拿去计算误差很大,所以统一乘以100.需要特殊处理。
然后修改startMove框架:
我们要改变什么属性,这是框架事先无法把握的。所以就需要把属性名作为一个字符串传进一个参数(比如attr)里面去。
function getStyle(obj,attr){
    if(obj.crrentStyle){
        return obj.currentStyle[attr];
        //兼容IE8以下
    }else{
        return getComputedStyle(obj,false)[attr];
        //参数false已废。照用就好
    }
}

function startMove(obj,attr,iTarget){
    //清理定时器
    if(obj.timer){
        clearInterval(obj.timer);
    }

    obj.timer=setInterval(function(){
        // 处理属性值
        //var iCur=attr=='opacity'?parseInt(parseFloat(getStyle(obj,attr))*100):iCur=parseInt(getStyle(obj,attr));
        var iCur=0;
        if(attr=='opacity'){
            iCur=parseInt(parseFloat(getStyle(obj,attr))*100);
        }else{
            iCur=parseInt(getStyle(obj,attr));
        }

        //定义速度值
        var iSpeed=(iTarget-iCur)/8;
        iSpeed=iSpeed>0?Math.ceil(iSpeed):Math.floor(iSpeed);

        if(iCur==iTarget){
            clearInterval(obj.timer);
        }else{
            if(attr=='opacity'){
                obj.style[attr]=(iCur+iSpeed)/100;
                obj.style.filter='alpha(opacity:'+(iCur+iSpeed)+')';
            }else{
                obj.style[attr]=iCur+iSpeed+'px';
            }
        }
    },30);
}
调用时可以是:
window.onload=function(){
    var oDiv1=document.getElementById('div1');
    var oDiv2=document.getElementById('div2');
    var oDiv3=document.getElementById('div3');
    var oDiv4=document.getElementById('div4');

    oDiv1.onmouseover=function(){
        startMove(this,'width',300);
    };
    oDiv1.onmouseout=function(){
        startMove(this,'width',100);
    };

    oDiv2.onmouseover=function(){
        startMove(this,'height',150);
    };
    oDiv2.onmouseout=function(){
        startMove(this,'height',50);
    };

    oDiv3.onmouseover=function(){
        startMove(this,'opacity',100);
    };
    oDiv3.onmouseout=function(){
        startMove(this,'opacity',30);
    };

    oDiv4.onmouseover=function(){
        startMove(this,'fontSize',100);
    };
    oDiv4.onmouseout=function(){
        startMove(this,'fontSize',30);
    };

};
效果
是不是有种鬼畜的感觉呢,只要是网页可见的数值样式,比如字体大小,什么margin,padding,border值,都可以改。注意位置属性需要做定位。
六. 运动框架的进一步优化
链式运动——再加一个回调函数
链式运动就是扣一环。分若干个阶段进行。待动画完成之后再获取下一个执行的动作。比如360开机启动页面。
只要在停掉定时器之前加一个回调就可以了。
function getStyle(obj,attr){
    if(obj.crrentStyle){
        return obj.currentStyle[attr];
        //兼容IE8以下
    }else{
        return getComputedStyle(obj,false)[attr];
        //参数false已废。照用就好
    }
}

function startMove(obj,attr,iTarget,fn){
    //清理定时器
    if(obj.timer){
        clearInterval(obj.timer);
    }

    obj.timer=setInterval(function(){
        // 处理属性值
        //var iCur=attr=='opacity'?parseInt(parseFloat(getStyle(obj,attr))*100):iCur=parseInt(getStyle(obj,attr));
        var iCur=0;
        if(attr=='opacity'){
            iCur=parseInt(parseFloat(getStyle(obj,attr))*100);
        }else{
            iCur=parseInt(getStyle(obj,attr));
        }

        //定义速度值
        var iSpeed=(iTarget-iCur)/8;
        iSpeed=iSpeed>0?Math.ceil(iSpeed):Math.floor(iSpeed);

        if(iCur==iTarget){
            clearInterval(obj.timer);
            if(fn){//回调
                fn();
            }
        }else{
            if(attr=='opacity'){
                obj.style[attr]=(iCur+iSpeed)/100;
                obj.style.filter='alpha(opacity:'+(iCur+iSpeed)+')';
            }else{
                obj.style[attr]=iCur+iSpeed+'px';
            }
        }
    },30);
}
比如说,点击一个div,让它宽度变为300,而后高度再变为300:
window.onload=function(){
    var oDiv1=document.getElementById('div1');

    oDiv1.onclick=function(){
        startMove(this,'width',300,function(){
            startMove(oDiv1,'height',300);
        });
    };
};
动画队列想写多少写多少。
完美运动框架
如果我点击div后,需要把高度和宽度同时变化呢?
json放你想要定义的对象键值
思路是css属性-值全部放到一个对象里——
{
  'width':100,
  'height':200,
  ...
}
然后用for-in循环。把之前的大段代码塞进去
getStyle问题
之前的getStyle是这样的:
function getStyle(obj,attr){
    if(obj.crrentStyle){
        return obj.currentStyle[attr];
        //兼容IE8以下
    }else{
        return getComputedStyle(obj,false)[attr];
        //参数false已废。照用就好
    }
}
第一个参数是对象,第二个是属性。
我如果一次设置多个样式,能否用更方便的方式写?
思路:可以在setStyle例放一个样式集合(json)。然后循环这个json设置样式值。
function setStyle(obj,json){
    for(var attr in json){
        obj.style[i]=json[i];
    }
}

//调用时可以这样写:
setStyle(oDiv,{'200px',height:'200px',background:'green'});
原来的attr参数变成了json里遍历的属性名,iTarget也可以抛弃了。在框架中写为json[attr]
function getStyle(obj,attr){
    if(obj.crrentStyle){
        return obj.currentStyle[attr];
        //兼容IE8以下
    }else{
        return getComputedStyle(obj,false)[attr];
        //参数false已废。照用就好
    }
}

function startMove(obj,json,fn){
    //清理定时器
    if(obj.timer){
        clearInterval(obj.timer);
    }

    obj.timer=setInterval(function(){
        // 处理属性值
        for(var attr in json){
            var iCur=0;

            if(attr=='opacity'){
                iCur=parseInt(parseFloat(getStyle(obj,attr))*100);
            }else{
                iCur=parseInt(getStyle(obj,attr));
            }

            //定义速度值
            var iSpeed=(json[attr]-iCur)/8;
            iSpeed=iSpeed>0?Math.ceil(iSpeed):Math.floor(iSpeed);

            if(iCur==json[attr]){
                clearInterval(obj.timer);
                if(fn){
                    fn();
                }
            }else{
                if(attr=='opacity'){
                    obj.style[attr]=(iCur+iSpeed)/100;
                    obj.style.filter='alpha(opacity:'+(iCur+iSpeed)+')';
                }else{
                    obj.style[attr]=iCur+iSpeed+'px';
                }
            }
        }

    },30);
}

window.onload=function(){
    var oDiv1=document.getElementById('div1');

    oDiv1.onclick=function(){
        startMove(this,{
            'width':102,
            'height':600,
            'opacity':100
        });
    };
};
又出问题。
不是真正的完美
在上面的框架下运动到一半就停了。显然是定时器公有造成的。
定时器又不要钱,设多几个?太麻烦了。
思路:我直接把判断终止条件移出for-in循环做一个循环外判断,当所有运动完成,定时器才停止。
function getStyle(obj,attr){
    if(obj.crrentStyle){
        return obj.currentStyle[attr];
        //兼容IE8以下
    }else{
        return getComputedStyle(obj,false)[attr];
        //参数false已废。照用就好
    }
}

function startMove(obj,json,fn){
    //清理定时器
    if(obj.timer){
        clearInterval(obj.timer);
    }

    obj.timer=setInterval(function(){
        var bStop=false;//如果为false就停了定时器!
        var iCur=0;
        // 处理属性值
        for(var attr in json){


            if(attr=='opacity'){
                iCur=parseInt(parseFloat(getStyle(obj,attr))*100);
            }else{
                iCur=parseInt(getStyle(obj,attr));
            }

            //定义速度值
            var iSpeed=(json[attr]-iCur)/8;
            iSpeed=iSpeed>0?Math.ceil(iSpeed):Math.floor(iSpeed);

            //检测停止:如果我发现某个值不等于目标点bStop就不能为true。
            if(iCur!==json[attr]){
                bStop=false;
            }

            if(attr=='opacity'){
                obj.style[attr]=(iCur+iSpeed)/100;
                obj.style.filter='alpha(opacity:'+(iCur+iSpeed)+')';
            }else{
                obj.style[attr]=iCur+iSpeed+'px';
            }
        }

        //检测是否停止,是的话关掉定时器
        if(bStop===true){
            if(iCur==json[attr]){
                clearInterval(obj.timer);
                if(fn){
                    fn();
                }
            }
        }

    },30);
}
以上才是真正完美的运动框架!
七.运动小结
还是跟中学物理课一样,在进阶之前,现在看看别的运动。
事实上,经过之前的学习,可以练习自己写出来。
匀速运动
<input id="btn1" type="button" value="开始运动!" onclick="startMove()" />
<div id="div1"></div>
#div1{
	 100px;
	height: 100px;
	background: red;
	position: absolute;
}
var iSpeed=1;
function startMove(){
    var oDiv=document.getElementById('div1');
    setInterval(function(){
        oDiv.style.left=oDiv.offsetLeft+iSpeed+'px';
    },30);
}
这就实现了一个匀速运动。
匀加速运动
每次执行定时器时,速度都在原基础累加1(加速度)。
var iSpeed=1;
function startMove(){
    var oDiv=document.getElementById('div1');
    setInterval(function(){
		iSpeed++;
        oDiv.style.left=oDiv.offsetLeft+iSpeed+'px';
    },30);
}
速度越来越快。
匀减速运动
同理,匀减速也是一样的机制。但是看上去会有一些不同
var iSpeed=20;
function startMove(){
    var oDiv=document.getElementById('div1');
    setInterval(function(){
		iSpeed--;
        oDiv.style.left=oDiv.offsetLeft+iSpeed+'px';
    },30);
}
就像上抛一样。
这些其实都是加速运动。具有以下特征:
(1) 速度不断增加或减小
(2) 当速度减少为负值,就朝着相反方向运动了
知道了运动规律,就可以实现更高档的运动,比如简谐运动。
从下一章开始,就是进阶的内容了。之前出现的问题不再提示。
八. 弹性运动
基本弹性运动
简谐运动听上去太物理。不如简单称为弹性运动。
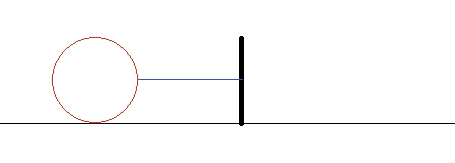
小球被橡皮筋和钉子栓着,然后不断在中途做反复的运动。
假如没有摩擦。这个运动将永不停止。
取右边为正方向。
当小球在钉子左边时,速度越来越快,到了右边,速度越来越慢。然后变为负数。——这块是一个判断语句。假设钉子在300px处:
var iSpeed=0;
function startMove(){
    var oDiv=document.getElementById('div1');
    setInterval(function(){
        oDiv.style.left=oDiv.offsetLeft+iSpeed+'px';
        if(oDiv.offsetLeft<300){
            iSpeed+=1;
        }else{
            iSpeed-=1;
        }
    },30);
}
这看起来就实现了弹性运动。
但是,根据物理知识,简谐运动的加速度是不断变化的,而不是定值。所以可以再标准一点。
在页面加一个多行文本框<textarea id="txt1"></textarea>,纪录每30ms时刻瞬时速度值:
var iSpeed=0;
function startMove(){
    var oDiv=document.getElementById('div1');
    var oTxt=document.getElementById('txt1');
    setInterval(function(){

        if(oDiv.offsetLeft<300){
            iSpeed+=(300-oDiv.offsetLeft)/100;
        }else{
            iSpeed-=-(300-oDiv.offsetLeft)/100;
        }
        txt1.value+=iSpeed+'
';//加速度值探针
        oDiv.style.left=oDiv.offsetLeft+iSpeed+'px';
    },30);
}

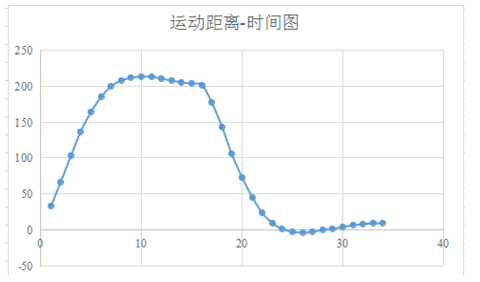
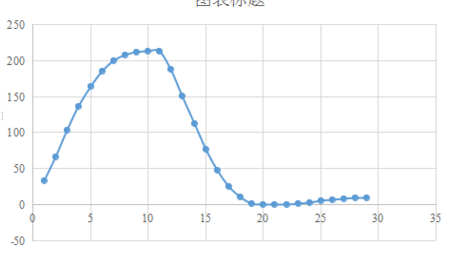
截取数据进行分析:
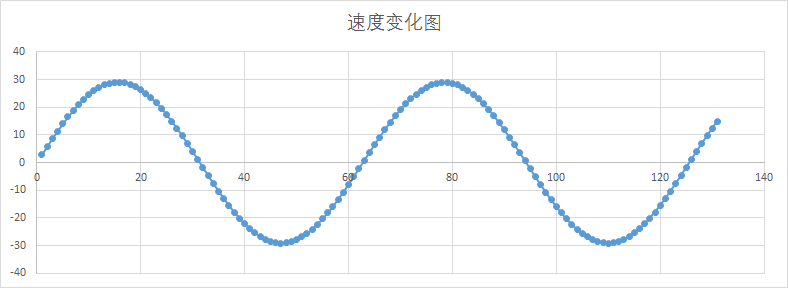
这是一个标准的三角函数
(1)在目标点左边,加速,在目标点右边:减速
(2)根据距离,计算加速度
发现上面代码中,定义速度值可以完全不要这个判断。直接写作iSpeed+=(300-oDiv.offsetLeft)/100;
引入摩擦系数(阻尼)
还是和物理实验一样,让理想归理想,现实还是现实,而现实中不可能就这么让你在光滑的地上这么无限摩擦。需要引入摩擦系数。每次运动,速度都会减小。所以,我假设摩擦系数是0.98:
var iSpeed=0;
function startMove(){
    var oDiv=document.getElementById('div1');
    var oTxt=document.getElementById('txt1');
    setInterval(function(){

        iSpeed+=(300-oDiv.offsetLeft)/100;
		iSpeed*=0.98;
        txt1.value+=iSpeed+'
';//加速度值探针
        oDiv.style.left=oDiv.offsetLeft+iSpeed+'px';
    },30);
}
看起来不错。把它封装为框架吧:
iSpeed=0;
function startMove(obj,amp,freq,decay){
    clearInterval(obj.timer);
    obj.timer=setInterval(function(){
        iSpeed+=(amp-obj.offsetLeft)/freq;
        iSpeed*=decay;

        obj.style.left=obj.offsetLeft+iSpeed+'px';
		document.title=obj.offsetLeft+'|'+amp+'|'+iSpeed;//速度分析
    },30);
}

window.onload=function(){
	var oDiv=document.getElementById('div1');
	var oBtn=document.getElementById('btn1');

	oBtn.onclick=function(){
		startMove(oDiv,300,100,0.98);
	};
};
一下多出了4个参数,其实都是方便做效果。
amp是振幅 freq是振频,decay是阻尼。可以调整,对比看看效果
小数处理
看起来运动已经停下来了——实际上没有,你会发现,txt1的文本框一直在刷新。
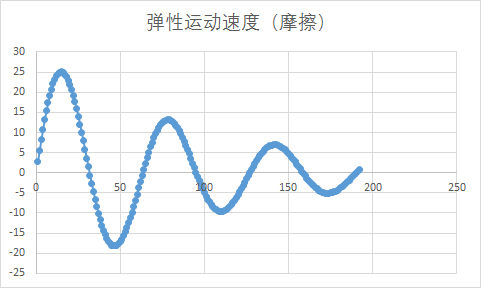
速度分析表明,这个定时器根本就没停。在这个运动中,根本取不到0。
既然是小数问题,能否用之前的办法?
iSpeed=iSpeed>0?Math.ceil(iSpeed):Math.floor(iSpeed);
答案是不行。你会发现情况更糟糕。

style.left只能是整数。每次取整之后,误差不断放大。最后导致定时器永远在几个值反复抖动判断。
解决方案,定义一个left,让它继承一个精确数值,继承完了之后在交给style.left。所以代码是
iSpeed=0;
left=0;
function startMove(obj,amp,freq,decay){
    clearInterval(obj.timer);
    obj.timer=setInterval(function(){
        iSpeed+=(amp-obj.offsetLeft)/freq;
        iSpeed*=decay;

        left+=iSpeed;
        obj.style.left=left+'px';
        document.title=obj.offsetLeft+'|'+amp+'|'+iSpeed;
    },30);
}

你发现虽然位置对准了。但是速度值还在抖动。
开着的定时器消耗了很多资源。所以做一个判断:到了目标之后关掉定时器。既要让速度为0,又要让物体到达终点——才关掉定时器。
但是iSpeed和left值永远不会等于对应的数值,考虑取范围(放缩法)
a=Math.abs(left-amp);
b=Math.abs(iSpeed);
if(a<1&&b<1){
	clearInterval(obj.timer);
}else{
	obj.style.left=left+'px';
	document.title=obj.offsetLeft+'|'+amp+'|'+iSpeed;
}
但是这样又引入误差了。看得火大,干脆关掉定时器之后让它直接停到终点!
var iSpeed=0;
var left=0;
function startMove(obj,amp,freq,decay){
    clearInterval(obj.timer);
    obj.timer=setInterval(function(){
        iSpeed+=(amp-obj.offsetLeft)/freq;
        iSpeed*=decay;

        left+=iSpeed;
        if(Math.abs(left-amp)<1&&Math.abs(iSpeed)<1){
            clearInterval(obj.timer);
            obj.style.left=amp+'px';
        }else{
            obj.style.left=left+'px';
        }

    },30);
}
做一个案例吧
案例:鼠标悬停菜单
页面有一个#div1:
#div1{
	 100px;
	height: 50px;
	background: red;
	position: absolute;
}
当鼠标悬停在菜单上时:高度变为200px.
var height=50,iSpeed=0;
function startMove(obj,amp,freq,decay){
	clearInterval(obj.timer);
	obj.timer=setInterval(function(){
		iSpeed+=(amp-height)/freq;
		iSpeed*=decay;

		if(Math.abs(iSpeed)<1&&Math.abs(amp-height)<1){
			clearInterval(obj.timer);
			obj.style.height=amp+'px';
		}else{
			height+=iSpeed;
			obj.style.height=height+'px';
		}

	},30);
}
window.onload=function(){
	var oDiv=document.getElementById('div1');
	oDiv.onmouseover=function(){
		startMove(this,200,5,0.6);
	};
	oDiv.onmouseout=function(){
		clearInterval(oDiv.timer);
		startMove(this,50,5,0.6);
	};
};
看起来效果不错。
但是在IE7条件下,把height改为10;会出错。因为弹性的特性,高度值是小于0的。
可以加一个判断:
var height=10,iSpeed=0;
function startMove(obj,amp,freq,decay){
	clearInterval(obj.timer);
	obj.timer=setInterval(function(){
		iSpeed+=(amp-height)/freq;
		iSpeed*=decay;

		if(Math.abs(iSpeed)<1&&Math.abs(amp-height)<1){
			clearInterval(obj.timer);
			obj.style.height=amp+'px';
		}else{
			height+=iSpeed;
			if(height<0){
				height=0;
			}//极限位置判断:
			obj.style.height=height+'px';
		}
	},30);
}
看起来就正常了,计划通。
接下来可以进一步封装下
所谓封装,就是去掉讨厌的全局变量:
function getStyle(obj,attr){
    if(obj.crrentStyle){
        return obj.currentStyle[attr];
        //兼容IE8以下
    }else{
        return getComputedStyle(obj,false)[attr];
        //参数false已废。照用就好
    }
}


function startMove(obj,attr,json){
	clearInterval(obj.timer);
	obj.iValue=parseInt(getStyle(obj,attr));
	obj.iSpeed=0;
	var  amp,freq,decay;
	for(var i in json){
		if(i=='amp'){
			amp=json[i];
		}else if(i=='freq'){
			freq=json[i];
		}else if(i=='decay'){
			decay=json[i];
		}
	}

	obj.timer=setInterval(function(){
		obj.iSpeed+=(amp-obj.iValue)/freq;
		obj.iSpeed*=decay;

		if(Math.abs(obj.iSpeed)<1&&Math.abs(amp-obj.iValue)<1){
			clearInterval(obj.timer);
			obj.style[attr]=amp+'px';
		}else{
			obj.iValue+=obj.iSpeed;
			if(obj.iValue<0){
				obj.iValue=0;
			}//极限位置判断:兼容旧版本IE
			obj.style[attr]=obj.iValue+'px';
		}
	},30);
}
支持宽高字体大小等属性。但是透明度就没这个必要了。
比如,我要让宽度变化:
window.onload=function(){
	var oDiv=document.getElementById('div1');
	oDiv.onmouseover=function(){
		startMove(this,'width',{'amp':200,'freq':5,'decay':0.6});
	};
	oDiv.onmouseout=function(){
		clearInterval(oDiv.timer);
		startMove(this,'width',{'amp':50,'freq':5,'decay':0.6});
	};
};
九. 碰撞运动
碰撞运动基本实现
带方向的运动
现在要做一个能够上下左右运动的小球,从运动学的角度来看,这都可以正交分解成水平和垂直两个方向上的分量。我们可以直接定义这两个分量,在定时器内,把这两个分量累加给物体的offsetLeft和offsetTop,就实现了带方向的运动。
如何判断碰到浏览器边缘?
相加得到和之后,马上判断极限:
- 水平方向的极限是:当
和小于0,或者和大于(超出)设备宽度-水平偏移值 - 垂直方向的极限是:当
和小于0,或者和超出设备宽度-水平偏移值。
遇到这两种情况,把分量值*=-1,否则,把这个累加的和作为新的偏移值。
为了研究方便,把之前的小方块变成小球:
<input id="btn1" type="button" value="开始运动!" />
<div id="div1"></div>
#div1{
	 100px;height: 100px;
	background: red;
	position: absolute;
	border-radius: 50%;
}
function startMove(obj,iSpeedX,iSpeedY){
	this.timer=setInterval(function(){
		var l=obj.offsetLeft+iSpeedX;
		var t=obj.offsetTop+iSpeedY;
		if(t>=document.documentElement.clientHeight-obj.offsetHeight||t<0){
			iSpeedY*=-1;
		}
		if(l>=document.documentElement.clientWidth-obj.offsetWidth||l<0){
			iSpeedX*=-1;
		}
		obj.style.left=l+'px';
		obj.style.top=t+'px';
	},30);
}
window.onload=function(){
	var oDiv=document.getElementById('div1');
	var oBtn=document.getElementById('btn1');
	oBtn.onclick=function(){
		startMove(oDiv,6,18);
	};
};
效果:
这下就叫做乐极生悲了吧!小球出现了极其猥琐的动作,还带出了滚动条。
解决思路:
(1)给body加一个overflow:hidden;——不好
(2)当碰界时,直接把偏移值设置为0
function startMove(obj,iSpeedX,iSpeedY){
	this.timer=setInterval(function(){
		var l=obj.offsetLeft+iSpeedX;
		var t=obj.offsetTop+iSpeedY;
		if(t>=document.documentElement.clientHeight-obj.offsetHeight){
			t=document.documentElement.clientHeight-obj.offsetHeight;
			iSpeedY*=-1;
		}
		if(t<0){
			t=0;
			iSpeedY*=-1;
		}
		if(l>=document.documentElement.clientWidth-obj.offsetWidth){
			l=document.documentElement.clientWidth-obj.offsetWidth;
			iSpeedX*=-1;
		}
		if(l<0){
			l=0;
			iSpeedX*=-1;
		}
		obj.style.left=l+'px';
		obj.style.top=t+'px';
	},30);
}


window.onload=function(){
	var oDiv=document.getElementById('div1');
	var oBtn=document.getElementById('btn1');
	oBtn.onclick=function(){
		startMove(oDiv,6,18);
	};
};
再看一下效果,小球就可以欢快地动起来了。
到碰撞遇上重力:
理想的重力就是垂直方向上的速度不断变化(匀加速)的运动。但限于篇幅,就不讨论理想状态了。作为一个函数,还需要加几个参数:重力加速度,摩擦系数,并把横轴速度和纵轴速度作为参数传进去:
function startMove(obj,a,decay,iSpeedX,iSpeedY){
	setInterval(function(){
		iSpeedY+=a;
		var l=obj.offsetLeft+iSpeedX;
		var t=obj.offsetTop+iSpeedY;
		if(t>=document.documentElement.clientHeight-obj.offsetHeight){
			iSpeedY*=-decay;
			iSpeedX*=decay;
			t=document.documentElement.clientHeight-obj.offsetHeight;
		}
		if(t<0){
			t=0;
			iSpeedY*=-1;
			iSpeedX*=decay;
		}
		if(l>=document.documentElement.clientWidth-obj.offsetWidth){
			l=document.documentElement.clientWidth-obj.offsetWidth;
			iSpeedX*=-decay;
		}
		if(l<0){
			l=0;
			iSpeedX*=-decay;
		}
		obj.style.left=l+'px';
		obj.style.top=t+'px';
	},30);
}

window.onload=function(){
	var oDiv=document.getElementById('div1');
	var oBtn=document.getElementById('btn1');
	oBtn.onclick=function(){
		startMove(oDiv,3,0.8,6,8);
	};
};
效果如图:
a是重力加速度(当然,这里没给他定为9.8),decay是损耗,iSpeedX,Y是初始速度的正交分解值。
当碰撞遇上重力和碰撞
写一个拖拽的函数吧!
window.onload=function(){
	var oDiv=document.getElementById('div1');
	oDiv.onmousedown=function(ev){
		var oEvent=ev||event;
		var disX=oEvent.clientX-oDiv.offsetLeft;
		var disY=oEvent.clientY-oDiv.offsetTop;
		document.onmousemove=function(ev){
			var oEvent=ev||event;
			var l=oEvent.clientX-disX;
			var t=oEvent.clientY-disY;
			oDiv.style.left=l+'px';
			oDiv.style.top=t+'px';

          	// 打点计时器
			var oBox=document.createElement('div');
			oBox.style.left=l+'px';
			oBox.style.top=t+'px';
			document.body.appendChild(oBox);

	};
	oDiv.onmouseup=function(){
		document.onmousemove=null;
		document.onmousedown=null;
	};
};
现在问题在于让onmouseup的时候,物体获取一个初速度,同时进行碰撞运动。初速度的方向根据指针先后的位置得出。
不管是我们自定义的startMove也好,onmousemove也好,运动的本质是重复执行的一个个小的函数。表面上看起来是一个事件。
在这里,又要开始研究运动了。给打点计时器做一个样式:
div{
	2px;height: 2px;
	position: absolute;
	background: black;
}/*点的样式*/
function startMove(obj,a,decay,iSpeedX,iSpeedY){
	clearInterval(obj.timer);
	obj.timer=setInterval(function(){
		iSpeedY+=a;
		var l=obj.offsetLeft+iSpeedX;
		var t=obj.offsetTop+iSpeedY;
		if(t>=document.documentElement.clientHeight-obj.offsetHeight){
			iSpeedY*=-decay;
			iSpeedX*=decay;
			t=document.documentElement.clientHeight-obj.offsetHeight;
		}
		if(t<0){
			t=0;
			iSpeedY*=-1;
			iSpeedX*=decay;
		}
		if(l>=document.documentElement.clientWidth-obj.offsetWidth){
			l=document.documentElement.clientWidth-obj.offsetWidth;
			iSpeedX*=-decay;
		}
		if(l<0){
			l=0;
			iSpeedX*=-decay;
		}
		obj.style.left=l+'px';
		obj.style.top=t+'px';

		// 打点计时器!
		var oBox=document.createElement('div');
		oBox.style.left=l+'px';
		oBox.style.top=t+'px';
		document.body.appendChild(oBox);

	},30);
}
看到的是小球的运动轨迹。每隔一段时间打一个点,瞬时速度越慢,点越密集,瞬时速度快,点就稀疏。
再试试拖拽下的打点计时器:
这相邻两个点之间的距离,其实就是这段时间的速度——把它作为瞬时速度就可以了!距离可以用解析几何中两坐标之间的差值计算出来。
var timer=null;
function startMove(obj,a,decay,iSpeedX,iSpeedY){
	timer=setInterval(function(){
		iSpeedY+=a;
		var l=obj.offsetLeft+iSpeedX;
		var t=obj.offsetTop+iSpeedY;
		if(t>=document.documentElement.clientHeight-obj.offsetHeight){
			iSpeedY*=-decay;
			iSpeedX*=decay;
			t=document.documentElement.clientHeight-obj.offsetHeight;
			//让Y轴速度反方向。
		}
		if(t<0){
			t=0;
			iSpeedY*=-1;
			iSpeedX*=decay;
		}
		if(l>=document.documentElement.clientWidth-obj.offsetWidth){
			l=document.documentElement.clientWidth-obj.offsetWidth;
			iSpeedX*=-decay;
		}
		if(l<0){
			l=0;
			iSpeedX*=-decay;
		}
		if(Math.abs(iSpeedX)<1){
			iSpeedX=0;
		}
		if(Math.abs(iSpeedY)<1){
			iSpeedY=0;
		}
		//小数处理
		obj.style.left=l+'px';
		obj.style.top=t+'px';
	},30);
}
var X=0;
var Y=0;
window.onload=function(){
	var oDiv=document.getElementById('div1');
	var Yt=0;
	var Xt=0;
	oDiv.onmousedown=function(ev){
      	//第2次拖拽时原来的定时器失效。
		clearInterval(timer);

		var oEvent=ev||event;
		var disX=oEvent.clientX-oDiv.offsetLeft;
		var disY=oEvent.clientY-oDiv.offsetTop;
		document.onmousemove=function(ev){
			var oEvent=ev||event;
			var l=oEvent.clientX-disX;
			var t=oEvent.clientY-disY;

          	//获取瞬时速度。
			X=l-Xt;
			Y=t-Yt;

          	//更新初速度
			oDiv.style.left=l+'px';
			oDiv.style.top=t+'px';
			Xt=l;
			Yt=t;

          	//检测瞬时速度,可以在title上打出来
			document.title="X:"+X+'Y:'+Y

		}
	}
	oDiv.onmouseup=function(ev){
		var oEvent=ev||event;
		document.onmousemove=null;
		document.onmouseup=null;
		startMove(this,3,0.8,X,Y);
	}
	clearInterval(timer);
}
在这个demo中,你可以在网页的title上看到你两个分量表示的瞬时速度。
碰撞运动停止的条件
很自然想到,当两个分量速度都为0时,停止定时器。同时进行小数处理。
但是,再想想垂直上抛运动,当物体到达重力势能最大点的时候,速度就完全为0了。总不能这样就停了吧?因为停止时t值总是在最低处,所以判断条件是:
var timer=null;
function startMove(obj,a,decay,iSpeedX,iSpeedY){
	timer=setInterval(function(){
		iSpeedY+=a;
		var l=obj.offsetLeft+iSpeedX;
		var t=obj.offsetTop+iSpeedY;
		if(t>=document.documentElement.clientHeight-obj.offsetHeight){
			iSpeedY*=-decay;
			iSpeedX*=decay;
			t=document.documentElement.clientHeight-obj.offsetHeight;
			//让Y轴速度反方向。
		}
		if(t<0){
			t=0;
			iSpeedY*=-1;
			iSpeedX*=decay;
		}
		if(l>=document.documentElement.clientWidth-obj.offsetWidth){
			l=document.documentElement.clientWidth-obj.offsetWidth;
			iSpeedX*=-decay;
		}
		if(l<0){
			l=0;
			iSpeedX*=-decay;
		}
		if(Math.abs(iSpeedX)<1){
			iSpeedX=0;
		}
		if(Math.abs(iSpeedY)<1){
			iSpeedY=0;
		}
		//小数处理

      	// 停止定时器的条件
		if(iSpeedX==0&&iSpeedY==0&&t==document.documentElement.clientHeight-obj.offsetHeight){
			clearInterval(timer);
		}else{
			obj.style.left=l+'px';
			obj.style.top=t+'px';
		}

	},30);
}
var X=0;
var Y=0;
window.onload=function(){
	var oDiv=document.getElementById('div1');
	var Yt=0;
	var Xt=0;
	oDiv.onmousedown=function(ev){
		clearInterval(timer);
		//第2次拖拽时原来的定时器失效。
		var oEvent=ev||event;
		var disX=oEvent.clientX-oDiv.offsetLeft;
		var disY=oEvent.clientY-oDiv.offsetTop;
		document.onmousemove=function(ev){
			var oEvent=ev||event;
			var l=oEvent.clientX-disX;
			var t=oEvent.clientY-disY;
			X=l-Xt;
			Y=t-Yt;
			//获取瞬时速度。
			oDiv.style.left=l+'px';
			oDiv.style.top=t+'px';
			Xt=l;
			Yt=t;
			//更新初速度
			document.title="X:"+X+'Y:'+Y
			//检测瞬时速度
		}
	}
	oDiv.onmouseup=function(ev){
		var oEvent=ev||event;
		document.onmousemove=null;
		document.onmouseup=null;
		startMove(this,3,0.8,X,Y);
	}
	clearInterval(timer);
}
那么,javascript运动学就完了。