一、OpenStack Swift对象存储
1、安装Swift服务
在controller节点依次执行iaas-install-swift-controller.sh和iaas-install-swift-compute.sh 即可完成安装
[root@controller ~]# iaas-install-swift-controller.sh
[root@controller ~]# iaas-install-swift-compute.sh
安装完Swift之后,查看一下Swift的状态
# swift stat
[root@controller ~]# swift stat
       Account: AUTH_18e38545a20f4fbb8dba8944118d43bc
    Containers: 0
       Objects: 0
         Bytes: 0
  Content-Type: text/plain; charset=utf-8
   X-Timestamp: 1548156941.88853
    X-Trans-Id: tx104a2cef8e1d438f84b38-005c47000d
X-Put-Timestamp: 1548156941.88853
查看容器
# swift list
仓库为空,因为没有容器,所以查询不到
[root@controller ~]# swift list
[root@controller ~]#
2、创建容器
创建一个容器名称为gw001,并查看
[root@controller ~]# swift post gw001
[root@controller ~]# swift list
gw001
3、容器操作
上传anaconda-ks.cfg文件到gw001容器
# swift upload gw001 anaconda-ks.cfg
[root@controller ~]# touch gw001
[root@controller ~]#
[root@controller ~]# swift upload gw001 anaconda-ks.cfg
anaconda-ks.cfg
[root@controller ~]# swift list gw001
anaconda-ks.cfg
删除这个文件并查看
# swift delete gw001 anaconda-ks.cfg
[root@controller ~]# swift delete gw001 anaconda-ks.cfg
anaconda-ks.cfg
[root@controller ~]# swift list
gw001
这时文件已被删除,删除这个容器,系统内容器列表信息
# swift delete gw001
[root@controller ~]# swift delete gw001
[root@controller ~]# swift list
[root@controller ~]#
二、配置OpenStack分布式块存储(Cinder)
1、环境说明
利用上节已经搭建完毕的IaaS平台的一个分区(使用的是/dev/sdc1)
在controller节点执行以下脚本顺序安装Cinder服务
# iaas-install-cinder-controller.sh
# iaas-install-cinder-compute.sh
2、使用cinder块存储
(1)登录OpenStack
(2)修改安全规则
(3)创建网络
(4)创建路由
(5)创建云主机
(6)绑定浮动IP
(7)登录云主机
可发现主机有一个vda的硬盘

(8)云硬盘挂载
接着回到controller节点,创建一个名字叫test1,大小为2G的卷。
# cinder create --display-name test1 2
[root@controller ~]# cinder create --display-name test1 2
+---------------------+--------------------------------------+
|       Property      |                Value                 |
+---------------------+--------------------------------------+
|     attachments     |                  []                  |
|  availability_zone  |                 nova                 |
|       bootable      |                false                 |
|      created_at     |      2019-01-22T13:14:22.919157      |
| display_description |                 None                 |
|     display_name    |                test1                 |
|      encrypted      |                False                 |
|          id         | 8ccc4a20-d765-4c0f-be70-12d3b94fc436 |
|       metadata      |                  {}                  |
|         size        |                  2                   |
|     snapshot_id     |                 None                 |
|     source_volid    |                 None                 |
|        status       |               creating               |
|     volume_type     |                 None                 |
+---------------------+--------------------------------------+
使用命令查看
# cinder list
[root@controller ~]#
[root@controller ~]# cinder list
+--------------------------------------+-----------+--------------+------+-------------+----------+-------------+
|                  ID                  |   Status  | Display Name | Size | Volume Type | Bootable | Attached to |
+--------------------------------------+-----------+--------------+------+-------------+----------+-------------+
| 8ccc4a20-d765-4c0f-be70-12d3b94fc436 | available |    test1     |  2   |     None    |  false   |             |
+--------------------------------------+-----------+--------------+------+-------------+----------+-------------+
[root@controller ~]#
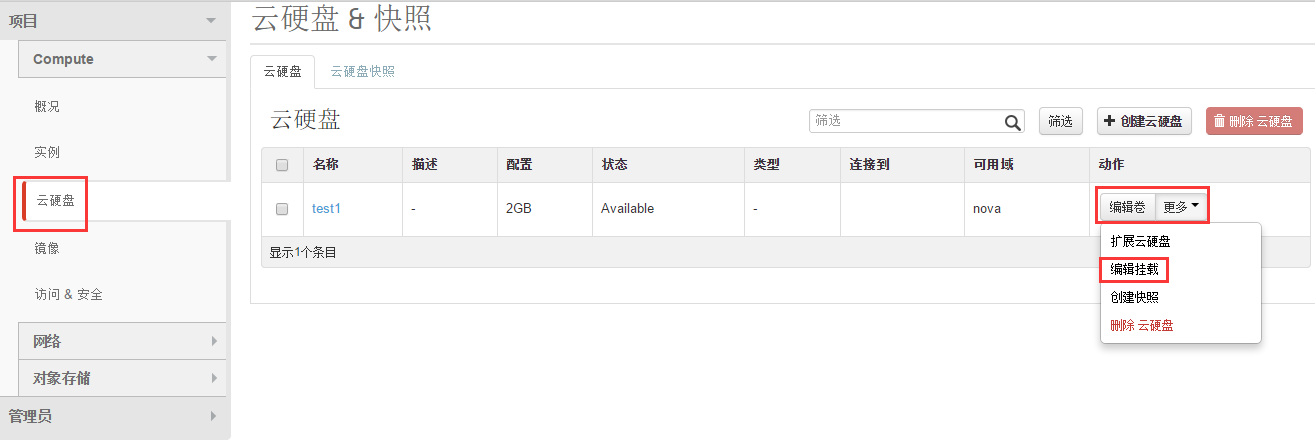
接着在dashboard中操作,在“云硬盘&快照”页面中,单击右侧“更多”按钮,在打开的下拉菜单中选择“编辑挂载”

单击“选择一个云主机”下来菜单,选择刚才创建的cirros主机,然后单击右下角的“连接云硬盘”

结果如下

到云主机上查看设备
可以看到一个vdb的大小为2G的硬盘
$
$ lsblk
NAME   MAJ:MIN RM    SIZE RO TYPE MOUNTPOINT
vda    253:0    0      1G  0 disk
`-vda1 253:1    0 1011.9M  0 part /
$
$ lsblk
NAME   MAJ:MIN RM    SIZE RO TYPE MOUNTPOINT
vda    253:0    0      1G  0 disk
`-vda1 253:1    0 1011.9M  0 part /
vdb    253:16   0      2G  0 disk
$
$
$
验证cinder块存储服务成功
end