[版权声明]:本文章由danvid发布于http://danvid.cnblogs.com/,如需转载或部分使用请注明出处
在业务中经常会用到拼音匹配查询,大家都会用到拼音分词器,但是拼音分词器匹配的时候有个问题,就是会出现同音字匹配,有时候这种情况是业务不希望出现的。
业务场景:我输入"纯生pi酒"进行搜索,文档中有以下数据:
doc[1]:{"name":"纯生啤酒"}
doc[2]:{"name":"春生啤酒"}
doc[3]:{"name":"纯生劈酒"}
以上业务点是我输入"纯生pi酒"理论上业务希望只返回doc[1]:{"name":"纯生啤酒"}和doc[3]:{"name":"纯生劈酒"}其他的不是我要的数据,因为从业务角度来看,我已经输入"纯生"了,理论上只需要返回有"纯生"的数据(当然也有很多情况,会希望把"春生"也返回来),正常使用拼音分词器,会把doc[2]也会返回,原因是拼音分词器会把doc[2]变成:
{
  "tokens": [
    {
      "token": "c",
      "start_offset": 0,
      "end_offset": 1,
      "type": "word",
      "position": 0
    },
    {
      "token": "chun",
      "start_offset": 0,
      "end_offset": 1,
      "type": "word",
      "position": 0
    },
    {
      "token": "s",
      "start_offset": 1,
      "end_offset": 2,
      "type": "word",
      "position": 1
    },
    {
      "token": "sheng",
      "start_offset": 1,
      "end_offset": 2,
      "type": "word",
      "position": 1
    },
    {
      "token": "p",
      "start_offset": 2,
      "end_offset": 3,
      "type": "word",
      "position": 2
    },
    {
      "token": "pi",
      "start_offset": 2,
      "end_offset": 3,
      "type": "word",
      "position": 2
    },
    {
      "token": "j",
      "start_offset": 3,
      "end_offset": 4,
      "type": "word",
      "position": 3
    },
    {
      "token": "jiu",
      "start_offset": 3,
      "end_offset": 4,
      "type": "word",
      "position": 3
    }
  ]
}
由于"纯生"和"春生"是同音字,分词结果doc[1]和doc[2]是一样的,所以把doc[2]匹配上就是理所当然了,那么如何解决?
其实我们的需求是就当输入搜索文本时(搜索文本中可能同时存在中文/拼音),搜索文本中有[中文] 则按[中文]匹配,有[拼音]则按[拼音]匹配即可,这样就屏蔽掉了输入中文时匹配到同音字的问题。那么我们可以这样思考,我们索引的时候同时存在 全拼/简拼/中文 三种分词,搜索的时候 输入中有中文则按中文一个个分开,有英文则按拼音进行分词即可 例如:
索引时"纯生啤酒"分词为:
索引分词:
{
  "tokens": [
    {
      "token": "c",
      "start_offset": 0,
      "end_offset": 1,
      "type": "word",
      "position": 0
    },
    {
      "token": "chun",
      "start_offset": 0,
      "end_offset": 1,
      "type": "word",
      "position": 0
    },
    {
      "token": "纯",
      "start_offset": 0,
      "end_offset": 1,
      "type": "word",
      "position": 0
    },
    {
      "token": "s",
      "start_offset": 1,
      "end_offset": 2,
      "type": "word",
      "position": 1
    },
    {
      "token": "sheng",
      "start_offset": 1,
      "end_offset": 2,
      "type": "word",
      "position": 1
    },
    {
      "token": "生",
      "start_offset": 1,
      "end_offset": 2,
      "type": "word",
      "position": 1
    },
    {
      "token": "p",
      "start_offset": 2,
      "end_offset": 3,
      "type": "word",
      "position": 2
    },
    {
      "token": "pi",
      "start_offset": 2,
      "end_offset": 3,
      "type": "word",
      "position": 2
    },
    {
      "token": "啤",
      "start_offset": 2,
      "end_offset": 3,
      "type": "word",
      "position": 2
    },
    {
      "token": "j",
      "start_offset": 3,
      "end_offset": 4,
      "type": "word",
      "position": 3
    },
    {
      "token": "jiu",
      "start_offset": 3,
      "end_offset": 4,
      "type": "word",
      "position": 3
    },
    {
      "token": "酒",
      "start_offset": 3,
      "end_offset": 4,
      "type": "word",
      "position": 3
    }
  ]
}
搜索"纯生pi酒",分词为:
搜索分词:
{
  "tokens": [
    {
      "token": "纯",
      "start_offset": 0,
      "end_offset": 1,
      "type": "word",
      "position": 0
    },
    {
      "token": "生",
      "start_offset": 1,
      "end_offset": 2,
      "type": "word",
      "position": 1
    },
    {
      "token": "pi",
      "start_offset": 2,
      "end_offset": 4,
      "type": "word",
      "position": 2
    },
    {
      "token": "酒",
      "start_offset": 4,
      "end_offset": 5,
      "type": "word",
      "position": 3
    }
  ]
}
这样就可以只匹配出有"纯"|"生"|"酒"这几个字的数据了,而不是把"春"字的doc也匹配出来,既然解决思路有了,就找方案了。
由于目前的es的拼音分词器是没有分离中文并保留中文的功能,所以就需要修改其源码增加这个功能(使用的拼音分词器: https://github.com/medcl/elasticsearch-analysis-pinyin)
源码的话在上面地址上可以下在,源码的原理大概讲一下,就是他调用一个nlp工具包( https://github.com/NLPchina)先对输入文本解析成拼音 即"纯生pi酒"会解析成["chun","sheng",null,null,"酒"]数组(这里再提一句这个nlp工具包会对词组进行解析,而不是单个字进行解析例如"厦/门"会解析成"xia/men"而不是"sha/men"这个确实有用很多,当然他还有很多工具,例如简繁体转化等等,大家可以学习使用一哈),然后再单独对英文数字放到buff里面进行二次匹配,采用"正向最大匹配"和"逆向最大匹配"取出最优解(这些都是常用的分词手法)匹配出拼音字符,源代码如下:
// 分别正向、逆向最大匹配,选出最短的作为最优结果
List<String> forward = positiveMaxMatch(pinyinText, PINYIN_MAX_LENGTH);
if (forward.size() == 1) { // 前向只切出1个的话,没有必要再做逆向分词
    pinyinList.addAll(forward);
} else {
    // 分别正向、逆向最大匹配,选出最短的作为最优结果
    List<String> backward = reverseMaxMatch(pinyinText, PINYIN_MAX_LENGTH);
    if (forward.size() <= backward.size()) {
        pinyinList.addAll(forward);
    } else {
        pinyinList.addAll(backward);
    }
}
至于拼音字典匹配结构由于拼音的数量不多,拼音源码采用了HashSet的结构而不是我们ik里面的字典树。("正向最大匹配"和"逆向最大匹配"百度一大把就不在这说了)
原理大概讲完了根据需求我们是不需要管英文数字这一块的匹配逻辑的,只需要修改中文转拼音这附近的逻辑即可。
首先我们先写一个中文分割的工具类或者方法如下:
public class ChineseUtil {
    /**
     * 汉字始
     */
    public static char CJK_UNIFIED_IDEOGRAPHS_START = 'u4E00';
    /**
     * 汉字止
     */
    public static char CJK_UNIFIED_IDEOGRAPHS_END = 'u9FA5';

    public static List<String> segmentChinese(String str){
        if (StringUtil.isBlank(str)) {
            return Collections.emptyList();
        }

        List<String> lists = str.length()<=32767?new ArrayList<>(str.length()):new LinkedList<>();
        for (int i=0;i<str.length();i++){
            char c = str.charAt(i);
            if(c>=CJK_UNIFIED_IDEOGRAPHS_START&&c<=CJK_UNIFIED_IDEOGRAPHS_END){
                lists.add(String.valueOf(c));
            }
            else{
                lists.add(null);
            }

        }
        return lists;
    }
}
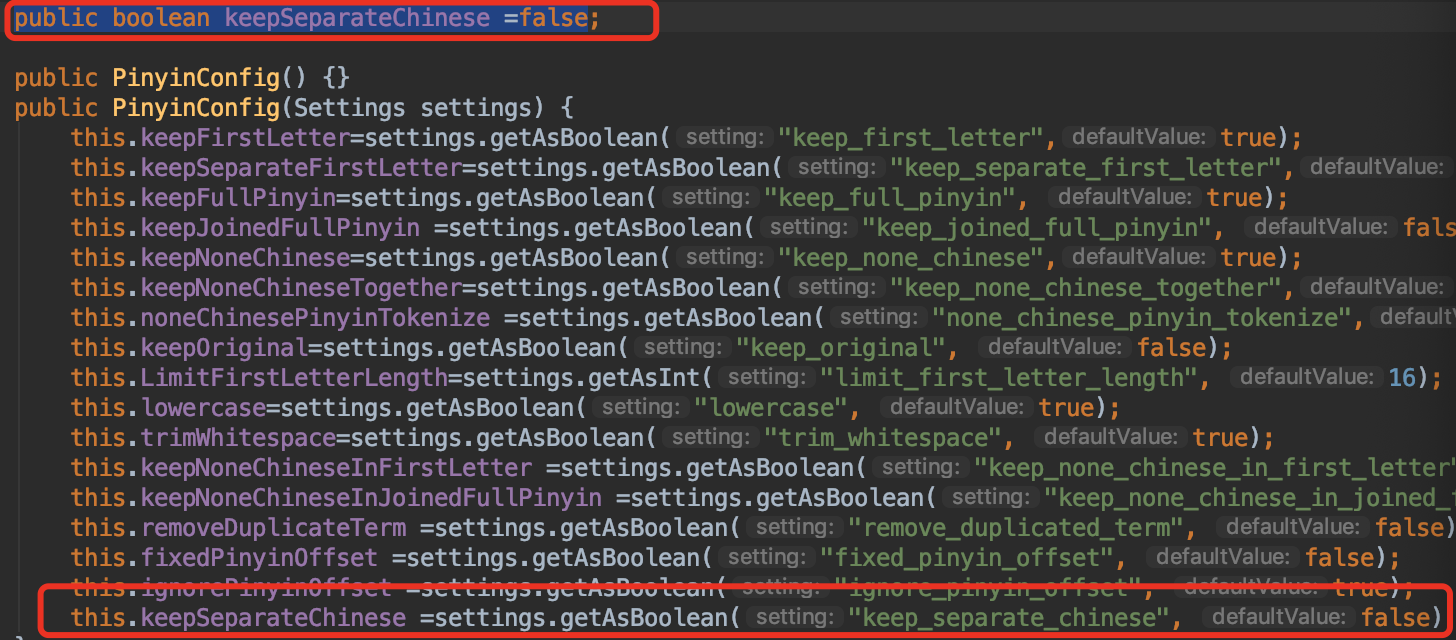
汉字始或者汉字止这个查一下nlp工具的源码(PinyinUtil)就可以找到,或者百度。然后在拼音源码中的PinyinConfig类中添加一项中文分割的配置:

默认false就可以了,然后我们需要修改两个类(PinyinTokenFilter/PinyinTokenizer),这两个类是最要的分词类,对应es的analysis的filter和tokenizer
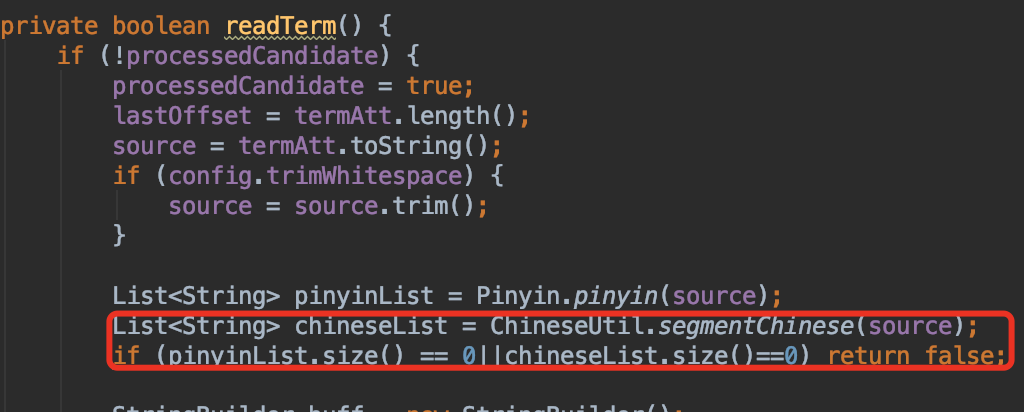
由于这两个类修改地方是一样的我就随便讲一个,首先需要修改构造器的校验,添加刚刚增加的配置:

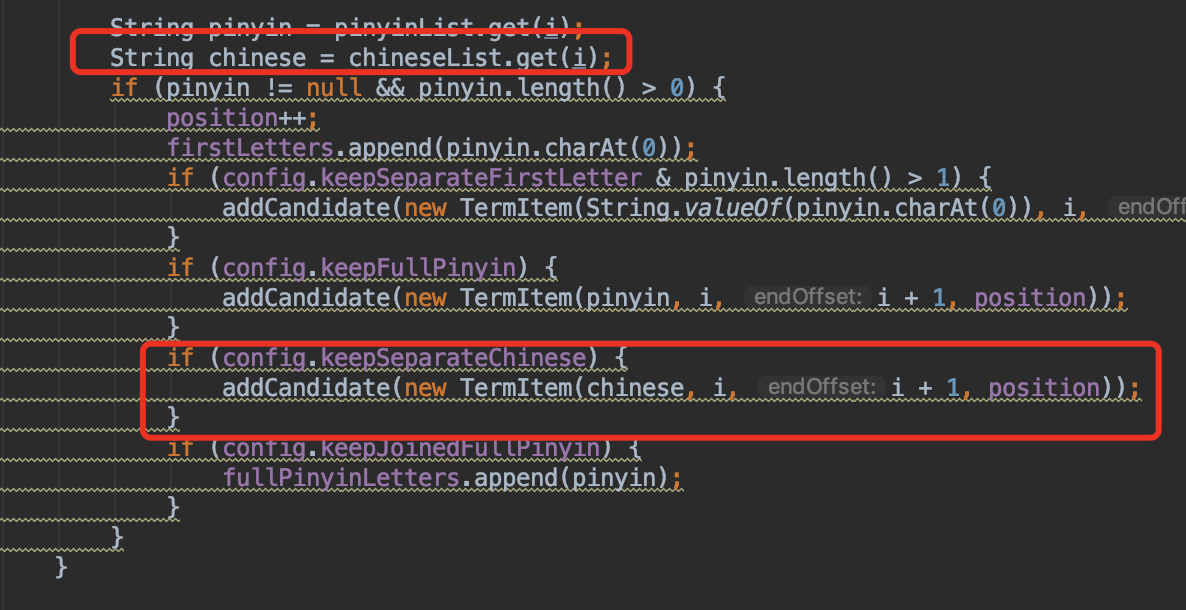
然后修改该类的readTerm()方法,如下:


两个类都修改完就完成源码修改了,现在需要对源码重新进行打包,mvn install以下就可以了,你就会拿到elasticsearch-analysis-pinyin-5.6.4.jar(你下载源码的时候要下载release的版本进行修改,版本也要对应你的es哦),同时在源码的lib拿到nlp-lang-1.7.jar包 ,再加上resource中的plugin-descriptor.properties(这个需要定义插件版本,启动类等东西,这个去拼音release版本中找个可用的插件解压一下跟着配置就可以了),最后变成下面这个样子:

放在一个文件夹里面,这个就是打包好的插件了,名字自己命名即可,然后放到es的plugin目录里面就完成修改了。
剩下就是修改index的setting和mapping,修改思想就是按照开头说的那样search_analyzer和analyzer分开即可,如下:
PUT /test_index
{
  "settings": {
    "analysis": {
      "analyzer": {
        "pinyin_chinese_analyzer": {
          "tokenizer": "pinyin_tokenizer"
        },
        "pinyin_analyzer": {
          "tokenizer": "pinyin_chinese_tokenizer"
        }
      },
      "tokenizer": {
        "pinyin_chinese_tokenizer": {
          "type": "pinyin",
          "keep_first_letter": false,
          "keep_separate_first_letter": false,
          "keep_full_pinyin":false,
          "keep_original":false,
          "limit_first_letter_length":50,
          "keep_separate_chinese": true,
          "lowercase":true

        },
        "pinyin_tokenizer": {
          "type": "pinyin",
          "keep_first_letter": false,
          "keep_separate_first_letter": true,
          "keep_full_pinyin":true,
          "keep_original":false,
          "limit_first_letter_length":50,
          "keep_separate_chinese": true,
          "lowercase":true
        }
      }
    }
  }
  , "mappings": {
    "indexType":{
      "properties": {
        "name":{
          "type": "text",
          "search_analyzer": "pinyin_chinese_analyzer",
          "analyzer": "pinyin_analyzer"
        }
      }
    }
  }
}
查询使用match_pharse即可(使用原理可以参考我的文章https://www.cnblogs.com/danvid/p/10570334.html),当然也可以用其他,根据业务来把。
下面是简单的验证结果:索引中有以下文档doc[1]:{"name": "雪花纯生啤酒200ml"}|doc[2]:{"name": "雪花纯爽啤酒200ml"}|doc[3]:{"name": "雪花春生啤酒200ml"}
查询输入:
GET /test_index/_search
{
  "query": {
    "match_phrase": {
      "name": "xuehcs"
    }
  }
}
结果:
"hits": [
      {
        "_index": "test_index",
        "_type": "indexType",
        "_id": "2","_source": {
          "name": "雪花纯爽啤酒200ml"
        }
      },
      {
        "_index": "test_index",
        "_type": "indexType",
        "_id": "1","_source": {
          "name": "雪花纯生啤酒200ml"
        }
      },
      {
        "_index": "test_index",
        "_type": "indexType",
        "_id": "3","_source": {
          "name": "雪花春生啤酒200ml"
        }
      }
    ]
查询输入:
GET /test_index/_search
{
  "query": {
    "match_phrase": {
      "name": "xueh纯生"
    }
  }
}
结果:
"hits": [
      {
        "_index": "test_index",
        "_type": "indexType",
        "_id": "1","_source": {
          "name": "雪花纯生啤酒200ml"
        }
      }
    ]
总结:其实解决思路并不复杂,不过其实在修改源码之前也考虑过其他方案,例如通过修改tokenizer为standard或者ik+fliter为pinyin进行分词等,但是总是存在各种问题不尽人意,用standard的时候由于已经拆分成了字,所以会出现"厦门"这种多音字被转化为"shamen"而不是"xiamen",而ik分词则在使用match_phrase时可控性较差~加上受词库的影响,最后才决定使用修改源码增加功能的方式~如果大家有更好的方式可以推荐一下
注意:在配置tokenizer时由于noneChinesePinyinTokenize和keepNoneChinese属性默认时true,所以会对字母数字等非中文字符按拼音进行分割(liudehua12->liu,de,hua,12)所以如果你有修改这些属性就要注意了~应该要配置两个项为true
[说明]:elasticsearch版本5.6.4