本章目录
代理模式
概念
- Proxy, 表示代理! 提供了对目标对象另外的访问方式,即通过代理访问目标对象。
- 通过代理对象查找目标对象,有以下优点:
- 目标对象没有暴露给用户
- 代理,在目标对象的基础上,可以增加额外的验证等功能
静态代理
-
特点:
- 目标对象必须实现接口
- 代理对象必须实现和目标对象同样的接口
-
简单例子
需求
- IUserDao.java(dao接口)
- UserDao.java(dao实现)
- UserDaoProxy.java(dao代理类,对UserDao中功能进行扩展)
- App(测试类)
代码
-
 IUserDao.java
package claire.a_static;

/**
 * Dao接口
 * @author claire
 *
 */
public interface IUserDao {
    void save();
}
UserDaopackage claire.a_static; /** * dao实现类(目标对象) * @author claire * */ public class UserDao implements IUserDao{ @Override public void save() { System.out.println("保存用户"); } }
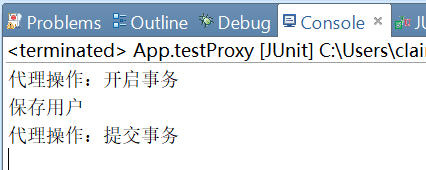
UserDaoProxypackage claire.a_static; /** * dao代理类,对UserDao进行扩展 * @author claire * */ public class UserDaoProxy implements IUserDao{ private UserDao target = new UserDao(); @Override public void save() { System.out.println("代理操作:开启事务"); target.save(); System.out.println("代理操作:提交事务"); } }
Apppackage claire.a_static; import org.junit.Test; /** * 测试类 * @author claire * */ public class App { @Test public void testProxy() throws Exception{ IUserDao proxy = new UserDaoProxy(); proxy.save(); } }
-
缺点
- 代理对象,需要依赖目标对象的接口。如果接口功能变化,目标对象变化,会引入代理对象的变化。
- 对每一个目标对象,都要分别写一个代理类,麻烦! (代理工厂)

动态代理
-
简介
- 通常说的动态代理,就是指jdk代理。 因为是通过jdk的api在运行时期,动态的生成代理对象的。
- 目标对象一定要实现接口,代理对象不用实现接口
-
JDK 生成代理对象的Api
- Proxy newProxyInstance(ClassLoader loader, Class<?>[] interfaces, InvocationHandler h)
参数loader : 当前目标对象使用的类加载器。
参数interfaces : 当前目标对象实现的接口
参数 h: 接口类型,事件处理器.
当执行目标对象方法的时候,会触发事件; 把当前执行的方法(method对象),传入事件处理器方法参数中, 这样就可以根据业务逻辑,判断是否执行目标对象方法或扩展功能 - 示例代码
IUserDao
package claire.b_dynamic;

/**
 * Dao接口
 * @author claire
 *
 */
public interface IUserDao {
    void save();
    void find();
}
UserDaopackage claire.b_dynamic; /** * dao实现类(目标对象) * @author claire * */ public class UserDao implements IUserDao{ @Override public void save() { System.out.println("保存用户"); } @Override public void find() { // TODO Auto-generated method stub System.out.println("find"); } }
ProxyFactorypackage claire.b_dynamic; import java.lang.reflect.InvocationHandler; import java.lang.reflect.Method; import java.lang.reflect.Proxy; /** * 代理工厂 * * @author claire * */ public class ProxyFactory{ // 接收目标对象 private static Object target; public ProxyFactory(Object target) { super(); this.target = target; } // 返回目标对象的代理对象 /** * Proxy.newProxyInstance参数loader : 当前目标对象使用的类加载器! 参数interfaces : * 当前目标对象实现的接口 参数 h: 接口类型,事件处理器. * * @return */ public static Object getProxyInstance(){ return Proxy.newProxyInstance(target.getClass().getClassLoader(), target.getClass().getInterfaces(), new InvocationHandler() { @Override public Object invoke(Object proxy, Method method, Object[] args) throws Throwable { Object result = null; //获取当前执行的方法名 if("find".equals(method.getName())){ //直接调用 result = method.invoke(target, args); }else{ System.out.println("开启额外事务"); result = method.invoke(target, args); System.out.println("提交事务"); } //执行目标对象的方法 return result; } } ); } }
Apppackage claire.b_dynamic; import org.junit.Test; /** * 测试类 * @author claire * */ public class App { @Test public void testProxy() throws Exception{ //创建代理对象 UserDao target = new UserDao(); //代理对象 IUserDao proxyInstance = (IUserDao)new ProxyFactory(target).getProxyInstance(); //执行代理对象方法 proxyInstance.save(); } @Test public void testProxy_find() throws Exception{ //创建代理对象 UserDao target = new UserDao(); //代理对象 IUserDao proxyInstance = (IUserDao)new ProxyFactory(target).getProxyInstance(); //执行代理对象方法 proxyInstance.find(); } }


- Proxy newProxyInstance(ClassLoader loader, Class<?>[] interfaces, InvocationHandler h)
Cglib
-
简介
也叫”子类代理” 当目标对象没有实现接口,就不能使用jdk提供的代理,可以以子类的方式实现。在运行时期动态在内存中构建一个子类对象的方法,从而对目标对象扩展,这种就是cglib代理。Spring也支持cglib代理,核心包中已经包含此功能。cglib是一个强大的高性能的代码生成包,它可以在运行期扩展Java类与实现Java接口。cglib包的底层是通过使用一个小而快的字节码处理框架ASM,来转换字节码并生成新的类。不鼓励直接使用ASM,因为它要求你必须对JVM内部结构包括class文件的格式和指令集都很熟悉。
-
代码
-
- 示例代码
UserDao
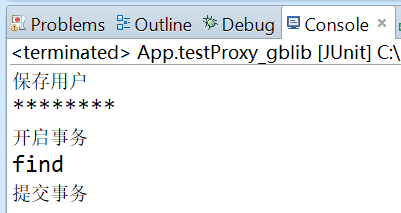
package claire.c_cglib;

/**
 * dao实现类(目标对象)
 * @author claire
 *
 */
public class UserDao{

    /**
     * 设为final或static,不会重写。不会执行额外事务
     */
    public final void save() {
        System.out.println("保存用户");
    }

    public void find() {
        // TODO Auto-generated method stub
        System.out.println("find");
    }

}
ProxyFactorypackage claire.c_cglib; import java.lang.reflect.Method; import org.springframework.cglib.proxy.Enhancer; import org.springframework.cglib.proxy.MethodInterceptor; import org.springframework.cglib.proxy.MethodProxy; /** * 代理工厂 * * @author claire * */ public class ProxyFactory implements MethodInterceptor { // 接收目标对象 private static Object target; public ProxyFactory(Object target) { super(); this.target = target; } /** * 对目标对象生成子类对象 * * @return */ public Object getProxyInstance(){ //字节码生成工具 Enhancer en = new Enhancer(); //设置父类 en.setSuperclass(target.getClass()); //设置回调函数 en.setCallback(this); //创建子类对象 return en.create(); } /** * 事件处理器,执行目标方法时候触发 */ @Override public Object intercept(Object obj, Method method, Object[] args, MethodProxy methodProxy) throws Throwable { // TODO Auto-generated method stub System.out.println("开启事务"); Object result = method.invoke(target, args); System.out.println("提交事务"); return result; } }
Apppackage claire.c_cglib; import org.junit.Test; /** * 测试类 * @author claire * */ public class App { @Test public void testProxy_gblib() throws Exception{ //创建代理对象 UserDao target = new UserDao(); //代理对象 UserDao proxyInstance = (UserDao)new ProxyFactory(target).getProxyInstance(); //执行代理对象方法 proxyInstance.save(); System.out.println("********"); proxyInstance.find(); } }
- 示例代码
-
总结
- 目标对象可以不实现接口
- 目标类不能为final, 如果为final报错
- 方法如果为final/static, 不会被代理拦截,会直接执行目标对象方法
代理总结
在SpringAop编程中
- JDK的动态代理有一个限制,就是使用动态代理的对象必须实现一个或多个接口。如果目标对象有实现接口,spring使用jdk提供的代理生成代理对象。
- 如果目标对象没有实现接口,使用cglib代理。
- 如果目标没有实现接口、且为final,不能进行aop编程,报错。不能生成代理。
Aop编程
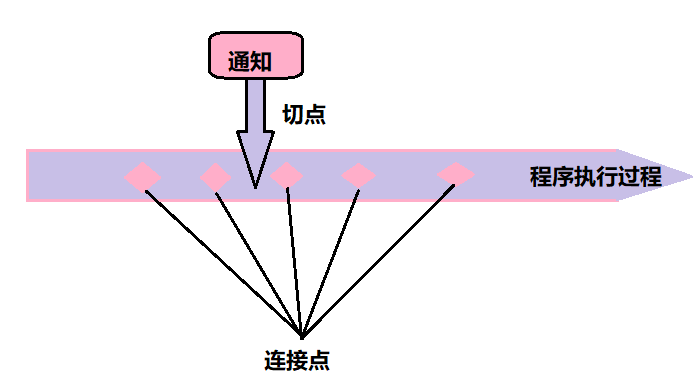
- 通知: 通知定义了切面是什么以及何时使用。Spring定义了5种通知,分别为:前置通知,后置通知,返回通知,异常通知及环绕通知。
- 连接点:应用执行过程中能够插入切面的一个点。这个“点”可以是调用方法时,抛出异常时,甚至是修改一个字段时。
- 切点: 一个切面不需要通知应用的所有连接点,切点有助于缩小切面所通知的连接点的范围。定义“何处”执行通知。
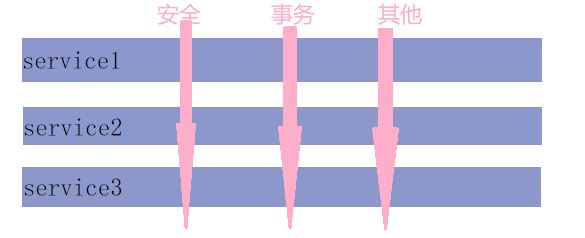
- 切面: 切面是通知和切点的结合。
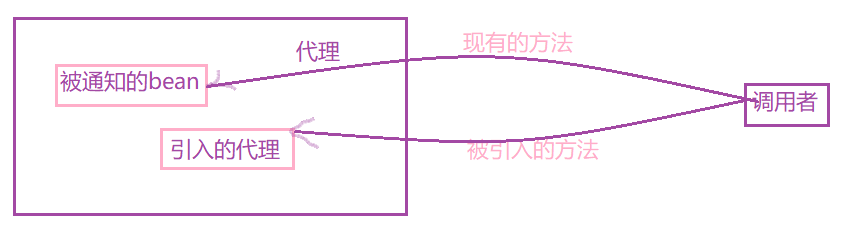
- 引入: 引入允许我们向现有的类添加新方法或属性。
- 织入: 织入是把切面应用到目标对象并创建新的代理对象的过程。切面在指定的连接点被织入到目标对象中。
实现Aop编程
示例代码:
package claire.d_aop2;

public interface IUserDao {

    void save();

}
package claire.d_aop2;

import org.springframework.stereotype.Repository;

@Repository //把对象加入IOC
public class UserDao implements IUserDao{
    @Override
    public void save() {
        System.out.println("save...");
    }
}
package claire.d_aop2;

import org.springframework.stereotype.Component;

//重复的代码

@Component("aop")
public class TranscationAop {

    public void beginTransaction(){
        System.out.println("开启事务");
    }

    public void commit(){
        System.out.println("提交事务");
    }
}
package claire.d_aop2;

import java.lang.reflect.InvocationHandler;
import java.lang.reflect.Method;
import java.lang.reflect.Proxy;


public class ProxyFactory {
    /**
     * 生成代理对象
     * @param target 目标对象
     * @param aop 给目标对象动态植入重复代码(关注点代码)
     * @return
     */
    public Object getProxyInstance(final Object target, final TranscationAop aop){
        return Proxy.newProxyInstance(target.getClass().getClassLoader(),
                target.getClass().getInterfaces(),
                new InvocationHandler() {
                    @Override
                    public Object invoke(Object proxy, Method method, Object[] args)
                            throws Throwable {
                        aop.beginTransaction();
                        Object result = method.invoke(target, args);
                        aop.commit();
                        return result;
                    }
                });
    }
}
<?xml version="1.0" encoding="UTF-8"?>
<beans xmlns="http://www.springframework.org/schema/beans"
    xmlns:xsi="http://www.w3.org/2001/XMLSchema-instance"
    xmlns:p="http://www.springframework.org/schema/p"
    xmlns:context="http://www.springframework.org/schema/context"
    xsi:schemaLocation="http://www.springframework.org/schema/beans
        http://www.springframework.org/schema/beans/spring-beans.xsd
        http://www.springframework.org/schema/context
        http://www.springframework.org/schema/context/spring-context.xsd"
    >
    <!-- 注解方式实现Spring IOC容器配置 -->
    <!-- 开启注解扫描 -->
    <context:component-scan base-package="claire.d_aop2"></context:component-scan>
    <bean id="proxyFactory" class="claire.d_aop2.ProxyFactory"></bean>
    <bean id="userDaoProxy" factory-bean="proxyFactory" factory-method="getProxyInstance">
        <constructor-arg index="0" ref="userDao"></constructor-arg>
        <constructor-arg index="1" ref="aop"></constructor-arg>
    </bean>
</beans>
package claire.d_aop2;

import org.junit.Test;
import org.springframework.context.ApplicationContext;
import org.springframework.context.support.ClassPathXmlApplicationContext;

public class App {
    private ApplicationContext ac = new ClassPathXmlApplicationContext("applicationContext.xml", getClass());

    @Test
    public void test_dop() throws Exception{
        IUserDao user = (IUserDao)ac.getBean("userDaoProxy");
        user.save();
    }
}

Aop编程-注解方式
开发步骤:
- 引入jar文件(前三个包不再sping源码中,直接百度下载)
-
aopalliance.jar
-
aspectjrt.jar (aspectj 在spring之前,面向切面开发的公用组件)
-
aspectjweaver.jar 下载地址
-
spring-aop-4.3.9.RELEASE.jar
-
- 引入aop名称空间(需要注意schemaLocation的顺序,如果aop在context前面,就会没有出现注解提示)
<beans xmlns="http://www.springframework.org/schema/beans"
    xmlns:xsi="http://www.w3.org/2001/XMLSchema-instance"
    xmlns:p="http://www.springframework.org/schema/p"
    xmlns:context="http://www.springframework.org/schema/context"
    xmlns:aop="http://www.springframework.org/schema/aop"
    xsi:schemaLocation="http://www.springframework.org/schema/beans
        http://www.springframework.org/schema/beans/spring-beans.xsd
        http://www.springframework.org/schema/context
        http://www.springframework.org/schema/context/spring-context.xsd
        http://www.springframework.org/schema/aop
        http://www.springframework.org/schema/aop/spring-aop-4.3.xsd
        "
    >
- 开启aop注解<aop:aspectj-autoproxy></aop:aspectj-autoproxy>
- 使用aop相关注解实现aop编程(通知类)
-
@Aspect 指定一个类为切面类(通知类)
-
@Before 前置通知
-
@After 后置通知
-
@AfterReturning 返回后通知 【出现异常不执行】
-
@AfterThrowing 异常通知
-
@Around 环绕通知
-
@Pointcut 定义一个切入点表达式变量 (后面使用这个切入点表达式的时候,直接引用方法名即可)
-
- execution切入点指示符:
- execution(方法修饰符 方法返回值 方法所属类 匹配方法名 (方法中的形参表) 方法声明抛出的异常):括号中黑体部分不可以省略,
- 上面各部分均可使用通配符("*", "..")。其中“*”表示匹配任意类型的参数,“..” 代表0个或者多个任意类型的参数。
- 例如:
- (): 匹配任何一个无参方法。
- (..): 匹配一个可以接受任何数量和类型参数的方法。
- (*): 匹配一个可以接受一个任意类型的参数。
- (*, Integer): 匹配两个参数,第一个为任意类型,第二个必须为Integer类型。
- 例子2:
- execution(public * *(..)): 匹配所有类型为public,第一个*为返回值,第二个为方法名。
- execution(* save*(..)): 匹配所有方法名前缀为save的方法。其返回值可以为任意类型。
- execution(* *production(*, String)): 匹配返回值为任意类型的方法名后缀为production的方法,要求其参数有两个参数,且第二个参数为String类型。
- execution(* com.zhihu.claire..*(..)): 匹配返回值为任意类型的、在com.zhuihu.calire包下的所有方法,包括子包。
- execution(* com..*.*service.find*(..)): 匹配com包及其子包下所有后缀名为service的类中,所有方法名前缀为find的方法。
- execution(* foo(String, ..)): 至少有一个String类型的参数。
- 例如:
示例代码:
-
-
application.xml
<?xml version="1.0" encoding="UTF-8"?>
<beans xmlns="http://www.springframework.org/schema/beans"
    xmlns:xsi="http://www.w3.org/2001/XMLSchema-instance" xmlns:p="http://www.springframework.org/schema/p"
    xmlns:context="http://www.springframework.org/schema/context" xmlns:tx="http://www.springframework.org/schema/tx"
    xmlns:aop="http://www.springframework.org/schema/aop"
    xsi:schemaLocation="http://www.springframework.org/schema/beans
                        http://www.springframework.org/schema/beans/spring-beans.xsd
                        http://www.springframework.org/schema/context
                        http://www.springframework.org/schema/context/spring-context-4.3.xsd
                        http://www.springframework.org/schema/aop
                        http://www.springframework.org/schema/aop/spring-aop-4.3.xsd">

    <!-- 注解方式实现Spring IOC容器配置 -->
    <!-- 开启注解扫描 -->
    <context:component-scan base-package="claire"></context:component-scan>
    <aop:aspectj-autoproxy></aop:aspectj-autoproxy>


</beans>
IUserDao.javapackage claire.dao; public interface IUserDao { void save(); }
UserDaopackage claire.dao; import org.springframework.stereotype.Repository; @Repository //把对象加入IOC public class UserDao implements IUserDao{ @Override public void save() { System.out.println("save..."); } }
TranscationAoppackage claire.aopannotion; import org.aspectj.lang.ProceedingJoinPoint; import org.aspectj.lang.annotation.After; import org.aspectj.lang.annotation.Around; import org.aspectj.lang.annotation.Aspect; import org.aspectj.lang.annotation.Before; import org.springframework.stereotype.Component; //重复的代码 @Component("aop") @Aspect //指定为一个切面类 public class TranscationAop { @Before("execution(public * save(..))") public void beginTransaction(){ System.out.println("前置通知"); } @After("execution(public * save(..))") public void commit(){ System.out.println("后置通知"); } @Around("execution(public * save(..))") public void aroundTransaction(ProceedingJoinPoint pjp) throws Throwable{ System.out.println("环绕开始"); pjp.proceed(); System.out.println("环绕结束"); } }
Testpackage claire.aopannotion; import org.junit.Test; import org.springframework.context.ApplicationContext; import org.springframework.context.support.ClassPathXmlApplicationContext; import claire.dao.IUserDao; public class App { private ApplicationContext ac = new ClassPathXmlApplicationContext("applicationContext.xml", getClass()); @Test public void test_dop() throws Exception{ IUserDao user = (IUserDao)ac.getBean("userDao"); user.save(); } }
-
处理通知中的参数:
-
-
- 如果切面所通知的方法有参数的话,实现能访问和使用传递给被通知方法的参数
    @Before("execution(* save(int)) and args(count)")
    public void beginTransaction(int count) {
        System.out.println("前置通知+count:"+count);
    }
args()标明传递给sava方法的int型参数也会传递到通知中去。
- 如果切面所通知的方法有参数的话,实现能访问和使用传递给被通知方法的参数
-
通过注解引入新功能:
具体解释见下面的XML配置单元。使用 @DeclareParents(value="", defaultImpl=) 进行配置。
Spring生内部生成代理对象的过程:
1. 创建容器对象的时候, 根据“切入点表达式”拦截的类,生成代理对象。
2. 如果目标对象有实现接口,使用jdk代理。没有实现接口,使用cglib代理。
4. 从容器获取代理后的对象。
5. 执行代理对象的方法,运行时动态植入切面类中的通知。
Aop编程-xml配置方式
如果需要声明切面,但是又不能为通知类添加注解的时候,就必须转为xml配置。(xml配置更易于维护)
aop常用配置元素
| AOP配置元素 | 用途 |
| <aop:advisor> | 定义aop通知器 |
| <aop:after> | 定义aop后置通知(不管是否执行成功) |
| <aop:after-returning> | 定义aop返回通知 |
| <aop:after-throwing> | 定义dop异常通知 |
| <aop:around> | 定义aop环绕通知(可以不通过成员变量,使前置通知与后置通知之间能共享消息) |
| <aop:aspect> | 定义一个切面 |
| <aop:aspectj-autoproxy> | 启用@AspectJ注解驱动的切面 |
| <aop:before> | 定义一个aop前置通知 |
| <aop:config> | 顶层的aop配置元素。大多数的<aop:*>元素必须包含在<aop:config>元素内 |
| <aop:declare-parents> | 以透明的方式为被通知的对象引入额外的接口 |
| <aop:pointcut> | 定义一个切点 |
基础示例代码:
将上面注解方式实现aop中的java类中的注解删除,其他保持不变,只需在application.xml中配置即可,具体配置如下:
-
TranscationAop
package claire.aopannotion;

import org.aspectj.lang.ProceedingJoinPoint;

public class TranscationAop {

    public void beginTransaction() {
        System.out.println("前置通知");
    }

    public void afterTransaction() {
        System.out.println("后置通知");
    }

    public void aroundTransaction(ProceedingJoinPoint pjp) throws Throwable {
        System.out.println("环绕开始 + 目标对象" + pjp.getTarget());
        pjp.proceed();
        System.out.println("环绕结束");
    }
}
application.xml<?xml version="1.0" encoding="UTF-8"?> <beans xmlns="http://www.springframework.org/schema/beans" xmlns:xsi="http://www.w3.org/2001/XMLSchema-instance" xmlns:p="http://www.springframework.org/schema/p" xmlns:context="http://www.springframework.org/schema/context" xmlns:tx="http://www.springframework.org/schema/tx" xmlns:aop="http://www.springframework.org/schema/aop" xsi:schemaLocation="http://www.springframework.org/schema/beans http://www.springframework.org/schema/beans/spring-beans.xsd http://www.springframework.org/schema/context http://www.springframework.org/schema/context/spring-context-4.3.xsd http://www.springframework.org/schema/aop http://www.springframework.org/schema/aop/spring-aop-4.3.xsd"> <bean id="userDao" class="claire.dao.UserDao"></bean> <bean id="aop" class="claire.aopannotion.TranscationAop"></bean> <aop:config> <!-- 定义切入点, 在大量通知元素的pointcut属性定义相同时,使用此元素消除重复 --> <aop:pointcut expression="execution(public * claire.dao.UserDao.*(..))" id="pt"/> <!-- 定义切面 --> <aop:aspect ref="aop"> <!--aop:pointcut 也可以定义在切面定义里面,被一个切面内的所有通知使用--> <aop:pointcut expression="execution(public * claire.dao.UserDao.*(..))" id="pt2"/> <aop:before method="beginTransaction" pointcut-ref="pt"/> <aop:after method="afterTransaction" pointcut="execution(public * claire.dao.UserDao.*(..))"/> <aop:around method="aroundTransaction" pointcut-ref="pt2"/> </aop:aspect> <!-- aop通知器 --> </aop:config> </beans>
使用xml配置实现新功能:
不用直接修改对象或类的定义就能够为对象或者类增加新的方法。使用切面,可以为对象拥有的方法添加新功能。同样的,使用被成为引入的aop概念,可以为Spring Bean添加新方法。在Spring中,切面只是实现了其所包装bean的相同接口代理,如果除了这些接口,代理也能暴露新的接口的话,那么切面所通知的bean看起来就像是实现了新的接口。注意,当引入接口的方法被调用时,代理会把此调用委托给实现了新接口的某个其他对象,实际上一个bean的实现被拆分到多个类中
具体实现
(为了方便,例子中所有用到的文件都在同一个包下):
假设新引入的接口为Encoreable,定义了接口方法newMethod(),它的接口实现类为DefaultEncoreable。
-
<aop:declare-parents types-matching="" implement-interface="" delegate-ref="" />
<aop:declare-parents>声明了此切面所通知的bean要在它的对象层次结构中拥有新的父类型,类型匹配 types-matching接口的那些bean在父结构中会增加 implement-interface所指向的接口, 而具体实现则通过default-impl属性来指定。
- 代码:
新增接口Encoreable
package claire.execution;

public interface Encoreable {
    void newMethod();
}
新接口实现package claire.execution; import org.springframework.stereotype.Component; @Component("defaultEncoreable") public class DefaultEncoreable implements Encoreable{ @Override public void newMethod() { // TODO Auto-generated method stub System.out.println("实现了新引入接口方法的类"); } }
原有接口IUserDaopackage claire.execution; public interface IUserDao { void save(int a); int get(); }
UserDaopackage claire.execution; import org.springframework.stereotype.Repository; @Repository public class UserDao implements IUserDao{ @Override public void save(int a) { System.out.println("UserDao:save"); } @Override public int get() { // TODO Auto-generated method stub System.out.println("get"); return 0; } }
xml配置<?xml version="1.0" encoding="UTF-8"?> <beans xmlns="http://www.springframework.org/schema/beans" xmlns:xsi="http://www.w3.org/2001/XMLSchema-instance" xmlns:p="http://www.springframework.org/schema/p" xmlns:context="http://www.springframework.org/schema/context" xmlns:tx="http://www.springframework.org/schema/tx" xmlns:aop="http://www.springframework.org/schema/aop" xsi:schemaLocation="http://www.springframework.org/schema/beans http://www.springframework.org/schema/beans/spring-beans.xsd http://www.springframework.org/schema/context http://www.springframework.org/schema/context/spring-context-4.3.xsd http://www.springframework.org/schema/aop http://www.springframework.org/schema/aop/spring-aop-4.3.xsd"> <context:component-scan base-package="claire.execution"></context:component-scan> <aop:config> <aop:aspect> <aop:declare-parents types-matching="claire.execution.IUserDao+" implement-interface="claire.execution.Encoreable" delegate-ref="defaultEncoreable" /> </aop:aspect> </aop:config> </beans>
testpackage claire.execution; import org.junit.Test; import org.springframework.context.ApplicationContext; import org.springframework.context.support.ClassPathXmlApplicationContext; public class App { private ApplicationContext ac = new ClassPathXmlApplicationContext("applicationContext.xml", getClass()); @Test public void test_dop() throws Exception{ IUserDao user = (IUserDao)ac.getBean("userDao"); ((Encoreable)user).newMethod(); System.out.println("**********"); user.get(); System.out.println("************"); user.save(2); } }
切入点表达式
Spring借助AspectJ的切入点表达式来定义Spring切面。
(注意只有execution指示器是实际匹配执行的,而其他的指示器都是用来限制匹配的。)
| AspectJ指示器 | 描述 |
| arg() | 限制连接点匹配参数为指定类型的执行方法 |
| @args() | 限制连接点匹配参数由指定注解标注的执行方法 |
| execution() | 用于匹配是连接点的执行方法 |
| this() | 限制连接点匹配aop代理的bean引用为指定类型的类 |
| target | 限制连接点匹配目标对象为指定类型的类 |
| @target() | 限制连接点匹配特定的执行对象,这些对象对应的类要具有指定类型的注解 |
| within() | 限制连接点匹配指定的类型 |
| @within() | 限制连接点匹配指定注解所标注的类型 |
| @annotion | 限定匹配带有指定注解的连接点 |
格式:
- 切入点表达式的api文档在spring-framework-4.3.9.RELEASEdocsspring-framework-referencehtml中的第十一章 Aspect Oriented Programming with Spring的11.2.3 Declaring a pointcut章节中
execution(modifiers-pattern? ret-type-pattern declaring-type-pattern?name-pattern(param-pattern)
            throws-pattern?)
具体:
- modifiers-pattern: 拦截的方法的访问修饰符,可以省略即(“?”表示零次或一次)。
- ret-type-pattern: 连接点方法返回值类型,必须指定,通常定义为* ,表示可以匹配任意返回值类型。
- declaring-type-pattern: 拦截的方法所在的类(?)。
- name-pattern(param-pattern): 方法名(参数), 方法名必须指定,可定义为*。参数用".."表示匹配任意参数
- throws-pattern: 方法声明的异常。
例子:
-
<aop:config>
        <aop:aspect ref="aop">
            <!-- 对claire.execution.UserDao内的所有方法加入前置通知 -->
            <aop:pointcut expression="execution(* claire.execution.UserDao.*(..))" id="pt1"/>
            <aop:before method="beginTransaction" pointcut-ref="pt1"/>
            <!-- 对所有返回值为int类型的方法设置后置通知 -->
            <!-- 定义省略了方法修饰符,方法所在包,方法名任意,参数任意 -->
            <aop:pointcut expression="execution(int *(..))" id="pt2"/>
            <aop:after method="afterTransaction" pointcut-ref="pt2"/>
        </aop:aspect>
    </aop:config>
- 所有名称中包含“save"的方法: execution(* *save*(..))
- 指定包(此例中包名为claire)及其子包的所有类的所有方法: execution(* claire..*.*(..)) 这里第二个 * 表示类,第三个 * 表示方法名。
- save及get方法: execution(* claire..*.save(..)) or execution(* claire..*.get(..)) 或者用 ||
- 不拦截get: !execution(* claire.execution.UserDao.get(..)) 或者用not(使用not时not前面要加空格)
- *为通知传递参数:
execution(* claire..UserDao.save(int)) and args(count)