-
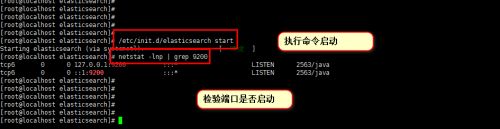
首先确保elasticsearch处于启动状态,启动elasticsearch的命令为/etc/init.d/elasticsearch start 。启动后我们基于9200端口验证es是否启动成功。具体如下图所示。
-
然后我们输入命令"curl -XGET 'http://localhost:9200/_cluster/health?pretty'" 查看集群状态信息,从下图我们可以看到集群处于yellow状态,且存在unassigned_shards信息。具体如下图所示。

-
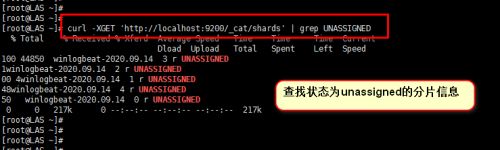
然后我们可以执行命令"curl -XGET 'http://localhost:9200/_cat/shards' | grep UNASSIGNED" 查看状态为unassigned的分片信息。具体展示如下图所示,可以看到出现了5条记录信息。
-
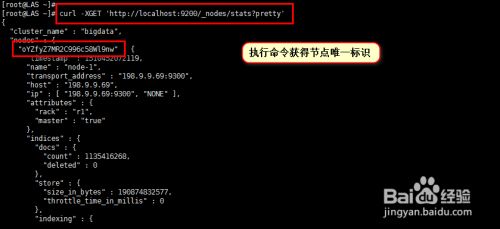
然后我们执行命令"curl -XGET 'http://localhost:9200/_nodes/stats?pretty'"查看节点的名称,这个名称后面处理未注册的shards时候要用到。具体结果如下图所示。
-
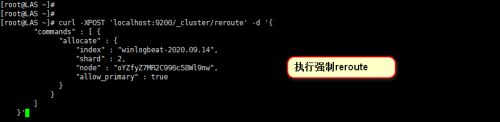
然后我们执行分片的强制reroute 具体命令格式为:"
curl -XPOST 'localhost:9200/_cluster/reroute' -d '{
"commands" : [ {
"allocate" : {
"index" : "winlogbeat-2020.09.14",
"shard" : 4,
"node" : "oYZfyZ7MR2C996c58Wl9nw",
"allow_primary" : true
}
}
]
}'"
其中 index代表要处理的索引名称,shard代表要处理的分配序号,node代表节点名称。
具体如下图所示。
-
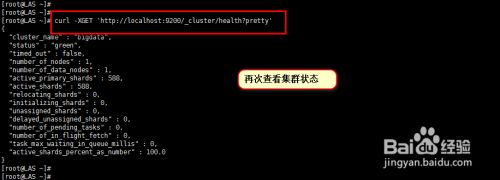
待我们手动循环执行以上脚本,处理未注册的shard信息后,我们再次验证集群的状态,同样输入命令"curl -XGET 'http://localhost:9200/_cluster/health?pretty'",查看集群状态,可以看到集群状态已经为green了。
-
最后在给大家提供一种脚本,批量处理未注册的shard信息的方法。脚本内容如下:
#!/bin/bash
for index in $(curl -s 'http://localhost:9200/_cat/shards' | grep UNASSIGNED | awk '{print $1}' | sort | uniq); do
for shard in $(curl -s 'http://localhost:9200/_cat/shards' | grep UNASSIGNED | grep $index | awk '{print $2}' | sort | uniq); do
echo $index $shard
curl -XPOST 'localhost:9200/_cluster/reroute' -d "{
'commands' : [ {
'allocate' : {
'index' : $index,
'shard' : $shard,
'node' : 'oYZfyZ7MR2C996c58Wl9nw',
'allow_primary' : true
}
}
]
}"
sleep 5
done
done
当然其中的node对应的值需要各位更改为自己节点的名称。