- 折线图

plt.figure(figsize=(40, 40))            # 确定图像画布的大小
plt.subplot(211)                        # 将画布分为两行一列

plt.xlabel('Number of sample', fontsize=40)                          # x轴的label
plt.ylabel('Characteristics of the amplitude', fontsize=40)          # y轴的label     备注(plot所有的原件都可以加fontsize属性)
plt.title('{} characteristics (ml_id=2 waveType=2)'.format(c_type), fontsize=50)     # 图的title

plt.plot(two_type_list[:two_negative_end_index], linestyle = "-", color = 'r',                # 绘制折线图,其中若x参数省略,则横坐标以y列表的索引代替
         label = 'Negative | average: {} variance: {} median: {}'.format(('%.2f' % np.mean(two_type_list[ : two_negative_end_index])),     # label参数表示这条线的label,可以当作图例显示出来
                                                                         ('%.2f' % np.var(two_type_list[ : two_negative_end_index])),
                                                                         ('%.2f' % np.median(two_type_list[ : two_negative_end_index]))),
        linewidth=3.0)                                                                        # 线宽

plt.plot(two_type_list[two_negative_end_index+1:], linestyle = "-", color = 'g',              # 备注(一张图可以累积加多个plot)
         label = 'Positive   | average: {} variance: {} median: {}'.format(('%.2f' % np.mean(two_type_list[two_negative_end_index+1 : ])),
                                                                           ('%.2f' % np.var(two_type_list[two_negative_end_index+1 : ])),
                                                                           ('%.2f' % np.median(two_type_list[two_negative_end_index+1 : ]))),
         linewidth=3.0)

# plt.ylim(0, 5)                     # 设置y轴的取值范围,如设置(0,5)则y轴坐标为从0开始,到5结束
# 刻度值字体大小设置
plt.tick_params(labelsize=40)        # 设置坐标轴上刻度的字体大小
plt.legend(loc=0, fontsize = 40)     # 显示图例,loc=0表示图例会根据图片情况自动摆放
####################################################################################################################################
plt.subplot(212)

plt.xlabel('Number of sample', fontsize=40)
plt.ylabel('Characteristics of the amplitude', fontsize=40)
plt.title('{} characteristics (ml_id=6 waveType=2)'.format(c_type), fontsize=50)

plt.plot(six_type_list[:six_negative_end_index], linestyle = "-", color = 'r',
         label = 'Negative | average: {} variance: {} median: {}'.format(('%.2f' % np.mean(six_type_list[ : six_negative_end_index])),
                                                                         ('%.2f' % np.var(six_type_list[ : six_negative_end_index])),
                                                                         ('%.2f' % np.median(six_type_list[ : six_negative_end_index]))),
         linewidth=3.0)

plt.plot(six_type_list[six_negative_end_index+1:], linestyle = "-", color = 'g',
         label = 'Positive   | average: {} variance: {} median: {}'.format(('%.2f' % np.mean(six_type_list[six_negative_end_index+1 : ])),
                                                                           ('%.2f' % np.var(six_type_list[six_negative_end_index+1 : ])),
                                                                           ('%.2f' % np.median(six_type_list[six_negative_end_index+1 : ]))),
         linewidth=3.0)

# 刻度值字体大小设置
plt.tick_params(labelsize=40)
plt.legend(loc=0, fontsize = 40)

plt.savefig('C:/Users/Mloong/Desktop/f_image/{} characteristics.png'.format(c_type), dpi=300)
plt.show()
2.散点图
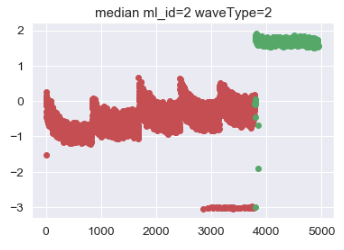
_type = 'median'

plt.scatter(range(0, 3790), two_avgAbs_list[0:3790], c='r')              # 散点图的x参数不可省略
plt.scatter(range(3791, 4939), two_avgAbs_list[3791:4939], c='g')

plt.title('{} ml_id=2 waveType=2'.format(_type))

plt.savefig('C:/Users/Mloong/Desktop/f_image/{} scatter ml_id=2 waveType=2.png'.format(_type), dpi=300)
plt.show()
3.概率分布图

# 概率分布图

type_list = two_median_list
_type = 'median'


num_bins = 100            # 条状图的个数

plt.hist(type_list[:3790], num_bins, normed=1, facecolor='blue', alpha=0.5)
plt.hist(type_list[3791:], num_bins, normed=1, facecolor='red', alpha=0.5)

plt.xlabel('Value')
plt.ylabel('Probability')
plt.title('{} probability distribution ml_id=2 waveType=2'.format(_type))

plt.subplots_adjust(left=0.15)
plt.savefig('C:/Users/Mloong/Desktop/f_image/{} probability distribution ml_id=2 waveType=2.png'.format(_type), dpi=300)
plt.show()
4.箱形图

_type = 'pca_value'

import seaborn as sns

plt.subplot(121)

plt.title('{} (ml_id=2 waveType=2)'.format(_type))
sns.set(style='whitegrid')         # 设置背景
sns.boxplot(x='label', y='{}'.format(_type), data=two_data, hue='label')    # data参数是一个dataframe对象,其中x和y分别时这个dataframe中的列名

#########################################################################################
plt.subplot(122)

plt.title('{} (ml_id=6 waveType=2)'.format(_type))
sns.set(style='whitegrid')         # 设置背景
sns.boxplot(x='label', y='{}'.format(_type), data=six_data, hue='label')    # 绘制箱形图

plt.savefig('C:/Users/Mloong/Desktop/f_image/{} box figure.png'.format(_type), dpi=300)
plt.show()
5.热图
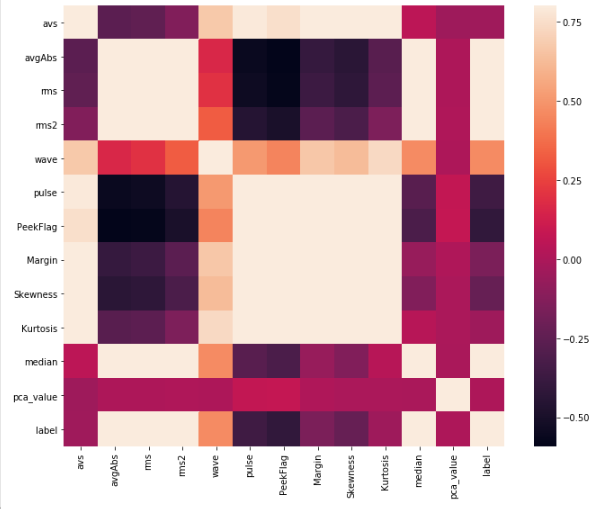
# 2.相关矩阵
import seaborn as sns
corrmat = two_data[['avs', 'avgAbs', 'rms', 'rms2', 'wave', 'pulse', 'PeekFlag',
                    'Margin', 'Skewness', 'Kurtosis', 'median', 'pca_value', 'label']].corr()       # .corr()求相关矩阵,此时返回的值corrmat为相关矩阵
f, ax = plt.subplots(figsize=(12, 9))
sns.heatmap(corrmat, vmax=.8, square=True)                                                          # 将这个相关矩阵以热图的形式画出来
plt.savefig('C:/Users/Mloong/Desktop/f_image/two correlation matrix.png', dpi=300)
plt.show()