第三百九十九节,Django+Xadmin打造上线标准的在线教育平台—生产环境部署CentOS6.5安装mysql5.6
1.检测系统是否已经安装过mysql或其依赖,若已装过要先将其删除,否则第4步使用yum安装时会报错:
[root@192 ~]# yum list installed | grep mysql
mysql-libs.x86_64       5.1.71-1.el6    @anaconda-CentOS-201311272149.x86_64/6.5
[root@192 ~]#
2.删除已安装的MySQL
[root@192 ~]# yum -y remove mysql-libs.x86_64
3.从mysql的官网下载.rpm安装库,有了安装库才能在线安装
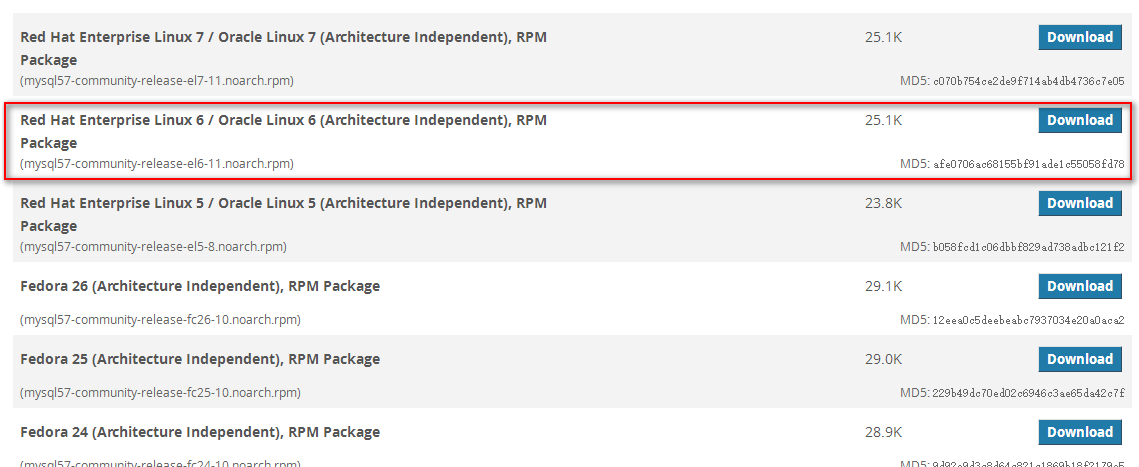
到官网下载系统对应的版本
https://dev.mysql.com/downloads/repo/yum/
wget dev.mysql.com/get/mysql57-community-release-el6-11.noarch.rpm 下载安装库
如果报以下错误
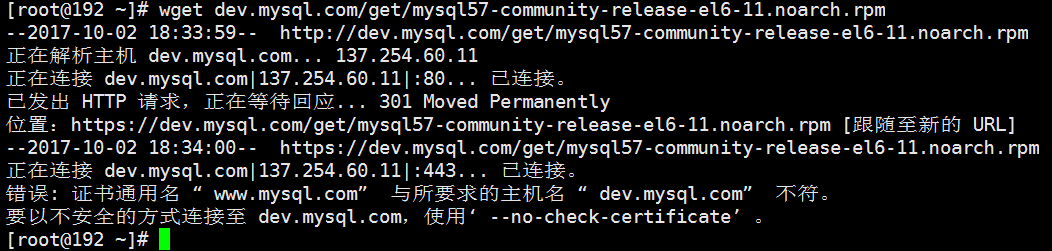
wget --no-check-certificate dev.mysql.com/get/mysql57-community-release-el6-11.noarch.rpm
4.安装刚才下载的mysql安装库
yum install mysql57-community-release-el6-11.noarch.rpm
5.安装成功后,我们可以看到/etc/yum.repos.d/目录下增加了以下两个文件
[root@192 ~]# ls /etc/yum.repos.d
CentOS-Base.repo  CentOS-Debuginfo.repo  CentOS-Media.repo  CentOS-Vault.repo  mysql-community.repo  mysql-community-source.repo
[root@192 ~]#
6.查看mysql5.6的安装源是否可用
[root@192 ~]# yum repolist enabled | grep mysql
mysql-connectors-community           MySQL Connectors Community              42
mysql-tools-community                MySQL Tools Community                   51
mysql57-community                    MySQL 5.7 Community Server             201
[root@192 ~]#
7.可以看到现在mysql安装源是5.7版本,我需要修改成5.6版本
使mysql5.6下面的enable=1
若有mysql其它版本的安装源可用,也请自行修改配置文件使其enable=0
vim /etc/yum.repos.d/mysql-community.repo 修改文件

8.使用yum命令安装mysql
[root@bogon ~]# yum -y install mysql-server
9.设置开机启动
[root@bogon ~]# chkconfig mysqld on
10.启动MySQL服务
启动文件在/usr/sbin/mysqld
[root@bogon ~]# service mysqld start
11.设置MySQL的root用户设置密码
[root@bogon ~]#  mysql -u root                //登录数据库
mysql> select user,host,password from mysql.user;     //查看数据库用户名和密码
+------+-----------+----------+
| user | host      | password |
+------+-----------+----------+
| root | localhost |          |
| root | bogon     |          |
| root | 127.0.0.1 |          |
|      | localhost |          |
|      | bogon     |          |
+------+-----------+----------+
可以看到用户名root的密码为空,用下面的命令设置root的密码为root
mysql> set password for root@localhost=password('root');
mysql> exit
12.用新密码登陆
[root@bogon ~]#  mysql -u root -p
Enter password:
13.查看mysql默认存储引擎,保证储引擎是InnoDB,因为InnoDB引擎才支持事务
[root@bogon etc]# mysql -u root -p
Enter password:
Welcome to the MySQL monitor.  Commands end with ; or g.
Your MySQL connection id is 2
Server version: 5.1.73 Source distribution

Copyright (c) 2000, 2013, Oracle and/or its affiliates. All rights reserved.

Oracle is a registered trademark of Oracle Corporation and/or its
affiliates. Other names may be trademarks of their respective
owners.

Type 'help;' or 'h' for help. Type 'c' to clear the current input statement.

mysql> show variables like 'storage_engine';
+----------------+--------+
| Variable_name  | Value  |
+----------------+--------+
| storage_engine | InnoDB |
+----------------+--------+
1 row in set (0.00 sec)
14.CentOS6.5开放mysql端口3306,CentOS6.5默认是不开放端口的,如果要让外部的系统访问CentOS6.5上的mysql,必须开放mysql的端口3306,修改/etc/sysconfig/iptables
vim /etc/sysconfig/iptables
在文件里加上
-A INPUT -m state --state NEW -m tcp -p tcp --dport 3306 -j ACCEPT
# Firewall configuration written by system-config-firewall
# Manual customization of this file is not recommended.
*filter
:INPUT ACCEPT [0:0]
:FORWARD ACCEPT [0:0]
:OUTPUT ACCEPT [0:0]
-A INPUT -m state --state ESTABLISHED,RELATED -j ACCEPT
-A INPUT -p icmp -j ACCEPT
-A INPUT -i lo -j ACCEPT
-A INPUT -m state --state NEW -m tcp -p tcp --dport 22 -j ACCEPT
#添加配置项
-A INPUT -m state --state NEW -m tcp -p tcp --dport 80 -j ACCEPT
-A INPUT -m state --state NEW -m tcp -p tcp --dport 3306 -j ACCEPT
-A INPUT -j REJECT --reject-with icmp-host-prohibited
-A FORWARD -j REJECT --reject-with icmp-host-prohibited
COMMIT
15.重启防火墙
[root@bogon etc]# service iptables restart
16.创建新用户test_user,远程登录mysql
create user '用户名'@'IP地址' identified by '密码'; 创建一个用户
%表示任意ip
create user 'test_user'@'%' identified by 'test_user';
17.给新用户test_user授权,让他可以从外部登陆和本地登陆
1
grant all privileges(除授权外的所有权限) on *.*(表示所有数据库的所有表) to 'test_user(授权的用户名)'@'localhost(授权ip)' identified by 'test_user(用户密码)';
grant all privileges on *.* to 'test_user'@'localhost' identified by 'test_user';
2
grant all privileges(除授权外的所有权限) on *.*(表示所有数据库的所有表) to 'test_user(授权的用户名)'@'%(所有ip)' identified by 'test_user(用户密码)';
grant all privileges on *.* to 'test_user'@'%' identified by 'test_user';
18.查看用户授权后的情况
mysql> select user,host,password from mysql.user;
+-----------+-----------------+-------------------------------------------+
| user      | host            | password                                  |
+-----------+-----------------+-------------------------------------------+
| root      | localhost       | *81F5E21E35407D884A6CD4A731AEBFB6AF209E1B |
| root      | 192.168.158.128 |                                           |
| root      | 127.0.0.1       |                                           |
| root      | ::1             |                                           |
|           | localhost       |                                           |
|           | 192.168.158.128 |                                           |
| test_user | %               | *8A447777509932F0ED07ADB033562027D95A0F17 |
| test_user | localhost       | *8A447777509932F0ED07ADB033562027D95A0F17 |
+-----------+-----------------+-------------------------------------------+
8 rows in set (0.00 sec)

mysql>
19.使用授权用户远程登陆
可以远程登陆了