目录
Vue指令
文本相关指令
<div id="app">
    <!-- 插值表达式 -->
    <p>{{ msg }}</p>
    <!-- eg:原文本会被msg替换 -->
    <p v-text='msg'>原文本</p>
    <!-- 可以解析带html标签的文本信息 -->
    <p v-html='msg'></p>
    <!-- v-once控制的标签只能被赋值一次 -->
    <p v-once>{{ msg }}</p>
</div>
<script type="text/javascript">
    // 指令: 出现在html标签中可以被vue解析处理的全局属性
    new Vue({
        el: "#app",
        data: {
            msg: "message"
        }
    })
</script>
属性指令
<!-- 给自定义全局属性绑定变量 -->
<p v-bind:abc="abc"></p>
<!-- 以原字符串形式绑定全局属性 -->
<p v-bind:title="'abc'"></p>

<!-- 单类名绑定 -->
<p v-bind:class="c1"></p>
<!-- 多类名绑定 -->
<p v-bind:class="[c2, c3]"></p>
<!-- 类名状态绑定 -->
<p v-bind:class="{c4: true|false|var}"></p>
<!-- 多类名状态绑定 -->
<p v-bind:class="[{c5: true}, {c6: flase}]"></p>

<!-- 样式绑定 -->
<div :style="div_style"></div>
<div :style="{ '100px', height: '100px', backgroundColor: 'blue'}"></div>
<script type="text/javascript">
    new Vue({
        el:"#app",
        data: {
            abc: "abc",
            c1: "p1",
            c2: "p2",
            c3: "p3",
            div_style: {
                 "200px",
                height: "200px",
                backgroundColor: "cyan"
            }
        }
    })
</script>
<!-- v-bind: 指令可以简写为 : -->
事件指令
<!-- v-on: 指令 简写 @ -->
<!-- 不传参事件绑定,但事件回调方法可以获取事件对象 -->
<p @click="fn"></p>
<!-- ()可以传入具体实参 -->
<p @click="fn()"></p>
<!-- ()情况下,事件对象应该显式传入 -->
<p @click="fn($event)"></p>
表单指令
-
v-model针对于表单元素
-
提交必须在表单中
-
v-model="控制value的变量"
-
v-model 指令用来在 input、select、textarea、checkbox、radio 等表单控件元素上创建双向数据绑定,根据表单上的值,自动更新绑定的元素的值。
按钮的事件我们可以使用 v-on 监听事件,并对用户的输入进行响应。
<div id="app">
    <!-- v-model针对于表单元素 -->
    <form action="" method="get">
        <!-- 1、双向绑定:服务于文本输入框 -->
        <!-- v-model存储的值为输入框的value值 -->
        <div>
            <input type="text" name="usr" v-model="in_val">
            <input type="password" name="ps" v-model="in_val" >
            <textarea name="info" v-model="in_val"></textarea>
        </div>

        <!-- 2、单选框 -->
        <div>
            <!-- 单选框是以name进行分组,同组中只能发生单选 -->
            <!-- v-model存储的值为单选框的value值 -->
            男:<input type="radio" name="sex" value="男" v-model="ra_val">
            女:<input type="radio" name="sex" value="女" v-model="ra_val">
            {{ ra_val }}
        </div>

        <!-- 3、单一复选框 -->
        <!-- v-model存储的值为true|false -->
        <!-- 或者为自定义替换的值 -->
        <div>
            <input type="checkbox" v-model='sin_val' true-value="选中" false-value="未选中" />
            {{ sin_val }}
        </div>

        <!-- 4、多复选框 -->
        <!-- v-model存储的值为存储值多复选框value的数组 -->
        <div>
            <input type="checkbox" value="男的" name="cless" v-model='more_val' />
            <input type="checkbox" value="女的" name="cless" v-model='more_val' />
            <input type="checkbox" value="呵呵" name="cless" v-model='more_val' />
            {{ more_val }}
        </div>
    </form>
</div>

<script type="text/javascript">
    new Vue({
        el: '#app',
        data: {
            in_val: '',
            // 默认值可以决定单选框默认选项
            ra_val: '男',
            // 默认值为true,单一复选框为选中,反之false为不选中
            sin_val: '',
            // 数组中存在的值对应的复选框默认为选中状态
            more_val: ['女的','不挑']//默认选项
        }
    })
</script>
双向绑定
同时绑定一个值,是虚拟DOM来不断的渲染现存的DOM
<!--双向绑定-->
<!--属性指令:v-model="变量",v-model绑定的变量控制的是表单元素的value值-->
<!--普通表单元素,用v-model直接绑定变量控制value值-->
<!--真实的DOM-->
<div id="app">
    <input type="text" v-model="v1">
    <input type="text" v-model="v1">
</div>

<!--data里面的是虚拟DOM-->
</body>
<script src="vuejs/vue.js"></script>
<script>
    new Vue({
        el:"#app",
        data:{
            v1:""
        }
    })
</script>
斗篷指令
- 避免页面闪烁
- v-cloak针对于斗篷指令
 <style>
        [v-cloak]{ display: none; }
    </style>
</head>
<body>
<div id="app" >
    <p>{{ msg }}</p>
    <p>{{ msg }}</p>
    <p>{{ msg }}</p>
    <p>{{ msg }}</p>
    <p>{{ msg }}</p>
    <p>{{ msg }}</p>
</div>
</body>
<script src="vuejs/vue.js"></script>
<script>
    new Vue({
        el:'#app',
        data:{
            msg:123456
        }
    })
</script>
条件指令
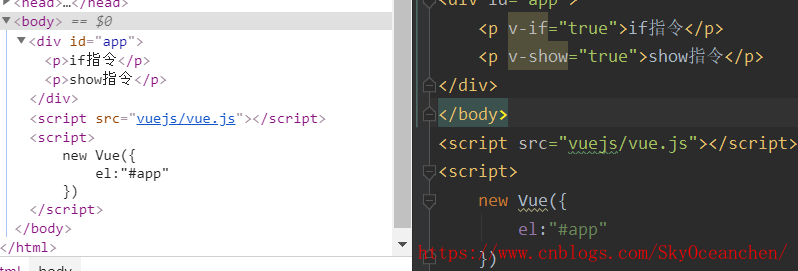
v-if和v-show的区别
条件渲染的值为true|false
true代表标签显示方式渲染
-
v-if:false v-if不渲染到页面
-
v-show :v-show以display:none渲染到页面,但也不会显示
<div id="app"> <p v-if="true">if指令</p> <p v-show="true">show指令</p> <p></p> </div> </body> <script src="vuejs/vue.js"></script> <script> new Vue({ el:"#app" }) </script>-
v-if是一个家族,包含v-if,v-else-if,v-else
-
v-if相关分支操作,在未显示情况下,是不会被渲染到页面中
-
通过key全局属性操作后,渲染过的分支会建立key对应的缓存,提高下一次渲染速度
-
v-else分支只要在所有上分支都为假时显示,且不需要条件
-
如果没有v-else,v-if在遇到下一个v-if也会结束
-
<div id="app">
        <!--条件指令:
            v-if="true|false",为假时,在页面上不渲染,可以隐藏标签中的信息
            v-show="true|false",为假时,在页面中用display:none渲染,虽然没展示,但是任在页面结构中
        -->
        <p v-if="false">if指令</p>
        <p v-show="false">show指令</p>

        <!-- v-if是一个家族
        v-if
        v-else-if
        v-else
        1、上分支成立,下分支会被屏蔽
        2、else分支只要在所有上分支都为假时显示,且不需要条件
        -->
        <p v-if="v1 === '1'">if分支</p>
        <p v-else-if="v1 === '2'">elif分支1</p>
        <p v-else-if="v1 === '3'">elif分支2</p>
        <p v-else>else分支</p>
        <hr>
</div>
</body>
<script src="js/vue.js"></script>
<script>
    new Vue({
        el: '#app',
        data: {
            v1: '2'
        }
    })
</script>


指令案例
<!DOCTYPE html>
<html lang="zh">
<head>
    <meta charset="UTF-8">
    <title>条件指令案例</title>
    <style>
        .box {
             400px;
            height: 200px;
        }
        .r {background-color: red}
        .y {background-color: yellow}
        .g {background-color: green}
        .action {background-color: pink;}
    </style>
</head>
<body>
<div id="app">
    <p>
        <!-- 控制高亮  action: c === 'red' if c === 'red' 成立 action 是true 成立 -->
        <button @click="changeC('red')" :class="{action: c === 'red'}">红</button>
        <!--<button @click="changeC('red')" :class="c === 'red'? 'action': ''">红</button>-->
        <button @click="changeC('yellow')" :class="{action: c === 'yellow'}">黄</button>
        <button @click="changeC('green')" :class="{action: c === 'green'}">绿</button>
    </p>
    <div class="wrap">
        <div class="box r" v-if="c === 'red'"></div>
        <div class="box y" v-else-if="c === 'yellow'"></div>
        <div class="box g" v-else></div>
    </div>
</div>
</body>
<script src="js/vue.js"></script>
<script>
    // sessionStorage的生命周期与页面标签绑定,当标签页被关闭,数据库被清空
    // localStorage是前台永久数据库

    // sessionStorage.name = '123';
    // localStorage.name = 'xyz';
    // localStorage.clear();


    new Vue({
        el: '#app',
        data: {
            // 页面重新刷新加载,可以从数据库中获取缓存,如果没有,再取默认值
            // c: 'red',
            c: localStorage.c ? localStorage.c : 'red',
        },
        methods: {
            changeC(color) {
                this.c = color;
                // 每一次改变c的值,将值同步到前台数据库
                localStorage.c = color;  // 存
            }
        }
    })
</script>
</html>
sessionStorage的生命周期与页面标签绑定,当标签页被关闭,数据库被清空
localStorage是前台永久数据库
测试
sessionStorage.name = '123';
localStorage.name = 'xyz';
清空
localStorage.clear();
循环指令
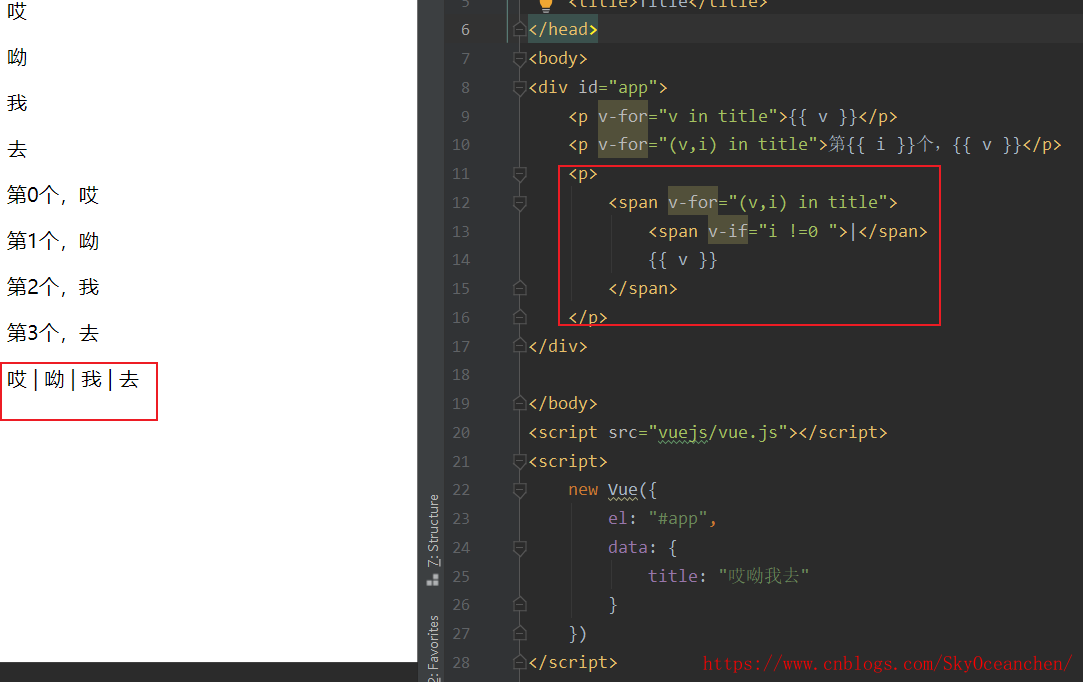
v-for,也可以多层嵌套
<div id="app">
        <p v-for="v in title">{{ v }}</p>
</div>

</body>
<script src="vuejs/vue.js"></script>
<script>
    new Vue({
        el: "#app",
        data: {
            title:"哎呦我去 "
        }
    })
</script>
<div id="app">
    <!--v:代表值,i:代表索引>
    <p v-for="(v,i) in title">第{{ i }}个,{{ v }}</p>
</div>

</body>
<script src="vuejs/vue.js"></script>
<script>
    new Vue({
        el: "#app",
        data: {
            title: "哎呦我去"
        }
    })
</script>
 <div id="app">
        <!--循环指令:
            v-for=""
            语法:
            v-for="成员 in 容器"
        -->
        <!--1、字符串循环渲染: 可以只遍历值,也可以遍历值与索引-->
        <!--2、数组循环渲染: 可以只遍历值,也可以遍历值与索引-->
        <div>
            <p v-for="(v, i) in arr">第{{ i }}元素:{{ v }}</p>
        </div>
        <!--3、对象循环渲染: 可以只遍历值,也可以遍历值与键,还可以遍历值、键与索引-->
        <div>
            <p v-for="v in people">{{ v }}</p>
        </div>
        <div>
            <p v-for="(v, k) in people">{{ k }}:{{ v }}</p>
        </div>
        <div>
                <!--(v, k, i) v :value k:key i :index-->
            <p v-for="(v, k, i) in people">{{ i }}-{{ k }}:{{ v }}</p>
        </div>
        <br>
        <div>
            <div v-for="(stu, i) in stus">
                <hr v-if="i != 0">
                <p v-for="(v, k) in stu">{{ k }}:{{ v }}</p>
            </div>
        </div>

    </div>
</body>
<script src="js/vue.js"></script>
<script>
    new Vue({
        el: '#app',
        data: {
            title: '循环指令',
            arr: [1, 4, 2, 5, 3],
            people: {
                name: '兔子',
                color: '粉白',
                price: 6.66,
            },
            stus: [
                {
                    name: "Bob",
                    age: 18
                },
                {
                    name: "Tom",
                    age: 17
                },
                {
                    name: "Jerry",
                    age: 19
                }
            ]
        }
    })
</script>


条件
循环指令案例(留言案例)
数组的增
push pop unshift shift splice
this.comments.unshift(this.msg);
this.comments.splice(0,0,0);
    <div id="app">
        <input type="text" v-model="msg">
        <button @click="send_comment">留言</button>
        <ul>
            <li v-for="(v, i) in comments" @click="deleteMsg(i)">{{ v }}</li>
        </ul>
    </div>
</body>
<script src="js/vue.js"></script>
<script>
    new Vue({
        el: '#app',
        data: {
            msg: '',
            comments: []
        },
        methods: {
            send_comment() {
                // 数组的增
                // push pop unshift shift splice
                // this.comments.unshift(this.msg);
                // this.comments.splice(0,0,0);
                if (this.msg) {
                    this.comments.push(this.msg);  // 留言
                    this.msg = '';  // 留言后清空输入框
                }
            },
            //清除记录
            deleteMsg(index) {
                this.comments.splice(index, 1);
            }
        }
    })
</script>
splice的用法
主要用于对数组的操作
// 数组操作万能方法,可以完成增删改
let arr = [1, 2, 3];
// 参数:开始索引,操作长度,操作的结果们
arr.splice(2, 0, 100);
arr.splice(1, 1);
console.log(arr);
todolist案例
<div id="app">
    <div>
        <input type="text" v-model="val">
        <button type="button" @click="submitMsg">提交</button>
    </div>
    <ul>
        <li v-for="(v, i) in list" :key="i" @click="removeMsg(i)">{{ v }}</li>
    </ul>
    {{ list }}
</div>
<script type="text/javascript">
    new Vue({
        el: "#app",
        data: {
            val: "",
            list: []
        },
        methods: {
            submitMsg () {
                if (this.val) {
                    this.list.push(this.val);
                    this.val = ""
                }
            },
            removeMsg(index) {
                this.list.splice(index, 1)
            }
        }
    })
</script>
A作业(必做)
1、先有一下成绩单数据
scores = [
	{ name: 'Bob', math: 97, chinese: 89, english: 67 },
	{ name: 'Tom', math: 67, chinese: 52, english: 98 },
	{ name: 'Jerry', math: 72, chinese: 87, english: 89 },
	{ name: 'Ben', math: 92, chinese: 87, english: 59 },
	{ name: 'Chan', math: 47, chinese: 85, english: 92 },
]
用table表格标签渲染以上数据,表格第一列是学生总分排序,最后一列是学生总分;
<body>
<div id="app">
    <h1 style="text-align: center">成绩单</h1>
    <table width="400" border="1" rules="all" style="margin: auto">
        <thead>
        <tr>
            <td>sort</td>
            <td>name</td>
            <td>math</td>
            <td>chinese</td>
            <td>english</td>
            <td>total</td>
        </tr>
        </thead>
        <tbody>
        <tr v-for="(stu,i) in scores">
            <td>{{ i+1 }}</td>
            <td v-for="v in stu">{{ v }}</td>
        </tr>
        </tbody>
    </table>

</div>

</body>
<script src="vuejs/vue.js"></script>
<script>
    let scores = [
        {name: 'Bob', math: 97, chinese: 89, english: 67},
        {name: 'Tom', math: 67, chinese: 52, english: 98},
        {name: 'Jerry', math: 72, chinese: 87, english: 89},
        {name: 'Ben', math: 92, chinese: 87, english: 59},
        {name: 'Chan', math: 47, chinese: 85, english: 92},
    ];

    let total_scores = [];
    // in 和 of 的区别   in 是求出来的是索引, of 直接是求的数值结果
    // for (stu in scores)
    // 计算总分
    for (stu of scores) {
        stu.total = stu.math + stu.chinese + stu.english;
        total_scores.push(stu);
    }


    //冒泡排序
    for (let i = 0; i < total_scores.length - 1; i++) {
        for (let j = 0; j < total_scores.length - 1 - i; j++) {
            if (total_scores[j].total < total_scores[j + 1].total) {
                let t = total_scores[j];
                total_scores[j] = total_scores[j + 1];
                total_scores[j + 1] = t;
            }
        }
    }
    console.log(total_scores);


    new Vue({
        el: '#app',
        data: {
            scores: total_scores,
        }
    });


</script>
冒泡排序
    let arr = [1, 4, 2, 5, 3];
    for (let i = 0; i < 5 - 1; i++) {
        for (let j = 0; j < 5 - 1 - i; j++) {
            if (arr[j] > arr[j + 1]) {
                // arr[j] ^= arr[j+1];
                // arr[j+1] ^= arr[j];
                // arr[j] ^= arr[j+1];
                let t = arr[j];
                arr[j] = arr[j + 1];
                arr[j + 1] = t;
            }
        }
    }
    console.log(arr);
2、还是采用上方相同的数据,采用相同的渲染规则,只渲染所有科目都及格了的学生。
<tbody>
     <tr v-for="(stu,i) in scores" v-if="stu.math>60&&stu.chinese>60&&stu.english>60">
        <td>{{ i+1 }}</td>
		<td v-for="v in stu">{{ v }}</td>
     </tr>
</tbody>
B作业(选做)
1、还是采用上方相同的数据,添加筛选规则:
i)有三个按钮:语文、数学、外语,点击谁谁高亮,且当前筛选规则采用哪门学科
    <style>
        .action{
            background-color: deeppink;
        }
    </style>
<div style="text-align: center;margin: 20px">
        <button :class="{ action:rule === 'chinese'}" @click="clickAction('chinese')">chinese</button>
        <button :class="{ action:rule === 'math'}" @click="clickAction('math')">math</button>
        <button :class="{ action:rule === 'english'}" @click="clickAction('english')">english</button>
</div>
new Vue({
        el: '#app',
        data: {
            scores: total_scores,
            rule:"",
        },
        methods:{
            clickAction(rule){
                this.rule=rule
            }
        }
    });
ii)两个输入框,【】~【】,前面天最小分数,后面填最大分数,全部设置完毕后,表格的数据会被更新只渲染满足所有条件的结果
举例:点击语文,输入【86】~【87】,那就只会渲染Jerry和Ben两条数据
<div style="text-align: center;margin: 20px">
        <button :class="{ action:rule === 'chinese'}" @click="clickAction('chinese')">chinese</button>
        <button :class="{ action:rule === 'math'}" @click="clickAction('math')">math</button>
        <button :class="{ action:rule === 'english'}" @click="clickAction('english')">english</button>
        <input type="number" min="1" max="100" v-model="min">
        ~
        <input type="number" min="1" max="100" v-model="max">

    </div>
<tbody v-if="rule === 'math'">
    <tr v-for="(stu,i) in scores" v-if="(min&&max&&stu.math>= +min && stu.math <= +max || (!min || !max))">
        <td>{{ i+1 }}</td>
        <td v-for="v in stu">{{ v }}</td>
    </tr>
</tbody>
<tbody v-else-if="rule === 'chinese'">
    <tr v-for="(stu,i) in scores" v-if="(min&&max&&stu.chinese>= +min && stu.chinese <= +max || (!min || !max))">
        <td>{{ i+1 }}</td>
        <td v-for="v in stu">{{ v }}</td>
    </tr>
</tbody>
<tbody v-else-if="rule === 'english'">
    <tr v-for="(stu,i) in scores" v-if="(min&&max&&stu.english>= +min && stu.english <= +max || (!min || !max))">
        <td>{{ i+1 }}</td>
        <td v-for="v in stu">{{ v }}</td>
    </tr>
</tbody>
<tbody v-else>
    <tr v-for="(stu,i) in scores">
        <td>{{ i+1 }}</td>
        <td v-for="v in stu">{{ v }}</td>
	</tr>
</tbody>
   new Vue({
        el: '#app',
        data: {
            scores: total_scores,
            rule: "",
            min: "",
            max: ""
        },
        methods: {
            clickAction(rule) {
                this.rule = rule
            },

        }
    });
知识点总结
1、v-model完成表单指令,简单的控制value,单选框中的使用,单独复选框的使用以及复选框中的使用
	<input type="password" v-model="控制value的变量" />
2、了解:斗篷指令解决页面闪烁
	v-cloak =>  [v-cloak] {display:none} => 加载vue就会清除v-cloak属性
3、条件指令v-if与v-show区别,v-if家族成员以及上分支会成立会屏蔽下分支的工作机制
	v-if不渲染隐藏 | v-show以display:none渲染隐藏
	v-if | v-else-if | v-else
4、循环指令v-for如何循环渲染字符串、数组、字典,以及需要嵌套循环渲染赋值结构
	v-for="v in str"  v-for="(v,i) in str"
	v-for="v in arr"  v-for="(v,i) in arr"
	v-for="v in dic"  v-for="(v,k) in dic"  v-for="(v,k,i) in dic"
	[{},{}] {a:[]} [str1,str2]
5、了解:delimiters实例成员解决插值表达式符号冲突
	delimiters: ['{{', '}}']
6、计算属性(方法属性)在computed中声明,方法内部变量会被监听,值来源于方法返回值
	computed: {
		methodAttr() {
			// 内部出现的变量都会被监听,发生值更新会回调该方法
			return '方法属性的值'
		}
	}
7、监听watch可以设置数据的监听方法,在监听属性更新时,完成特定逻辑
	watch: {
		attr() {
			// attr属性被监听,发生值更新会回调该方法
		}
	}
8、重点:组件的概念,组件就是vue实例(对象)
	<div id="app">
		<tag />
		<tag />
	</div>

	let tag = {
		template: '<p>子组件</p>'
	}

	new Vue({
		el: '#app',
		components: {
			tag,
		}
	})