VMware 的安装过程就省略了,这步应该也不会遇到什么大的问题,下载 Ubuntu 镜像,建议在创建虚拟机的时候给足 CPU 核心和硬盘空间
https://releases.ubuntu.com/20.04/ubuntu-20.04.4-desktop-amd64.iso安装 ROS ,笔者使用的版本为 Ubuntu 20.04 对应的 Noetic 版本,也就是最新的 ROS 系统,官方测试表示 16.04 和 18.04 能正常使用,安装其他版本 ros 的话,后面所有 noetic 关键词都需要更换成对应的版本
sudo sh -c 'echo "deb http://packages.ros.org/ros/ubuntu $(lsb_release -sc) main" > /etc/apt/sources.list.d/ros-latest.list'
sudo apt install curl
curl -s https://raw.githubusercontent.com/ros/rosdistro/master/ros.asc | sudo apt-key add -
sudo apt update
sudo apt install ros-noetic-desktop-full
echo "source /opt/ros/melodic/setup.bash" >> ~/.bashrc
source ~/.bashrc
安装 Ceres ,笔者使用的版本为 2.1.0 ,之后编译 driver 的时候需要用的 c++17 的特性,因此需要 g++-7 以后的版本,笔者测试后确认 g++-9 (9.4.0) 可用,因此安装该版本并设为首选编译器,可以通过 g++ -v测试当前安装的版本,如果已经是该版本则可以不用安装
sudo apt-get install cmake git libgoogle-glog-dev libgflags-dev libatlas-base-dev libeigen3-dev libsuitesparse-dev software-properties-common
sudo add-apt-repository ppa:ubuntu-toolchain-r/test
sudo apt-get update
sudo apt-get install gcc-9 g++-9
sudo update-alternatives --install /usr/bin/gcc gcc /usr/bin/gcc-9 60 --slave /usr/bin/g++ g++ /usr/bin/g++-9
git clone https://ceres-solver.googlesource.com/ceres-solver
cd ceres-solver
mkdir build && cd build
cmake ..
make -j4
make test
sudo make install
如果设置首选编译器失败,可以分为两行执行
sudo update-alternatives --install /usr/bin/gcc gcc /usr/bin/gcc-9
sudo update-alternatives --install /usr/bin/g++ g++ /usr/bin/g++-9
安装 PCL ,笔者安装的是最新的 1.12 ,测试可以正常使用,官方要求安装 1.9 及之后的版本
https://github.com/PointCloudLibrary/pcl/releases 下载 Source Code 并解压
cd pcl
mkdir build && cd build
cmake -DCMAKE_BUILD_TYPE=Release ..
make -j4
sudo make install
安装 LIVOX SDK
git clone https://github.com/Livox-SDK/Livox-SDK.git
cd Livox-SDK
cd build && cmake ..
sudo make && make install
安装 LOAM-LIVOX
mkdir catkin_ws && cd catkin_ws
mkdir src && cd src
git clone https://github.com/hku-mars/loam_livox.git
git clone https://github.com/Livox-SDK/livox_ros_driver.git ws_livox/src
将 livox_ros_driver/src 文件夹下的文件移动到 livox_ros_driver 下
cd ..
catkin_make
笔者编译时遇到了和 OpenCV 相关的错误,修正方式如下
loam_livox/source/laser_feature_extractor.hpp:42
#include <opencv2/opencv.hpp>

loam_livox/source/read_camera.cpp:25
cap.set(cv::CAP_PROP_SETTINGS, 1); //opens camera properties dialog

loam_livox/source/read_camera.cpp:27
cap.set(cv::CAP_PROP_FRAME_WIDTH, 320);

loam_livox/source/read_camera.cpp:28
cap.set(cv::CAP_PROP_FRAME_HEIGHT, 240);
如果编译顺利,就可以下载一个作者提供的 rosbag 跑一下试试了,笔者将 rosbag 放在 catkin_ws/bag/ 下
roslaunch loam_livox rosbag_largescale.launch
rosbag play bag/xxx.bag
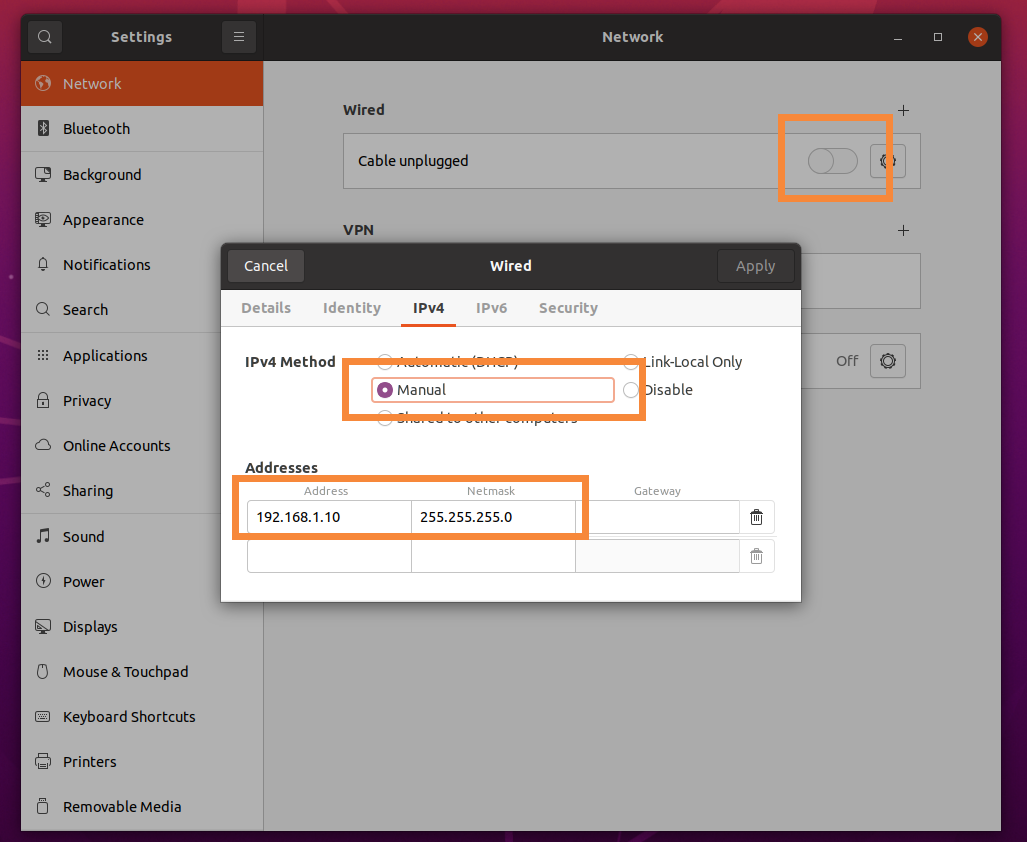
如果能顺利跑完,则可以上机测试了, Livox 提供两种和 PC 连接的方式,第一种是通过路由器 DHCP 分配动态 IP ,然后和 PC 处于同一个局域网内则可以连上;另一种是设置静态 IP 后通过网线与 PC 直连,这需要先通过路由器连接上 Livox 然后使用官方提供的 Livox Viewer 将设备的 IP 设置为静态 IP ,格式为 192.168.1.xxx ,不同设备有不同的网段,具体可以查看官方手册, Livox-40 是 11-80 ,笔者设置为 192.168.1.30 ,然后在 VMware 设置里将虚拟机的网络连接方式改为桥接模式 ,然后将 IPv4 设置在同一网段下,子网掩码为 255.255.255.0(必须填写) ,重开网络则可以连接上设备。如果是在笔记本内安装虚拟机,则可以通过 WiFi 连网然后网线连接设备,方便开发,此时虚拟机内是无法上网的,如果要上网则切回 NAT 模式,然后重开网络即可


如果需要自动保存 rosbag 在 livox.launch 里新增一行即可,保存路径填写自己的路径
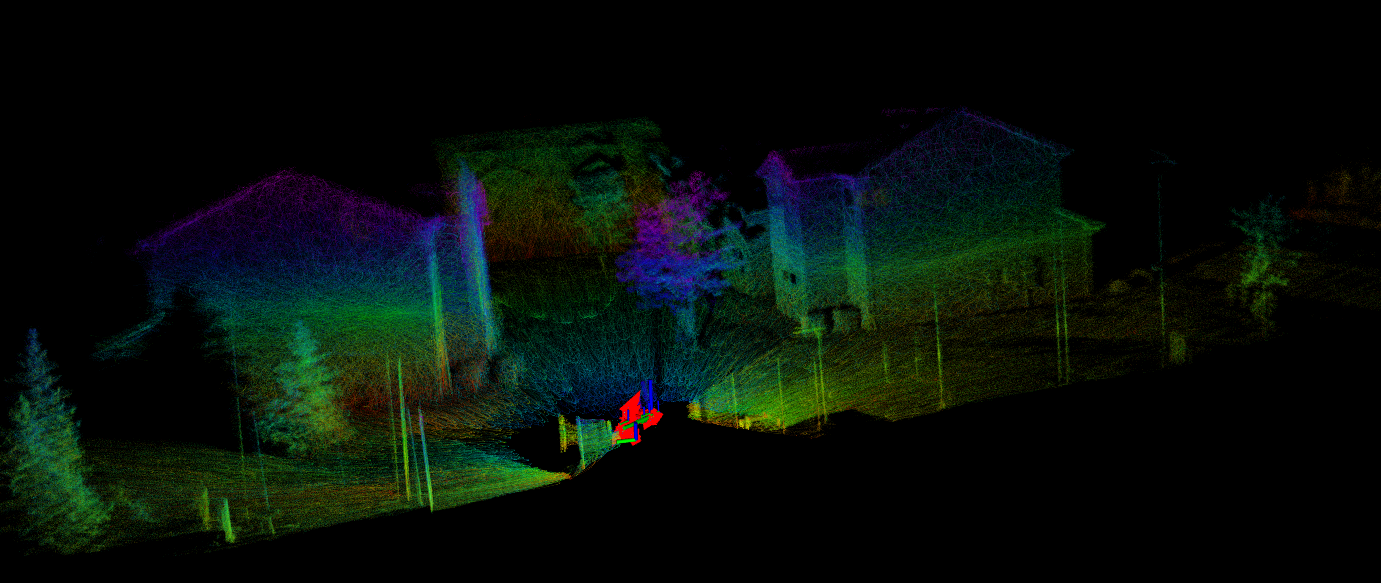
<node pkg="rosbag" type="record" name="bag_record" args="/livox/lidar -o 保存路径/my_bag.bag"/>以下为笔者实机测试的效果图
