UINavigationController, 导航控制器
单视图控制器工程, window的rootViewController只能管理一个视图控制器
缺点: 切换页面必须手动修改代码
self.window.rootViewController = [[[RootViewController alloc] init] autorelease];
多视图控制器工程

如何切换视图控制器?
    UINavigationController, 导航控制器, 继承于UIViewController, 用与管理具有层级关系的多个视图控制器
    FirstViewController *firstVC = [[FirstViewController alloc] init];
    创建导航控制器, 并指定它管理的第一个页面(视图控制器)
    UINavigationController *navC = [[UINavigationController alloc] initWithRootViewController:firstVC];
    指定window的rootViewController为导航控制器
    self.window.rootViewController = navC;
    释放
    [firstVC release];
    [navC release];
导航控制器如何管理视图控制器?
1.以栈的形式管理视图控制器
2.切换到下一个页面, 需要入栈(压栈)
3.返回到上一个页面, 需要出栈, 第一个页面不能出栈
4.哪一个页面在栈顶, 就显示哪一个页面
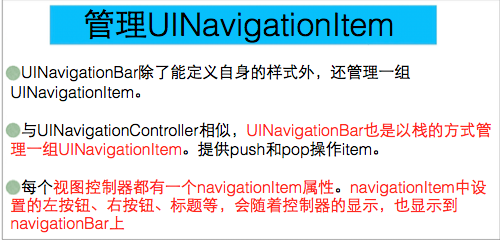
UINavigationBar, 导航栏, 继承于UIView
UINavigationController自带一个UINavigationBar
UINavigationController管理的视图控制器共用一个UINavigationBar
UINavigationBar, 竖屏高44, 横屏高30
半透明效果(毛玻璃效果), 默认YES
navC.navigationBar.translucent = YES;
透明: y值0从顶部开始
不透明: y值0从导航栏底部开始
导航栏颜色
navC.navigationBar.barTintColor = [UIColor colorWithRed:0.549 green:1.000 blue:0.987 alpha:1.000];
    导航栏样式
    navC.navigationBar.barStyle = UIBarStyleBlack;
    导航栏渲染色, 文字和按钮的渲染色
    navC.navigationBar.tintColor = [UIColor whiteColor];
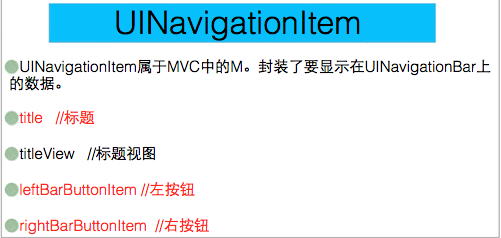
UINavigationItem, 用于管理标题和按钮, 继承于NSObject
导航控制器管理的视图控制器都有一个UINavigationItem
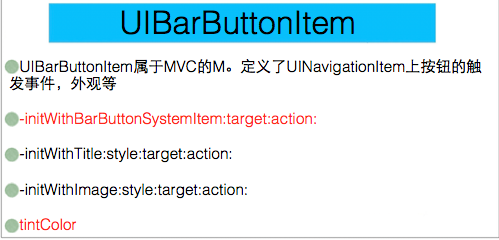
"FirstViewController.m
#import "FirstViewController.h"
#import "SecondViewController.h"
@interface FirstViewController ()
@end

@implementation FirstViewController
- (void)viewDidLoad {
    [super viewDidLoad];

    self.view.backgroundColor = [UIColor colorWithRed:0.932 green:1.000 blue:0.438 alpha:1.000];

    UIButton *button = [UIButton buttonWithType:UIButtonTypeSystem];
    [button setTitle:@"进入SecondVC" forState:UIControlStateNormal];
    button.frame = CGRectMake(100, 100, 175, 40);
    [button addTarget:self action:@selector(goToSecondVC) forControlEvents:UIControlEventTouchUpInside];
    [self.view addSubview:button];

    //设置标题和按钮
    //设置标题
    self.navigationItem.title = @"第一页";
    //自定义标题视图
    UISegmentedControl *segment = [[UISegmentedControl alloc] initWithItems:@[@"已接电话", @"未接电话"]];
    self.navigationItem.titleView = segment;
    [segment release];

    //右侧按钮
    //UIBarButtonItem, 继承于UIBarItem, 导航栏上的按钮
    UIBarButtonItem *right = [[UIBarButtonItem alloc] initWithBarButtonSystemItem:(UIBarButtonSystemItemDone) target:self action:@selector(pressRight)];
    self.navigationItem.rightBarButtonItem = right;
    [right release];
    //多个右侧按钮
    UIBarButtonItem *right1 = [[UIBarButtonItem alloc] initWithTitle:@"水上漂" style:(UIBarButtonItemStylePlain) target:self action:@selector(pressRight)];
    UIBarButtonItem *right2 = [[UIBarButtonItem alloc] initWithImage:[UIImage imageNamed:@"1"] style:(UIBarButtonItemStylePlain) target:self action:@selector(pressRight)];
    self.navigationItem.rightBarButtonItems = @[right1, right2];
    [right1 release];
    [right2 release];
    //左侧
    //self.navigationItem.leftBarButtonItem
    //self.navigationItem.leftBarButtonItems


}

- (void)pressRight {
    NSLog(@"%s", __FUNCTION__);
}

- (void)goToSecondVC {
    NSLog(@"%s", __FUNCTION__);
    //切换下一个页面
    //1.创建下一个页面
    SecondViewController *secondVC = [[SecondViewController alloc] init];
    //2.导航控制器把下一个页面压入栈中
    [self.navigationController pushViewController:secondVC animated:YES];
    //3.释放
    [secondVC release];
}

- (void)didReceiveMemoryWarning {
    [super didReceiveMemoryWarning];
    // Dispose of any resources that can be recreated.
}
@end
SecondViewController.m
#import "SecondViewController.h"
#import "ThirdViewController.h"
@interface SecondViewController ()
@end

@implementation SecondViewController

- (void)viewDidLoad {
    [super viewDidLoad];

    self.view.backgroundColor = [UIColor colorWithRed:0.782 green:1.000 blue:0.586 alpha:1.000];

    UIButton *button = [UIButton buttonWithType:UIButtonTypeSystem];
    [button setTitle:@"进入ThirdVC" forState:UIControlStateNormal];
    button.frame = CGRectMake(255, 100, 100, 40);
    [button addTarget:self action:@selector(goToThirdVC) forControlEvents:UIControlEventTouchUpInside];
    [self.view addSubview:button];

    UIButton *backButton = [UIButton buttonWithType:UIButtonTypeSystem];
    [backButton setTitle:@"返回FirstVC" forState:UIControlStateNormal];
    backButton.frame = CGRectMake(20, 100, 100, 40);
    [backButton addTarget:self action:@selector(backToFirstVC) forControlEvents:UIControlEventTouchUpInside];
    [self.view addSubview:backButton];

    self.navigationItem.title = @"第二页";
}

- (void)goToThirdVC {
    ThirdViewController *thirdVC = [[ThirdViewController alloc] init];
    [self.navigationController pushViewController:thirdVC animated:YES];
    [thirdVC release];
}

- (void)backToFirstVC {
    //如何返回上一个页面
    //让当前的视图控制器出战
    [self.navigationController popViewControllerAnimated:YES];
}
- (void)didReceiveMemoryWarning {
    [super didReceiveMemoryWarning];
    // Dispose of any resources that can be recreated.
}
@end
ThirdViewController.m
#import "ThirdViewController.h"
@interface ThirdViewController ()
@end

@implementation ThirdViewController

- (void)viewDidLoad {
    [super viewDidLoad];

    self.view.backgroundColor = [UIColor colorWithRed:0.574 green:0.981 blue:1.000 alpha:1.000];

    UIButton *backButton = [UIButton buttonWithType:UIButtonTypeSystem];
    [backButton setTitle:@"返回SecondVC" forState:UIControlStateNormal];
    backButton.frame = CGRectMake(20, 100, 150, 40);
    [backButton addTarget:self action:@selector(backToScondVC) forControlEvents:UIControlEventTouchUpInside];
    [self.view addSubview:backButton];

    UIButton *button = [UIButton buttonWithType:UIButtonTypeSystem];
    [button setTitle:@"返回FirstVC" forState:UIControlStateNormal];
    button.frame = CGRectMake(375 - 170, 100, 150, 40);
    [button addTarget:self action:@selector(backToFirstVC) forControlEvents:UIControlEventTouchUpInside];
    [self.view addSubview:button];

    self.navigationItem.title = @"第三页";
}

- (void)backToFirstVC {
    //返回第一个页面
    //让当前的视图控制器出栈
    [self.navigationController popToRootViewControllerAnimated:YES];
}

- (void)backToScondVC {
    [self.navigationController popViewControllerAnimated:YES];
}

- (void)didReceiveMemoryWarning {
    [super didReceiveMemoryWarning];
    // Dispose of any resources that can be recreated.
}
@end
页面间传值
1.属性传值(从前往后传)
a.在后一个页面中, 根据传递的值, 写属性, 属性的类型由值的类型决定, 属性的个数由值得个数决定
b.在前一个页面中, 对属性进行赋值
c.在后一个页面中使用
2.代理传值(从后往前传)
a.在后一个页面中, 制定协议, 写delegate属性, 让代理执行方法, 把值传递过去
b.在前一个页面中, 设置代理, 遵守协议, 实现协议方法
c.在协议方法中使用传递过来的值
HomeViewController.m
#import "HomeViewController.h"
#import "DetailViewController.h"

@interface HomeViewController ()<DetailViewControllerDelegate>{
    UITextField *myText;
    UITextField *herText;
}
@end

@implementation HomeViewController

- (void)viewDidLoad {
    [super viewDidLoad];

    self.view.backgroundColor = [UIColor colorWithRed:0.749 green:1.000 blue:0.713 alpha:1.000];

    self.navigationItem.title = @"缘 分 测 试";

    myText = [[UITextField alloc] initWithFrame:CGRectMake(80, 100, 375 - 160, 40)];
    myText.borderStyle = UITextBorderStyleRoundedRect;
    myText.placeholder = @"请输入你的姓名";
    [self.view addSubview:myText];
    [myText release];

    herText = [[UITextField alloc] initWithFrame:CGRectMake(80, 160, 375 - 160, 40)];
    herText.borderStyle = UITextBorderStyleRoundedRect;
    herText.placeholder = @"请输入ta的姓名";
    [self.view addSubview:herText];
    [herText release];

    UIButton *startButton = [UIButton buttonWithType:UIButtonTypeSystem];
    startButton.frame = CGRectMake(80, 220, 375 - 160, 40);
    startButton.titleLabel.font = [UIFont systemFontOfSize:20];
    [startButton setTitle:@"开 始 测 试" forState:UIControlStateNormal];
    [startButton addTarget:self action:@selector(test) forControlEvents:UIControlEventTouchUpInside];
    [self.view addSubview:startButton];


}

- (void)test {
    if (myText.text.length == 0 || herText.text.length == 0) {
        //提示框
        UIAlertView *alertView = [[UIAlertView alloc] initWithTitle:@"提示" message:@"姓名不能为空, 请重新输入" delegate:nil cancelButtonTitle:@"OK" otherButtonTitles: nil];
        [alertView show];
        [alertView release];
        return;
    }
    DetailViewController *detailVC = [[DetailViewController alloc] init];
    detailVC.myname = myText.text;
    detailVC.hername = herText.text;
    detailVC.delegate = self;
    [self.navigationController pushViewController:detailVC animated:YES];
    [detailVC release];
}

- (void)didReceiveMemoryWarning {
    [super didReceiveMemoryWarning];
    // Dispose of any resources that can be recreated.
}

#pragma mark - DetailViewControllerDelegate
- (void)passString:(NSString *)text {
    //    NSLog(@"%@", text);
    self.navigationItem.title = text;
}
@end
DetailViewController.m
#import "DetailViewController.h"
@interface DetailViewController () {
    UITextField *textField;
}
@end

@implementation DetailViewController
- (void)dealloc {
    [_myname release];
    [_hername release];
    [super dealloc];
}

- (void)viewDidLoad {
    [super viewDidLoad];

    self.view.backgroundColor = [UIColor colorWithRed:0.801 green:1.000 blue:0.989 alpha:1.000];

    self.navigationItem.title = @"测 试 结 果";

    UILabel *resultLabel = [[UILabel alloc] initWithFrame:CGRectMake(20, 120, 335, 200)];
    resultLabel.backgroundColor = [UIColor whiteColor];
    resultLabel.numberOfLines = 0;
    resultLabel.text = [NSString stringWithFormat:@"%@和%@的父母就很好的朋友,%@和%@从穿开裆裤时就在一起。一起进幼儿园,一起上小学,一起过家家,一起闯祸后对家长撒谎。%@和%@是长辈默认的娃娃亲,%@和%@是邻居眼中的金童玉女,走到一起是天经地义的事。", _myname, _hername, _myname, _hername, _myname, _hername, _myname, _hername];
    [self.view addSubview:resultLabel];
    [resultLabel release];

    textField = [[UITextField alloc] initWithFrame:CGRectMake(80, 340, 375 - 160, 40)];
    textField.borderStyle = UITextBorderStyleRoundedRect;
    textField.placeholder = @"请输入内容";
    [self.view addSubview:textField];
    [textField release];
}

- (void)didReceiveMemoryWarning {
    [super didReceiveMemoryWarning];
    // Dispose of any resources that can be recreated.
}
- (void)viewWillDisappear:(BOOL)animated {
    [super viewWillDisappear:animated];
    if ([_delegate respondsToSelector:@selector(passString:)]) {
        [_delegate passString:textField.text];
    }
}