我们平时编程写一些辅助类的时候习惯用“XxxHelper”来命名。同样,在 MVC 中用于生成 Html 元素的辅助类是 System.Web.Mvc 命名空间下的 HtmlHelper,习惯上我们把 HtmlHelper 中的(扩展)方法叫 HtmlHelper Method,由于使用频繁,就简单称为Helper Method。它的作用是把生成 Html 代码的任务交给 MVC,以便 MVC 能完成很多自动处理的工作,也减少了代码量。我们在 View 中使用的 Html.ActionLink、Html.BeginForm、Html.CheckBox、Html.Raw 方法等都是 HtmlHelper 中的(扩展)方法。本文将进行简要系统的介绍 Helper Method。
本文目录
自定义 Helper Method
通过自定义 Helper Method,我们可以把一大段的 Html 代码打包成一个方法以便在整个应用程序中重复调用。如下面这个 View:
@{
    ViewBag.Title = "Index";
}

@helper StripHtml(string input) {
    @System.Text.RegularExpressions.Regex.Replace(input, "<.*?>", string.Empty)
}
<div>
    HTML Content: @HttpUtility.HtmlDecode("<div><p>Test</p><br/></div>")
    <br />
    Plain Content:@StripHtml("<div><p>Test</p></div>")
</div>
在 View 中通过 @helper 标记定义的方法,MVC 会把它编译成 HtmlHelper 类的扩展方法。但在 View 中定义的 Helper Method 的作用域是当前的 View。如果要在整个应用程序都能使用,我们可以把它定义在一个公用的类中,如下面的 CustomHelpers 类中定义的 StripHtml 方法和 View 中的是一样的:
public static class CustomHelpers {
    public static MvcHtmlString StripHtml(this HtmlHelper html, string input) {
        return new MvcHtmlString(System.Text.RegularExpressions.Regex.Replace(input, "<.*?>", string.Empty));
    }
}
关于扩展方法,不清楚的读者可以阅读本系列的 [ASP.NET MVC 小牛之路]02 - C#知识点提要 文章。
上面两种方式运行效果如下:

字符串编码问题
MVC 框架会自动把从 Controller 中传递到 View 的字符串进行Html编码,如下面Action方法中的字符串:
public ActionResult Index() {
    string message = "This is an HTML element: <input>";
    return View((object)message);
}
当这个字符串用 Razor 呈现到 View时,生成的 Html 代码如下:
This is an HTML element: <input>
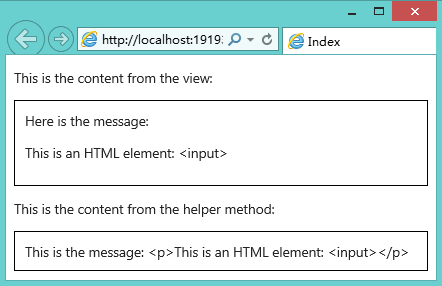
Razor 引擎会自动对后台传递过来的字符串进行Html编码,这是一种保护机制,使得后台传递给View的字符串不与 Html 标记冲突,也避免了用标记语言来攻击网站的恶意行为。
但在 Helper Mothod 返回 MvcHtmlString 是被 Razor 信任的,Razor 不会对其进行编码。我们可以简单验证一下。
在 CustomHelpers 类中加入一个 Helper Mothod,如下:
public static MvcHtmlString DisplayMessage(this HtmlHelper html, string msg) {
    string result = String.Format("This is the message: <p>{0}</p>", msg);
    return new MvcHtmlString(result);
}
然后我们在 Index.cshtml View 中以两种方式来输出 <input>:
@using MvcApplication1.Infrastructure
@model string

@{
    ViewBag.Title = "Index";
}

<p>This is the content from the view:</p>
<div style="border: thin solid black; padding: 10px">
    Here is the message:
    <p>@Model</p>
</div>
<p>This is the content from the helper method:</p>
<div style="border: thin solid black; padding: 10px">@Html.DisplayMessage(Model)
</div>
运行后我们可以看到如下两种结果:

有时候我们就是想通过Help Meothod 输出 <input> 字符串怎么办,很简单,像下面这样把 Helper Method 的返回类型改为 string 类型:
public static string DisplayMessage(this HtmlHelper html, string msg) {
    return String.Format("This is the message: <p>{0}</p>", msg);
}
但它也会把 <p> 给编码了(如下面左图),即返回给 View 的字符串会全部被编码。我们需要的是把那些要输出为 Html 代码的部分字符串进行编码,而不是全部,这时我们可以这样做:
public static MvcHtmlString DisplayMessage(this HtmlHelper html, string msg) {
    string result = String.Format("This is the message: <p>{0}</p>", html.Encode(msg));
    return new MvcHtmlString(result);
}
此时运行结果如下面右图:


表单元素 Helper Method
这部分的内容其实没什么好讲的,无非就是一些生成表单元素(如 <input type="text"...等)的 Helper Method,通过VS的智能提示可以很方便的知道每个方法的用法,本节只对这些 Helper Method 进行一个简要的概括。
首先来看看生成 form 元素的 Helper Method。在 View 中通过 Html.BeginForm 和 Html.EndForm 两个方法可以很便捷地生成一个 form,如下:
@Html.BeginForm()
    <label>PersonId</label>
    <input name="personId" value="@Model.PersonId"/>
    ...
    <input type="submit" value="Submit" />
@{Html.EndForm();}
我们熟悉的另外一种写法可以把 Html.EndForm 省略,如下:
@Html.BeginForm(){
    <label>PersonId</label>
    <input name="personId" value="@Model.PersonId"/>
    ...
    <input type="submit" value="Submit" />
}
BeginForm 有很多重载方法,在需要的时候我们可以通过VS智能提示进行了解。
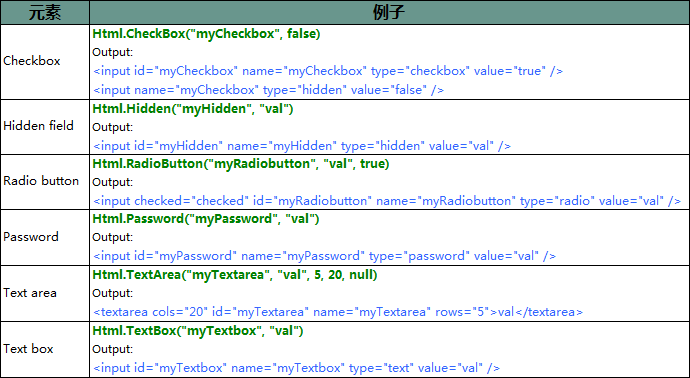
一般放在form表单内的元素的Helper Method就很多了,下面是生成 <input> 标签的 Helper Method 列表:

这里列出的每个 Helper Method 的第一个参数对应 input 元素 的 name 属性(默认也是id属性),第二个参数指定了 input 元素的值。它们都有若干个重载方法,这里列出来的是其中的一个。
这个列表的每个方法都有带一个 string 类型参数的重载方法,如 Html.TextBox("DataValue")。对于这个重载方法,MVC 框架会依次从 ViewBag 和 @Model 中去查找值。如 Html.TextBox("DataValue") 方法,MVC 会依次查找 ViewBag.DataValue 和 @Model.DataValue 的值作为生成 input 的 value 值。我们可以验证一下,如下面的 View
@{
    ViewBag.Title = "Index";
    ViewBag.DataValue = "This is the value from ViewBag.";
}

@Html.TextBox("DataValue")
它生成 input 标签的 value 值如下:
<input id="DataValue" name="DataValue" type="text"value="This is the value from ViewBag." />
如果指定的字符串参数是类似于这种的:DataValue.First.Name ,MVC 会依次查找 ViewBag.DataValue.First.Name、ViewBag.DataValue["First"].Name 等的值,我们知道有这么回事就可以了,不去研究它。
对于上面列表中的 Helper Method 都有对应的强类型版本,如 Html.CheckBox 方法对应有 Html.CheckBoxFor 方法。它们的参数是 lambda 表达式,如:
Html.TextBoxFor(x => x.FirstName)
其中 x 的类型是 View Model 的类型,它会根据 model 的属性名和属性值生成input标签的 name (id 默认和 name 一样)和 value 属性值,如下:
<input id="FirstName" name="FirstName" type="text" value="" />
另外,还有一种生成 Select 标签的 Helper Method,如下面列表所示:

模板化的 Helper Method
MVC 提供了另外一套生成 Html 元素的 Helper Method,它可以通过 Model 信息来生成想要的 Html 标签。例如要生成一个文本框可以用 Html.Editor 方法,它是多行还是单行或者其他,可以在 View Model 中进行定制。它就像一个模板(Template),要怎么显示元素,大部分都在 Model 中指定。下面来做个Demo 可能会让你更地好理解。
为了演示,我们先创建一个 Person Model,代码如下:
namespace MvcApplication1.Models {
    public class Person {
        public int PersonId { get; set; }
        public string FirstName { get; set; }
        public string LastName { get; set; }
        public Role Role { get; set; }
    }
    public enum Role {
        Admin, User, Guest
    }
}
添加一个 Action,如下:
public ActionResult CreatePerson() {
    return View(new Person());
}
为该 action 添加 View:
@model MvcApplication1.Models.Person
@{
    ViewBag.Title = "CreatePerson";
}

@Html.Editor("PersonId")
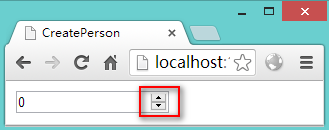
运行后分别在 IE 11(左)和 Chrome(右)浏览器中的显示如下:


如果浏览器足够支持 Html 5 的话,对于数字类型会出现像 Chrome 浏览器那样的上下增减小按钮。
我们再来看它生成的 Html 代码:
<input class="text-box single-line" data-val="true" data-val-number="字段 PersonId 必须是一个数字。" data-val-required="PersonId 字段是必需的。"
   id="PersonId" name="PersonId"type="number" value="0" />
这就是模板化的 Helper Method 生成的 Html 代码,通过生成的这些属性,MVC 可以(配合 jQuery 库)自动完成一些例如客户端验证之类的工作(后续博文介绍)。如果需要禁用客户端验证,可以在 View 中添加如下代码:
@{ Html.EnableClientValidation(false); }
模板化的 Helper Method 有下面几个:

每个模板化Helper Method都有两个版本,它们除了参数不一样,其它没什么区别。
我们可以用C#特性来表示的Model元数据(Metadata)来告诉Helper Method如何为Model呈现Html元素。如:
public class Person {
    [HiddenInput(DisplayValue=false)]
    public int PersonId { get; set; }
    ...
}
当在View中通过 @Html.EditorForModel 或 @Html.EditorFor(m => m.PersonId) 方法时,会生成一个隐藏的 input 元素,如下:
<input id="PersonId" name="PersonId"type="hidden" value="0" />
像这样“指导” Helper Method 生成 Html 元素的特性还有很多,如 [Display(Name="Your name")]、[DataType(DataType.Date)]、[UIHint("MultilineText")]等。
自定义 Helper Method 模板
前面我们简要介绍了 Helper Method 模板根据 Model 元数据生成 Html 元素的便捷之处。但有时候MVC提供的模板并不能满足我们的需求,这时我们可以为 Model 对象的某个属性自定义一个 Helper Method 模板。
在前文中我们知道,使用 Html.DropDownList(For) 可以为我们创建一个下拉列表,但这个方法有一点不好使,每次使用都需要给它构造器的第二个参数指定数据源,很是不方便。对于频繁使用的下拉列表,我们可以把它做成模板。下面我将通过为 Role 枚举类型(前文有定义)做一个下拉列表模板来演示如何自定义。
按照约定,MVC框架会在 /Views/Shared/EditorTemplates 文件夹下查找自定义的模板。因此我们需要先添加一个EditorTemplates 文件夹,然后在该文件夹下添加一个 Role.cshtml 文件,代码如下:
@model MvcApplication1.Models.Role

@Html.DropDownListFor(m => m, new SelectList(Enum.GetNames(Model.GetType()), Model.ToString()))
这样就做好了一个模板,我们可以像下面这样在一个View中使用它:
@model MvcApplication1.Models.Person

@Html.EditorFor(m => m.Role)
除了 EditorFor,调用任何一个模板化的Helper Method 为 Role 类型的属性呈现元素时都会显示为一个下拉列表,效果如下:

为了让这个功能更通用,使所有枚举类型都可以显示为这样的下拉列表,我们再改造一下这个功能。
删除原来的 Role.cshtml 文件,在同一目录下再新建一个 Enum.cshtml 分部视图,代码参考如下:
@model Enum

@Html.DropDownListFor(m => m, Enum.GetValues(Model.GetType()).Cast<Enum>()
    .Select(m => {
        string enumVal = Enum.GetName(Model.GetType(), m);
        return new SelectListItem() {
            Selected = (Model.ToString() == enumVal),
            Text = enumVal,
            Value = enumVal
        };
    })
)
然后我们可以在 Model 中通过 UIHint 特性来应用它,如下:
public class Person {
    public int PersonId { get; set; }
    ...
    [UIHint("Enum")]
    public Role Role { get; set; }
}
再运行程序看到的效果是和上面一样的。
注意,MVC 是根据属性的类型在 /Views/Shared/EditorTemplates 目录下找自定义的模板的,所以一定要保证模板的文件名和属性类型名一致(或用UIHint特性指定为模板的名称)。
另外,如果自定义的模板和内置的模板同名,MVC会使用自定义的。可以根据这个特点来用自定义的模板替换系统内置的。例如,如果在 EditorTemplates 文件夹下创建一个 Boolean.cshtml,当MVC要为 Boolean 类型的属性呈现 Html 元素时,它会使用自定义的 Boolean.cshtml 分部视图来呈现。
参考:《Pro ASP.NET MVC 4 4th Edition》