IdentityServer4 Code模式 账号密码授权思路-推荐使用这种模式
如:博客园使用微信扫码登录
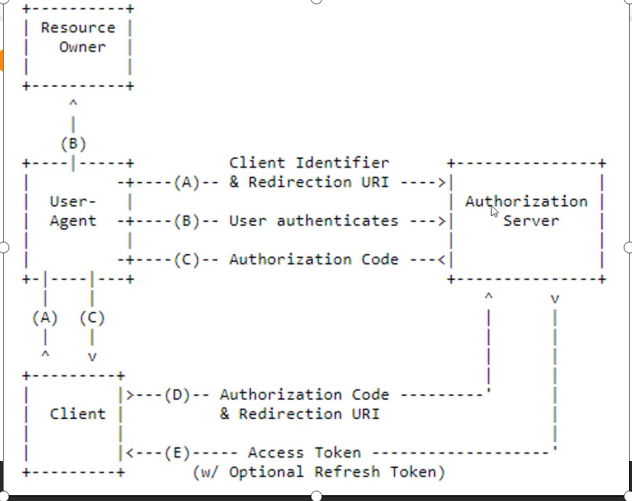
1.如下图流程 A>b>c>d>e
2.博客园点击微信扫码登录,跳转到微信的授权中心,用户进行扫码,验证账号密码通过
微信授权中心返回code给博客园,博客园再拿到code去微信的授权中心进行验证
微信授权中心验证code成功返回token(包含基础账户信息)给博客园,博客园拿到账号和自己系统账号匹配,进行登录


命令创建模板:
命令创建的程序:dotnet new is4empty -n Zhaoxi.AspNetCore.AuthenticationCenterIDS4
运行起来;
访问:http://localhost:5400/.well-known/openid-configuration
{
"issuer": "http://localhost:5000",发行网址,也就是说我们的权限验证站点。
"jwks_uri": "http://localhost:5000/.well-known/openid-configuration/jwks",这个接口获取的是公钥,用于验证jwt的数字签名部分(数字签名由sso维护的私钥生成)用的。
"authorization_endpoint": "http://localhost:5000/connect/authorize",授权服务器的授权端点的URL。
"token_endpoint": "http://localhost:5000/connect/token",获取token的网址
"userinfo_endpoint": "http://localhost:5000/connect/userinfo",根据token获取用户信息
"end_session_endpoint": "http://localhost:5000/connect/endsession",登录注销。
"check_session_iframe": "http://localhost:5000/connect/checksession",客户端对执行监视,可以获取用户的登出状态。
"revocation_endpoint": "http://localhost:5000/connect/revocation", 这个网址允许撤销访问令牌(仅access tokens 和reference tokens)。它实现了令牌撤销规范(RFC 7009)。
"introspection_endpoint": "http://localhost:5000/connect/introspect", introspection_endpoint是RFC 7662的实现。 它可以用于验证reference tokens(或如果消费者不支持适当的JWT或加密库,则JWTs)。
"frontchannel_logout_supported": true, 可选。基于前端的注销机制。
"frontchannel_logout_session_supported": true,可选。基于session的注销机制。check_session_iframe
"backchannel_logout_supported": true, 指示OP支持后端通道注销
"backchannel_logout_session_supported": true, 可选的。指定RP是否需要在注销令牌中包含sid(session ID)声明,以在使用backchannel_logout_uri时用OP标识RP会话。如果省略,默认值为false。
"scopes_supported": [ "api", "offline_access" ], 支持的范围
"claims_supported": [], 支持的claims
"grant_types_supported": [ "authorization_code", "client_credentials", "refresh_token", "implicit" ], 授权类型
"response_types_supported": [ "code", "token", "id_token", "id_token token", "code id_token", "code token", "code id_token token" ],
支持的请求方式
"response_modes_supported": [ "form_post", "query", "fragment" ],
传值方式
"token_endpoint_auth_methods_supported": [ "client_secret_basic", "client_secret_post" ],
JSON数组,包含此令牌端点支持的客户端身份验证方法列表。
"subject_types_supported": [ "public" ],
JSON数组,包含此OP支持的主题标识符类型列表。 有效值是 和 .类型。 更多信息.
"id_token_signing_alg_values_supported": [ "RS256" ],
"code_challenge_methods_supported": [ "plain", "S256" ]
JSON数组,包含此授权服务器支持的PKCE代码方法列表。
}pairwisepublic
客户端模式-Client Credentials
1>特点描述:
1.客户端模式不代表用户,授权是授权给某一个应用程序客户端;客户端本身就是资源所有者 2.通常用于机器和机器的通信 3.客户端也需要身份验证
2>流程实操:
1.授权,配置密码模式,生成Token;
Startup中的ConfigureServices 方法中添加:
var builder = services.AddIdentityServer(options =>
 {
     // see https://identityserver4.readthedocs.io/en/latest/topics/resources.html
      options.EmitStaticAudienceClaim = true;
  })
     .AddInMemoryIdentityResources(Config.IdentityResources)
     .AddInMemoryApiScopes(Config.ApiScopes)
     .AddInMemoryClients(Config.Clients);
      builder.AddDeveloperSigningCredential();
支持配置:
public static class Config
{
public static IEnumerable<IdentityResource> IdentityResources =>
new IdentityResource[]
{
new IdentityResources.OpenId(),
new IdentityResources.Profile(),
};
public static IEnumerable<ApiScope> ApiScopes =>
new ApiScope[]
{
new ApiScope("scope1"),
new ApiScope("scope2"),
};
public static IEnumerable<Client> Clients =>
new Client[]
{
new Client
{
ClientId = "m2m.client",
ClientName = "Client Credentials Client",
AllowedGrantTypes = GrantTypes.ClientCredentials,
ClientSecrets = { new Secret("511536EF-F270-4058-80CA-1C89C192F69A".Sha256()) },
AllowedScopes = { "scope1" }
}
};
}
2.获取token,Postman访问ids4鉴权中心:http://localhost:5400/connect/token
3.Postman访问Api:带token:http://localhost:5200/api/Third/getlist
3>请求规则:
获取Token:
访问受保护的Api:
密码模式-Resource Owner Password Credentials
1>特点描述
1.资源所有的密码凭证(用户名密码),直接用来请求accessToken
2.通常用于遗留的应用
3.资源所有者和客户端之间必须高度信任
4.尽量不用,其他授权方式不可用的时候才使用
2>流程实操
1.IdentityServer 增加Ui,计入Zhaoxi.AspNetCore.AuthenticationCenterIDS4执行命令
dotnet new is4ui
命令执行完毕后,会出现Quickstart、Views 之类的一个MVC界面
2.增加用户: .AddTestUsers(PasswordInitConfig.GetUsers()); 来自于Quickstart文件夹下
Startup中的ConfigureServices 方法中添加:
 services.AddIdentityServer()
 .AddDeveloperSigningCredential()//默认的开发者证书
 .AddInMemoryIdentityResources(PasswordInitConfig.GetIdentityResourceV4X())//API访问授权资源
 .AddInMemoryClients(PasswordInitConfig.GetClients())  //客户端
 .AddTestUsers(PasswordInitConfig.GetUsers());//添加用户
3.默认TestUser
public class TestUsers
    {
        public static List<TestUser> Users
        {
            get
            {
                var address = new
                {
                    street_address = "One Hacker Way",
                    locality = "Heidelberg",
                    postal_code = 69118,
                    country = "Germany"
                };

                return new List<TestUser>
                {
                    new TestUser
                    {
                        SubjectId = "818727",
                        Username = "alice",
                        Password = "alice",
                        Claims =
                        {
                            new Claim(JwtClaimTypes.Name, "Alice Smith"),
                            new Claim(JwtClaimTypes.GivenName, "Alice"),
                            new Claim(JwtClaimTypes.FamilyName, "Smith"),
                            new Claim(JwtClaimTypes.Email, "AliceSmith@email.com"),
                            new Claim(JwtClaimTypes.EmailVerified, "true", ClaimValueTypes.Boolean),
                            new Claim(JwtClaimTypes.WebSite, "http://alice.com"),
                            new Claim(JwtClaimTypes.Address, JsonSerializer.Serialize(address), IdentityServerConstants.ClaimValueTypes.Json)
                        }
                    },
                    new TestUser
                    {
                        SubjectId = "88421113",
                        Username = "bob",
                        Password = "bob",
                        Claims =
                        {
                            new Claim(JwtClaimTypes.Name, "Bob Smith"),
                            new Claim(JwtClaimTypes.GivenName, "Bob"),
                            new Claim(JwtClaimTypes.FamilyName, "Smith"),
                            new Claim(JwtClaimTypes.Email, "BobSmith@email.com"),
                            new Claim(JwtClaimTypes.EmailVerified, "true", ClaimValueTypes.Boolean),
                            new Claim(JwtClaimTypes.WebSite, "http://bob.com"),
                            new Claim(JwtClaimTypes.Address, JsonSerializer.Serialize(address), IdentityServerConstants.ClaimValueTypes.Json)
                        }
                    }
                };
            }
        }
    }
4.获取Token: 这个是一个Winform程序
private async void RequestaccessTokenBtn_Click(object sender, EventArgs e)
{
//如果要授权
var client = new HttpClient();
disco = await client.GetDiscoveryDocumentAsync("https://localhost:5001");
if (disco.IsError)
{
MessageBox.Show(disco.Error.ToString());
return;
}
string userName = this.userNameTxbox.Text;
string password = this.PassordTxbox.Text;
var accessTokneResponse = await client.RequestPasswordTokenAsync(new PasswordTokenRequest()
{
Address = disco.TokenEndpoint,
ClientId = "passwordClientId",
ClientSecret = "AAAAAAAA-F270-4058-80CA-1C89C192F69A",
Scope = "scope1 openid",
UserName = userName,
Password = password
});
if (accessTokneResponse.IsError)
{
MessageBox.Show(accessTokneResponse.Error);
}
this.accessTokenTxBox.Text = accessTokneResponse.AccessToken;
this.accessToken = accessTokneResponse.AccessToken;
}
5.请求Api
 private async void RequestApiResource_Click(object sender, EventArgs e)
        {
            HttpClient client = new HttpClient();
            client.SetBearerToken(this.accessToken);
            var apiResourceResponse = await client.GetAsync("http://localhost:5003/WeatherForecast/Get");
            if (!apiResourceResponse.IsSuccessStatusCode)
            {
                Console.WriteLine(apiResourceResponse.StatusCode);
            }
            else
            {
                var content = await apiResourceResponse.Content.ReadAsStringAsync();
                Console.WriteLine(Newtonsoft.Json.Linq.JArray.Parse(content));
                this.apiResourConsole.Text = content;
            }
        }
6.请求userInfo 用户信息
  private async void ReauestIdentityBtn_Click(object sender, EventArgs e)
        {
            HttpClient client = new HttpClient();
            client.SetBearerToken(this.accessToken);
            var apiResourceResponse = await client.GetAsync(disco.UserInfoEndpoint);
            if (!apiResourceResponse.IsSuccessStatusCode)
            {
                Console.WriteLine(apiResourceResponse.StatusCode);
            }
            else
            {
                var content = await apiResourceResponse.Content.ReadAsStringAsync();
                this.IdentityResourceConsole.Text = content;
            }
        }
7.请求更多用户信息
授权层配置:IdentityResources配置:
 public static IEnumerable<IdentityResource> IdentityResources =>
             new IdentityResource[]
                   {
                        new IdentityResources.OpenId(),
                        new IdentityResources.Address(), //更多内容
                        new IdentityResources.Email(), //更多内容
                        new IdentityResources.Phone(),
                        new IdentityResources.Profile(),
                   };
授权层配置:Client配置:
new Client
{
ClientId = "passwordClientId",
ClientName = "passwordClientName",
AllowedGrantTypes = GrantTypes.ResourceOwnerPassword,
ClientSecrets = { new Secret("AAAAAAAA-F270-4058-80CA-1C89C192F69A".Sha256()) },
AllowedScopes = {
"scope1",
IdentityServerConstants.StandardScopes.OpenId,
IdentityServerConstants.StandardScopes.Email,
IdentityServerConstants.StandardScopes.Phone,
IdentityServerConstants.StandardScopes.Address,
IdentityServerConstants.StandardScopes.Profile
}
}
客户端层配置:
3>请求规则
1.获取token
请求类型
请求参数:
2.Postman请求:
Code模式
1>MVC正常跳转
1.Identityserver4端
 new Client
    {
      ClientId = "Ddonet5Mvc",
      ClientName = "Ddonet5MvcName",
      AllowedGrantTypes = GrantTypes.Code,
      ClientSecrets = { new Secret("511536EF-F270-4058-80CA-1C89C192F69A".Sha256()) },
      RedirectUris={ "https://localhost:5002/signin-oidc"}, //登录后重定向到的位置
      FrontChannelLogoutUri="https://localhost:5002/signout-oidc",
      PostLogoutRedirectUris={"https://localhost:5002/signout-callback-oidc" },
      RequireConsent=true, //是否需要用户点击后确认跳转
      AllowedScopes = {
                        "scope1",
                        IdentityServerConstants.StandardScopes.OpenId,
                        IdentityServerConstants.StandardScopes.Profile
                    }
                 }
2.MVC程序
            JwtSecurityTokenHandler.DefaultOutboundClaimTypeMap.Clear();//Jwt映射关闭
            services.AddAuthentication(option =>
            {
                option.DefaultScheme = CookieAuthenticationDefaults.AuthenticationScheme;
                option.DefaultChallengeScheme = OpenIdConnectDefaults.AuthenticationScheme;
            })
            .AddCookie(CookieAuthenticationDefaults.AuthenticationScheme)
            .AddOpenIdConnect(OpenIdConnectDefaults.AuthenticationScheme, options =>
            {
                options.SignInScheme = CookieAuthenticationDefaults.AuthenticationScheme;
                options.Authority = "https://localhost:5001";
                options.RequireHttpsMetadata = true;//使用Https  必须使用,如果不是Https会报错
                options.ClientId = "Ddonet5Mvc";
                options.ClientSecret = "511536EF-F270-4058-80CA-1C89C192F69A";
                options.ResponseType = "code";
                options.Scope.Clear();
                options.Scope.Add("scope1");
                options.Scope.Add("openid");
                options.Scope.Add(OidcConstants.StandardScopes.Profile);
            });
2>获取token
1.控制器获取Token 准备代码
public IActionResult Privacy()
{
var accessToken = HttpContext.GetTokenAsync(OpenIdConnectParameterNames.AccessToken);
var idToken = HttpContext.GetTokenAsync(OpenIdConnectParameterNames.IdToken);
var refreshToken = HttpContext.GetTokenAsync(OpenIdConnectParameterNames.RefreshToken);
var authorizationCode = HttpContext.GetTokenAsync(OpenIdConnectParameterNames.Code);
ViewBag.accessToken = accessToken.Result;
ViewBag.idToken = idToken.Result;
ViewBag.refreshToken = refreshToken.Result;
ViewBag.authorizationCode = authorizationCode.Result;
return View();
}
2.视图展示
<h2>accessToken</h2>
<p>:@ViewBag.accessToken</p>
<h2>idToken:</h2>
<p>@ViewBag.idToken</p>
<h2>refreshToken:</h2>
<p>@ViewBag.refreshToken</p>
<h2>authorizationCode:</h2>
<p>@ViewBag.authorizationCode</p>
3.如何获取Token: 在MVC程序中设置 options.SaveTokens = true;
services.AddAuthentication(option =>
   {
        option.DefaultScheme = CookieAuthenticationDefaults.AuthenticationScheme;
        option.DefaultChallengeScheme = OpenIdConnectDefaults.AuthenticationScheme;
    })
    .AddCookie(CookieAuthenticationDefaults.AuthenticationScheme)
    .AddOpenIdConnect(OpenIdConnectDefaults.AuthenticationScheme, options =>
    {
       options.SaveTokens = true;  //必须要设置这个值,Token才能保存下来;
    });
4.refreshToken获取不到:
在MVC程序中必须要设置
 services.AddAuthentication(option =>
            {
                option.DefaultScheme = CookieAuthenticationDefaults.AuthenticationScheme;
                option.DefaultChallengeScheme = OpenIdConnectDefaults.AuthenticationScheme;
            })
            .AddCookie(CookieAuthenticationDefaults.AuthenticationScheme)
            .AddOpenIdConnect(OpenIdConnectDefaults.AuthenticationScheme, options =>
            {
                options.Scope.Add(OidcConstants.StandardScopes.OfflineAccess); //设置这个才能获取到refreshtoken
            });
在IdentityServer4中必须设置
new Client
   {
      AllowOfflineAccess=true,//是否可以申请刷新Token
   }
5.如何查看code:
3>获取用户信息
1.在视图中准备代码 View
@using Microsoft.AspNetCore.Authentication
<dl>
    @foreach (var claim in User.Claims)
    {
        <dt>@claim.Type</dt>
        <dd>@claim.Value</dd>
    }
</dl>
2.获取用户信息不全:需要在Identityser4中设置AlwaysIncludeUserClaimsInIdToken=true
 new Client
   {
      AlwaysIncludeUserClaimsInIdToken=true, //默认一次带上所有的用户信息
   }
3.想要获取更多信息;需要在MVC程序中设置+IdentityServer4服务器设置
MVC程序设置:OidcConstants.StandardScopes
  services.AddAuthentication(option =>
            {
                option.DefaultScheme = CookieAuthenticationDefaults.AuthenticationScheme;
                option.DefaultChallengeScheme = OpenIdConnectDefaults.AuthenticationScheme;
            })
            .AddCookie(CookieAuthenticationDefaults.AuthenticationScheme)
            .AddOpenIdConnect(OpenIdConnectDefaults.AuthenticationScheme, options =>
            {
                options.Scope.Add(OidcConstants.StandardScopes.Address);
                options.Scope.Add(OidcConstants.StandardScopes.Profile);
                options.Scope.Add(OidcConstants.StandardScopes.Phone);
            });
IdentityServer4服务器:
IdentityResources:
 public static IEnumerable<IdentityResource> IdentityResources =>
            new IdentityResource[]
            {
                new IdentityResources.OpenId(),
                new IdentityResources.Address(),
                new IdentityResources.Email(),
                new IdentityResources.Phone(),
                new IdentityResources.Profile(),
            };
Client:设置:注意 IdentityResources Client 用户信息数量必须一致; MVC程序获取的值必须要小于等于Client的数量
new Client
     {
         AllowedScopes = {
                        "scope1",
                        IdentityServerConstants.StandardScopes.OpenId,
                        IdentityServerConstants.StandardScopes.Email,
                        IdentityServerConstants.StandardScopes.Address,
                        IdentityServerConstants.StandardScopes.Phone,
                        IdentityServerConstants.StandardScopes.Profile
                    }

      }
4.JwtSecurityTokenHan
dler.DefaultOutboundClaimTypeMap.Clear(); 的作用;
5.屏蔽存放在Token中的用户信息
4>退出登录
Layout中更新代码:
    @if (User.Identity.IsAuthenticated)
                        {
                            <li class="nav-item">
                                <a class="nav-link text-dark" asp-area="" asp-controller="Home"                                             asp-action="LogOut">LogOut</a>
                            </li>
                        }
控制器代码:
 public async Task LogOut()
        {
            await HttpContext.SignOutAsync(CookieAuthenticationDefaults.AuthenticationScheme); //退出当前系统
            await HttpContext.SignOutAsync(OpenIdConnectDefaults.AuthenticationScheme); //Identityser4登录
        }
退出后无法跳转:
5>获取第三方被保护的资源
1.建立APi 配置
  services.AddAuthentication(JwtBearerDefaults.AuthenticationScheme)
           .AddJwtBearer(JwtBearerDefaults.AuthenticationScheme, options =>
           {
               options.Authority = "https://localhost:5001";
               options.RequireHttpsMetadata = false;
               options.TokenValidationParameters = new TokenValidationParameters
               {
                   ValidateIssuer = true,
                   ValidIssuer = "https://localhost:5001",
                   ValidateAudience = true,
                   ValidAudience = "https://localhost:5001/resources",
                   ValidateIssuerSigningKey = true
               };
           });
2.在MVC程序中添加:增加方法返回View 增加ApiResource 视图
  public async Task<IActionResult> ApiResource()
        {
            var accessToken = await HttpContext.GetTokenAsync(OpenIdConnectParameterNames.AccessToken);
            var apiclient = new HttpClient();
            apiclient.SetBearerToken(accessToken);
            var response = await apiclient.GetAsync("http://localhost:5003/WeatherForecast/Get");
            if (!response.IsSuccessStatusCode)
            {
                if (response.StatusCode == HttpStatusCode.Unauthorized)
                {
                    await RenewTokensAsync();
                    return RedirectToAction();
                }
                throw new Exception(response.ReasonPhrase);
            }
            object message = await response.Content.ReadAsStringAsync();
            return View(message);
        }
3.可以无限获取Api资源---设置token有效期在IdentityServer4中设置:AccessTokenLifetime
 new Client
   {
                    AccessTokenLifetime=30//Token的有效期为30s
   }
也就是说每过30s Token就失效了;但是发现Api资源还是能够返回;Why?
因为没有启动验证token
4.启动验证Token 设置后,默认5分钟验证一次
options.TokenValidationParameters.RequireExpirationTime = true; //是否过期
设置验证时间间隔
options.TokenValidationParameters.ClockSkew = TimeSpan.FromSeconds(10);//默认5分钟验证Token
会报错,第三方被保护的资源获取不到了; Token 失效,就需要重新获取Token,就是刷新Token
6>刷新Token
1.刷新Token:定义刷新Token方法
private async Task<string> RenewTokensAsync()
{
var client = new HttpClient();
var disco = await client.GetDiscoveryDocumentAsync("https://localhost:5001");
if (disco.IsError)
{
throw new Exception(disco.Error);
}
var refreshToken = await HttpContext.GetTokenAsync(OpenIdConnectParameterNames.RefreshToken);
// Refresh Access Token
var tokenResponse = await client.RequestRefreshTokenAsync(new RefreshTokenRequest
{
Address = disco.TokenEndpoint,
ClientId = "Ddonet5Mvc",
ClientSecret = "511536EF-F270-4058-80CA-1C89C192F69A",
Scope = "scope1 openid profile email phone address",
GrantType = OpenIdConnectGrantTypes.RefreshToken,
RefreshToken = refreshToken
});
if (tokenResponse.IsError)
{
throw new Exception(tokenResponse.Error);
}
var expiresAt = DateTime.UtcNow + TimeSpan.FromSeconds(tokenResponse.ExpiresIn);
var tokens = new[]
{
new AuthenticationToken
{
Name = OpenIdConnectParameterNames.IdToken,
Value = tokenResponse.IdentityToken
},
new AuthenticationToken
{
Name = OpenIdConnectParameterNames.AccessToken,
Value = tokenResponse.AccessToken
},
new AuthenticationToken
{
Name = OpenIdConnectParameterNames.RefreshToken,
Value = tokenResponse.RefreshToken
},
new AuthenticationToken
{
Name = "expires_at",
Value = expiresAt.ToString("o", CultureInfo.InvariantCulture)
}
};
// 获取身份认证的结果,包含当前的pricipal和properties
var currentAuthenticateResult =
await HttpContext.AuthenticateAsync(CookieAuthenticationDefaults.AuthenticationScheme);
// 把新的tokens存起来
currentAuthenticateResult.Properties.StoreTokens(tokens);
// 登录
await HttpContext.SignInAsync(CookieAuthenticationDefaults.AuthenticationScheme,
currentAuthenticateResult.Principal, currentAuthenticateResult.Properties);
return tokenResponse.AccessToken;
}
2.使用Token刷新,如果调用被保护的资源提示没有权限,就标识Token失效了,就需要刷新Token
   if (response.StatusCode == HttpStatusCode.Unauthorized)
              {
                     await RenewTokensAsync();  //刷新Token
                    return RedirectToAction(); //页面刷新
               }
持久化
1.指明命令创建IdentityServer4授权中心
dotnet new is4ef -n IdentityServerEfCore
2.安装IdentityServer4.EntityFramework.Storage
3.引入SqlServer
Microsoft.EntityFrameworkCore.SqlServer
4.修改Starup
var migrationsAssembly = typeof(Startup).GetTypeInfo().Assembly.GetName().Name;
const string connectionString = @"Data Source=(LocalDb)MSSQLLocalDB;database=IdentityServer4.Quickstart.EntityFramework-4.0.0;trusted_connection=yes;";
var builder = services.AddIdentityServer(options =>
{
options.Events.RaiseErrorEvents = true;
options.Events.RaiseInformationEvents = true;
options.Events.RaiseFailureEvents = true;
options.Events.RaiseSuccessEvents = true;
// see https://identityserver4.readthedocs.io/en/latest/topics/resources.html
options.EmitStaticAudienceClaim = true;
})
.AddTestUsers(TestUsers.Users)
// this adds the config data from DB (clients, resources, CORS)
.AddConfigurationStore(options =>
{
options.ConfigureDbContext = b => b.UseSqlServer(connectionString,
sql => sql.MigrationsAssembly(migrationsAssembly));
})
.AddOperationalStore(options =>
{
options.ConfigureDbContext = b => b.UseSqlServer(connectionString,
sql => sql.MigrationsAssembly(migrationsAssembly));
});
// not recommended for production - you need to store your key material somewhere secure
builder.AddDeveloperSigningCredential();