(查看behave具体教程可以访问官网: http://pythonhosted.org/behave/)
1.安装behave
安装好python后,使用 pip install behave命令安装behave
2.简单实例
新建下面几个文件,文件结构如下
firstCase
firstCase/wordcheck.feature
firstCase/steps
firstCase/steps/wordcheck.py
wordcheck.feature的内容如下:
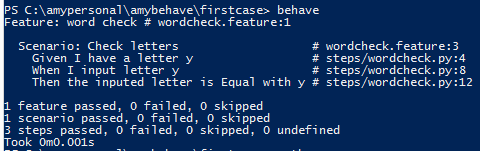
Feature: word check
  Scenario: Check letters
    Given I have a letter
    When I input letter y
    Then the inputed letter is Equal with y
wordcheck.py内容如下:
__author__ = 'Amy'
from behave import *

@Given('I have a letter')
def step_impl(context):
    pass

@When('I input letter {letter}')
def step_impl(context,letter):
    context.letter = letter

@Then('the inputed letter is Equal with {TargetLetter}')
def step_impl(context,TargetLetter):
    context.TargetLetter = TargetLetter
    assert context.letter is context.TargetLetter
3.在cmd里面运行
4.Scenario Outlines
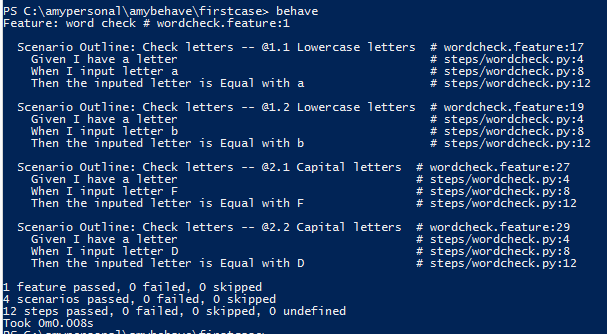
在测试同一个场景时,很多时候我们需要输入各种各样的数据来验证不同的结果输出,这时我们用Scenario Outlines就可以实现了。如下图分别输大小写字母来验证场景
Feature: word check
  Scenario Outline: Check letters
    Given I have a letter
    When I input letter <keyword>
    Then the inputed letter is Equal with <targetword>

   Examples: Lowercase letters
    |keyword|targetword|
    |a      |a         |
    |b      |b         |

    Examples: Capital letters
    |keyword|targetword|
    |F      |F         |
    |D      |D         |
结果如下:
5.使用table
在场景中可以一个表格作为context.table属性值,如下图在Given中加入表格:
Feature: show the table
  Scenario: some scenario
  Given a set of specific users
     | name      | department  |
     | Barry     | Beer Cans   |
     | Pudey     | Silly Walks |
     | Two-Lumps | Silly Walks |
 """
 This is a table,and this line will be displayed in result,it is context.text attribute
 """
 When we count the number of people in each department
 Then we will find two people in "Silly Walks"
  But we will find one person in "Beer Cans"
6.Environment.py
Environment.py是个非常重要的文件,放在feature文件夹下,与.feature文件并列。下面是Environment.py中定义的一些方法:
before_step(context, step), after_step(context, step)
These run before and after every step.
before_scenario(context, scenario), after_scenario(context, scenario)
These run before and after each scenario is run.
before_feature(context, feature), after_feature(context, feature)
These run before and after each feature file is exercised.
before_tag(context, tag), after_tag(context, tag)
These run before and after a section tagged with the given name. They are invoked for each tag encountered in the order they’re found in the feature file.
before_all(context), after_all(context)
These run before and after the whole shooting match.
下面是一个简单的例子,大家可以根据自己的需要定义方法:
# coding:utf-8
__author__ = 'Amy'
import sys
from behave import *
from selenium import webdriver

# 开始测试前,定义系统编码为utf-8
def before_all(context):
    reload(sys)
    sys.setdefaultencoding('utf-8')

def before_feature(context):
    context.driver = webdriver.Firefox()

def after_feature(context):
    context.driver.quit()
7.通过标签tag来控制测试执行
标签以@开头,如下示例:
Feature: find a look
  @valid
  Scenario: look up a book
   Given I search for a valid book
    Then the result page will include "success"

  @invalid
  Scenario: look up an invalid book
    Given I search for a invalid book
     Then the result page will include "failure"
执行的时候在behave 后面加上tag 标签即可,如我只测试“valid”这个场景,那么就输入“behave --tags=valid”.
如果你想执行若干个不同标签的场景,你可以这么写“behave --tags=valid,invalid”;
如果你想执行除了@invalid外的所有场景,你可以这么写“behave --tags=-invalid”;
如果你要执行标签包含了 “valid”和“invalid”两个签标的场景,你可以这么写“behave --tags=valid --tags=invalid”
当然,tags在py文件中也起作用,例如
def before_feature(context):
    if 'browser' in feature.tags:
        context.driver = webdriver.Firefox()

def after_feature(context):
    if 'browser' in feature.tags:
        context.driver.quit()