用户权限管理一般是对用户页面、按钮的访问权限管理。Shiro框架是一个强大且易用的Java安全框架,执行身份验证、授权、密码和会话管理,对于Shiro的介绍这里就不多说。本篇博客主要是了解Shiro的基础使用方法,在权限管理系统中集成Shiro实现登录、url和页面按钮的访问控制。
一、引入依赖
使用SpringBoot集成Shiro时,在pom.xml中可以引入shiro-spring-boot-web-starter。由于使用的是thymeleaf框架,thymeleaf与Shiro结合需要 引入thymeleaf-extras-shiro。
        <!-- https://mvnrepository.com/artifact/org.apache.shiro/shiro-spring-boot-web-starter -->
        <dependency>
            <groupId>org.apache.shiro</groupId>
            <artifactId>shiro-spring-boot-web-starter</artifactId>
            <version>1.4.0</version>
        </dependency>
        <!-- https://mvnrepository.com/artifact/com.github.theborakompanioni/thymeleaf-extras-shiro -->
        <dependency>
            <groupId>com.github.theborakompanioni</groupId>
            <artifactId>thymeleaf-extras-shiro</artifactId>
            <version>2.0.0</version>
        </dependency>
二、增加Shiro配置
有哪些url是需要拦截的,哪些是不需要拦截的,登录页面、登录成功页面的url、自定义的Realm等这些信息需要设置到Shiro中,所以创建Configuration文件ShiroConfig。


package com.example.config;


import org.apache.shiro.mgt.SecurityManager;
import org.apache.shiro.spring.web.ShiroFilterFactoryBean;
import org.apache.shiro.web.mgt.DefaultWebSecurityManager;
import org.springframework.beans.factory.annotation.Qualifier;
import org.springframework.context.annotation.Bean;
import org.springframework.context.annotation.Configuration;

import at.pollux.thymeleaf.shiro.dialect.ShiroDialect;

import java.util.LinkedHashMap;
import java.util.Map;


@Configuration
public class ShiroConfig {
    @Bean("shiroFilterFactoryBean")
    public ShiroFilterFactoryBean shiroFilterFactoryBean(SecurityManager securityManager) {
        System.out.println("ShiroConfiguration.shirFilter()");
        ShiroFilterFactoryBean shiroFilterFactoryBean = new ShiroFilterFactoryBean();
        shiroFilterFactoryBean.setSecurityManager(securityManager);
        //拦截器.
        Map<String,String> filterChainDefinitionMap = new LinkedHashMap<String,String>();
        // 配置不会被拦截的链接 顺序判断
        filterChainDefinitionMap.put("/static/**", "anon");
        //配置退出 过滤器,其中的具体的退出代码Shiro已经替我们实现了
        filterChainDefinitionMap.put("/logout", "logout");
        //<!-- 过滤链定义,从上向下顺序执行,一般将/**放在最为下边 -->:这是一个坑呢,一不小心代码就不好使了;
        //<!-- authc:所有url都必须认证通过才可以访问; anon:所有url都都可以匿名访问-->
        filterChainDefinitionMap.put("/**", "authc");
        // 如果不设置默认会自动寻找Web工程根目录下的"/login.jsp"页面
        shiroFilterFactoryBean.setLoginUrl("/login");
        // 登录成功后要跳转的链接
        shiroFilterFactoryBean.setSuccessUrl("/index");

        //未授权界面;
        shiroFilterFactoryBean.setUnauthorizedUrl("/403");
        shiroFilterFactoryBean.setFilterChainDefinitionMap(filterChainDefinitionMap);
        return shiroFilterFactoryBean;
    }

    @Bean(name="defaultWebSecurityManager")    //创建DefaultWebSecurityManager
    public DefaultWebSecurityManager getDefaultWebSecurityManager(@Qualifier("userRealm")MyShiroRealm userRealm){
        DefaultWebSecurityManager defaultWebSecurityManager = new DefaultWebSecurityManager();
        defaultWebSecurityManager.setRealm(userRealm);
        return defaultWebSecurityManager;

    }
    //创建Realm
    @Bean(name="userRealm")
    public MyShiroRealm getUserRealm(){
        return new MyShiroRealm();

    }

    @Bean
    public ShiroDialect shiroDialect() {
        return new ShiroDialect();
    }
}
ShiroDialect这个bean对象是在thymeleaf与Shiro结合,前端html访问Shiro时使用。
三、自定义Realm
在自定义的Realm中继承了AuthorizingRealm抽象类,重写了两个方法:doGetAuthorizationInfo和doGetAuthenticationInfo。doGetAuthorizationInfo主要是用来处理权限配置,doGetAuthenticationInfo主要处理身份认证。这里在doGetAuthorizationInfo中,将role表的id和permission表的code分别设置到SimpleAuthorizationInfo对象中的role和permission中。还有一个地方需要注意:@Component("authorizer"),刚开始我没设置,但报错提示需要一个authorizer的bean,查看AuthorizingRealm可以发现它implements了Authorizer,所以在自定义的realm上添加@Component("authorizer")就可以了。
package com.example.config;
import org.apache.shiro.authc.AuthenticationException;
import org.apache.shiro.authc.AuthenticationInfo;
import org.apache.shiro.authc.AuthenticationToken;
import org.apache.shiro.authc.SimpleAuthenticationInfo;
import org.apache.shiro.authz.AuthorizationInfo;
import org.apache.shiro.authz.SimpleAuthorizationInfo;
import org.apache.shiro.realm.AuthorizingRealm;
import org.apache.shiro.subject.PrincipalCollection;
import org.springframework.beans.factory.annotation.Autowired;
import org.springframework.stereotype.Component;
import com.example.pojo.Permission;
import com.example.pojo.Role;
import com.example.pojo.User;
import com.example.service.RoleService;
import com.example.service.UserService;

@Component("authorizer")
public class MyShiroRealm extends AuthorizingRealm {

    @Autowired
    private UserService userService;

    @Autowired
    private RoleService roleService;

    @Override
    protected AuthorizationInfo doGetAuthorizationInfo(PrincipalCollection principals) {
        System.out.println("权限配置-->MyShiroRealm.doGetAuthorizationInfo()");
        SimpleAuthorizationInfo authorizationInfo = new SimpleAuthorizationInfo();
        User user  = (User)principals.getPrimaryPrincipal();
        System.out.println("User:"+user.toString()+" roles count:"+user.getRoles().size());
        for(Role role:user.getRoles()){
            authorizationInfo.addRole(role.getId());
            role=roleService.getRoleById(role.getId());
            System.out.println("Role:"+role.toString());
            for(Permission p:role.getPermissions()){
                System.out.println("Permission:"+p.toString());
                authorizationInfo.addStringPermission(p.getCode());
            }
        }
        System.out.println("权限配置-->authorizationInfo"+authorizationInfo.toString());
        return authorizationInfo;
    }

    /*主要是用来进行身份认证的,也就是说验证用户输入的账号和密码是否正确。*/
    @Override
    protected AuthenticationInfo doGetAuthenticationInfo(AuthenticationToken token)
            throws AuthenticationException {
        System.out.println("MyShiroRealm.doGetAuthenticationInfo()");
        //获取用户的输入的账号.
        String username = (String)token.getPrincipal();
        System.out.println(token.getCredentials());
        //通过username从数据库中查找 User对象,如果找到,没找到.
        //实际项目中,这里可以根据实际情况做缓存,如果不做,Shiro自己也是有时间间隔机制,2分钟内不会重复执行该方法
        User user = userService.getUserById(username);
        System.out.println("----->>userInfo="+user);
        if(user == null){
            return null;
        }
        SimpleAuthenticationInfo authenticationInfo = new SimpleAuthenticationInfo(
                user, //用户名
                "123456", //密码
                getName()  //realm name
        );
        return authenticationInfo;
    }

}
四、登录认证
1.登录页面
这里做了一个非常丑的登录页面,主要是自己懒,不想在网上复制粘贴找登录页面了。
<!DOCTYPE html>
<head>
    <meta charset="utf-8">
    <title></title>
    <meta name="renderer" content="webkit">
    <meta http-equiv="X-UA-Compatible" content="IE=edge,chrome=1">
    <meta name="viewport" content="width=device-width, initial-scale=1, maximum-scale=1">
    <meta name="apple-mobile-web-app-status-bar-style" content="black">
    <meta name="apple-mobile-web-app-capable" content="yes">
    <meta name="format-detection" content="telephone=no">
</head>

<form action="/login" method="post">
      <label>用户名:</label><input type="text" name="id"   id="id" ><br>
      <label >密码:</label><input type="text" name="pwd"  id="pwd" ><br>
      <button type="submit">登录</button><button type="reset">取消</button>
</form>
</body>
</html>
2.处理登录请求
在LoginController中通过登录名、密码获取到token实现登录。
package com.example.controller;
import org.apache.shiro.SecurityUtils;
import org.apache.shiro.authc.IncorrectCredentialsException;
import org.apache.shiro.authc.UnknownAccountException;
import org.apache.shiro.authc.UsernamePasswordToken;
import org.apache.shiro.subject.Subject;
import org.springframework.stereotype.Controller;
import org.springframework.ui.Model;
import org.springframework.web.bind.annotation.RequestMapping;
import org.springframework.web.bind.annotation.RequestMethod;

@Controller
public class LoginController {

    //退出的时候是get请求,主要是用于退出
    @RequestMapping(value = "/login",method = RequestMethod.GET)
    public String login(){
        return "login";
    }

    //post登录
    @RequestMapping(value = "/login",method = RequestMethod.POST)
    public String login(Model model,String id,String pwd){
        //添加用户认证信息
        Subject subject = SecurityUtils.getSubject();
        UsernamePasswordToken usernamePasswordToken = new UsernamePasswordToken(
                id,
                "123456");
        try {
                subject.login(usernamePasswordToken);
                return "home";
            }
        catch (UnknownAccountException e) {
            //用户名不存在
            model.addAttribute("msg","用户名不存在");
            return "login";
            }catch (IncorrectCredentialsException e) {
                //密码错误
                model.addAttribute("msg","密码错误");
                return "login";
                }

    }
    @RequestMapping(value = "/index")
    public String index(){
        return "home";
    }

}
五、Controller层访问控制
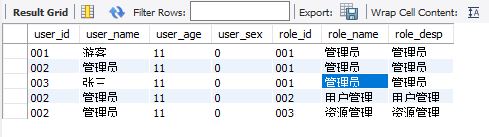
1.首先来数据库的数据,两张图是用户角色、和角色权限的数据。

2.设置权限
这里在用户页面点击编辑按钮时设置需要有id=002的角色,在点击选择角色按钮时需要有code=002的权限。
    @RequestMapping(value = "/edit",method = RequestMethod.GET)
    @RequiresRoles("002")//权限管理;
    public String editGet(Model model,@RequestParam(value="id") String id) {
        model.addAttribute("id", id);
        return "/user/edit";
    }
    @RequestMapping(value = "/selrole",method = RequestMethod.GET)
    @RequiresPermissions("002")//权限管理;
    public String selctRole(Model model,@RequestParam("id") String id,@RequestParam("type") Integer type) {
        model.addAttribute("id",id);
        model.addAttribute("type", type);
        return "/user/selrole";
    }
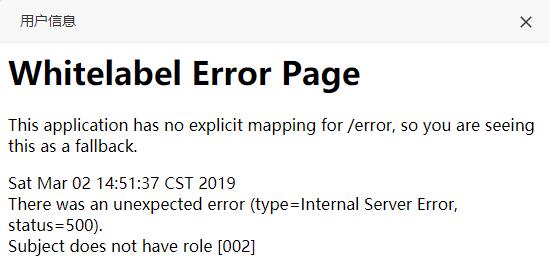
当使用用户001登录时,点击编辑,弹出框如下,提示没有002的角色
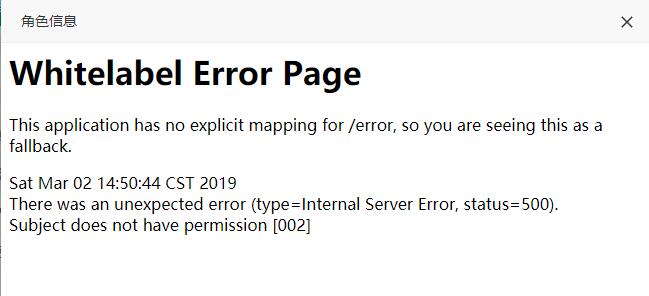
点击选择角色按钮时提示没有002的权限。
当使用用户002登录时,点击编辑按钮,显示正常,点击选择角色也是提示没002的权限,因为权限只有001。
六、前端页面层访问控制
有时为了不想像上面那样弹出错误页面,需要在按钮显示上进行不可见,这样用户也不会点击到。前面已经引入了依赖并配置了bean,这里测试下在html中使用shiro。
1.首先设置html标签引入shiro
<html xmlns:th="http://www.thymeleaf.org"
      xmlns:shiro="http://www.pollix.at/thymeleaf/shiro">
2.控制按钮可见
这里使用shiro:hasAnyRoles="002,003"判断用户角色是否是002或003,是则显示不是则不显示。
    <div class="layui-inline">
        <a shiro:hasAnyRoles="002,003" class="layui-btn layui-btn-normal newsAdd_btn" onclick="addUser('')">添加用户</a>
    </div>
    <div class="layui-inline">
        <a shiro:hasAnyRoles="002,003" class="layui-btn layui-btn-danger batchDel" onclick="getDatas();">批量删除</a>
    </div>
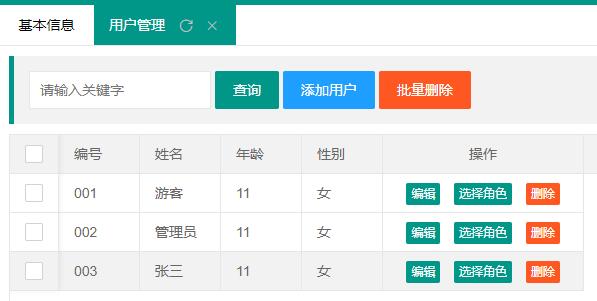
当001用户登录时,添加用户、批量删除按钮都不显示,只显示查询按钮。

当002用户登录时,添加用户、批量删除按钮都显示
七、小结
这里只是实现了Shiro的简单的功能,Shiro还有很多很强大的功能,比如session管理等,而且目前权限管理模块还有很多需要优化的功能,左侧导航栏的动态加载和权限控制、Shiro与Redis结合实现session共享、Shiro与Cas结合实现单点登录等。后续可以把项目做为开源项目,慢慢完善集成更多模块例如:Swagger2、Redis、Druid、RabbitMQ等供初学者参考。