祝大家春节快乐!万事如意!福如东海!寿比南山!早生贵子!哈哈哈哈!
AOP概述
AOP中的名词
Spring2.0版本前的AOP
-
小试牛刀AOP
-
Spring中的通知
-
RegexpMethodPointcutAdvisor切入点和通知类关联使用
-
给目标类新增接口
-
JDK代理和CGLib代理都是动态代理
-
一次生成多个代理对象
-
根据切入点生成代理对象
-
编程方式创建代理对象
-
TargetSource
AspectJ风格的SpringAOP
真正的AspectJ编译器
本类调用为什么会失效
AspectJ编译器体验
AOP概述
AOP要做的是将业务代码和功能代码分开实现。例如,一个类中的一个方法要往数据库添加一条数据,删除一条数据。这两个业务操作,都用得上事务管理。那么将事务管理抽取出一个类,类里的方法就是开启事务,提交事务,和回滚事务。AOP负责将事务代码和业务代码无缝结合在一块。
AOP中的名词
通知(Advice):通常我们要对目标类的某个方法进行增强。可以增强的点有方法执行前,后,异常后,finally中,或者前后一块(环绕)。
目标类(Target):业务类。通知就是要和目标类中的方法结合的。
连接点(JoinPoint):一个类的每个方法都可以被增强,这些方法就是连接点。
切入点(Pointcut):切入点匹配器,通常是execution表达式。被匹配到的具体方法,就是切入点。
引入(Introduction):spring允许对一个bean动态的实现一个接口。
代理(Proxy):实现AOP操作的方法就是通过代理,通过创建一个目标类的代理对象,在代理对象里对目标类增强。
切面(Aspect):切入点和通知的类方法结合的过程就是切面。
织入(Weaving):创建代理对象的这个过程就是织入。
Spring2.0前的AOP
1 小试牛刀AOP

package springcode.aop.spring;/*
 * @auther 顶风少年
 * @mail dfsn19970313@foxmail.com
 * @date 2020-01-25 18:54
 * @notify 通知类
 * @version 1.0
 */

import org.springframework.aop.MethodBeforeAdvice;

import java.lang.reflect.Method;

public class BeforeAdvice implements MethodBeforeAdvice {

    @Override
    public void before(Method method, Object[] objects, Object o) throws Throwable {
        System.out.println("我是BeforeAdvice");
    }
}

package springcode.aop.spring;/*
* @auther 顶风少年
* @mail dfsn19970313@foxmail.com
* @date 2020-01-25 21:10
* @notify
* @version 1.0
*/
public interface TargetInte {
     void show();
     void speak();
     void exc();
}

package springcode.aop.spring;/*
 * @auther 顶风少年
 * @mail dfsn19970313@foxmail.com
 * @date 2020-01-25 18:56
 * @notify 被增强的目标类
 * @version 1.0
 */

public class Target implements TargetInte {

    @Override
    public void show() {
        System.out.println("我是目标类的show方法");
    }

    @Override
    public void speak() {
        System.out.println("我是目标方法的speak方法");
    }

    @Override
    public void exc() {
        int i = 1 / 0;
    }
}

<?xml version="1.0" encoding="UTF-8"?>
<beans xmlns="http://www.springframework.org/schema/beans"
       xmlns:xsi="http://www.w3.org/2001/XMLSchema-instance"
       xsi:schemaLocation="http://www.springframework.org/schema/beans http://www.springframework.org/schema/beans/spring-beans.xsd">

    <bean class="springcode.aop.spring.BeforeAdvice" id="beforeAdvice"></bean>

    <bean id="pointcut1" class="org.springframework.aop.support.JdkRegexpMethodPointcut">
        <property name="pattern" value=".*show"></property>
    </bean>

    <bean id="advisor" class="org.springframework.aop.support.DefaultPointcutAdvisor">
        <property name="pointcut" ref="pointcut1"></property>
        <property name="advice" ref="beforeAdvice"></property>
    </bean>

    <bean class="springcode.aop.spring.Target" id="targetBean"></bean>

    <bean id="target" class="org.springframework.aop.framework.ProxyFactoryBean">
        <property name="target" ref="targetBean"></property>
        <property name="interceptorNames">
            <list>
                <value>advisor</value>
            </list>
        </property>
    </bean>
</beans>

<?xml version="1.0" encoding="UTF-8"?>
<beans xmlns="http://www.springframework.org/schema/beans"
       xmlns:xsi="http://www.w3.org/2001/XMLSchema-instance"
       xsi:schemaLocation="http://www.springframework.org/schema/beans http://www.springframework.org/schema/beans/spring-beans.xsd">

    <bean class="springcode.aop.spring.BeforeAdvice" id="beforeAdvice"></bean>

    <bean id="pointcut1" class="org.springframework.aop.support.JdkRegexpMethodPointcut">
        <property name="pattern" value=".*show"></property>
    </bean>

    <bean id="advisor" class="org.springframework.aop.support.DefaultPointcutAdvisor">
        <property name="pointcut" ref="pointcut1"></property>
        <property name="advice" ref="beforeAdvice"></property>
    </bean>

    <bean class="springcode.aop.spring.Target" id="targetBean"></bean>

    <bean id="target" class="org.springframework.aop.framework.ProxyFactoryBean">
        <property name="target" ref="targetBean"></property>
        <property name="proxyInterfaces"  value="springcode.aop.spring.TargetInte"/>
        <property name="interceptorNames">
            <list>
                <value>advisor</value>
            </list>
        </property>
    </bean>
</beans>
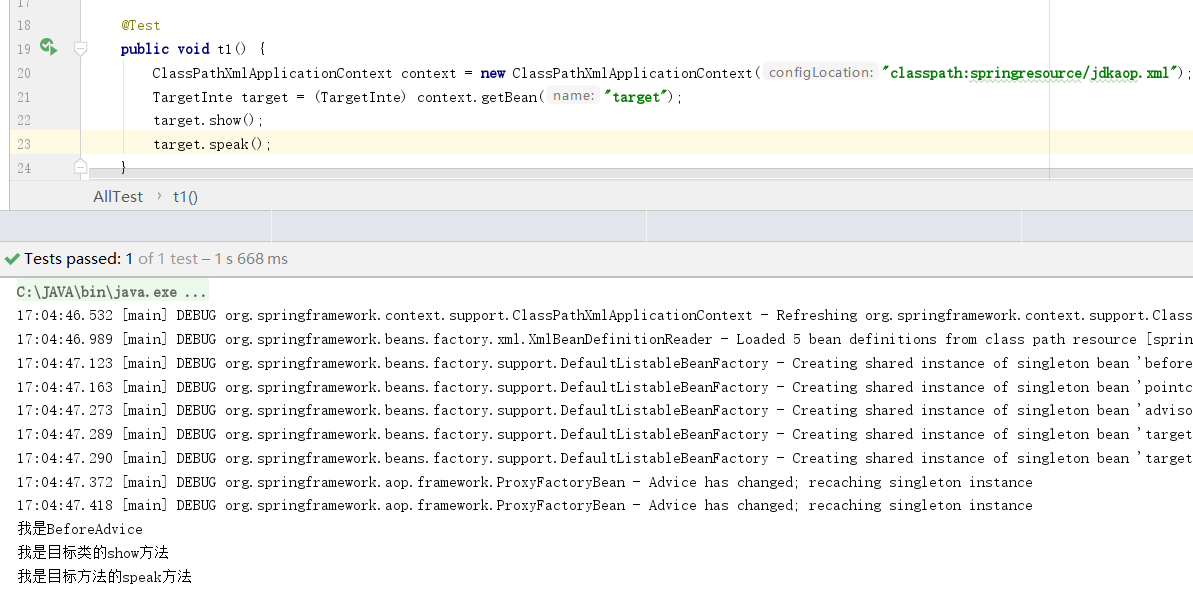
在上边的代码片段中,先来看BeforeAdvice.class它继承了MethodBeforeAdvice。前边我们提到过连接点的概念,继承了MethodBeforeAdvice则代表该类是一个通知类,并且可以作为前置通知。TargetInte接口,定义的是业务接口它的作用就像是Service接口一样,并没有特殊的意义。Target类实现了业务接口TargetInte。在高版本的Spring中目标类有没有父类并不重要,但是一个目标类,有父接口和没有这是有区别的,我们稍后会提到。对于以上三个类其实对于AOP操作我们必须凑齐的条件已经够了,有目标类,有通知类。最后我们需要在xml配置文件中,将两个类结合使用就行。beforeAdvice将通知类注册成bean,targetBean将目标类注册成bean,JdkRegexpMethodPointcut是Spring提供的一个切入点,通过JDK正则表达式匹配这个切入点可切入的类中的方法。DefaultPointcutAdvisor这个bean当做一个中间层,它将切入点和通知类管理到一起。那么现在我们需要的只剩下对目标类做代理操作了。ProxyFactoryBean它内部必须的参数需要代理的bean(target),需要代理的bean的父接口(proxyInterfaces),最后该代理对象所需要的通知(往下成为拦截器),这是一个列表,意味着我们可以给一个代理对象指定多个通知,它们将依次执行(interceptorNames)
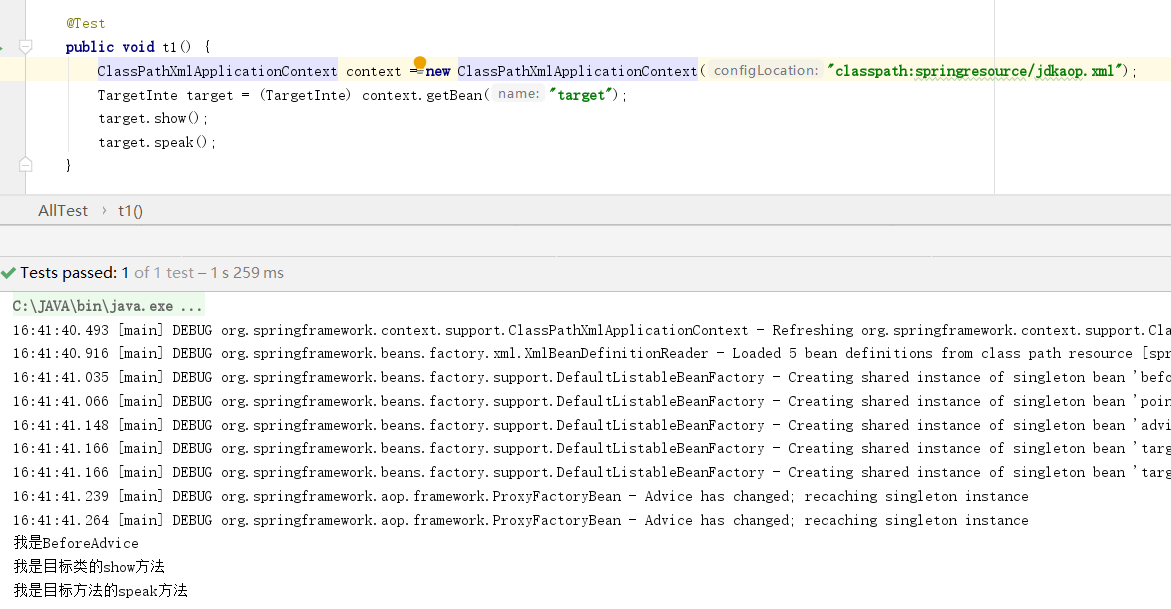
JdkRegexpMethodPointcut切入点匹配了show方法,所以只有show方法有前置通知。
2 Spring中的通知
在spring中定义了4个接口供我们使用。我们可以使用一个Advice类实现4个接口,也可以单独使用。但是一个Advice实现4个接口,意味着该Advice拥有所有的连接点。
1 MethodBeforeAdvice 前置通知

package springcode.aop.spring;/*
 * @auther 顶风少年
 * @mail dfsn19970313@foxmail.com
 * @date 2020-01-25 18:54
 * @notify 通知类
 * @version 1.0
 */

import org.springframework.aop.MethodBeforeAdvice;

import java.lang.reflect.Method;

public class BeforeAdvice implements MethodBeforeAdvice {

    @Override
    public void before(Method method, Object[] objects, Object o) throws Throwable {
        System.out.println("我是BeforeAdvice");
    }
}

<?xml version="1.0" encoding="UTF-8"?>
<beans xmlns="http://www.springframework.org/schema/beans"
       xmlns:xsi="http://www.w3.org/2001/XMLSchema-instance"
       xsi:schemaLocation="http://www.springframework.org/schema/beans http://www.springframework.org/schema/beans/spring-beans.xsd">

    <bean class="springcode.aop.spring.BeforeAdvice" id="beforeAdvice"></bean>

    <bean id="pointcut1" class="org.springframework.aop.support.JdkRegexpMethodPointcut">
        <property name="pattern" value=".*show"></property>
    </bean>

    <bean id="advisor" class="org.springframework.aop.support.DefaultPointcutAdvisor">
        <property name="pointcut" ref="pointcut1"></property>
        <property name="advice" ref="beforeAdvice"></property>
    </bean>

    <bean class="springcode.aop.spring.Target" id="targetBean"></bean>

    <bean id="target" class="org.springframework.aop.framework.ProxyFactoryBean">
        <property name="target" ref="targetBean"></property>
        <property name="proxyInterfaces"  value="springcode.aop.spring.TargetInte"/>
        <property name="interceptorNames">
            <list>
                <value>advisor</value>
            </list>
        </property>
    </bean>
</beans>
2 AfterReturningAdvice 后置通知

package springcode.aop.spring;/*
* @auther 顶风少年
* @mail dfsn19970313@foxmail.com
* @date 2020-01-25 18:54
* @notify 通知类
* @version 1.0
*/

import org.springframework.aop.AfterReturningAdvice;

import java.lang.reflect.Method;

public class AfterAdvice implements AfterReturningAdvice {

    @Override
    public void afterReturning(Object o, Method method, Object[] objects, Object o1) throws Throwable {
        System.out.println("我是AfterAdvice");
    }
}

<?xml version="1.0" encoding="UTF-8"?>
<beans xmlns="http://www.springframework.org/schema/beans"
       xmlns:xsi="http://www.w3.org/2001/XMLSchema-instance"
       xsi:schemaLocation="http://www.springframework.org/schema/beans http://www.springframework.org/schema/beans/spring-beans.xsd">

    <bean class="springcode.aop.spring.AfterAdvice" id="afterAdvice"></bean>

    <bean id="pointcut1" class="org.springframework.aop.support.JdkRegexpMethodPointcut">
        <property name="pattern" value=".*show"></property>
    </bean>

    <bean id="advisor" class="org.springframework.aop.support.DefaultPointcutAdvisor">
        <property name="pointcut" ref="pointcut1"></property>
        <property name="advice" ref="afterAdvice"></property>
    </bean>

    <bean class="springcode.aop.spring.Target" id="targetBean"></bean>

    <bean id="target" class="org.springframework.aop.framework.ProxyFactoryBean">
        <property name="target" ref="targetBean"></property>
        <property name="proxyInterfaces"  value="springcode.aop.spring.TargetInte"/>
        <property name="interceptorNames">
            <list>
                <value>advisor</value>
            </list>
        </property>
    </bean>
</beans>

3 ThrowsAdvice异常通知
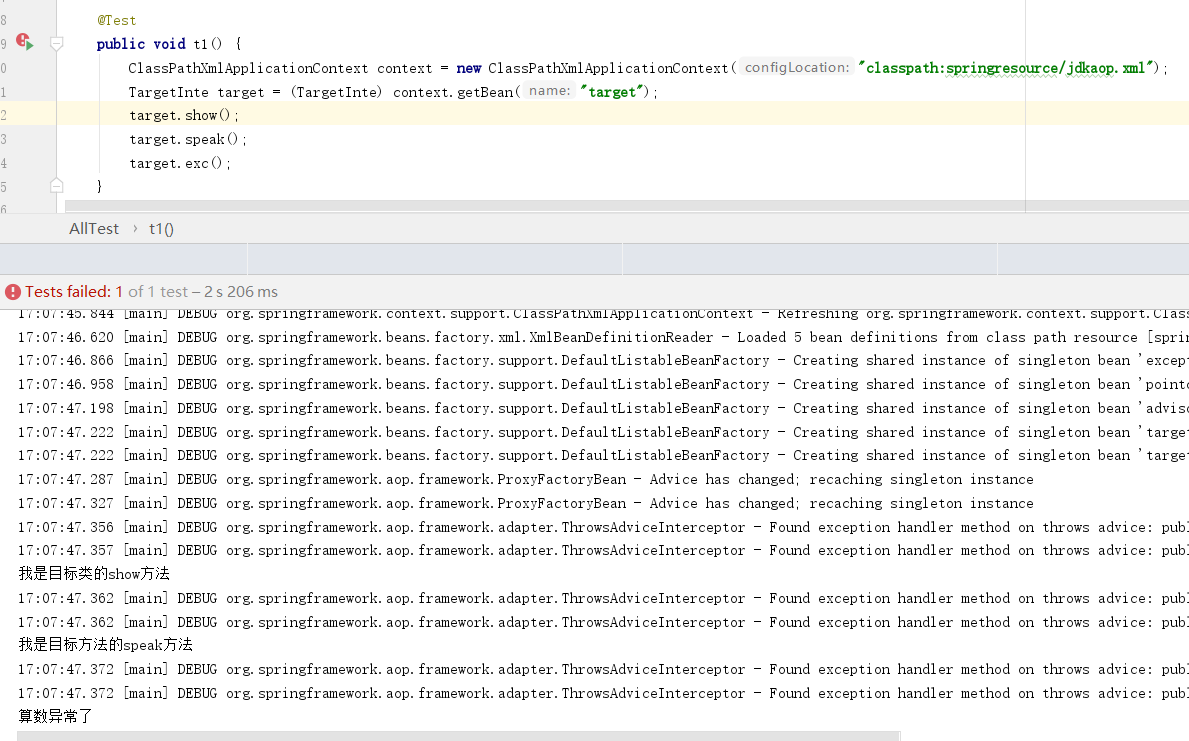
这里需要注意了,ThrowsAdvice是一个标记接口,我们不需要覆盖任何方式。但是afterThrowing()方法名是固定的,我们能改变的是参数类型,异常通知会根据业务代码抛出的异常类型,选择合适的异常通知。

package springcode.aop.spring;/*
* @auther 顶风少年
* @mail dfsn19970313@foxmail.com
* @date 2020-01-25 22:21
* @notify
* @version 1.0
*/

import org.springframework.aop.ThrowsAdvice;

public class ExceptionAdvice implements ThrowsAdvice {
    public void afterThrowing(Exception ex){
        System.out.println("异常了");
    }

    public void afterThrowing(ArithmeticException ex){
        System.out.println("算数异常了");
    }
}

<?xml version="1.0" encoding="UTF-8"?>
<beans xmlns="http://www.springframework.org/schema/beans"
       xmlns:xsi="http://www.w3.org/2001/XMLSchema-instance"
       xsi:schemaLocation="http://www.springframework.org/schema/beans http://www.springframework.org/schema/beans/spring-beans.xsd">

    <bean class="springcode.aop.spring.ExceptionAdvice" id="exceptionAdvice"></bean>

    <bean id="pointcut1" class="org.springframework.aop.support.JdkRegexpMethodPointcut">
        <property name="patterns">
            <list>
                <value>.*show</value>
                <value>.*speak</value>
                <value>.*exc</value>
            </list>
        </property>
    </bean>

    <bean id="advisor" class="org.springframework.aop.support.DefaultPointcutAdvisor">
        <property name="pointcut" ref="pointcut1"></property>
        <property name="advice" ref="exceptionAdvice"></property>
    </bean>

    <bean class="springcode.aop.spring.Target" id="targetBean"></bean>

    <bean id="target" class="org.springframework.aop.framework.ProxyFactoryBean">
        <property name="target" ref="targetBean"></property>
        <property name="proxyInterfaces"  value="springcode.aop.spring.TargetInte"/>
        <property name="interceptorNames">
            <list>
                <value>advisor</value>
            </list>
        </property>
    </bean>
</beans>
4 MethodInterceptor 环绕通知和finally
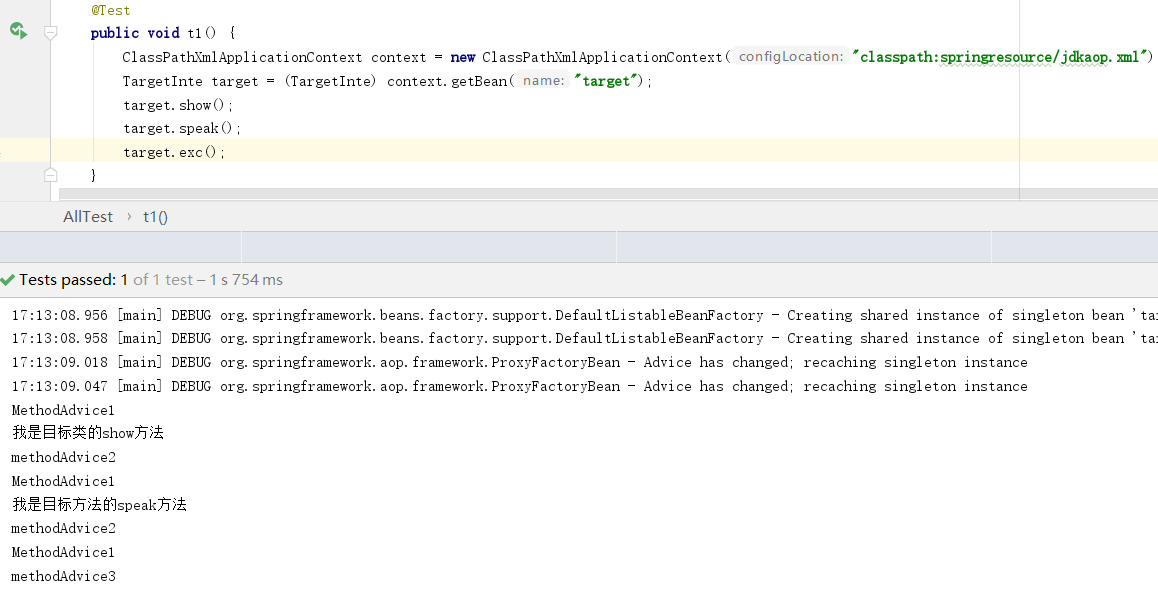
Spring将环绕通知和finally放到了同一个接口中,invoke(MethodInvocation methodInvocation)参数methodInvocation的proceed()方法,执行目标类的本身的代码。如果出现异常则catch代码块必定执行。看打印结果,show()和speak()方法没有抛出异常,则有前置和后置通知,exc()方法抛出了异常则只有前置和finally通知。

package springcode.aop.spring;/*
 * @auther 顶风少年
 * @mail dfsn19970313@foxmail.com
 * @date 2020-01-25 22:35
 * @notify
 * @version 1.0
 */


import org.aopalliance.intercept.MethodInterceptor;
import org.aopalliance.intercept.MethodInvocation;

public class MethodAdvice implements MethodInterceptor {
    @Override
    public Object invoke(MethodInvocation methodInvocation) throws Throwable {
        Object result = null;
        try {
            System.out.println("MethodAdvice1");
            result = methodInvocation.proceed();
            System.out.println("methodAdvice2");
            return result;
        } catch (Exception e) {
            System.out.println("methodAdvice3");
            return result;
        }
    }
}

<?xml version="1.0" encoding="UTF-8"?>
<beans xmlns="http://www.springframework.org/schema/beans"
       xmlns:xsi="http://www.w3.org/2001/XMLSchema-instance"
       xsi:schemaLocation="http://www.springframework.org/schema/beans http://www.springframework.org/schema/beans/spring-beans.xsd">

    <bean class="springcode.aop.spring.MethodAdvice" id="methodAdvice"></bean>

    <bean id="pointcut1" class="org.springframework.aop.support.JdkRegexpMethodPointcut">
        <property name="patterns">
            <list>
                <value>.*show</value>
                <value>.*speak</value>
                <value>.*exc</value>
            </list>
        </property>
    </bean>

    <bean id="advisor" class="org.springframework.aop.support.DefaultPointcutAdvisor">
        <property name="pointcut" ref="pointcut1"></property>
        <property name="advice" ref="methodAdvice"></property>
    </bean>

    <bean class="springcode.aop.spring.Target" id="targetBean"></bean>

    <bean id="target" class="org.springframework.aop.framework.ProxyFactoryBean">
        <property name="target" ref="targetBean"></property>
        <property name="proxyInterfaces"  value="springcode.aop.spring.TargetInte"/>
        <property name="interceptorNames">
            <list>
                <value>advisor</value>
            </list>
        </property>
    </bean>
</beans>
3 RegexpMethodPointcutAdvisor切入点和通知类关联使用
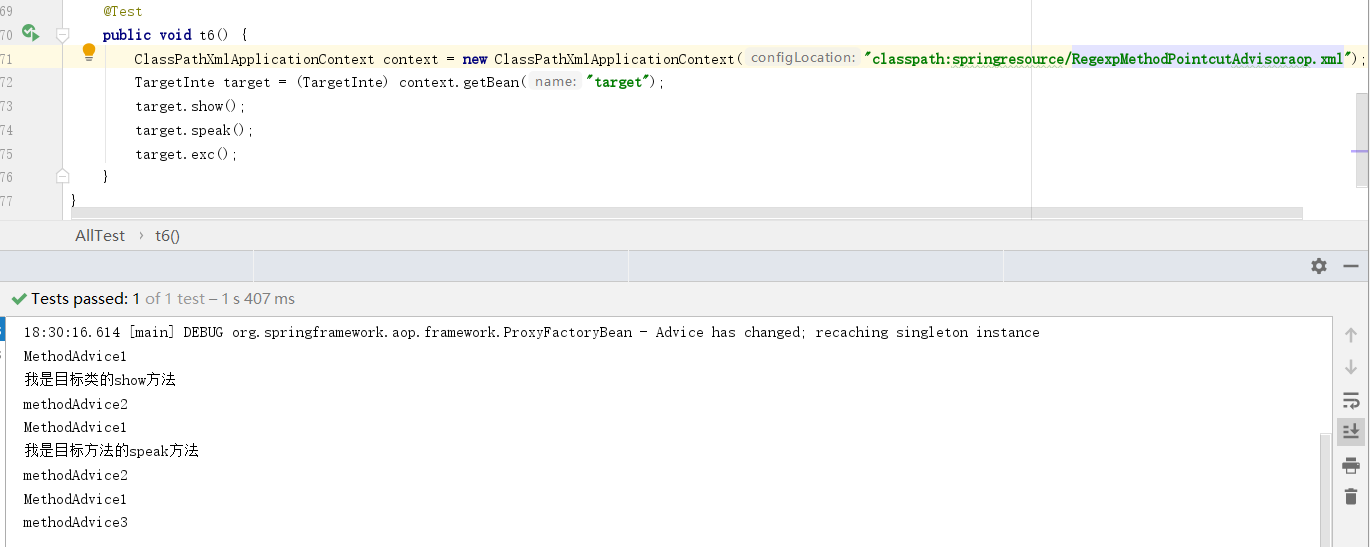
回顾上述内容我们的xml配置文件总是需要做的内容1、将Advice类的注册成bean。2、创建一个JdkRegexpMethodPointcut匹配器,用来确定哪些类的哪些方法可以被代理。3、创建DefaultPointcutAdvisor用来连接Advice和JdkRegexpMethodPointcut。4、将Target目标类注册成bean。5、创建ProxyFactoryBean设置需要代理的bean和拦截器链。似乎是一气呵成,但是总是的第3步骤好像没有起到实际的意义。于是RegexpMethodPointcutAdvisor的出现就是直接在匹配器中注入Advice,然后在ProxyFactoryBean直接引用RegexpMethodPointcutAdvisor。

<?xml version="1.0" encoding="UTF-8"?>
<beans xmlns="http://www.springframework.org/schema/beans"
       xmlns:xsi="http://www.w3.org/2001/XMLSchema-instance"
       xsi:schemaLocation="http://www.springframework.org/schema/beans http://www.springframework.org/schema/beans/spring-beans.xsd">

    <bean class="springcode.aop.spring.MethodAdvice" id="methodAdvice"></bean>

    <bean id="pointcut1" class="org.springframework.aop.support.RegexpMethodPointcutAdvisor">
        <property name="advice">
            <ref bean="methodAdvice"/>
        </property>
        <property name="patterns">
            <list>
                <value>.*show</value>
                <value>.*speak</value>
                <value>.*exc</value>
            </list>
        </property>
    </bean>


    <bean class="springcode.aop.spring.Target" id="targetBean"></bean>

    <bean id="target" class="org.springframework.aop.framework.ProxyFactoryBean">
        <property name="target" ref="targetBean"></property>
        <property name="proxyInterfaces"  value="springcode.aop.spring.TargetInte"/>
        <property name="interceptorNames">
            <list>
                <value>pointcut1</value>
            </list>
        </property>
    </bean>
</beans>
4 给目标类新增接口
在aop名词中提到了引入的概念,我们可以动态的给代理对象新增一个接口,并且实现它。目标类Target只实现了TargetInte接口,并且有3个方法。现在我们创建一个类并且实现IntroductionInterceptor接口和IOther接口,IOther接口是我们新定义的一个接口给目标类扩展的接口就是它。在IntroductionInterceptor实现类中实现方法implementsInterface()invoke()和IOther接口的doOther(),当方法执行时,所执行的方法属于IOther接口,则调用本类的doOther()。xml配置也做了修改,原来的RegexpMethodPointcutAdvisor换成DefaultIntroductionAdvisor,并且它也不需要方法过滤,DefaultIntroductionAdvisor需要两个参数1、Adivce通知,2、额外增加的接口。看测试结果,Target类本来没有doOther()方法,现在则有了。

package springcode.aop.spring;/*
 * @auther 顶风少年
 * @mail dfsn19970313@foxmail.com
 * @date 2020-01-25 18:56
 * @notify 被增强的目标类
 * @version 1.0
 */

public class Target implements TargetInte {

    @Override
    public void show() {
        System.out.println("我是目标类的show方法");
    }

    @Override
    public void speak() {
        System.out.println("我是目标方法的speak方法");
    }

    @Override
    public void exc() {
        int i = 1 / 0;
    }
}

package springcode.aop.spring;/*
 * @auther 顶风少年
 * @mail dfsn19970313@foxmail.com
 * @date 2020-01-25 22:45
 * @notify
 * @version 1.0
 */

import org.aopalliance.intercept.MethodInvocation;
import org.springframework.aop.IntroductionInterceptor;

public class IntroductionInterceptorAdvice implements IntroductionInterceptor, IOther {

    @Override
    public void doOther(){
        System.out.println("Other对象的功能");
    }

    @Override
    public Object invoke(MethodInvocation methodInvocation) throws Throwable {
        if(implementsInterface(methodInvocation.getMethod().getDeclaringClass())){
            return methodInvocation.getMethod().invoke(this, methodInvocation.getArguments());
        }
        else{
            return methodInvocation.proceed();
        }
    }

    @Override
    public boolean implementsInterface(Class arg0){
        boolean assignableFrom = arg0.isAssignableFrom(IOther.class);
        return assignableFrom;
    }
}

<?xml version="1.0" encoding="UTF-8"?>
<beans xmlns="http://www.springframework.org/schema/beans"
       xmlns:xsi="http://www.w3.org/2001/XMLSchema-instance"
       xsi:schemaLocation="http://www.springframework.org/schema/beans http://www.springframework.org/schema/beans/spring-beans.xsd">

    <bean class="springcode.aop.spring.IntroductionInterceptorAdvice" id="introductionInterceptorAdvice"></bean>

    <bean id="pointcut1" class="org.springframework.aop.support.DefaultIntroductionAdvisor">
        <constructor-arg ref="introductionInterceptorAdvice"></constructor-arg>
        <constructor-arg value="springcode.aop.spring.IOther" />
    </bean>


    <bean class="springcode.aop.spring.Target" id="targetBean"></bean>

    <bean id="target" class="org.springframework.aop.framework.ProxyFactoryBean">
        <property name="target" ref="targetBean"></property>
        <property name="proxyInterfaces"  value="springcode.aop.spring.TargetInte"/>
        <property name="interceptorNames">
            <list>
                <value>pointcut1</value>
            </list>
        </property>
    </bean>
</beans>

package springcode.aop.spring;/*
* @auther 顶风少年
* @mail dfsn19970313@foxmail.com
* @date 2020-01-25 23:01
* @notify
* @version 1.0
*/
public interface IOther {
     void doOther();
}

5 JDK代理和CGLib代理都是动态代理
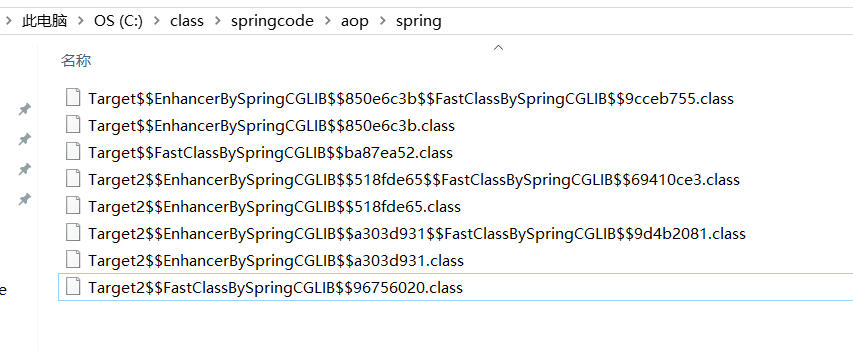
在上边我们的Target目标类总是有一个父接口,原因是Spring动态代理有两种实现方式,一种是使用JDK动态代理,JDK代理明确的要想给一个类生成代理对象,这个类必须要有父接口。如果没有父接口的类,则需要通过CGLib动态代理。他们两个都是动态代理也就是在运行时给类生成代理对象,注意是运行时!通俗讲JDK动态代理是通过接口,给目标类创建了一个新的兄弟类。而CGLib代理则是通过目标类创建了一个子类。类Target2并没有父接口,也可以成功生成代理对象。原因是Spring会根据目标类本身有没有父接口,自动的选择使用JDK动态代理还是CGLib动态代理。测试代码System.setProperty(DebuggingClassWriter.DEBUG_LOCATION_PROPERTY, "C:\class");设置CGLib动态生成的类存放位置。可以看出,对于Target目标类并没有使用CGLib动态代理,只有Target2才使用了。

package springcode.aop.spring;/*
* @auther 顶风少年
* @mail dfsn19970313@foxmail.com
* @date 2020-01-26 11:39
* @notify
* @version 1.0
*/
public class Target2 {
    public void show() {
        System.out.println("我是目标类2的show方法");
    }
}

<?xml version="1.0" encoding="UTF-8"?>
<beans xmlns="http://www.springframework.org/schema/beans"
       xmlns:xsi="http://www.w3.org/2001/XMLSchema-instance"
       xsi:schemaLocation="http://www.springframework.org/schema/beans http://www.springframework.org/schema/beans/spring-beans.xsd">

    <bean class="springcode.aop.spring.BeforeAdvice" id="beforeAdvice"></bean>

    <bean id="pointcut1" class="org.springframework.aop.support.RegexpMethodPointcutAdvisor">
        <property name="advice">
            <ref bean="beforeAdvice"/>
        </property>
        <property name="patterns">
            <list>
                <value>.*show</value>
                <value>.*speak</value>
                <value>.*exc</value>
            </list>
        </property>
    </bean>


    <bean class="springcode.aop.spring.Target" id="targetBean"></bean>

    <bean id="target" class="org.springframework.aop.framework.ProxyFactoryBean">
        <property name="target" ref="targetBean"></property>
        <property name="interceptorNames">
            <list>
                <value>pointcut1</value>
            </list>
        </property>
    </bean>

    <bean class="springcode.aop.spring.Target2" id="targetBean2"></bean>

    <bean id="target2" class="org.springframework.aop.framework.ProxyFactoryBean">
        <property name="target" ref="targetBean2"></property>
        <property name="interceptorNames">
            <list>
                <value>pointcut1</value>
            </list>
        </property>
    </bean>
</beans>

 @Test
    public void t8() {
        System.setProperty(DebuggingClassWriter.DEBUG_LOCATION_PROPERTY, "C:\class");
        ClassPathXmlApplicationContext context = new ClassPathXmlApplicationContext("classpath:springresource/cglib.xml");
        TargetInte target = (TargetInte) context.getBean("target");
        target.show();

        Target2 target2 = (Target2) context.getBean("target2");
        target2.show();
    }

当然对于有父接口的目标类,我们也可以强制的让它使用CGLib代理。ProxyFactoryBean的proxyTargetClass属性设置为true则强制使用CGLib代理。

<?xml version="1.0" encoding="UTF-8"?>
<beans xmlns="http://www.springframework.org/schema/beans"
       xmlns:xsi="http://www.w3.org/2001/XMLSchema-instance"
       xsi:schemaLocation="http://www.springframework.org/schema/beans http://www.springframework.org/schema/beans/spring-beans.xsd">

    <bean class="springcode.aop.spring.BeforeAdvice" id="beforeAdvice"></bean>

    <bean id="pointcut1" class="org.springframework.aop.support.RegexpMethodPointcutAdvisor">
        <property name="advice">
            <ref bean="beforeAdvice"/>
        </property>
        <property name="patterns">
            <list>
                <value>.*show</value>
                <value>.*speak</value>
                <value>.*exc</value>
            </list>
        </property>
    </bean>


    <bean class="springcode.aop.spring.Target" id="targetBean"></bean>

    <bean id="target" class="org.springframework.aop.framework.ProxyFactoryBean">
        <property name="target" ref="targetBean"></property>
        <property name="proxyTargetClass" value="true"/>
        <property name="interceptorNames">
            <list>
                <value>pointcut1</value>
            </list>
        </property>
    </bean>

    <bean class="springcode.aop.spring.Target2" id="targetBean2"></bean>

    <bean id="target2" class="org.springframework.aop.framework.ProxyFactoryBean">
        <property name="target" ref="targetBean2"></property>
        <property name="interceptorNames">
            <list>
                <value>pointcut1</value>
            </list>
        </property>
    </bean>
</beans>
6 一次生成多个代理对象
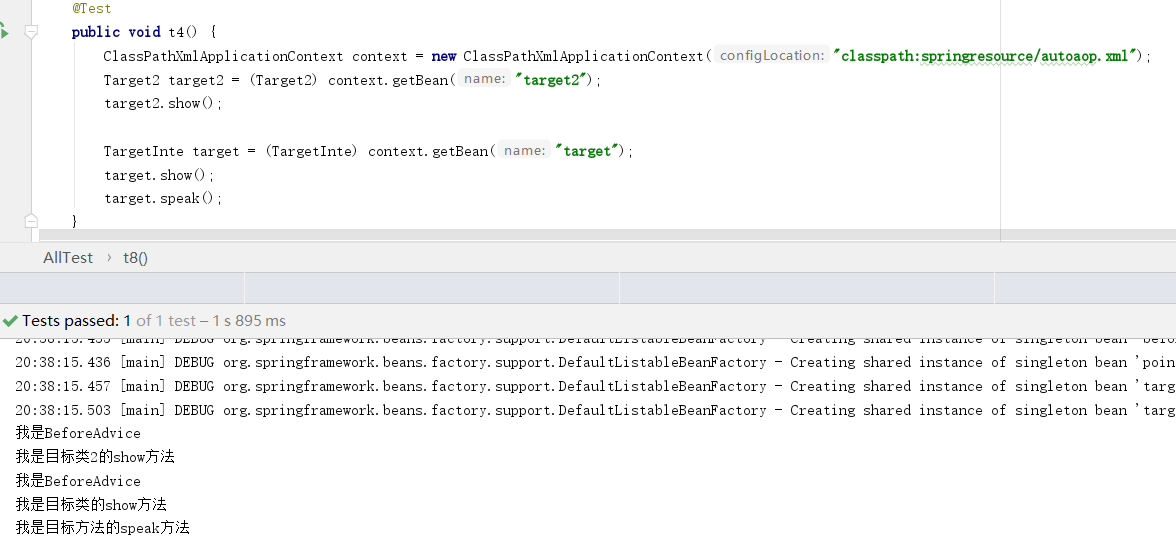
有没有发现一个问题,ProxyFactoryBean虽然它可以指定多个拦截器,一次只能给我们生成一个代理对象。BeanNameAutoProxyCreator则完全的消除这个弊端,BeanNameAutoProxyCreator允许我们匹配bean的Name从而确定我们需要几个代理对象。属性beanNames的值设置为target*,则代表所有target开头的bean都会生成代理对象。

<?xml version="1.0" encoding="UTF-8"?>
<beans xmlns="http://www.springframework.org/schema/beans"
       xmlns:xsi="http://www.w3.org/2001/XMLSchema-instance"
       xsi:schemaLocation="http://www.springframework.org/schema/beans http://www.springframework.org/schema/beans/spring-beans.xsd">

    <bean class="springcode.aop.spring.BeforeAdvice" id="beforeAdvice"></bean>

    <bean id="pointcut1"
          class="org.springframework.aop.support.RegexpMethodPointcutAdvisor">
        <property name="advice">
            <ref bean="beforeAdvice"/>
        </property>
        <property name="patterns">
            <list>
                <value>.*show</value>
            </list>
        </property>
    </bean>

    <bean class="springcode.aop.spring.Target" id="target"></bean>

    <bean class="springcode.aop.spring.Target2" id="target2"></bean>
    <bean class="org.springframework.aop.framework.autoproxy.BeanNameAutoProxyCreator">
        <property name="beanNames" value="targe*"/>
        <property name="interceptorNames">
            <list>
                <value>pointcut1</value>
            </list>
        </property>
    </bean>

</beans>
7 根据切入点生成代理对象
思考一个问题,我们配置的RegexpMethodPointcutAdvisor有了目标类和目标方法的匹配规则,然后使用ProxyFactoryBean或者BeanNameAutoProxyCreator确定给哪个类做代理对象,然后确定使用什么拦截器。如果我们换个思考方式,只要是RegexpMethodPointcutAdvisor匹配的目标类和目标方法我们就想生成代理类。类DefaultAdvisorAutoProxyCreator则会自动的收集RegexpMethodPointcutAdvisor匹配到的类,并生成代理对象。在配置文件中我们配置了两个RegexpMethodPointcutAdvisor,第一个是前置通知对show和speak方法进行匹配,第二个则是后置通知只对show方法进行匹配。DefaultAdvisorAutoProxyCreator我们不设置任何的属性。可以看到结果,show方法有前置和后置通知,而speak方法只有前置通知。不管是Target目标类还是Target2目标类,都生成了代理对象。

<?xml version="1.0" encoding="UTF-8"?>
<beans xmlns="http://www.springframework.org/schema/beans"
       xmlns:xsi="http://www.w3.org/2001/XMLSchema-instance"
       xsi:schemaLocation="http://www.springframework.org/schema/beans http://www.springframework.org/schema/beans/spring-beans.xsd">

    <bean class="springcode.aop.spring.BeforeAdvice" id="beforeAdvice"></bean>

    <bean id="pointcut1"
          class="org.springframework.aop.support.RegexpMethodPointcutAdvisor">
        <property name="advice">
            <ref bean="beforeAdvice"/>
        </property>
        <property name="patterns">
            <list>
                <value>.*show</value>
                <value>.*speak</value>
            </list>
        </property>
    </bean>

    <bean class="springcode.aop.spring.AfterAdvice" id="afterAdvice"></bean>

    <bean id="pointcut2"
          class="org.springframework.aop.support.RegexpMethodPointcutAdvisor">
        <property name="advice">
            <ref bean="afterAdvice"/>
        </property>
        <property name="patterns">
            <list>
                <value>.*show</value>
            </list>
        </property>
    </bean>

    <bean class="springcode.aop.spring.Target" id="target"></bean>
    <bean class="springcode.aop.spring.Target2" id="target2"></bean>

    <bean id="autoProxyCreator" class="org.springframework.aop.framework.autoproxy.DefaultAdvisorAutoProxyCreator">
    </bean>

</beans>

8 编程方式创建代理对象
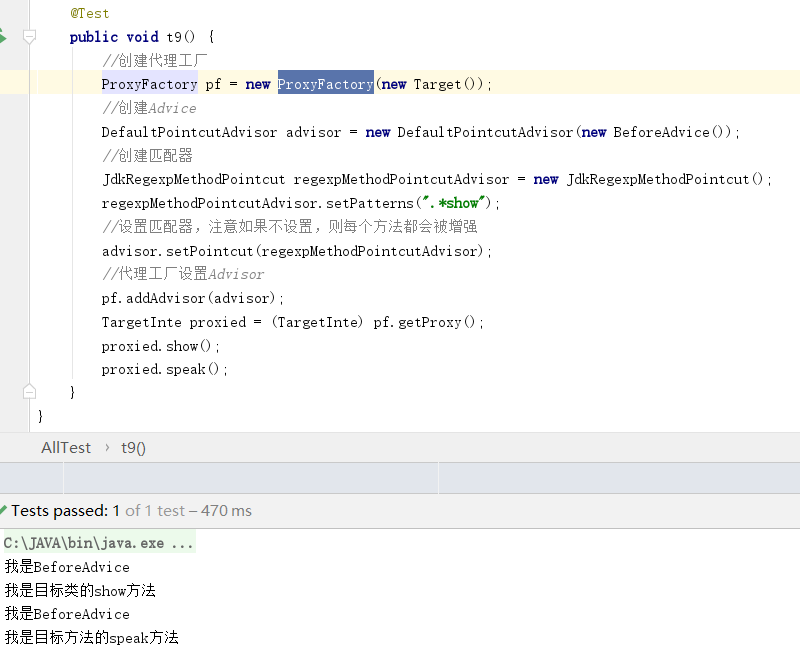
同样的SpringAOP允许我们使用java代码的方式创建代理对象。仔细观察你会发现xml配置方式使用的是ProxyFactoryBean类而java代码ProxyFactory类除此之外他们几乎没有任何的差别。重要的在于我们怎样理解SpringAop提供的组件,又怎么把组件连接起来。
9 TargetSource
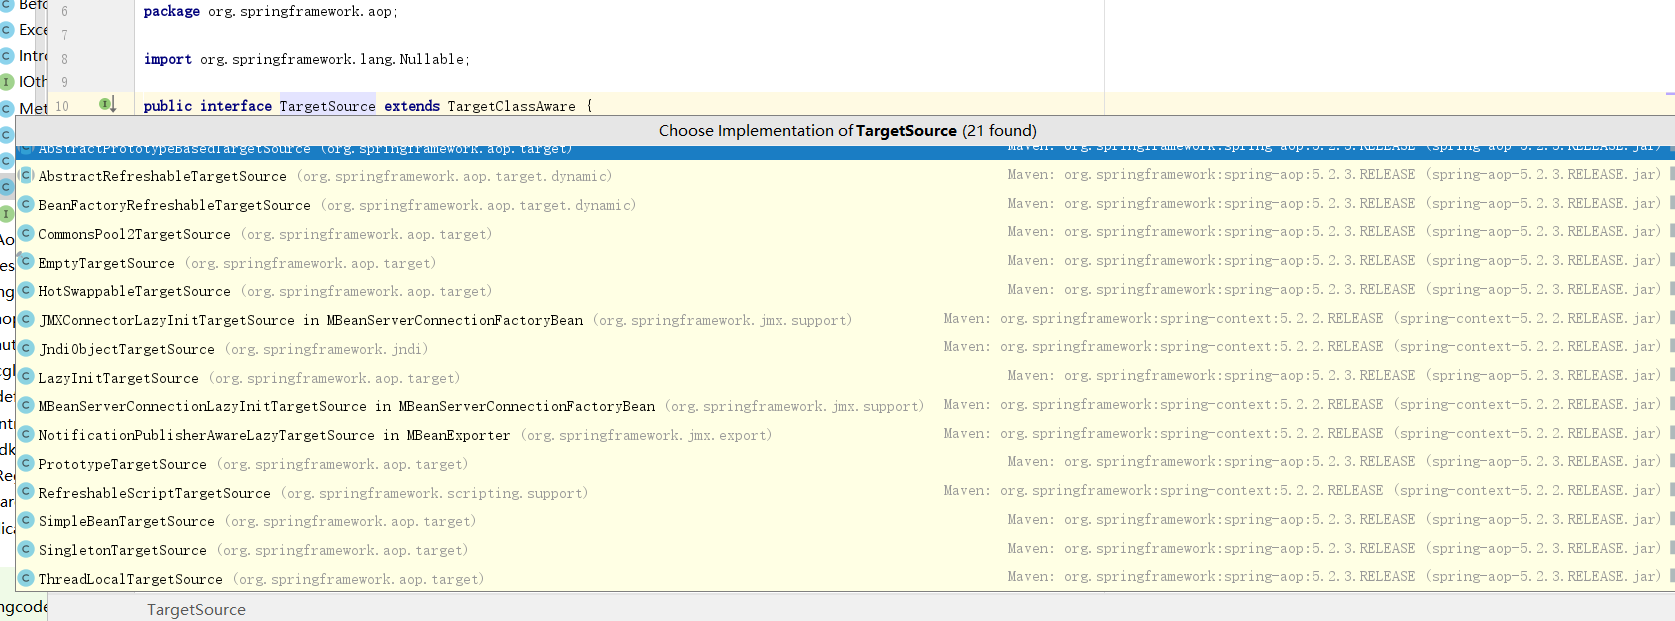
TargetSourceTargetSource为了使代理对象有更多的原则操作而诞生的,简单说生成代理对象这一个操作,我们可以对他进行装饰。如果我们不设置TargetSource,默认的使用EmptyTargetSource。TargetSource的实现类有很多,这里我们只看文档上提及的几个。
1 HotSwappableTargetSource
作用可动态的切换目标源,注意!!!ProxyFactoryBean必须要是scope="prototype"否则会出问题的。在下面xml代码中,ProxyFactoryBean设置target,而是设置了一个targetSource,而在targetSource中设置了target。获取HotSwappableTargetSource的bean然后调用swap()方法,这里需要传递一个对象,需要替换的对象。

<?xml version="1.0" encoding="UTF-8"?>
<beans xmlns="http://www.springframework.org/schema/beans"
       xmlns:xsi="http://www.w3.org/2001/XMLSchema-instance"
       xsi:schemaLocation="http://www.springframework.org/schema/beans http://www.springframework.org/schema/beans/spring-beans.xsd">

    <bean class="springcode.aop.spring.BeforeAdvice" id="beforeAdvice"></bean>

    <bean id="pointcut1" class="org.springframework.aop.support.RegexpMethodPointcutAdvisor">
        <property name="advice">
            <ref bean="beforeAdvice"/>
        </property>
        <property name="patterns">
            <list>
                <value>.*show</value>
                <value>.*speak</value>
                <value>.*exc</value>
            </list>
        </property>
    </bean>


    <bean class="springcode.aop.spring.Target2" id="targetBean2"></bean>

    <bean id="hotSwappableTargetSource" class="org.springframework.aop.target.HotSwappableTargetSource">
        <constructor-arg ref="targetBean2"/>
    </bean>


    <bean id="target" class="org.springframework.aop.framework.ProxyFactoryBean" scope="prototype">
        <property name="targetSource" ref="hotSwappableTargetSource"/>
        <property name="interceptorNames">
            <list>
                <value>pointcut1</value>
            </list>
        </property>
    </bean>

</beans>

package springcode.aop.spring;/*
 * @auther 顶风少年
 * @mail dfsn19970313@foxmail.com
 * @date 2020-01-25 18:56
 * @notify 被增强的目标类
 * @version 1.0
 */

public class Target3  {


    public void show() {
        System.out.println("我是目标类3的show方法");
    }


    public void speak() {
        System.out.println("我是目标方法3的speak方法");
    }

    public void exc() {
        int i = 1 / 0;
    }
}

package springcode.aop.spring;/*
* @auther 顶风少年
* @mail dfsn19970313@foxmail.com
* @date 2020-01-26 11:39
* @notify
* @version 1.0
*/
public class Target2 {
    public void show() {
        System.out.println("我是目标类2的show方法");
    }
}

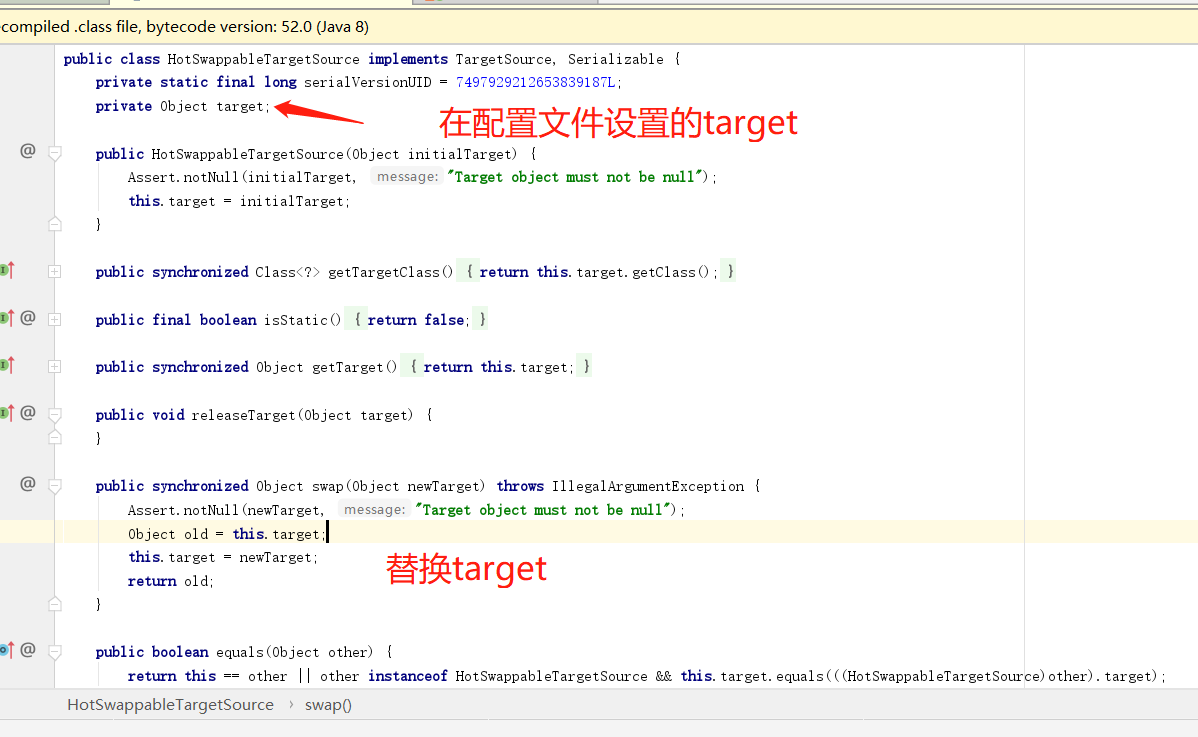
从源码中看,道理很简单。所以一定要把ProxyFactoryBean设置为原型,如果是单例bean被Spring存放到单例池里,那下次在getBean()还是同一个,这样根本无法切换目标源。
2 PrototypeTargetSource
一般的我们创建的代理对象都是单例的,PrototypeTargetSource帮我们创建不同实例的代理对象。Target目标类需要设置scope="prototype"

<?xml version="1.0" encoding="UTF-8"?>
<beans xmlns="http://www.springframework.org/schema/beans"
       xmlns:xsi="http://www.w3.org/2001/XMLSchema-instance"
       xsi:schemaLocation="http://www.springframework.org/schema/beans http://www.springframework.org/schema/beans/spring-beans.xsd">

    <bean class="springcode.aop.spring.BeforeAdvice" id="beforeAdvice"></bean>

    <bean id="pointcut1" class="org.springframework.aop.support.RegexpMethodPointcutAdvisor">
        <property name="advice">
            <ref bean="beforeAdvice"/>
        </property>
        <property name="patterns">
            <list>
                <value>.*show</value>
                <value>.*speak</value>
                <value>.*exc</value>
            </list>
        </property>
    </bean>


    <bean class="springcode.aop.spring.Target2" id="targetBean2" scope="prototype"></bean>

<!--        <bean id="hotSwappableTargetSource" class="org.springframework.aop.target.HotSwappableTargetSource">-->
<!--            <constructor-arg ref="targetBean2"/>-->
<!--        </bean>-->

    <bean id="prototypeTargetSource" class="org.springframework.aop.target.PrototypeTargetSource">
        <property name="targetBeanName" value="targetBean2"/>
    </bean>

    <bean id="target" class="org.springframework.aop.framework.ProxyFactoryBean">
        <property name="targetSource" ref="prototypeTargetSource"/>
        <property name="interceptorNames">
            <list>
                <value>pointcut1</value>
            </list>
        </property>
    </bean>

</beans>

AspectJ风格的SpringAOP
1 Aspect风格和Aspect编译器
Aspect风格的AOP还是SpringAOP使用JDK动态代理或者是CGLib动态代理,只是注解和xml方式和Aspect编译器类似,Aspect编译器是静态代理。动态代理在类运行时创建新的代理类,静态代理在编译时改变类的字节码,不会有新的Class产生。Spring支持使用Aspect编译器,下边会讲到。
2 一个简单的入门
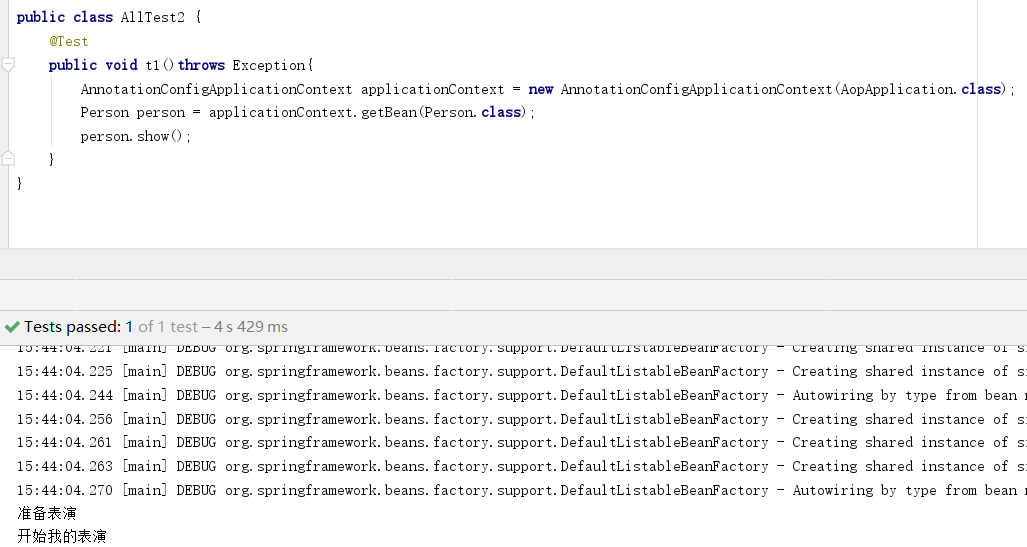
SpringBoot项目导入AOP包,创建一个目标类,这个目标类没有父接口,意味着使用的CGLib动态代理。定义一个Advice类,@Componnet和@Aspect注解不可少。方法pointcut()是一个空方法,方法上使用@Pointcut注解声明目标类和切入点。方法before()上注解@Before值为任意一个被@Pointcut注解的方法。这样就完成了AOP的代理对象的操作,有点简单哦。

    <dependency>
            <groupId>org.springframework.boot</groupId>
            <artifactId>spring-boot-starter-aop</artifactId>
        </dependency>

package springcode.aop.aspectj;/*
* @auther 顶风少年
* @mail dfsn19970313@foxmail.com
* @date 2020-01-27 14:39
* @notify
* @version 1.0
*/

import org.springframework.stereotype.Component;

import java.io.IOException;

@Component
public class Person {
    public void show()throws Exception {
        System.out.println("开始我的表演");
    }
}

package springcode.aop.aspectj;/*
* @auther 顶风少年
* @mail dfsn19970313@foxmail.com
* @date 2020-01-27 14:27
* @notify
* @version 1.0
*/

import org.aspectj.lang.annotation.Before;
import org.aspectj.lang.annotation.Pointcut;
import org.springframework.stereotype.Component;
import org.aspectj.lang.annotation.Aspect;

@Component
@Aspect
public class Aspectj1 {

    //返回类型模式、方法名模式和参数模式
    @Pointcut(value = "execution(public * springcode.aop..show(..)throws Exception)")
    public void pointcut(){}


    @Before(value = "pointcut()")
    public void before(){
        System.out.println("准备表演");
    }
}
3 支持的切入点匹配器
@Pointcut注解的value值,Spring最多的支持9中匹配模式。execution、within、this、target、args、@target、@args、@within、@annotation最常用的还是execution
execution:用于匹配方法执行连接点。这是使用Spring AOP时要使用的主要切入点指示器。格式为 方法修饰符 返回值类型 包名类名(参数列表)异常类型。其中返回类型模式、方法名模式和参数模式是不可少的,其他的都可以省略。@Pointcut(value = "execution( * *show(..))") 代表任意方法修饰符,任意返回值类型,任意包下以show结尾方法参数任意,异常类型任意的都匹配。
4 切入点组合
&& || !组合多个切入点匹配器使用 !的表达式不知道怎么用Q_Q

package springcode.aop.aspectj;/*
* @auther 顶风少年
* @mail dfsn19970313@foxmail.com
* @date 2020-01-27 14:27
* @notify
* @version 1.0
*/

import org.aspectj.lang.annotation.Aspect;
import org.aspectj.lang.annotation.Before;
import org.aspectj.lang.annotation.Pointcut;
import org.springframework.stereotype.Component;

@Component
@Aspect
public class Aspectj2 {


    @Pointcut(value = "execution(* show(..))")
    public void pointcut(){}


    @Pointcut(value = "execution(* rrrshow(..))")
    public void pointcut2(){}

    @Pointcut(value = "pointcut()&&pointcut2()")
    public void pointcut3(){}

    @Pointcut(value = "pointcut()||pointcut2()")
    public void pointcut4(){}

    @Before(value = "pointcut4()")
    public void before(){
        System.out.println("准备表演");
    }
}
5 注解方式的连接点
@Before
前置通知@Before,连接点的value可以给切入点的方法名,也可以直接写匹配器。

package springcode.aop.aspectj;/*
* @auther 顶风少年
* @mail dfsn19970313@foxmail.com
* @date 2020-01-27 14:27
* @notify
* @version 1.0
*/

import org.aspectj.lang.annotation.Aspect;
import org.aspectj.lang.annotation.Before;
import org.aspectj.lang.annotation.Pointcut;
import org.springframework.stereotype.Component;

@Component
@Aspect
public class Aspectj3 {
    @Before(value = "execution(* show(..))")
    public void before(){
        System.out.println("准备表演");
    }
}
@After
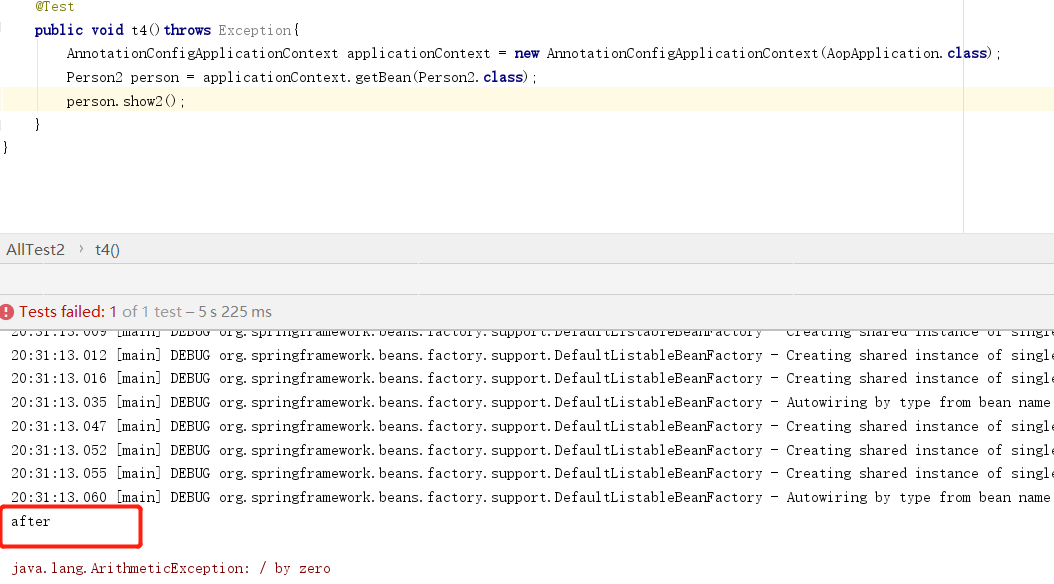
@After后置通知,无论目标方法是否有异常,该通知都会执行。可以当做finally使用。

package springcode.aop.aspectj;/*
 * @auther 顶风少年
 * @mail dfsn19970313@foxmail.com
 * @date 2020-01-27 14:27
 * @notify
 * @version 1.0
 */

import org.aspectj.lang.annotation.After;
import org.aspectj.lang.annotation.Aspect;
import org.springframework.stereotype.Component;

@Component
@Aspect
public class Aspectj6 {
    @After(value = "execution(* show2(..))")
    public void before() {
        System.out.println("after");
    }
}

package springcode.aop.aspectj;/*
* @auther 顶风少年
* @mail dfsn19970313@foxmail.com
* @date 2020-01-27 14:39
* @notify
* @version 1.0
*/

import org.springframework.stereotype.Component;


@Component
public class Person2 {
    public int show()throws Exception {
        System.out.println("person2.show()");
        return 100;
    }

    public void show2(){
        int i = 1/0;
    }
}
@AfterReturning
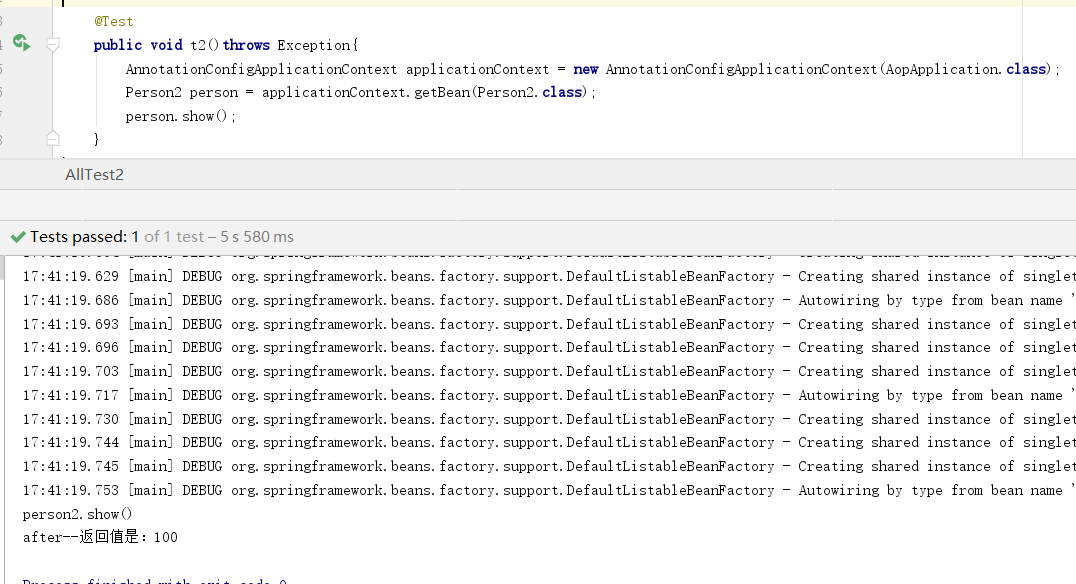
后置通知@AfterRetruning可以获取目标对象方法执行后的返回值。需要注意的是returning的值必须和连接点的参数名一样。和@After不同的是,@AfterReturning只能在没有异常时才会执行。

package springcode.aop.aspectj;/*
* @auther 顶风少年
* @mail dfsn19970313@foxmail.com
* @date 2020-01-27 14:39
* @notify
* @version 1.0
*/

import org.springframework.stereotype.Component;


@Component
public class Person2 {
    public int show()throws Exception {
        System.out.println("person2.show()");
        return 100;
    }
}

package springcode.aop.aspectj;/*
 * @auther 顶风少年
 * @mail dfsn19970313@foxmail.com
 * @date 2020-01-27 14:27
 * @notify
 * @version 1.0
 */

import org.aspectj.lang.annotation.AfterReturning;
import org.aspectj.lang.annotation.Aspect;
import org.aspectj.lang.annotation.Before;
import org.springframework.stereotype.Component;

@Component
@Aspect
public class Aspectj4 {
    @AfterReturning(value = "execution(* show(..))", returning = "r")
    public void before(Object r) {
        System.out.println("after--返回值是:"+r);
    }
}
@AfterThrowing
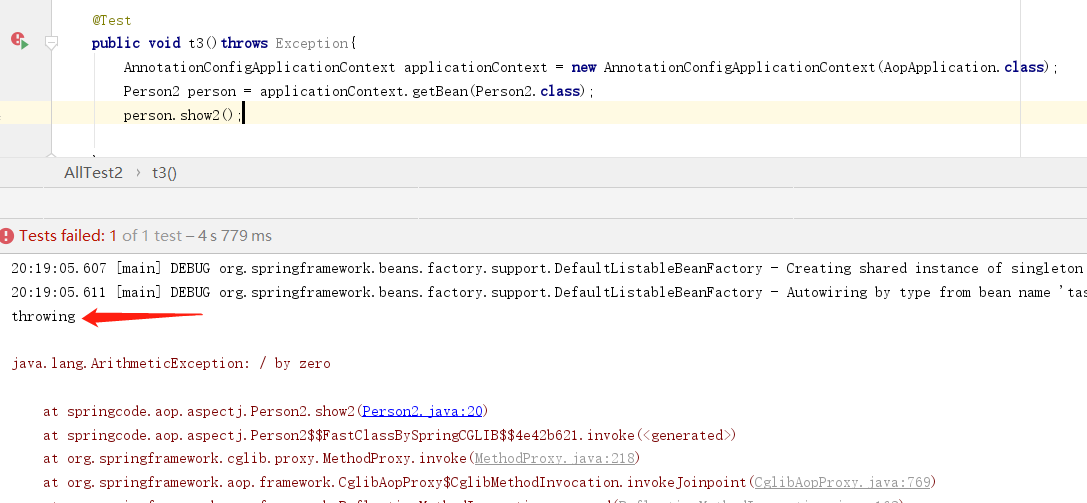
@AfterThrowing发生在异常后,如果要指定异常类型,则可以在参数中声明要拦截的异常,抛出的异常是拦截异常或其子类则可以拦截。

package springcode.aop.aspectj;/*
 * @auther 顶风少年
 * @mail dfsn19970313@foxmail.com
 * @date 2020-01-27 14:27
 * @notify
 * @version 1.0
 */

import org.aspectj.lang.annotation.AfterReturning;
import org.aspectj.lang.annotation.AfterThrowing;
import org.aspectj.lang.annotation.Aspect;
import org.springframework.stereotype.Component;

import java.io.IOException;

@Component
@Aspect
public class Aspectj5 {
    @AfterThrowing(value = "execution(* show2(..))",throwing = "e")
    public void before(Exception e) {
        System.out.println("throwing");
    }
}

package springcode.aop.aspectj;/*
* @auther 顶风少年
* @mail dfsn19970313@foxmail.com
* @date 2020-01-27 14:39
* @notify
* @version 1.0
*/

import org.springframework.stereotype.Component;


@Component
public class Person2 {
    public int show()throws Exception {
        System.out.println("person2.show()");
        return 100;
    }

    public void show2(){
        int i = 1/0;
    }
}
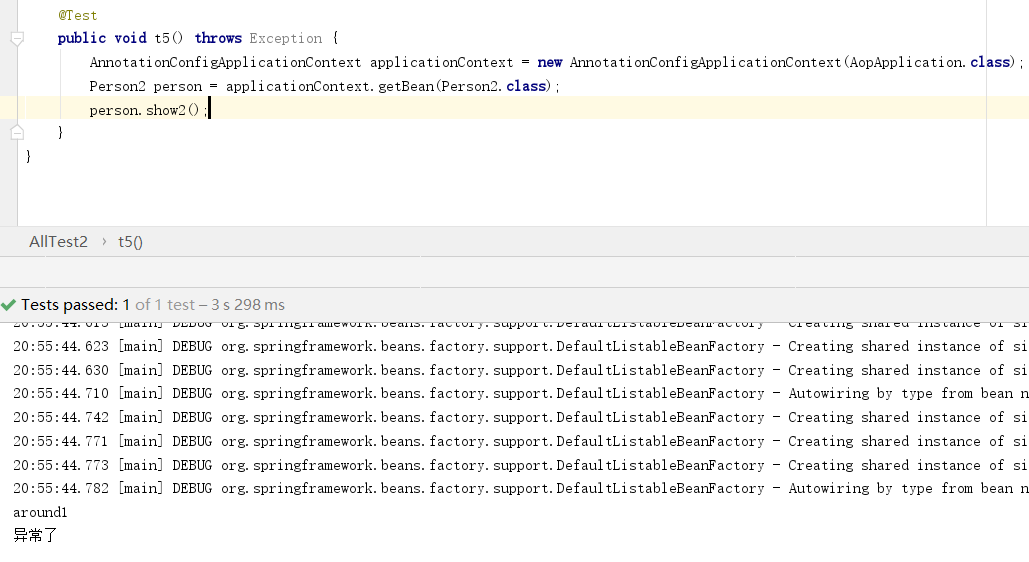
@Around
在目标类目标方法的开始和结束处增强,当然也可以使用catch将异常捕获,当做finally使用。

package springcode.aop.aspectj;/*
 * @auther 顶风少年
 * @mail dfsn19970313@foxmail.com
 * @date 2020-01-27 14:27
 * @notify
 * @version 1.0
 */

import org.aspectj.lang.ProceedingJoinPoint;
import org.aspectj.lang.annotation.Around;
import org.aspectj.lang.annotation.Aspect;
import org.springframework.stereotype.Component;

@Component
@Aspect
public class Aspectj7 {
    @Around(value = "execution(* show*(..))")
    public Object around(ProceedingJoinPoint pjp) {
        Object proceed = null;
        try {
            System.out.println("around1");
            proceed = pjp.proceed();
            System.out.println("around2");
            return proceed;
        } catch (Throwable e) {
            System.out.println("异常了");
            return proceed;
        }

    }
}

package springcode.aop.aspectj;/*
* @auther 顶风少年
* @mail dfsn19970313@foxmail.com
* @date 2020-01-27 14:39
* @notify
* @version 1.0
*/

import org.springframework.stereotype.Component;


@Component
public class Person2 {
    public int show()throws Exception {
        System.out.println("person2.show()");
        return 100;
    }

    public void show2(){
        int i = 1/0;
    }
}
6 连接点的通用参数
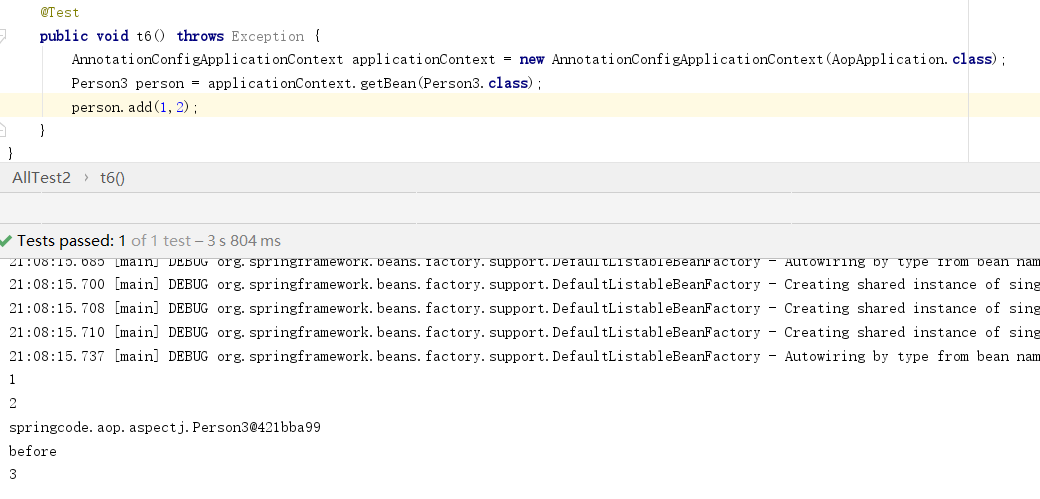
所有的注解连接点都可以带一个参数,JoinPoint,除了@Around注解除外,其他的都需要将该参数放到参数列表的第一个位置。通过该参数,可以获取到目标对象,和代理对象的信息。

package springcode.aop.aspectj;/*
 * @auther 顶风少年
 * @mail dfsn19970313@foxmail.com
 * @date 2020-01-27 21:05
 * @notify
 * @version 1.0
 */

import org.springframework.stereotype.Component;

@Component
public class Person3 {

    public void add(Integer arg1, Integer arg2) {
        System.out.println(arg1 + arg2);
    }
}

package springcode.aop.aspectj;/*
* @auther 顶风少年
* @mail dfsn19970313@foxmail.com
* @date 2020-01-27 21:03
* @notify
* @version 1.0
*/

import org.aspectj.lang.JoinPoint;
import org.aspectj.lang.annotation.Around;
import org.aspectj.lang.annotation.Aspect;
import org.aspectj.lang.annotation.Before;
import org.springframework.stereotype.Component;


@Component
@Aspect
public class Aspectj8 {

    @Before(value = "execution(* add(..))")
    public void before(JoinPoint joinPoint){
        //获取原对象的参数
        Object[] args = joinPoint.getArgs();
        for (Object o:args){
            System.out.println(o);
        }
        //获取原对象
        Object target = joinPoint.getTarget();
        System.out.println(target);
        System.out.println("before");
    }
}
7 XML方式使用AOP
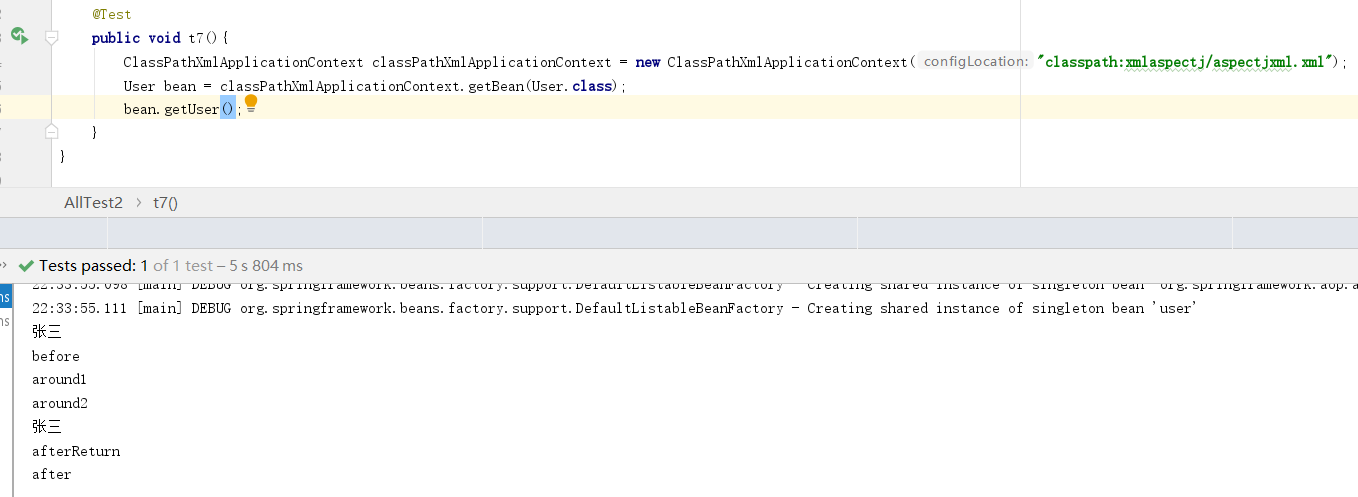
xml配置方式aop配置都在<aop:config>标签内<aop:pointcut expression="execution(* *(..))" id="anyMethod"/> 声明切入点匹配器。<aop:aspect>引用一个Advice的bean在内部可配置连接点。连接点既可以直接使用pointcut匹配器的id,也可以自己配置pointcut。同样的,Advice方法都可以添加JoinPoint作为参数。

package springcode.aop.xmlaspectj;/*
 * @auther 顶风少年
 * @mail dfsn19970313@foxmail.com
 * @date 2020-01-27 22:01
 * @notify
 * @version 1.0
 */

public class User {
    public String name = "张三";
    public void add() {
        System.out.println("添加用户");
    }

    public void update() {
        System.out.println("修改用户");
    }

    public void delete() {
        System.out.println("删除用户");
    }

    public User getUser() {
        return this;
    }
}

package springcode.aop.xmlaspectj;/*
 * @auther 顶风少年
 * @mail dfsn19970313@foxmail.com
 * @date 2020-01-27 22:03
 * @notify
 * @version 1.0
 */

import org.aspectj.lang.JoinPoint;
import org.aspectj.lang.ProceedingJoinPoint;

public class UserAdvice {

    public void before(JoinPoint joinPoint) {
        User target = (User)joinPoint.getTarget();
        System.out.println(target.name);
        System.out.println("before");
    }

    public void after() {
        System.out.println("after");
    }

    public void afterReturn(User user) {
        System.out.println(user.name);
        System.out.println("afterReturn");
    }

    public void thro() {
        System.out.println("throws");
    }

    public Object around(ProceedingJoinPoint proceedingJoinPoint) {
        Object object = null;
        try {
            System.out.println("around1");
            object = proceedingJoinPoint.proceed();
            System.out.println("around2");
            return object;
        } catch (Throwable e) {
            System.out.println("around3");
            return object;
        }
    }
}

<?xml version="1.0" encoding="UTF-8"?>
<beans xmlns="http://www.springframework.org/schema/beans"
       xmlns:xsi="http://www.w3.org/2001/XMLSchema-instance"
       xmlns:aop="http://www.springframework.org/schema/aop"
       xsi:schemaLocation="http://www.springframework.org/schema/beans http://www.springframework.org/schema/beans/spring-beans.xsd
        http://www.springframework.org/schema/aop
        http://www.springframework.org/schema/aop/spring-aop.xsd">

    <!-- 配置切面类 bean -->
    <bean id="advice" class="springcode.aop.xmlaspectj.UserAdvice"></bean>
    <!-- 配置目标类 bean -->
    <bean id="user" class="springcode.aop.xmlaspectj.User"></bean>

    <!-- aop 配置 -->
    <aop:config>
        <!-- 自定义切入点 -->
        <aop:pointcut expression="execution(* *(..))" id="anyMethod"/>

        <aop:aspect ref="advice">
            <!-- 前置通知 -->
            <aop:before method="before" pointcut-ref="anyMethod"/>
            <!-- 最终通知 -->
            <aop:after method="after" pointcut-ref="anyMethod"/>
            <!-- 后置通知 -->
            <aop:after-returning method="afterReturn" pointcut="execution(* getUser(..))" returning="user"/>
            <!-- 环绕通知 -->
            <aop:around method="around" pointcut-ref="anyMethod"/>
            <!-- 异常抛出通知 -->
            <aop:after-throwing method="thro" pointcut-ref="anyMethod"/>
        </aop:aspect>
    </aop:config>

</beans>
8 给目标对象增加接口
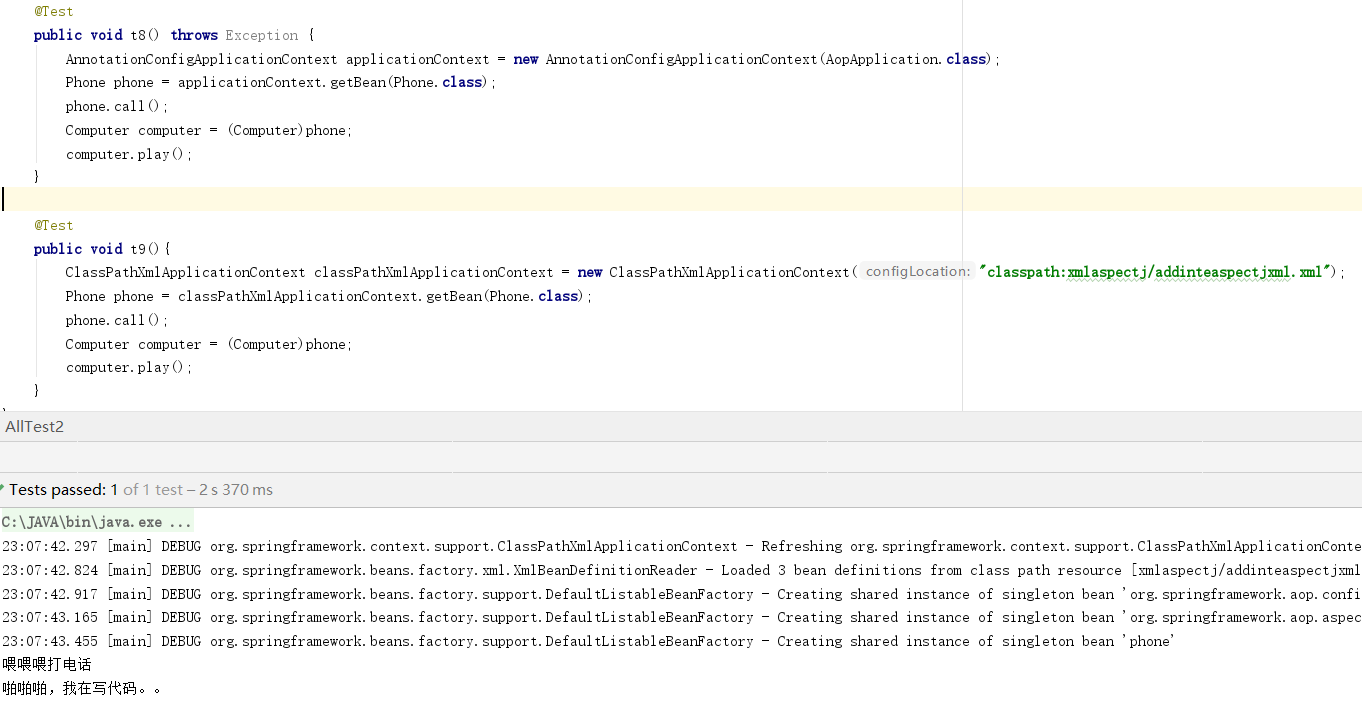
注解方式使用注解@DeclareParents被注解的必须是一个接口,value指定代理对象类型匹配器,defaultImpl必须是接口的子类。xml配置方式类似。
注解方式

package springcode.aop.addInte;/*
* @auther 顶风少年
* @mail dfsn19970313@foxmail.com
* @date 2020-01-27 22:49
* @notify
* @version 1.0
*/

import org.springframework.stereotype.Component;

@Component
public class Phone {
    public void call(){
        System.out.println("喂喂喂打电话");
    }
}

package springcode.aop.addInte;/*
* @auther 顶风少年
* @mail dfsn19970313@foxmail.com
* @date 2020-01-27 22:50
* @notify
* @version 1.0
*/

import org.springframework.stereotype.Component;


public interface Computer {
    public void play();
}

package springcode.aop.addInte;/*
* @auther 顶风少年
* @mail dfsn19970313@foxmail.com
* @date 2020-01-27 22:50
* @notify
* @version 1.0
*/

import org.springframework.stereotype.Component;


public class DEComputer implements Computer{
    public void play(){
        System.out.println("啪啪啪,我在写代码。。");
    }
}

package springcode.aop.addInte;/*
 * @auther 顶风少年
 * @mail dfsn19970313@foxmail.com
 * @date 2020-01-27 22:51
 * @notify
 * @version 1.0
 */

import org.aspectj.lang.annotation.Aspect;
import org.aspectj.lang.annotation.DeclareParents;
import org.springframework.stereotype.Component;

@Component
@Aspect
public class AdviceInte {
    @DeclareParents(value = "springcode.aop.addInte.Phone", defaultImpl = DEComputer.class)
    public  Computer computer;
}
XML配置方式

<?xml version="1.0" encoding="UTF-8"?>
<beans xmlns="http://www.springframework.org/schema/beans"
       xmlns:xsi="http://www.w3.org/2001/XMLSchema-instance"
       xmlns:aop="http://www.springframework.org/schema/aop"
       xsi:schemaLocation="http://www.springframework.org/schema/beans http://www.springframework.org/schema/beans/spring-beans.xsd
        http://www.springframework.org/schema/aop
        http://www.springframework.org/schema/aop/spring-aop.xsd">

    <aop:config>
        <aop:aspect >
            <aop:declare-parents
                    types-matching="springcode.aop.addInte.Phone"
                    implement-interface="springcode.aop.addInte.Computer"
                    default-impl="springcode.aop.addInte.DEComputer"
            />
        </aop:aspect>
    </aop:config>
    <!-- 目标类 -->
    <bean id="phone" class="springcode.aop.addInte.Phone"></bean>
</beans>
真正的AspectJ编译器
本类调用为什么会失效
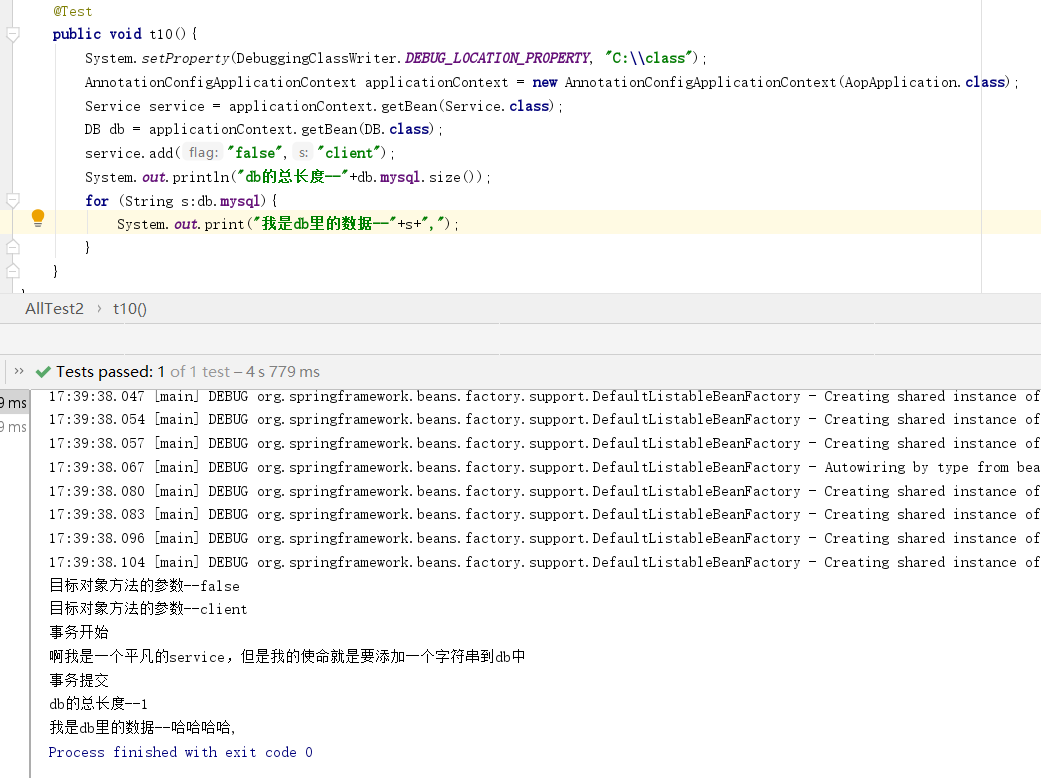
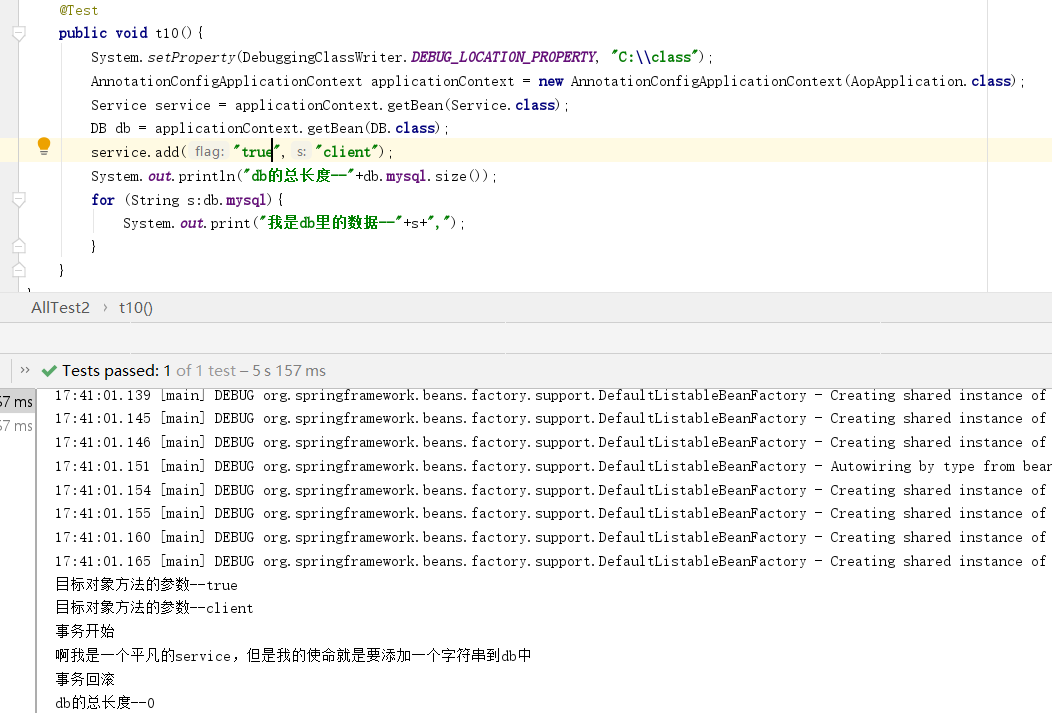
类DB封装了一个List集合,DBTransaction是一个普通的注解类。通知类DBTransactionAspect中声明连接点匹配规则是@Pointcut("@annotation(springcode.aop.transactiontest.DBTransaction)")这意味着,任何使用@DBTransaction的方法都将会被拦截。around()是一个环绕通知,当被拦截的方法内部抛出异常,则删掉List中最后一条数据。Service类中的add方法,是业务类,它模拟向数据库中添加数据,当参数是true是则会抛出异常。
结果是我们想要看到的,这其实就是模拟一个事务。

package springcode.aop.transactiontest;

import java.lang.annotation.*;

@Target(ElementType.METHOD)
@Retention(RetentionPolicy.RUNTIME)
@Documented
public @interface DBTransaction {
}

package springcode.aop.transactiontest;/*
* @auther 顶风少年
* @mail dfsn19970313@foxmail.com
* @date 2020-01-28 14:53
* @notify
* @version 1.0
*/

import org.springframework.stereotype.Component;

import java.util.ArrayList;

@Component
public class DB {
    public ArrayList<String> mysql = new ArrayList<>();
}

package springcode.aop.transactiontest;/*
 * @auther 顶风少年
 * @mail dfsn19970313@foxmail.com
 * @date 2020-01-28 15:26
 * @notify
 * @version 1.0
 */

import org.aspectj.lang.ProceedingJoinPoint;
import org.aspectj.lang.annotation.Around;
import org.aspectj.lang.annotation.Aspect;
import org.aspectj.lang.annotation.Pointcut;
import org.springframework.beans.factory.annotation.Autowired;
import org.springframework.stereotype.Component;

@Component
@Aspect
public class DBTransactionAspect {
    @Autowired
    private DB db;

    @Pointcut("@annotation(springcode.aop.transactiontest.DBTransaction)")
    public void Pointcut() {
    }

    @Around("Pointcut()")
    public void around(ProceedingJoinPoint pjp) {
        Object[] args = pjp.getArgs();
        for (Object s : args) {
            String o = (String) s;
            System.out.println("目标对象方法的参数--"+o);
        }
        Object object = null;
        try {
            System.out.println("事务开始");
            object = pjp.proceed();
            System.out.println("事务提交");
        } catch (Throwable throwable) {
            db.mysql.remove(db.mysql.size() - 1);
            System.out.println("事务回滚");
        }

    }
}

package springcode.aop.transactiontest;/*
 * @auther 顶风少年
 * @mail dfsn19970313@foxmail.com
 * @date 2020-01-28 14:56
 * @notify
 * @version 1.0
 */

import org.springframework.beans.factory.annotation.Autowired;
import org.springframework.stereotype.Component;

@Component
public class Service {
    @Autowired
    private DB db;

    @DBTransaction
    public void add(String flag, String s) {
        System.out.println("啊我是一个平凡的service,但是我的使命就是要添加一个字符串到db中");
        db.mysql.add("哈哈哈哈");
        if (flag.equals("true")) {
            int i = 1 / 0;
        }
    }
}
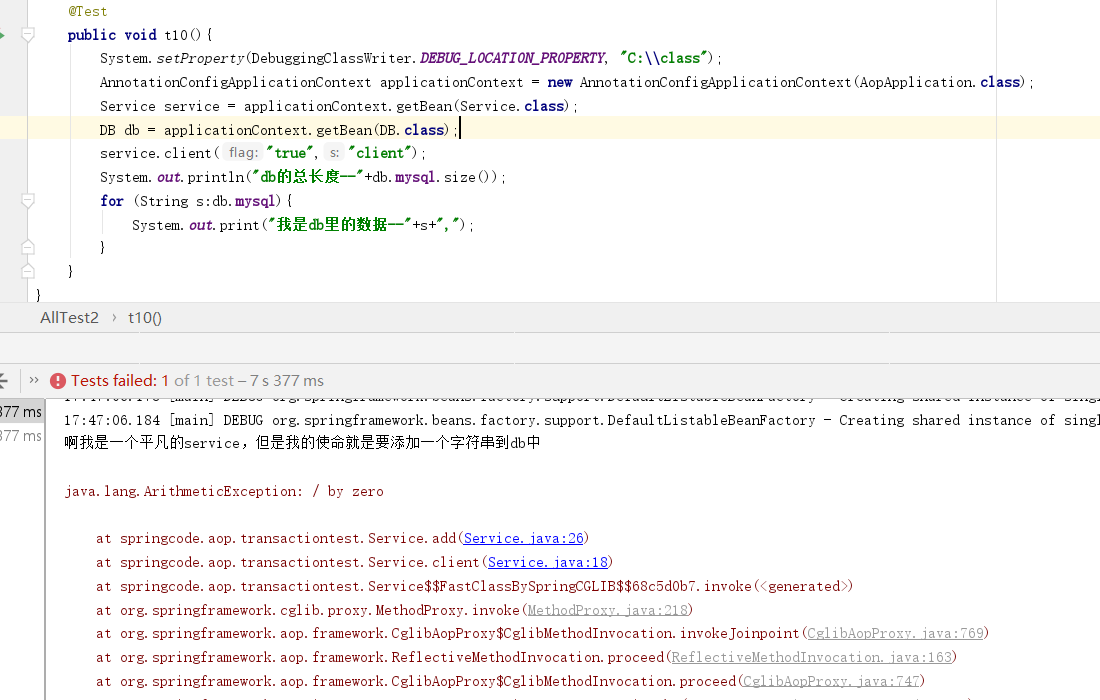
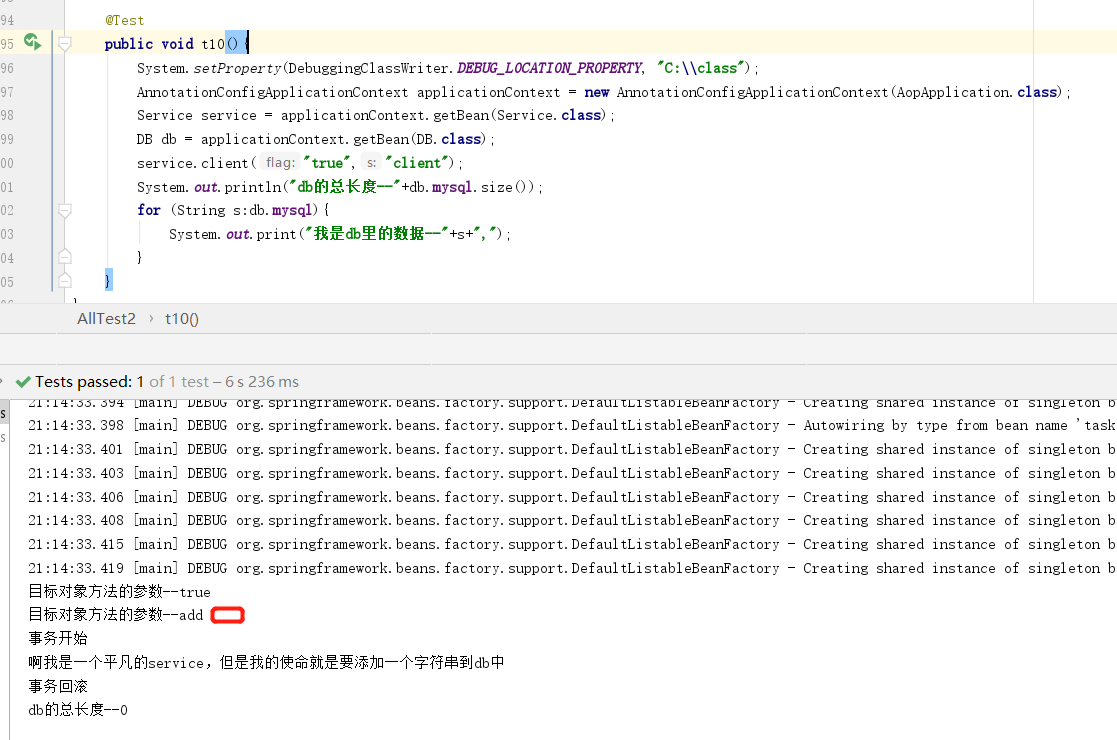
现在业务变动了,在Service中新增了一个方法client()所有的客户端只能通过它访问add()方法。此时我们发现,无论抛不抛异常add()方法都没有被拦截。这个问题很关键,所以我首先贴出来官方的解释,然后在拼凑自己的理解。
The key thing to understand here is that the client code inside the main(..) method of the Main class has a reference to the proxy. This means that method calls on that object reference are calls on the proxy. As a result, the proxy can delegate to all of the interceptors (advice) that are relevant to that particular method call. However, once the call has finally reached the target object (the SimplePojo, reference in this case), any method calls that it may make on itself, such as this.bar() or this.foo(), are going to be invoked against the this reference, and not the proxy. This has important implications. It means that self-invocation is not going to result in the advice associated with a method invocation getting a chance to execute.

package springcode.aop.transactiontest;/*
 * @auther 顶风少年
 * @mail dfsn19970313@foxmail.com
 * @date 2020-01-28 14:56
 * @notify
 * @version 1.0
 */

import org.springframework.beans.factory.annotation.Autowired;
import org.springframework.stereotype.Component;

@Component
public class Service {
    @Autowired
    private DB db;

    public void client(String flag, String s) {
        add(flag, "add");
    }

    @DBTransaction
    public void add(String flag, String s) {
        System.out.println("啊我是一个平凡的service,但是我的使命就是要添加一个字符串到db中");
        db.mysql.add("哈哈哈哈");
        if (flag.equals("true")) {
            int i = 1 / 0;
        }
    }
}

当Service调用client时,它发现,没有任何一个拦截器是拦截clinet(),所以他没有走代理对象,走的只是Service.class。然后Service对象调用自己的add()当然也不会走代理对象!那么原因就是client()方法使用的不是代理对象的client()。
接下来我们试试这种。

package springcode.aop.transactiontest;/*
 * @auther 顶风少年
 * @mail dfsn19970313@foxmail.com
 * @date 2020-01-28 14:56
 * @notify
 * @version 1.0
 */

import org.springframework.beans.factory.annotation.Autowired;
import org.springframework.stereotype.Component;

@Component
public class Service {
    @Autowired
    private DB db;

    @DBTransaction
    public void client(String flag, String s) {
        add(flag, "add");
    }

    @DBTransaction
    public void add(String flag, String s) {
        System.out.println("啊我是一个平凡的service,但是我的使命就是要添加一个字符串到db中");
        db.mysql.add("哈哈哈哈");
        if (flag.equals("true")) {
            int i = 1 / 0;
        }
    }
}

此时事务虽然生效了,但是并不是add()方法的事务,真正被拦截的是client(),也就是说,在代理类的client中走的是目标类自己的add()。这也就是官方说明的一点,关于所有的this引用都指向的是目标类本身,而非代理对象。对于这种问题的方式官方给出了解决办法。
首先将AopContext上下文暴露出来。@EnableAspectJAutoProxy(exposeProxy=true)然后目标对象中创建代理对象。这种方式粗暴简单说,我要用的就是你的代理对象,没毛病。但是一旦我们换了AOP不用SpringAop了,这种方式肯定是报错的。

package springcode.aop.transactiontest;/*
 * @auther 顶风少年
 * @mail dfsn19970313@foxmail.com
 * @date 2020-01-28 14:56
 * @notify
 * @version 1.0
 */

import org.springframework.aop.framework.AopContext;
import org.springframework.beans.factory.annotation.Autowired;
import org.springframework.stereotype.Component;

@Component
public class Service {
    @Autowired
    private DB db;

    public void client(String flag, String s) {
        ((Service) AopContext.currentProxy()).add(flag, "add");
    }


    @DBTransaction
    public void add(String flag, String s) {
        System.out.println("啊我是一个平凡的service,但是我的使命就是要添加一个字符串到db中");
        db.mysql.add("哈哈哈哈");
        if (flag.equals("true")) {
            int i = 1 / 0;
        }
    }
}
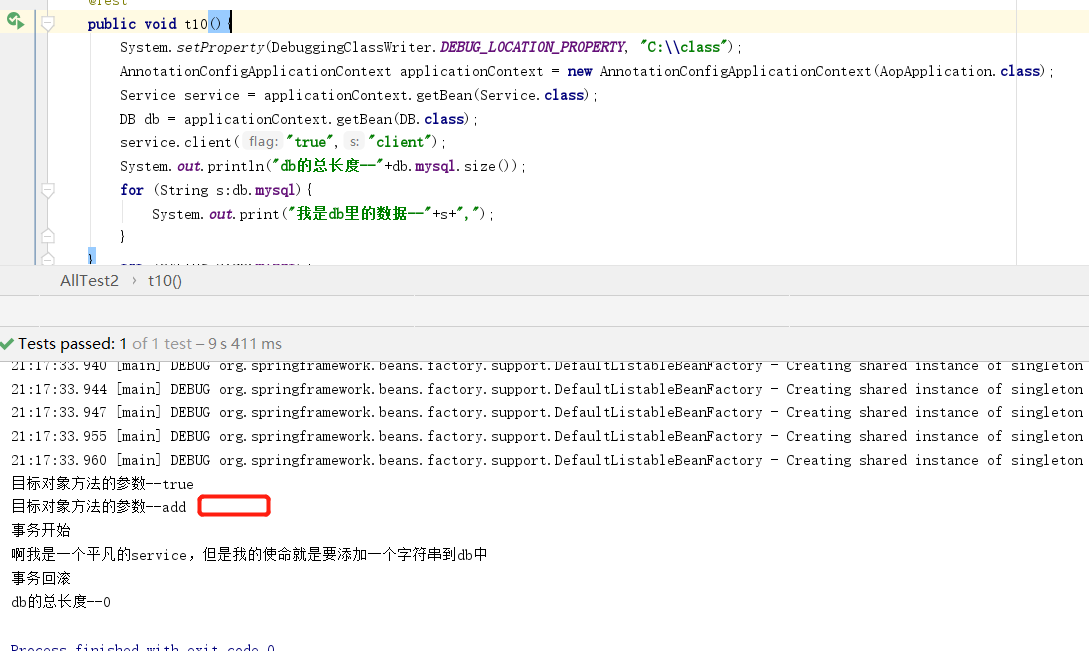
然后,还有一种方式。既然this是本类对象的方法,那么我不用this。手动注入一个本类,通过Spring容器,那么你就要乖乖走代理对象。

package springcode.aop.transactiontest;/*
 * @auther 顶风少年
 * @mail dfsn19970313@foxmail.com
 * @date 2020-01-28 14:56
 * @notify
 * @version 1.0
 */

import org.springframework.aop.framework.AopContext;
import org.springframework.beans.factory.annotation.Autowired;
import org.springframework.stereotype.Component;

@Component
public class Service {
    @Autowired
    private DB db;

    @Autowired
    private Service service;

    public void client(String flag, String s) {
       // ((Service) AopContext.currentProxy()).add(flag, "add");
        service.add(flag, "add");
    }


    @DBTransaction
    public void add(String flag, String s) {
        System.out.println("啊我是一个平凡的service,但是我的使命就是要添加一个字符串到db中");
        db.mysql.add("哈哈哈哈");
        if (flag.equals("true")) {
            int i = 1 / 0;
        }
    }
}
AspectJ编译器体验
首先我要先吐槽下Spring文档,它对于AspectJ编译器真的一点都不友好!!!这一个Demo是找了好多资料拼拼凑凑完成的。只为了填本类调用的坑!下面代码片段是重新开的项目SpringBoot2.2.4。JDK8。编译器使用的IDEA。这里依然有两个问题我没有解决1、生成的代理Class在哪放?2、为什么@Component注解会失效!

<?xml version="1.0" encoding="UTF-8"?>
<project xmlns="http://maven.apache.org/POM/4.0.0" xmlns:xsi="http://www.w3.org/2001/XMLSchema-instance"
         xsi:schemaLocation="http://maven.apache.org/POM/4.0.0 https://maven.apache.org/xsd/maven-4.0.0.xsd">
    <modelVersion>4.0.0</modelVersion>
    <parent>
        <groupId>org.springframework.boot</groupId>
        <artifactId>spring-boot-starter-parent</artifactId>
        <version>2.2.4.RELEASE</version>
        <relativePath/> <!-- lookup parent from repository -->
    </parent>
    <groupId>com.datang</groupId>
    <artifactId>demo</artifactId>
    <version>0.0.1-SNAPSHOT</version>
    <name>aspectj</name>
    <description>Demo project for Spring Boot</description>

    <properties>
        <java.version>1.8</java.version>
    </properties>

    <dependencies>
        <dependency>
            <groupId>org.springframework.boot</groupId>
            <artifactId>spring-boot-starter-aop</artifactId>
        </dependency>

        <dependency>
            <groupId>org.springframework.boot</groupId>
            <artifactId>spring-boot-starter-test</artifactId>
            <scope>test</scope>
        </dependency>
    </dependencies>

    <build>
        <plugins>
            <plugin>
                <groupId>org.apache.maven.plugins</groupId>
                <artifactId>maven-surefire-plugin</artifactId>
                <configuration>
                    <argLine>
                        -javaagent:"${settings.localRepository}/org/aspectj/aspectjweaver/${aspectj.version}/aspectjweaver-${aspectj.version}.jar"
                        -javaagent:"${settings.localRepository}/org/springframework/spring-instrument/5.2.3.RELEASE/spring-instrument-5.2.3.RELEASE.jar"
                        <!-- -Dspring.profiles.active=test-->
                    </argLine>
                </configuration>
            </plugin>
            <plugin>
                <groupId>org.springframework.boot</groupId>
                <artifactId>spring-boot-maven-plugin</artifactId>
                <configuration>
                    <agent>
                        ${settings.localRepository}/org/aspectj/aspectjweaver/${aspectj.version}/aspectjweaver-${aspectj.version}.jar
                    </agent>
                    <agent>
                        ${settings.localRepository}/org/springframework/spring-instrument/5.2.3.RELEASE/spring-instrument-5.2.3.RELEASE.jar
                    </agent>
                </configuration>
            </plugin>
        </plugins>
    </build>

</project>
pom文件需要注意的是aspectjweaver和spring-instrument这两个jar。位置不要照着写。

package com.datang.demo.aspectj;/*
 * @auther 顶风少年
 * @mail dfsn19970313@foxmail.com
 * @date 2020-01-28 15:26
 * @notify
 * @version 1.0
 */

import org.aspectj.lang.ProceedingJoinPoint;
import org.aspectj.lang.annotation.Around;
import org.aspectj.lang.annotation.Aspect;
import org.aspectj.lang.annotation.Pointcut;
import org.springframework.beans.factory.annotation.Autowired;

@Aspect
public class DBTransactionAspect {

    @Autowired
    private DB db;

    @Pointcut("@annotation(com.datang.demo.aspectj.DBTransaction)&&execution(* *(..)) ")
    public void Pointcut() {
    }

    @Around("Pointcut()")
    public void around(ProceedingJoinPoint pjp) {
        Object[] args = pjp.getArgs();
        for (Object s : args) {
            String o = (String) s;
            System.out.println("目标对象方法的参数--"+o);
        }
        Object object = null;
        try {
            System.out.println("事务开始");
            object = pjp.proceed();
            System.out.println("事务提交");
        } catch (Throwable throwable) {
            System.out.println(db==null);
            db.mysql.remove(db.mysql.size() - 1);
            System.out.println("事务回滚");
        }

    }
}
通知类此处还有坑@Component失效!所以我没有加。其次@Pointcut后边也加入了一段这个是为了应对AspectJ的BUG,如果不加在本类调用会被AOP两次!

package com.datang.demo.aspectj;/*
 * @auther 顶风少年
 * @mail dfsn19970313@foxmail.com
 * @date 2020-01-28 14:56
 * @notify
 * @version 1.0
 */

import org.springframework.beans.factory.annotation.Autowired;
import org.springframework.stereotype.Component;

@Component
public class Service {
    @Autowired
    private DB db;


    public void client(String flag, String s) {
        this.add(flag, "add....");
    }


    @DBTransaction
    public void add(String flag, String s) {
        System.out.println("啊我是一个平凡的service,但是我的使命就是要添加一个字符串到db中");
        db.mysql.add("哈哈哈哈");
        if (flag.equals("true")) {
            int i = 1 / 0;
        }
    }
}

package com.datang.demo.aspectj;

import java.lang.annotation.*;

@Target(ElementType.METHOD)
@Retention(RetentionPolicy.RUNTIME)
@Documented
public @interface DBTransaction {
}
Service和注解类不变

package com.datang.demo.aspectj;/*
* @auther 顶风少年
* @mail dfsn19970313@foxmail.com
* @date 2020-01-29 14:37
* @notify
* @version 1.0
*/

import org.springframework.context.annotation.ComponentScan;
import org.springframework.context.annotation.Configuration;
import org.springframework.context.annotation.EnableLoadTimeWeaving;

import static org.springframework.context.annotation.EnableLoadTimeWeaving.AspectJWeaving.AUTODETECT;

@Configuration
@ComponentScan("com.datang.demo.aspectj")
@EnableLoadTimeWeaving(aspectjWeaving=AUTODETECT)
public class CustomLtwConfig {
}
此处用了个Spring配置类,主要为了配置@EnableLoadTimeWeaving(aspectjWeaving=AUTODETECT)这个玩意,启动AspectJ的XML配置。

<?xml version="1.0" encoding="UTF-8"?>
<!DOCTYPE aspectj PUBLIC "-//AspectJ//DTD//EN" "http://www.eclipse.org/aspectj/dtd/aspectj.dtd">
<aspectj>

    <!--要织入切面的目标类-->
    <weaver>
        <include within="com.datang.demo.aspectj..*" />
    </weaver>
    <!--切面类-->
    <aspects>
        <aspect name="com.datang.demo.aspectj.DBTransactionAspect" />
    </aspects>
</aspectj>
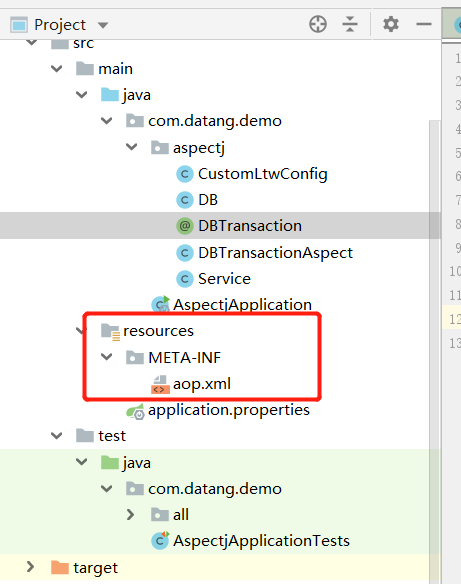
这个文件的位置不要放错
