1.注册git@osc(也就是“码云”)
这里会提示注册密码==push密码,反正一定要记住的东西。
2.安装git
这里要设置个人信息
git config --list //查看git信息
git config --global user.name "zqz"
git config --global user.email "zqz@zhaoqize.com"
git config --global core.editor vim
git -config --list
##
core.symlinks=false
core.autocrlf=true
color.diff=auto
color.status=auto
color.branch=auto
color.interactive=true
help.format=html
http.sslcainfo=C:/Program Files/Git/mingw64/ssl/certs/ca-bundle.crt
diff.astextplain.textconv=astextplain
rebase.autosquash=true
user.name=zqz
user.email=zqz@zhaoqize.com
core.editor=vim
core.repositoryformatversion=0
core.filemode=false
core.bare=false
core.logallrefupdates=true
core.symlinks=false
core.ignorecase=true
core.hidedotfiles=dotGitOnly
##
里面的邮箱这个可以随意取个名字,与你的github邮箱或者git@osc邮箱啥的没有半毛钱关系。
但是会与你的SSH有关系。
3.新建文件夹初始化git仓库
cd E:
cd GruntFrist/
git init
#Initialized empty Git repository in E:/GruntFrist/.git/ //提示初始化仓库成功
ls
##
Gruntfile.js  node_modules/  package.json  src/
##
git add Gruntfile.js //add文件进入仓库
git add src //add文件进入仓库
git status
##
On branch master
Initial commit
Changes to be committed:
(use "git rm --cached <file>..." to unstage)
new file: Gruntfile.js
new file: src/css/ni.css
new file: src/css/style.css
new file: src/page/index.html
Untracked files:
(use "git add <file>..." to include in what will be committed)
.idea/
node_modules/
package.json
##
git commit -m'The first submission'//提交代码
4.生成秘钥(是一种基于密钥的安全验证,也就是你的git与github或者git@OSC之间的通信"密码")
只有这样,你才能将git中的文件push到github或者git@OSC上面。
ssh-keygen -t rsa -C "zqz@zhaoqize.com"
##
Generating public/private rsa key pair.
Enter file in which to save the key (/c/Users/Administrator/.ssh/id_rsa):
Enter passphrase (empty for no passphrase):
Enter same passphrase again:
Your identification has been saved in /c/Users/Administrator/.ssh/id_rsa.
Your public key has been saved in /c/Users/Administrator/.ssh/id_rsa.pub.
The key fingerprint is:
SHA256:Gc7pA4FyRJccfDHkD6nE/PEDrrB3L97t3PWk1+gDQA8 zqz@zhaoqize.com
The key's randomart image is:
+---[RSA 2048]----+
|   .ooo++.       |
|   . =+..oE      |
|  . o =.B. o     |
|   o . B X. .    |
|    . o S +.     |
|     o +   ..    |
|    . o +    . .+|
|     . ..+ o .o++|
|       ...o.+.+o.|
+----[SHA256]-----+

##
cat ~/.ssh/id_rsa.pub //查看秘钥
##
ssh-rsa AAAAB3NzaC1y....(这里省略一大坨字符)......../h zqz@zhaoqize.com
##
我们看最后,这个就是我们之前设置git的email的邮箱
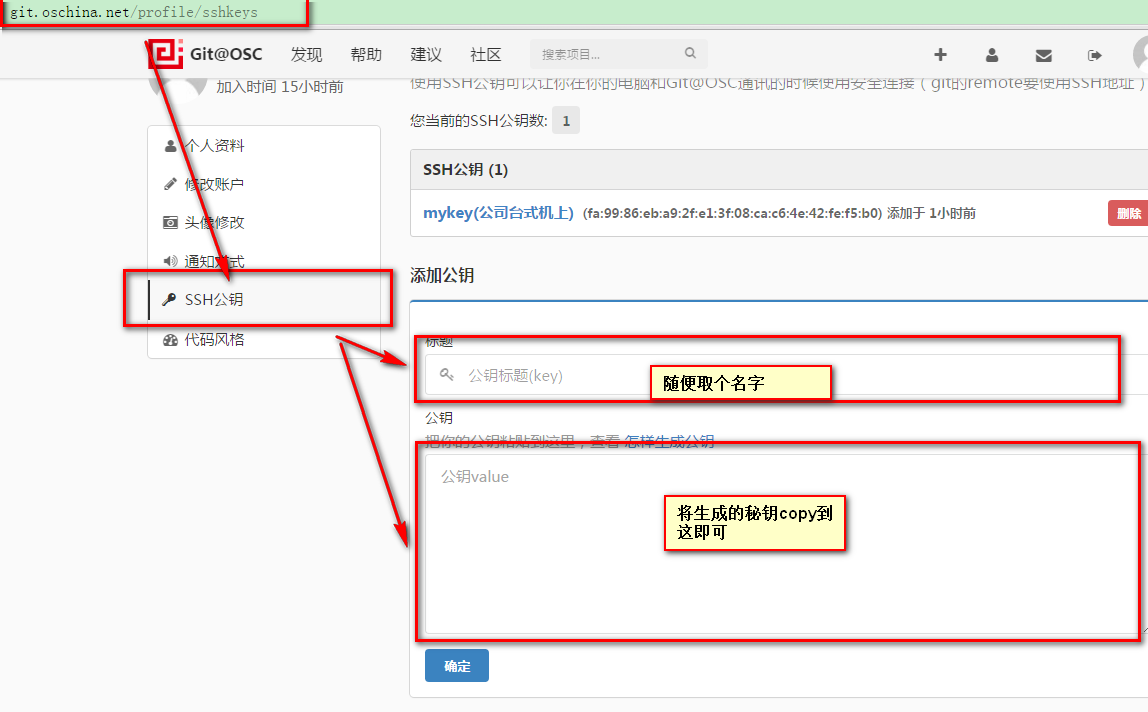
5.将秘钥copy到git@OSC中SSH

6.测试git到git@osc的连接情况
ssh -T git@git.oschina.net
##
The authenticity of host 'git.oschina.net (103.21.119.119)' can't be established.
ECDSA key fingerprint is SHA256:FQGC9Kn/eye1W8icdBgrQp+KkGYoFgbVr17bmjey0Wc.
Are you sure you want to continue connecting (yes/no)? yes
Warning: Permanently added 'git.oschina.net,103.21.119.119' (ECDSA) to the list of known hosts.
Welcome to Git@OSC, ma丶xzwj!
##
最后出现
Welcome to Git@OSC, ma丶xzwj!
OK了!连接成功!
7.push本地代码
我这里出了个错:
git remote add origin https://git.oschina.net/oschina/git-osc.git    //这个设置成了oschina
git push -u origin master
Username for 'https://git.oschina.net':
Password for 'https://ma丶xzwj@git.oschina.net':
这里设置成了https的方式。一直要输入密码,用户啥的,并且报下面的错:
##
Authentication failed for 'https://git.oschina.net/oschina/git-osc.git/'
##
这里我们这么修改:
查看使用的协议
git remote -v
git remote -v
##
origin  https://git.oschina.net/oschina/git-osc.git (fetch)
origin  https://git.oschina.net/oschina/git-osc.git (push)
##

移除并设置成SSH的方式
git remote rm origin
git remote add origin git@git.oschina.net:zqzjszqzjs/Grunt.git
git pull origin master
##
warning: no common commits
remote: Counting objects: 3, done.
remote: Compressing objects: 100% (2/2), done.
remote: Total 3 (delta 0), reused 0 (delta 0)
Unpacking objects: 100% (3/3), done.
From git.oschina.net:zqzjszqzjs/Grunt
 * branch            master     -> FETCH_HEAD
 * [new branch]      master     -> origin/master
Merge made by the 'recursive' strategy.
 LICENSE | 20 ++++++++++++++++++++
 1 file changed, 20 insertions(+)
 create mode 100644 LICENSE

##
git push -u origin master //提交代码至远程仓库
##
Counting objects: 11, done.
Delta compression using up to 4 threads.
Compressing objects: 100% (8/8), done.
Writing objects: 100% (11/11), 1.40 KiB | 0 bytes/s, done.
Total 11 (delta 0), reused 0 (delta 0)
To git@git.oschina.net:zqzjszqzjs/Grunt.git
   f051f9c..78f4d5f  master -> master
Branch master set up to track remote branch master from origin.
##
push OK了!
上面提交的时候还有个问题,就是如果你有东西add进入l缓存,但是忘记commit的了。
这时候你push的时候回报错的。push的时候确保所有add进缓存的文件都已经commit!
8.clone项目
git clone git@git.oschina.net:vic.liu/vic_context.git
##
Cloning into 'vic_context'...
remote: Counting objects: 71, done.
remote: Compressing objects: 100% (68/68), done.
l 71 (delta 35), reused 0 (delta 0)
Receiving objects: 100% (71/71), 44.84 KiB | 8.00 KiB/s, done.
Resolving deltas: 100% (35/35), done.
Checking connectivity... done.

##
clone OK了!