• 在inteillj idea中使用Spark操作Hive


    前言:

             都知道,小编前面已经简单介绍过在windows下hadoop和hive环境搭建和基本使用。这次的Spark有点突兀,但是也可以先忽略,重要的是先在IDEA中安装bigData插件连接hadoop已经HDFS,而后再简单介绍使用Spark操作Hive。

    Big Data Tools安装:

    1. 点击File, 选择Settings,再选择Plugins搜索Big Data Tools,最后下载安装。

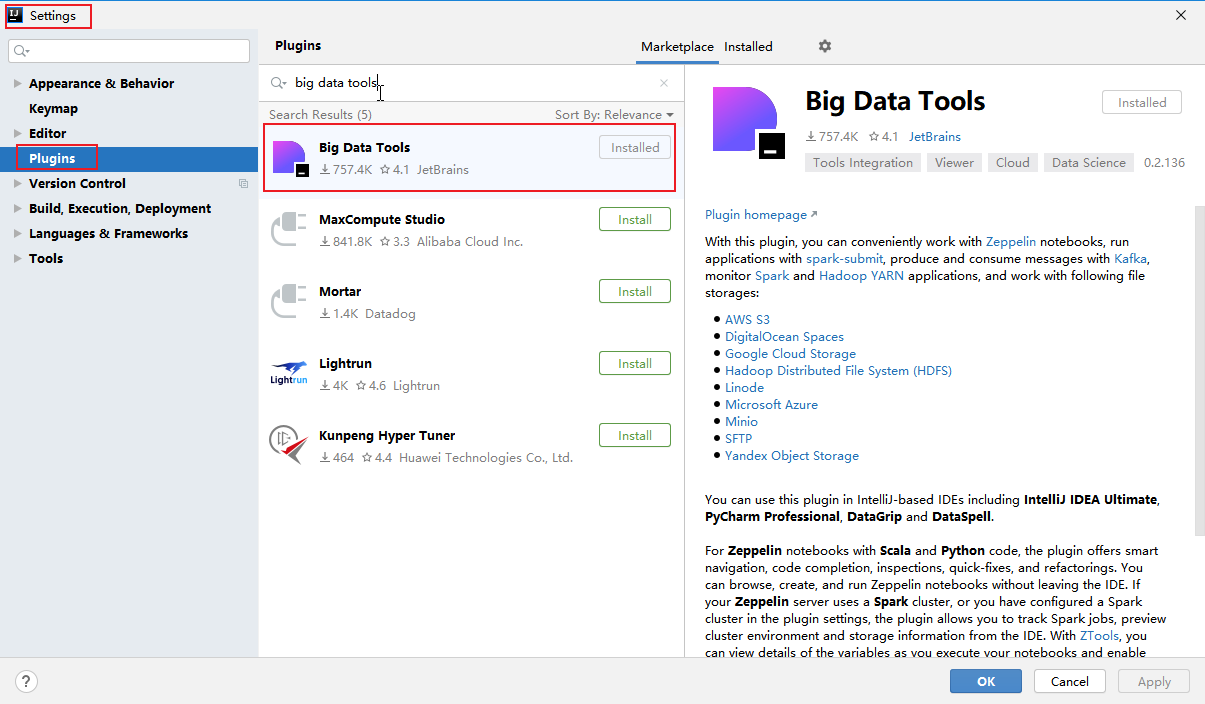
    2. 下载完毕后,底部和右侧栏会多出Hadoop或Big Data Tools的选项。

    连接方法:

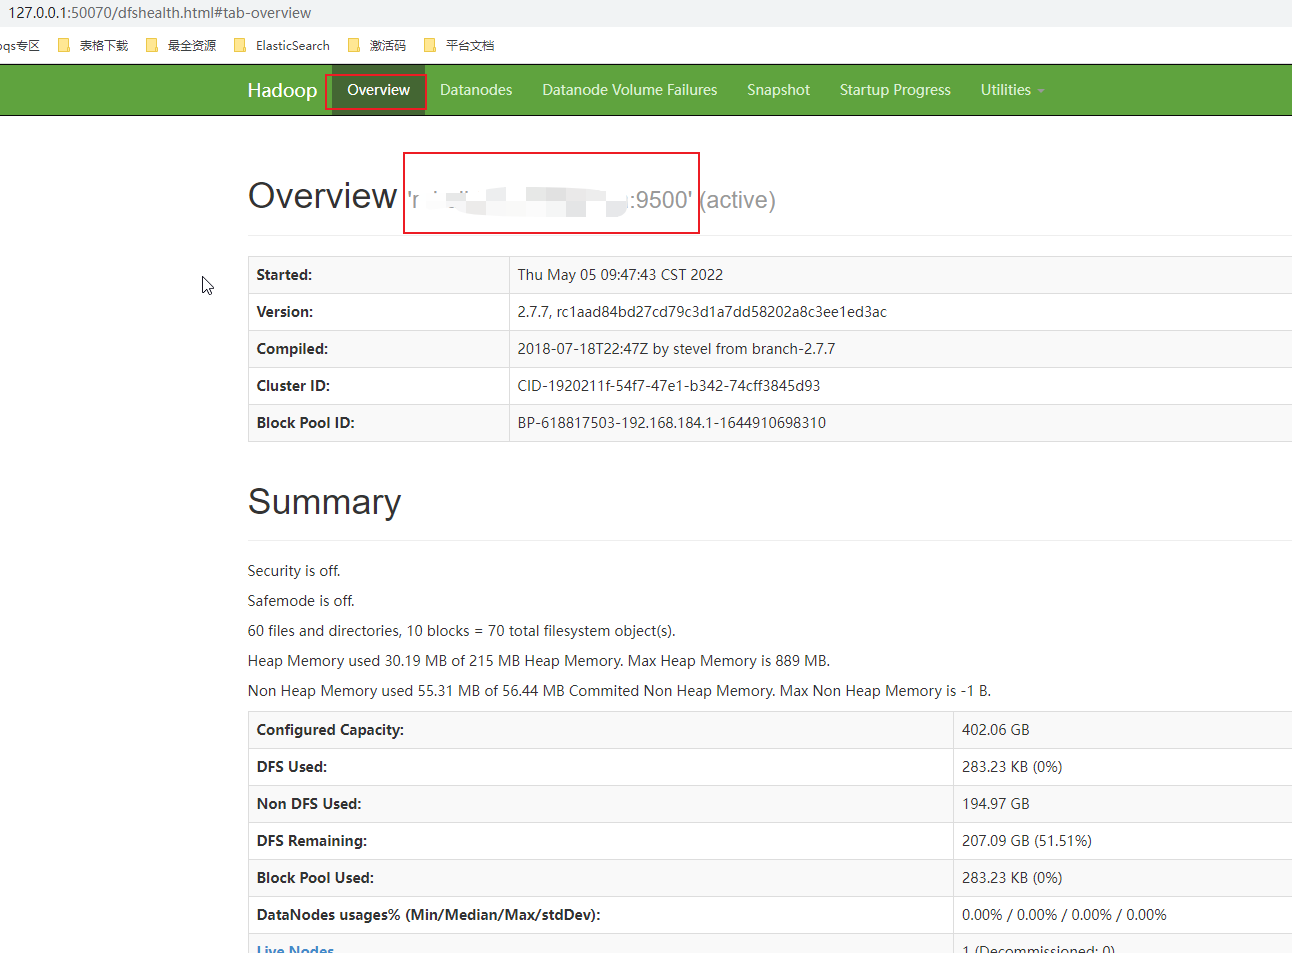
    1. 进入hadoop的sbin目录,start-all启动成功,打开web控制台127.0.0.1:50070(默认),记住如下标志的节点地址,后面hdfs连接的就是这个。

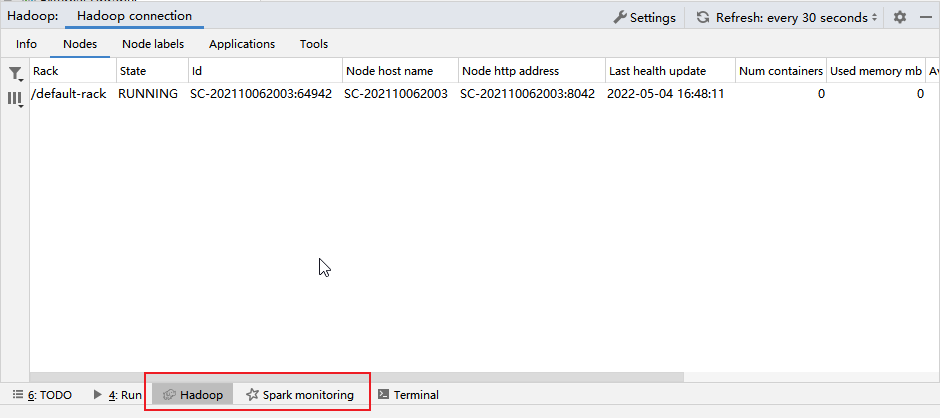
    2. 只要hadoop启动成功后,打开IDEA的hadoop其实就可以正常自动连接了。

    3. 或者打开右侧栏的Big Data Tools,添加一个连接,Hadoop。
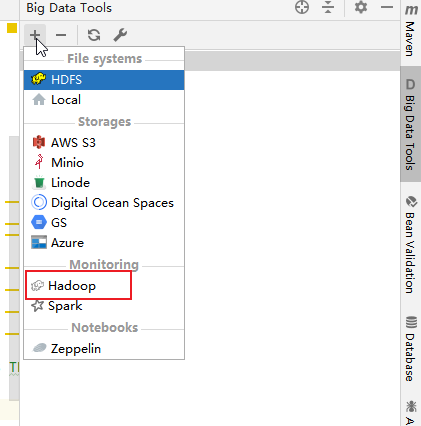
    4. 连接Hdfs。

    (1). 点击右侧栏Big Data Tools新增Hdfs。

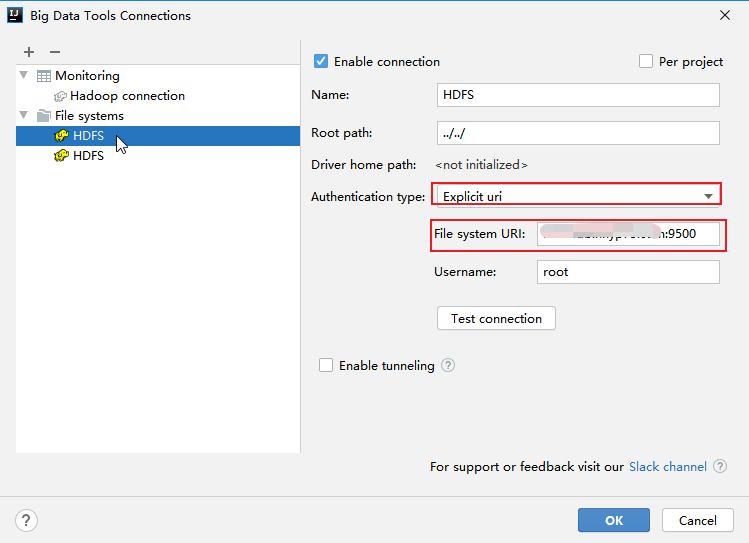
    (2). 重要的就是Authentication type,选择Explicit uri。File system URI填写的就是上面控制台的节点地址。

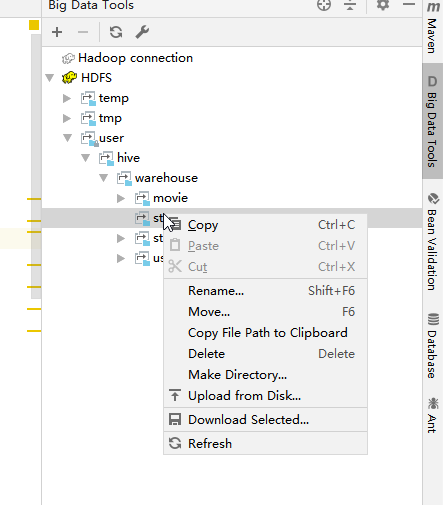
    (3). 连接成功后就可以清晰的看到HDFS的目录,并且可以创建,删除和上传。不过需要对指定路径授权。


    Hive操作:

              关于操作Hive, 以下基于Maven构建Scala项目。项目创建和Hive就略过了,好像在Kafka一文中介绍过如何新建Maven的Scala,而Hive的产品还是原理介绍网上比较多,以下主要是小编的日志式记录,所以以过程居多,那么就开始了。

    1. pom.xml添加如下依赖并安装(其实是我整个文件,不需要的可以根据注释删除)。

    <project xmlns="http://maven.apache.org/POM/4.0.0" xmlns:xsi="http://www.w3.org/2001/XMLSchema-instance" xsi:schemaLocation="http://maven.apache.org/POM/4.0.0 http://maven.apache.org/maven-v4_0_0.xsd">
      <modelVersion>4.0.0</modelVersion>
      <groupId>org.example</groupId>
      <artifactId>maven_scala_test</artifactId>
      <version>1.0-SNAPSHOT</version>
      <name>${project.artifactId}</name>
      <description>My wonderfull scala app</description>
      <inceptionYear>2015</inceptionYear>
      <licenses>
        <license>
          <name>My License</name>
          <url>http://....</url>
          <distribution>repo</distribution>
        </license>
      </licenses>
    
      <properties>
        <maven.compiler.source>1.6</maven.compiler.source>
        <maven.compiler.target>1.6</maven.compiler.target>
        <encoding>UTF-8</encoding>
        <scala.version>2.11.5</scala.version>
        <scala.compat.version>2.11</scala.compat.version>
        <spark.version>2.2.0</spark.version>
        <hadoop.version>2.6.0</hadoop.version>
        <hbase.version>1.2.0</hbase.version>
      </properties>
    
      <dependencies>
        <dependency>
          <groupId>org.scala-lang</groupId>
          <artifactId>scala-library</artifactId>
          <version>${scala.version}</version>
        </dependency>
    
        <!-- Test -->
        <dependency>
          <groupId>junit</groupId>
          <artifactId>junit</artifactId>
          <version>4.11</version>
    <!--      <scope>test</scope>-->
        </dependency>
        <dependency>
          <groupId>org.specs2</groupId>
          <artifactId>specs2-core_${scala.compat.version}</artifactId>
          <version>2.4.16</version>
    <!--      <scope>test</scope>-->
        </dependency>
        <dependency>
          <groupId>org.scalatest</groupId>
          <artifactId>scalatest_${scala.compat.version}</artifactId>
          <version>2.2.4</version>
    <!--      <scope>test</scope>-->
        </dependency>
    
        <!--scala-->
        <dependency>
          <groupId>org.scala-lang</groupId>
          <artifactId>scala-library</artifactId>
          <version>${scala.version}</version>
        </dependency>
    
        <!-- spark -->
        <dependency>
          <groupId>org.apache.spark</groupId>
          <artifactId>spark-core_2.11</artifactId>
          <version>${spark.version}</version>
        </dependency>
        <dependency>
          <groupId>org.apache.spark</groupId>
          <artifactId>spark-sql_2.11</artifactId>
          <version>${spark.version}</version>
        </dependency>
        <dependency>
          <groupId>org.apache.spark</groupId>
          <artifactId>spark-streaming_2.11</artifactId>
          <version>${spark.version}</version>
          <scope>provided</scope>
        </dependency>
        <dependency>
          <groupId>org.apache.spark</groupId>
          <artifactId>spark-mllib_2.11</artifactId>
          <version>${spark.version}</version>
          <scope>provided</scope>
        </dependency>
        <dependency>
          <groupId>org.apache.spark</groupId>
          <artifactId>spark-hive_2.11</artifactId>
          <version>${spark.version}</version>
          <!--<scope>provided</scope>-->
        </dependency>


        <!-- hadoop -->
        <dependency>
          <groupId>org.apache.hadoop</groupId>
          <artifactId>hadoop-client</artifactId>
          <version>${hadoop.version}</version>
        </dependency>
        <dependency>
          <groupId>org.apache.hadoop</groupId>
          <artifactId>hadoop-common</artifactId>
          <version>${hadoop.version}</version>
        </dependency>
        <dependency>
          <groupId>org.apache.hadoop</groupId>
          <artifactId>hadoop-hdfs</artifactId>
          <version>${hadoop.version}</version>
        </dependency>
    
        <!--hbase-->
        <dependency>
          <groupId>org.apache.hbase</groupId>
          <artifactId>hbase-client</artifactId>
          <version>${hbase.version}</version>
        </dependency>
        <dependency>
          <groupId>org.apache.hbase</groupId>
          <artifactId>hbase-server</artifactId>
          <version>${hbase.version}</version>
        </dependency>
    
        <!--kafka-->
        <dependency>
          <groupId>org.apache.kafka</groupId>
          <artifactId>kafka_2.11</artifactId>
          <version>1.1.0</version>
        </dependency>
    
        <dependency>
          <groupId>org.apache.kafka</groupId>
          <artifactId>kafka-clients</artifactId>
          <version>1.1.0</version>
        </dependency>
    
      </dependencies>
    
      <build>
        <sourceDirectory>src/main/scala</sourceDirectory>
        <testSourceDirectory>src/test/scala</testSourceDirectory>
        <plugins>
          <plugin>
            <!-- see http://davidb.github.com/scala-maven-plugin -->
            <groupId>net.alchim31.maven</groupId>
            <artifactId>scala-maven-plugin</artifactId>
            <version>3.2.0</version>
            <executions>
              <execution>
                <goals>
                  <goal>compile</goal>
                  <goal>testCompile</goal>
                </goals>
                <configuration>
                  <args>
    <!--                <arg>-make:transitive</arg>-->
                    <arg>-dependencyfile</arg>
                    <arg>${project.build.directory}/.scala_dependencies</arg>
                  </args>
                </configuration>
              </execution>
            </executions>
          </plugin>
          <plugin>
            <groupId>org.apache.maven.plugins</groupId>
            <artifactId>maven-surefire-plugin</artifactId>
            <version>2.18.1</version>
            <configuration>
              <useFile>false</useFile>
              <disableXmlReport>true</disableXmlReport>
              <!-- If you have classpath issue like NoDefClassError,... -->
              <!-- useManifestOnlyJar>false</useManifestOnlyJar -->
              <includes>
                <include>**/*Test.*</include>
                <include>**/*Suite.*</include>
              </includes>
            </configuration>
          </plugin>
        </plugins>
      </build>
    </project>
    

    2. 项目的resources新建元数据文件,可以是txt,以空格为列,换行为行,这里对hive表格创建时重要。

    在通过HQL创建表格,如何没有指定分列和分行表示,再通过HQL的select查询数据都是NULL,具体可以看下面代码演示。

    3. 加载源数据文件,只需要项目根目录以下的路径即可。比如resouces下的hello.txt只需要指定

    src/main/resources/hello.txt

    4. Hive相关操作的代码。

    这里需要注意的是,hive中的Default(默认)数据仓库的最原始位置是在hdfs上的 /user/hive/warehouse,也就是以后在默认下,新建的表都在那个目录下。

    而仓库的原始位置是本地的/usr/local/hive/conf/hive-default.xml.template文件里配置
    package com.xudong
    
    import org.apache.spark.sql.SparkSession
    
    object TestSparkHiveHql {
    
      def main(args: Array[String]): Unit = {
    
          // 创建spark环境
          val spark = SparkSession
            .builder()
            .appName("Spark Hive HQL")
            .master("local[*]")
            .config("spark.sql.warehouse.dir","hdfs://rebuildb.xdddsd75.com:9500/user/hive/warehouse")
            .enableHiveSupport()
            .getOrCreate();
    
        import spark.implicits._
        import spark.sql
    
        // 显示HDFS数据库
        spark.sql("show databases").show();
        // 使用指定数据库
        spark.sql("use default");
        // 创建表格并约定字段
        spark.sql("CREATE TABLE users(id int, name string) ROW FORMAT DELIMITED FIELDS TERMINATED BY ' ' LINES TERMINATED BY '\\n' STORED AS TEXTFILE");
        // 将本地数据加载到表格
        spark.sql("LOAD DATA LOCAL INPATH 'src/main/resources/hello.txt' overwrite into table users");
    
        // 查询表格数据HQL
        spark.sql("SELECT * FROM users").show()
    
        // 聚合统计表格数据条数HQL
        spark.sql("SELECT COUNT(*) FROM users").show()
    
      }
    
    }
    

    5. hdfs简单操作示例。

    package com.xudong
    
    package com.dkl.leanring.spark.hdfs
    import java.net.URI;
    import org.apache.hadoop.conf.Configuration;
    import org.apache.hadoop.fs.FileSystem;
    import org.apache.hadoop.fs.Path;
    import org.apache.hadoop.fs.FileStatus;
    import org.apache.hadoop.fs.FileUtil;
    import scala.collection.mutable.ArrayBuffer
    
    /**
     * 主要目的是打印某个hdfs目录下所有的文件名,包括子目录下的
     * 其他的方法只是顺带示例,以便有其它需求可以参照改写
     */
    object FilesList {
    
      def main(args: Array[String]): Unit = {
    
        val path = "hdfs://rebuildb.hhyp75.com:9500/tmp/hive"
        println("打印所有的文件名,包括子目录")
    
        listAllFiles(path)
    
        println("打印一级文件名")
    
        listFiles(path)
        println("打印一级目录名")
    
        listDirs(path)
        println("打印一级文件名和目录名")
    
        listFilesAndDirs(path)
    
        // getAllFiles(path).foreach(println)
        // getFiles(path).foreach(println)
        // getDirs(path).foreach(println)
      }
    
      def getHdfs(path: String) = {
        val conf = new Configuration()
        FileSystem.get(URI.create(path), conf)
      }
    
      def getFilesAndDirs(path: String): Array[Path] = {
        val fs = getHdfs(path).listStatus(new Path(path))
        FileUtil.stat2Paths(fs)
      }
      /**************直接打印************/
    
      /**
       * 打印所有的文件名,包括子目录
       */
      def listAllFiles(path: String) {
        val hdfs = getHdfs(path)
        val listPath = getFilesAndDirs(path)
        listPath.foreach(path => {
          if (hdfs.getFileStatus(path).isFile())
            println(path)
          else {
            listAllFiles(path.toString())
          }
        })
      }
    
      /**
       * 打印一级文件名
       */
      def listFiles(path: String) {
        getFilesAndDirs(path).filter(getHdfs(path).getFileStatus(_).isFile()).foreach(println)
      }
    
      /**
       * 打印一级目录名
       */
      def listDirs(path: String) {
        getFilesAndDirs(path).filter(getHdfs(path).getFileStatus(_).isDirectory()).foreach(println)
      }
    
      /**
       * 打印一级文件名和目录名
       */
      def listFilesAndDirs(path: String) {
        getFilesAndDirs(path).foreach(println)
      }
    
      /**************直接打印************/
      /**************返回数组************/
      def getAllFiles(path: String): ArrayBuffer[Path] = {
        val arr = ArrayBuffer[Path]()
        val hdfs = getHdfs(path)
        val listPath = getFilesAndDirs(path)
        listPath.foreach(path => {
          if (hdfs.getFileStatus(path).isFile()) {
            arr += path
          } else {
            arr ++= getAllFiles(path.toString())
          }
        })
        arr
      }
    
      def getFiles(path: String): Array[Path] = {
        getFilesAndDirs(path).filter(getHdfs(path).getFileStatus(_).isFile())
      }
    
      def getDirs(path: String): Array[Path] = {
        getFilesAndDirs(path).filter(getHdfs(path).getFileStatus(_).isDirectory())
      }
    
      /**************返回数组************/
    }
    

    6. spark的wordCount示例。

    package com.xudong
    
    import org.apache.spark.mllib.linalg.{Matrices, Matrix}
    import org.apache.spark.{SparkContext, SparkConf}
    
    object TestSparkHdfs {
    
      def main(args: Array[String]): Unit = {
    
        val conf=new SparkConf().setAppName("SparkHive").setMaster("local")   //可忽略,已经自动创建了
        val sc=new SparkContext(conf)  //可忽略,已经自动创建了
    
        val textFile = sc.textFile("hdfs://rebuildb.fdfp75.com:9500/tmp/spark/test/workd.txt");
        val counts = textFile.flatMap(_.split(" ")).map((_, 1)).reduceByKey(_ + _);
        counts.saveAsTextFile("hdfs://rebuildb.fdfd75.com:9500/tmp/spark/test/wordcount/output");
    
      }
    
    }
    
    package com.xudong
    
    import org.apache.spark.mllib.linalg.{Matrices, Matrix}
    import org.apache.spark.{SparkContext, SparkConf}
    
    object WordCountLocal {
    
      def main(args: Array[String]) {
    
        /**
         * SparkContext 的初始化需要一个SparkConf对象
         * SparkConf包含了Spark集群的配置的各种参数
        */
        val conf = new SparkConf()
          .setMaster("local")         // 启动本地化计算
          .setAppName("testRdd")      // 设置本程序名称
    
        // Spark程序的编写都是从SparkContext开始的
        val sc = new SparkContext(conf)
    
        // 以上的语句等价与val sc=new SparkContext("local","testRdd")
        val data = sc.textFile("E:\\4work\\27java\\1_1_Movie_Recommend\\maven_scala_test\\src\\main\\resources\\hello.txt") // 读取本地文件
    
        data.flatMap(_.split(" "))      // 下划线是占位符,flatMap是对行操作的方法,对读入的数据进行分割
          .map((_, 1))                         // 将每一项转换为key-value,数据是key,value是1
          .reduceByKey(_ + _)                  // 将具有相同key的项相加合并成一个
          .collect()                           // 将分布式的RDD返回一个单机的scala array,在这个数组上运用scala的函数操作,并返回结果到驱动程序
          .foreach(println)                   // 循环打印
      }
    
    }
    

    学习交流

  • 相关阅读:
    Linux:sudo,没有找到有效的 sudoers 资源。
    Python中关于CSV文件中的I/O
    Python数据处理进阶——pandas
    脚本的含义
    Common.Logging.dll----------配置方式,可选引用,用于日志输出
    Net作业调度
    MySQL版本介绍
    在 Windows 上安装Rabbit MQ 指南
    版本控制器
    C# 中的占位符本质
  • 原文地址:https://www.cnblogs.com/zerofc/p/16227374.html
Copyright © 2020-2023  润新知